Future Directions
Watts New?
The majority of items that are new and different in the lighting field involve the application of modern technology to earlier approaches. The end result is generally a smaller, more efficient widget that takes the place of the earlier device. While the first product discussed here is certainly the application of modern technology, I am not aware of any previous device involving the same concept, except for in specialized medical applications.
HMI Offspring: the Fiber-Optic System
A product of the LTM Corporation, the fiber-optic system has an HMI light source and a variety of fiber-optic attachments. It is called the Micro-Set Lighting (MSL) system.
The MSL 250 system consists of two main units and as many as eight attachments that allow you to bend, distribute, and focus the output in a variety of unique ways. Like any HMI source, the system starts with a ballast to convert the AC line current to high-voltage DC. This DC current is then fed to a separate light box that contains a 250-watt HMI daylight lamp and has a port for the attachment of various accessories. The ballast can also be powered by a 12-volt DC supply such as an auto battery.
The attachments include the CML 100 fiber-optic bundle, which contains 100 2.5-foot fiberoptic strands. Each strand is covered with a wear-resistant black sheathing. These strands may be used separately or in bundles. I used this type of lighting in glamour photography and video, where I have very little space for light but still need the output (see Figure 11.1).

My initial reaction to this accessory was, “Big deal! What good is it?” Then I started thinking about the many times I was working with tabletop setups and needed a bit of light here or there and had to try to restrict the output of an inky enough so that it did the job without washing out everything else in the display. This product works well for that and other applications. You also have the luxury of using the “poor person’s approach” and use small makeup mirrors to reflect the light when you want it to go. But having the source itself, positioned where you desire it, is far better.
The CML 4 contains only four fiber-optic strands of much larger diameter and has two very useful accessories. One is the Microlite, which has a Fresnel and a barn door. It makes an excellent fill inside cars, trucks, and planes because it is extremely small and lightweight and can be mounted in very cramped locations. Since there is no heat at all at the end of the fiber-optic cables (like an LED light), you do not have to worry about scorching autointeriors or roasting the talent. Since the color temperature of the unit is 5600°K, it does not require booster blue gel to match sunlight, and is extremely powerful. It produces 1400 foot-candles for a 2-inch diameter beam at a distance of 1 foot from the subject—more than enough to add fill in bright sun-light. Even if another type of instrument did produce such high output, no human could stand the heat it would generate in close quarters.
This handy Fresnel can be mounted outside the vehicle to shine through side or front windows. It can also be used for many other applications.
The six-light bar attached to a CML 4 fiber-optic shaft is also great for interior vehicle use, clipped to a sun visor for fill or to the dash to simulate instrument lighting for nighttime scenes. Gels and neutral densities (NDs) can be used—in the same way they are used with conventional instruments—to color-correct or reduce the MSL’s output.
If you are involved in commercial production and the soap company wants to show its product in the best possible light, this is the device for you. A fiber-optic strand can be placed in the bar of soap to make it shine from within, and because there is no heat, the bar will not melt after the first take. A model submerged in a tub of bubble bath will look very glamorous when the water and bubbles are lit from below. Since there is no current in the fiber-optic strands, they can be submerged in liquids without endangering the talent.
A fiber-optic in a beverage will give it a punch like you have never seen before. Think about it for a minute. There are many times when you need lots of cold light in confined or dangerous locations. Shooting microchips, for instance. Think about the manufacturing equipment, factories, and plants you are called on to light and how difficult it is to do. The MSL system certainly has application for these and many other assignments. The designers at LTM even invite you to challenge them to design an accessory for this system that will solve some extremely difficult lighting situation you are facing.
Since the entire system costs about $6000, it probably will not sell like hot cakes, but a daily rental rate of about $200 puts it within reach of most production budgets.
This may be a glimpse at the future of studio and theater lighting. The time may come when a few large light sources are attached to multiple instruments with fiber-optic cables.
Hollywood has been using fiber optics since their inception. When models are built for films (Star Trek, Titanic, etc.) fiber optics are the means by which they are illuminated. Before the development of fiber optics, other more difficult and costly methods have had to be used.
Softlights: Sort Of
The success of the first HMI instruments with Fresnel lens systems proved the technology and the ultimate economy of this power-saving form of illumination. The soft, airy quality of the light was also appreciated by many cinematographers. This led to the development of the Molecool from Mole-Richardson. This light utilizes a new concept that uses 30-, 120-, 220- or 240-volt lamps running on either AC or DC. This easily boosts the daylight levels without generating the heat that HMIs often do (see Figure 11.2). This compact HMI light brings the same power and economy to the set as regular Fresnel instruments do, and it results in a far more efficient unit. It is possible to light a 15-foot-wide area 13 feet high to an intensity of 360 foot-candles at a distance of 10 feet—an impressive coverage when compared with conventional lights. This 1200- watt instrument draws only 10 amps.

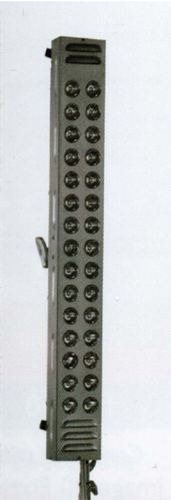
Just as the HMI softlights have caught on in commercial circles and with lighting directors who are looking for powerful diffuse sources, the hard rock crowd has fallen in love with HMI PARs (see Figure 11.3). These rather harsh (specular) sources lend themselves well to the strong shafts of light that are frequently swiveled around smoke-filled rock stages. This type of PAR light is now being used by network news crews for interior and exterior lighting setups.
Because they are extremely bright 5600°K sources, they can be used as fill in exterior daylight setups or can be bounced off ceilings for interior news coverage to provide a good soft fill for “talking head” interviews. A 575-watt PAR 46 can provide 45,000 foot-candles at 10 feet. The lamp life is rated at a minimum of 1000 hours. Like any HMI instrument, a ballast is required, and the Strand Century ballast unit for the 575-watt ParLite weighs 32 pounds.

Figure 11.3: A 575-Watt HMI Molepar (Photo courtesy of Mole-Richardson Co.).
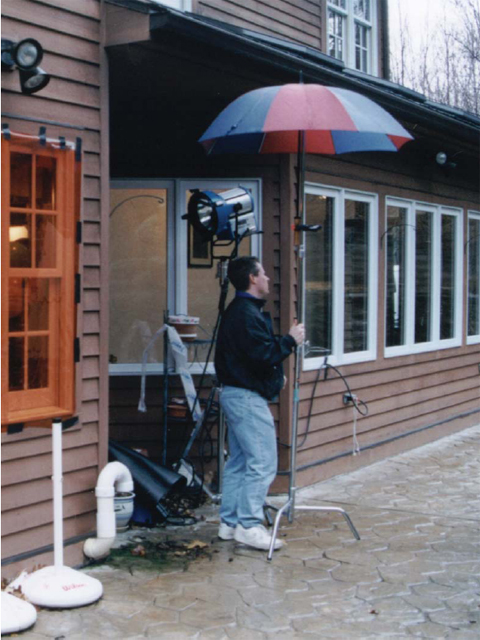
One of the things I enjoy most when using HMIs in video is how they affect whites. If you point an HMI at a white object, the white almost fluoresces. It actually makes the whites “pop” on a shoot. When shooting exteriors and I really want to impress the client, I’ll use HMIs to light the exterior of his or her business.
A 1200 PAR has much more impact and throw than a standard HMI 1200. Because of the wavelength of light produced by the HMI, the whites appear much brighter and more visually striking.
In Figure 11.4, an HMI PAR was used to supplement the sun. Sometimes the sun does not do what you want it to do—that is where HMIs come into play. Detergent commercials always use HMIs to shoot the “whiter whites.” Yes, Ultra Glip actually makes your whites whiter—if you point an HMI at them!
The MR-16 Family: the First in a Long Line
In the beginning, there were ordinary tungsten 35mm projection lamps. They were very hot and required heavy, forced ventilation to prevent slide meltdown. Along came Emmet Wiley, who designed the multimirrored MR-16 lamp. Its unique properties permit the infrared and ultraviolet rays to pass through the efficient reflector bowl rather than projecting them forward with the beam of light. The result is a much cooler beam and brighter slides.
This first MR-16 projection lamp was not suitable for general lighting purposes because of the nature of its secondary focal point. It produced a very uneven field of light when used as a source for open-faced lighting instruments. Then came George Panagiotou, who reasoned that the secondary focal point of the MR-16 could be changed to adapt it to general lighting applications. He spent several years redesigning the lamp so it would produce a more even light field and started marketing his new version of the MR-16 in a portable fixture called the Mini-Cool (see Figure 11.5). Photometrics show the newly designed 250-watt MR-16 lamp produces a higher light output than an ordinary 600-watt lamp. The Mini-Cool led to the development of other similar instruments such as the Anton Bauer single and dual-lamp Ultra Light.
Decasource Lighting
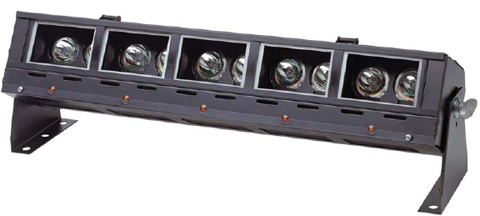
Realization of the potential of such an efficient, compact 3200°K source led to the development of other instrument types. The idea is now being used in miniature versions of a 30-light unit, such as the DecaPod, 2250-watt lighting system from DecaSource (www.decasource.com). These instruments are designed to use either 120-volt lamps in the same manner as their larger counterparts or 12-volt lamps in series, much like the mini-strips described later in the chapter. Thirty 75-watt MR-16 lamps on three circuits producing 2250 watts was designed for intense light output without the intense heat (see Figure 11.6). At a distance of 10 feet, 1300 foot-candles is output with a narrow 12-inch beam. If more output is desired, a 150-light, 11250-watt PentaLight, or a 300-light, 22500-watt DecaLight should suffice.

When Jules Fisher decided to take one of his shows on the road many years ago, a problem arose when the wagons were redesigned with a lower profile than those used in the Broadway production. Those higher wagons had concealed conventional theatrical strip-lights that washed a cyc. The new wagons would not hide the necessary strips. Mr. Fisher called on Victor En Yu Tan to work out a solution. What resulted was the low-voltage Mini-Striplight that uses ten MR-16 lamps per circuit, wired in series (see Figure 11.7). A neon indicator was designed to indicate which lamp had blown, since the series arrangement caused all lamps in the circuit to go out. These remarkably compact striplights, manufactured by both Strand Lighting and Lighting & Electronics, Inc., are extremely powerful and offer a viable alternative to conventional cyc lights on location. Theatrical striplights will not do the job, and legitimate cyc lights are very difficult to rent. These charmers will get the job done, and they are beginning to appear at rental houses around the country. They are also good for providing floods and washes in hallways and other confined locations. They can be easily fastened to a ceiling or concealed behind a small false beam.
Mini-Fresnels
The first application of the MR-16 lamp to a line of compact Fresnel instruments was undertaken by Lighting & Electronics, Inc. The 4.5-inch, 250-watt ENH MR-16 lamp Mini-Fresnel provides light output equal to a standard 6-inch 750-watt Fresnel. At the moment, the manufacturer does not recommend using this lamp under conditions where it might be bumped during operation, because it blows out rather easily when vibrated. Designers are working to produce a hardier version of the lamp. With the exception of this problem, it is a great little instrument. These Fresnels also come in 150-, 250- and 300-watt sizes.
Research is under way by the people at Cool-Lux to manufacture an MR-16-type lamp with a replaceable lamp capsule. This would substantially reduce the cost of lamp replacement, since the most costly part of the current lamp is the specially coated multifaceted reflector bowl.
The MR-16 lamp, like the earlier quartz-halogen lamp, makes possible the design of even more efficient and compact instruments to help you place shadows more precisely in your scenes. Like modern electronic gear, lighting tools are being improved and miniaturized.
Nifty New Products
These next few items are not as innovative as the previous ones, but they are examples of manufacturers recognizing the needs of professionals, and packaging products that meet those needs.
I call them “duck feet,” but the Matthews people who invented them call them Griff Clips. These interlocking wedge-shaped pieces are designed to allow the hanging of any fabric or diffusion material without damage to the material or the need for tools. One section of the wedge is placed on one side of the material to be hung, and the other section is placed on the opposite side of the fabric and inserted into the wide end of the first section. A ring in the first section can then be attached to suspension ropes. As tension is applied to the ropes, the interlocking wedges tighten and hold the fabric securely without ripping it. Originally intended to hang Griffolyn and other Matthews diffusion textiles used in butterflys or overheads, the Griff Clip can be used for many other fabric or diffusion hanging applications.
If you have done any lighting at all, there has probably been more than one occasion where you used household aluminum foil to mask spill from an instrument or create a snoot or a flag. The problem with ordinary aluminum foil is that it chars under the extremely high heat of an instrument and reflects objectionable spill in a variety of places around the set. While heavy-duty roasting foil does not char under high heat, it does produce unwanted reflections. The Great American Market has been producing a product called Blackwrap, which has a matte black finish and will stand up to the heat of lighting instruments (see Figure 13.3). It is packaged like ordinary household foil. A similar product, called Cinefoil, is manufactured by Rosco. Cinefoil also comes in a Satin Silver version, which reflects light softly and evenly.
The need to adjust intensity on some instruments, such as backlights, effect lights, and background lights, for which exact color temperature is not important, can be easily accomplished with a dimmer. Usually, you would not carry a dimming system around on location but would resort to the use of scrims, which diffuse the light, or ND material, which maintains the specular nature of a source. That means that intensity adjustments require moving the instrument farther away, or replacing or exchanging the scrim or ND.
The use of scrims will only permit corrections in half- or full-stop increments. The first convenient solution I found for such intensity correction was the Photo Dimmer by Cool-Lux. This extremely small inline dimmer can be used to dim their FOS-1 lamp in the Mini-Cool instrument. An interesting thing about it is the scale printed on the control that indicates the color temperature of the lamp at any given setting and tells you how much the lamp life will be extended if the lamp is operated at that setting throughout its life.
Since the Mini-Cool lamp is only 250 watts but produces the output equivalent to conventional 600-watt tungsten lamps, the Photo Dimmer is really limited to use with inkys or the Cool-Lux Mini-Cool. Their LC1000 is a 1000-watt dimmer and the LC7150 is a 500-watt dimmer. Most tungsten fixtures will change color balance when using a dimmer because a lower voltage is being supplied. Newer LED fixtures and fluorescents may be dimmed without the color temperature being affected.
For control of higher wattages, the LTM Pepper Pot is the solution. This physically larger inline dimmer control is rated at 1000 watts. Measuring 5 × 2¾ × 3¼ in inches, it is a rugged, practical dimming device.
A new material called Cycscreen may soon add to the list of effects achieved by studios with cycs and may reduce the candlepower required to achieve satisfactory results.
Instead of using a dual-layered fabric arrangement consisting of an outer layer of scrim and a backing layer of muslin or canvas, the Rosco people have invented a rear-screen-type plastic film that can be welded together to form a seamless cyc of any shape or size. When lighted, these welds are invisible in normal operation from either the front or the back. The front surface of Cycscreen offers a reflectance that is approximately 10% higher than that of cloth surfaces used today. This can reduce air-conditioning and power requirements.
What makes Cycscreen truly different is that it allows you to paint scenes or designs on the surface with “Sign-Stick,” which can be removed later by simply peeling off the film coating. You can also project images on it from the rear. It has excellent off-axis reflectance characteristics and permits closer placement of lights, which reduces wasted studio floor space. Unlike conventional cyc materials, if a puncture occurs, an invisible repair can be made. Costs are said to be comparable to conventional two-layer fabric installations.
Homemade Improvements
Now you should be ready to light the world—at least a small part of it. Without getting on a soapbox, let me just say that you need to apply the techniques you’ve learned in this book to your own projects. Sometimes having a particular light in the wrong position will give you an idea. You may like the way a certain shadow falls, a highlight reflects off an object, etc. The key thing is to experiment—that’s the best way to learn. I can tell you what a specific light does, its design, foot-candle output, and color temperature, but you need to see what it actually does on the set. You’re the boss. In the next chapter, you will have the opportunity to light several scenes … but more on that in a little bit.
Your goal is to make the lighting unit do what you want (how many other things in life can you demand that of?). Putting two 2Ks next to each other doesn’t make that unit a 4K; it’s still two 2Ks. Through experience you’ll learn what every unit at your disposal is and isn’t capable of doing.
When I develop a lighting diagram, I place each type of light where I think it will do the most good. On the set, I will still tweak each light to get the most out of it, but the unit really hasn’t moved from where I originally placed it in the design—that knowledge will come with experience. But you (and I) will never stop learning. I am still amazed how any mood can be created with lighting. We are painting with light. The goal is to learn how to do it.
All the concepts learned here are fundamental. When you see or read about a new lighting unit, learn all you can about it. Ask yourself, “How can I use that in my projects? Will it replace what I already have, or augment my arsenal? How can I find out if it really does what the manufacturer says it does?” Remember, we are still the ones with the brains.
When working with a ceiling installation client, I had a two-by-four wooden frame of a room built in the studio. This setup allowed easy access to the suspended ceiling being installed as well as places to set up the lights. The entire room and ceiling could be in the shot without seeing any of the lighting instruments—they were placed outside of the studded walls. But I still had a problem: How do you light someone installing a white, textured ceiling on video without blowing out the talent’s hands or the ceiling?
My lighting compatriot George Winchell came up with a solution. We both knew that bounce lighting was the only effective way to illuminate both the actor and the ceiling without overexposure. George developed an apparatus that solved the problem. The light source would be a 1000-watt DP. Although much too harsh on its own, if bounced it produced a flattering softlight. George mounted an arm to a C-Stand. The back end of the arm contained the DP light and the front end a two-by-four foot piece of foam core. The DP light was angled down and pointed directly at the foam core. This unit could then be placed close to the ceiling to provide a soft, even light. Hands weren’t burned, and nothing was overexposed (see Figure 11.8).
This simple unit that George created was built from materials everyone has. He just modified a hard light source into something that would produce a softer light. Not bad for a two-dollar investment in foam core. The second lighting difficulty was also easily remedied.
When the actors were standing in the open-studded set and talking to the camera, I needed to expose them and the white ceiling. The white ceiling was four stops brighter than the actors’ faces. If I exposed for the actors, the ceiling would blow out; if I exposed for the ceiling, the talent would be dark. The only way to solve this problem was to somehow flag some of the light off the ceiling to lower the level a few stops.
If I used a flag, the ceiling would receive no light, and then it would be too dark. My solution, with George’s help, was to create a modified, silked and gelled wall of light. Two DPs would be the light source. They were placed side by side. A 6-foot-long piece of 216 diffusion was thumb-tacked to the studs (we didn’t even need to use a silk holder or stand because the studs did the trick). The 216 softened the DP’s light, but I still had to do something about the top of the silk. That’s where ND9 gel comes in handy. The ND9 was tacked to the top 2 feet of the 216. We now had a gradated, diffused source. The ND on the top lowered the ceiling’s level by 2½ stops, while the talent received a normal exposure. Once again, I used what I had available and came up with devices that worked for my application. If I ever run into this type of situation again, I’ll know exactly what to do (see Figure 11.9).


My goal in this book is to get you to do the same thing. You don’t always have to run out and get the newest and most expensive lighting instrument available. Most of the time, you won’t have the budget to get that “special” unit. With the limited time and resources available on your shoot, see what you can do with what you have. You may come up with some new, innovative procedure or instrument that will change the way we light something. If you do, contact me so we can split the royalties.
Remember the phrase “Lights, camera, action”? Lights come first for good reason. Without them, the camera and the action are useless.
This is not quite the end of your instruction. It is the beginning of your ongoing effort to light your subjects more effectively. It is a point at which you begin to apply a new understanding of light and technology to the realities of your profession. It is your opportunity to experience the control you hold over the viewer’s perception of every scene—to conceal and reveal selectively, to place shadows and light creatively. So let there be light, but not too much light. Remember, God’s job was to illuminate, yours is to light. You are now ready to pass “Go” and begin with actual scenarios.