Instrument Functions
What Do They Do?
Before we can discuss instrument placement, it is necessary to define eight primary instrument functions. Depending on where instruments are placed, their relative brightness, and the areas they light, they perform different functions. In one instance, a Leko may be positioned far upstage and aimed at the back of a rock star, serving as a backlight. In another application, that same instrument may be located downstage, projecting a cloud on the cyc and functioning as an effects light. The functional uses suggested here are only general guidelines. In reality, your backlight may function as a key with just a bit of front fill. The specific setup will be dictated by needs, conditions, and location limitations, plus the aesthetic requirements of the script.
Key Light
The title of this book is Placing Shadows. One reason for that title is to emphasize the importance and necessity of shadows in good lighting; where you “place” the shadow makes a big difference. The instrument that provides the biggest clue to the location of the presumed light source is the “key light.” We may delve deeply into the hidden meanings of the word “key”, but let’s just say that this is the most important light. Because its intensity is greater than any other light on the subject, it will and should create shadows. The angle and density of shadows serve as clues to the type and location of the presumed source. They also provide clues to time of day and the nature of the source.
If an exterior scene is extremely bright and has harsh shadows falling at a steep angle, it would not be unreasonable to assume that the action is taking place around noontime on a sunny day. By the same token, an exterior scene that has softer shadows falling at a very oblique angle in a warm light is likely to be taking place either during the early morning or late afternoon hours.
We would expect to see well-defined shadows falling at a steep angle at noon on a cloudless day. Therefore, we place a specular lighting instrument high overhead to imitate the sun at noon, and the angle of the cast shadows determines where the instrument is placed. Later in the day we would expect the sun to be lower on the horizon, casting more oblique shadows, so we would lower the instrument to cast an appropriate shadow angle. Instrument location is determined by the mood we wish to create, the basic setup we are working with and any motivating or practical lights that are in fact, or are presumed to be, the source of light for the scene.
Do not underestimate the importance of the statement, “any motivating or practical lights that are in fact, or are presumed to be, the source of light for the scene.” This is a very important consideration in setting the key light. You should not always think in a traditional manner regarding key-light placement. If the subject is walking away from the camera down a long narrow hallway toward a glass door leading to an exterior location, the key light should actually be a strong backlight. Always use the situation to determine location and type of key-light instrument.
If the location is an office without windows, we expect to see softer shadows and, therefore, would choose a softlight source or would heavily diffuse the light from more specular instruments.
The mood or atmosphere of a scene evokes a certain emotional response from the viewer and is established by the exposure and lighting ratios used by the lighting designer. Low-key scenes—and I am not referring to the height of the key light instrument—create a dark and somber mood, while high-key scenes are associated with happy, energetic situations. Using the cast shadows as your guide, the first thing you do is place the key light. The prominence of the shadows created by the key light is affected by the type of light source, specular or diffuse, and by the amount of fill light you add. Background and backlights, along with effects lights, help to complete the illusion.
Your choice of lighting setup will be based on how you wish to model or illuminate the facial features of the subject or the contour lines of the product. The most flattering setup (the portraiture setup) is one in which the key light is directed down on the actor from an angle that casts a small shadow of the nose directly below it or toward either side of the nose by the nasolabial folds, or “smile lines.” It does not matter if this key light is placed on the right or left of the subject.
Since the key is generally assumed to be the apparent light source of the scene such as a window, table lamp, overhead lights or the sun, we must analyze these elements of the scene when choosing the key’s location. If a preceding long shot established a bright table lamp on screen left, you would be ill-advised to key the subject from screen right in a close-up even though the lamp in question is not part of that shot. As mentioned earlier, the side the key light is placed is not important, but once placed or established, you should remain consistent.
Traditionally, a Fresnel or open-faced focusing spot will be used as the key instrument. It is a specular source that can be diffused and shaped with accessories and the focus control to provide the degree of sharpness you want from cast shadows. If you dim the key to get the intensity you want for the f-stop you desire to shoot at, you will destroy the color temperature and consequently the flesh tones. It is advisable to re-lamp the instrument with a lower-wattage lamp to establish the desired level. It is true that you can reduce intensity by using scrims or neutral density (ND) filters. They do not change the color temperature, but they do cause you to use more electricity than you need. This, in turn, adds needless heat to the location. You may also be able to take advantage of falloff and move the key farther away from the subject to reduce its intensity. Or, using LED or fluorescent lights will keep the heat down, and use less power in the process.
Using hot, mega-watt lamps is now a thing of the past when lighting people. Unless the only units available are of these heavy-power consumers, most of us have switched to using the soft-light as a viable key-light source. Unlike more traditional key instruments, the softlight is not as controllable with respect to spill and shadow intensity, but it can be used as a key source. This is especially advisable when the subject is prone to severe specular highlights such as those found on highly polished metal objects, or on foil- or cellophane-wrapped products. Softlight is also more flattering to the face of subjects, especially if they have age lines or skin imperfections.
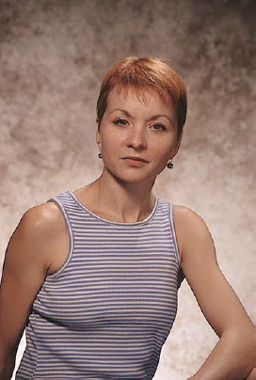
As an example of the key light used alone, see Figure 6.1. In this photo, the only light source is the key light. For the sake of this demonstration, a Mole-Richardson 2000-watt, 10-inch Junior was used. There is no diffusion on the surface of this Fresnel. Obviously, moving the light to the left or right, or up or down, would change the appearance, as would diffusion or a different lighting instrument. George Winchell created the look of this lighting test.
Fill Light
Placed in front of or on the opposite side of the subject from the key, the fill light’s job is to establish the desired lighting ratio and control the density of the shadows created by the key. It should not be strong enough to create its own opposing shadows. If it does project shadows, it becomes a second key and destroys the illusion.
In the hallway example previously mentioned, the fill may be nothing more than a soft-light aimed down the hall from the camera position to provide just enough detail in the actor’s clothing or on the walls of the hall. It may also be that you want no fill at all, if it is a dramatic situation. Just use the silhouette against the strong backlight that functions as the key.
Because of its quality, a softlight is usually chosen as a fill-light instrument since it is unlikely to create conflicting shadows. Its intensity can be controlled by scrims or diffusion material placed in front of it or by switches that control individual lamps in the instrument. You will still have the inherent problem of controlling spill from this instrument. If you are working in a confined area in which a softlight’s spill would add too much light to the background to permit you to control the desired exposure ratio, especially in low-key situations, you can use a heavily diffused focusing spot. So long as it is diffused sufficiently and does not match or overpower the effect of the key, it would be the better choice since its lens system makes it possible to minimize spill.

The fill light should be placed near the camera at eye level to prevent it from casting its own shadows on the subject’s face. While this placement eliminates one potential problem, it might create another. It may cast a distracting shadow of the subject on the background. If this occurs, there are several things that can be done to correct the situation.
You could diffuse the light further to lessen the severity of the cast shadow. If that does not produce an acceptable result, you could move the instrument closer to the subject. Less distance between the subject and a diffuse light source will soften the cast shadows.
If you are unable to move the fill closer because of intensity problems or the fact that it might enter the shot, you can try moving the subject and the fill farther away from the background. This will also lessen the density of the shadow that falls on the wall. When all else fails, try a more directional source and position the cast shadow to an area of the close-up that will be least distracting. These cast shadows are only a problem in low-key setups. High-key backgrounds generally have enough light to mask the shadow cast by a fill.
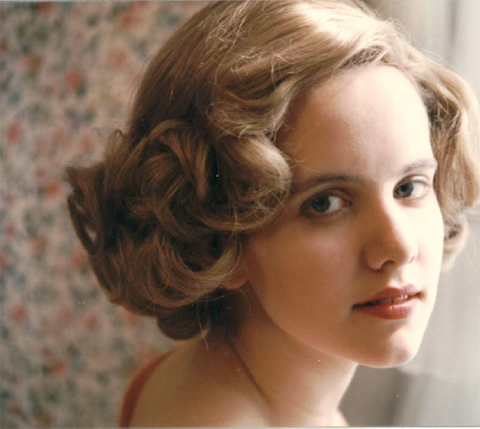
George Winchell often uses Foam core as his “fill light.” This bounce source allows illumination to fill in the dark areas without providing too much light. This is also helpful in a confined space when multiple instruments are not feasible or when your power requirements cannot be met. Foam core provides a very soft source when any instrument is pointed at it. Often the illumination from the key light is enough when used in conjunction with Foam core as fill. In Figure 6.2, Foam core was used to the left of the talent to supplement the daylight streaming in through the window. Since this was a 1930s comedy, I wanted the soft, radiant look that only Foam core and daylight provide–with flattering results.
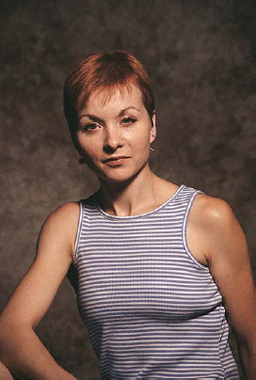
In Figure 6.3, you see an example of the key and fill light together. The fill light has “filled in” the shadows created by the key light. The fill light used is a 1000-watt Lowel Tota-Light with no diffusion.
Backlight
The backlight is the third function discussed, and it serves a very important role in modeling subjects. Since television is a two-dimensional medium, the backlight is essential to separate the subject from its background and give the illusion of depth to the scene. When used with a key and fill, it is frequently referred to as “three-point lighting.” If two backlights are used, it becomes a fourpoint setup. In addition to providing separation, backlights add contrast. Backlights should not only be used to separate actors from their backgrounds but also to separate various elements of the set from each other to further the illusion of depth.
Ideally, the backlight is a Fresnel or focusing spot that is placed above and directly behind the subject so that it strikes at an angle of about 45° to the floor. This will require a physical separation between the subject and the back wall of the set. If the backlight is at a greater angle to the floor, it could begin to act as a toplight and cause distracting shadows and highlights on the forehead, nose or chest of the subject. If the angle is much less than 45° it could cause lens flair.
The biggest problem with backlights on location is where to hang them. Since they should be directly behind the subject, it is not possible to mount them on a stand as with the key light and the fill. If you did, the stand would be in the middle of the shot and appear to grow out of the head of the subject. If the location has a standard suspended ceiling, the easiest method is to use a drop-ceiling scissor clamp like that described in Chapter 13.
If there is no suspended ceiling you might be able to use the Lowel Tota-mount support. It is a very useful device that can be gaffer taped to almost any surface and will support a small instrument for backlighting such as the Lowel Omni or Cool-Lux Mini-Cool. The Omni light provides focus and barn-door control and provides for the use of scrims and ND filters to control intensity. In some locations, such as in a typical warehouse, the scene is staged in a large open space that does not have a back wall near the subject and has a ceiling that is too high to permit mounting. In such cases, a horizontal boom can be attached to a floor stand with a gobo head to suspend the instrument in the proper location. You may also install a rigging system for general lighting purposes that is supported on stands or towers, out of camera range. Find some method to get the job done.


In Figure 6.4, we did not have access to the ceiling and our white-haired talent needed a backlight. We used an Arri 650-watt Fresnel mounted on a C-stand and arm. Mounted high above the talent and pointed down, no distracting stand was seen in the shot.
Do not get the shot without a backlight just because it is too difficult to find a way to mount the light. You will not get professional results without one.
The specular nature of the backlight and the color of the subject’s hair (if any) and clothing will all have an effect on the desired intensity. These factors make it difficult to establish a standard ratio between the backlight and the key and fill lights. For this reason, you should have the subject or a stand-in run through the blocking while you rehearse any camera moves that will be part of the finished take as you adjust the light. While making the adjustments, look at the picture and waveform monitor so that you are sure of the results. If you do not use this technique, you may find the backlight level is too bright or too dim to produce the desired effect.
You are also likely to discover at the last minute that the backlight creates lens flair at some point during the shot. The solution may be to adjust the barn door of the backlight or to place a flag above the front of the lens. If the camera is stationary during the shot, the flag may be stationary also. If the shot involves camera movement, a flexi-arm or gobo arm may be fastened to the camera dolly so that the flag will travel with the camera and prevent flair. Unlike key and fill lights, you can dim backlights with an auto-transformer or silicon-controlled rectifier dimmer to achieve the degree of separation you desire. Since they light the back of a subject (the shoulders, hair, etc.), you do not need to be concerned about color temperature or their effect on the white balance of the camera. Cool-Lux and LTM manufacture compact inline dimmers to assist with this problem (see Chapter 11).
In Figure 6.5, the backlight is the only lamp illuminated. Figure 6.5A illustrates the backlight and the hair light activated. In Figure 6.6, the backlight has been added to our setup. With three-point lighting, the subject now stands out from the background. The light of choice in this example is a 600-watt Lowel Omni.
Hair Light
I tend to think of a hair light as a limited area backlight that is used in conjunction with the backlight. As the name implies, it is used to illuminate the hair and cause a nice highlight for a modeling effect. Because of its limited coverage area, it is not an effective light to use when the actor is moving around a great deal. It should be a narrow-beam specular spot, generally with a snout to provide controlled coverage (the LTM Pepper 150 is an ideal choice). Because you can literally paint with light in the same way an artist paints with a brush, the hair light can be very useful when the talent is blonde and wears dark brown, blue or black clothing. Here, a backlight that strikes the hair and shoulders of the subject will have to be a compromise (see Figure 6.7). If it is strong enough to give the separation you desire between the shoulders and the background, it will certainly be too hot for the hair. If you set its intensity for the hair, the clothing will soak up what little falls on it, and the backlight will fail to provide the necessary separation.

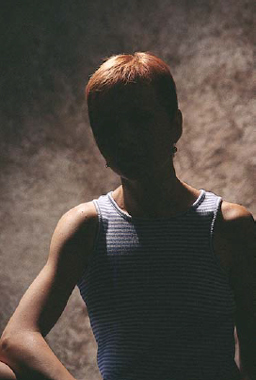
Figure 6.5B: Backlight and hairlight only.

In the instance cited in Figure 6.4, the talent had extremely white hair. The backlight was pointed at his shoulders and barn doored off his hair to keep it from glowing.
For this, use a stronger backlight on the shoulder area and flag it off the hair. When you flag an instrument, you place a flag or barn door (see Chapter 13) in the light path to cast a shadow on an area of the set or talent that you do not want lit. Then you can use the limited scope of the hair light to provide a lesser level of backlight for the hair. Remember, if you pay attention to detail, you have total control over the look of the picture. When things do not look exactly as you would like, the fault is yours. Think it through and fix it.

The reverse approach would be taken if the talent had black hair and very light-colored clothing. Remember, dark objects absorb light and light objects reflect light. A dim backlight would be used to provide the small amount of light necessary to separate the clothing from the background. At such a low intensity, it would have no effect on the talent’s black hair. Then add a high-intensity hair light to give some sparkle to the talent’s black hair. You could also place a blue or amber gel in this hair light to produce a more flattering result.
In Figure 6.8, a hair light has been included. Because of the subject’s light-colored hair, a 150-watt LTM Pepper with 216 diffusion was used on the back of her head. In this case, with one Pepper pointed at her back, the hair light would have caused her hair to glow. Therefore, one Pepper is pointed at her back and barn-doored, and another pointed at her hair.
Kickers
The kicker is also a limited-coverage backlight, but it comes at the subject from behind and off to one side or the other. It is usually used for dramatic effect to simulate some motivated source or for the sheer effect produced. Unlike the hair light, which is always mounted above and behind the subject, kickers can come from any position above or below your subject. This light gives the subject a “kick” to separate them from the background.
The term “kicker” is also used to describe specular reflections that come from various areas of the set such as the glass in a picture frame, a shiny spot on the actor’s face, or eyeglasses or their rims. These types of kickers are usually undesirable and can be removed by changing the angle between the object and the light, by changing the camera position, or by spraying the area or questionable item. Polarizing filters may also solve the problems of kickers. Kickers are seen as long, thin vertical spikes on the waveform monitor and will frequently cause the auto iris to close down, leaving everything in the mud.
Sidelights or Rim Lights
Sidelights are an acceptable substitution for backlights. They are instruments that are placed to one or both sides of the actor to provide separation from the surroundings. Unlike kickers, these instruments are located just in front of the actor. They result in a rim of light around the edges of the body. Used primarily for musical numbers to give dancers a light, airy quality, they can also be substituted for a backlight when it is absolutely impossible to mount one.
Background Lights
Background lights are instruments used to light the walls of a set or the studio cyclorama. Their only function is to provide a basic light intensity on the background material in a set. Since they do not light actors, they can be dimmed as a means of controlling their intensity without affecting flesh tones. Dimming also cuts down on necessary hardware such as flags, scrims, ND filters, and stands, and reduces power consumption and heat generation on location.
Background lights have a great influence on the exposure ratio and the overall mood of the shot. In smaller setups, the background light may be provided by spill from other instruments that are lighting the subjects, or special instruments may be placed around the set specifically for that purpose. Spots or floods may be used as background lights, depending on desired results.
Background lights should be placed just as carefully as any of the other instruments in the setup. Remember that you are always trying to create the illusion that the scene is lit by some primary source such as the sun, daylight coming through a window or fluorescents overhead. There may be two or more sources of light if the scene is indoors and is lit by multiple lamps in the room, or outdoors at night surrounded by a variety of artificial sources such as streetlights, marquees, electric signs, and light from the windows of buildings. Key lights are placed so that their cast shadows are consistent with those that would be cast by the supposed source of illumination for the scene. If that source is daylight through a window that is located screen right, the actors should be keyed from the right and so should the background elements.
I am always disturbed when I see sunlight coming through a window from the right and then see picture frames and bookcases in the background casting shadows toward the right or at some angle other than the cast shadows of the key. These shadows destroy the illusion and are the result of careless and sloppy background light placement by the lighting director.
Any instrument that illuminates the background and casts shadows should be carefully located so that its shadows will be consistent with those created by the key light. Do not say, “I need more light on the background.” Say, “I need some light on that bookcase from the key light angle.” Or say, “Those picture frames are casting a shadow straight down from the frame”. Move the background light so the shadows fall to the left of the frame and down. Pay attention to detail.
Figure 6.9 has the addition of a background light. Now our subject is no longer in limbo and the set has depth. The background light is a 1000-watt Lowel DP.
Effects Lights
Effects lights are instruments that do not serve any of the previous seven functions. They are used to create an effect, such as the projection of a tree branch onto a wall of the set. They may also be used to supplement regular background lights to bring set decorations such as plants or very dark wood furniture up to desired levels of illumination. As we have seen, plants seem to soak up light and require additional illumination. Fresnels or open-face spots are good for this purpose. You may wish to highlight a piece of dark-wood furniture with light from a Leko. Effects lights also create artificial sunlight, lightning or explosion effects, to name just a few. Special Lekos with gobos for projecting intricate patterns or expensive pattern projectors that project moving effects such as fire or passing clouds may also be used (see the Appendix for examples of available patterns and effects).
Also in the “special effects” category are colored lights or lighting instruments with a “colored” gel placed in front. In Figure 6.10, a 650-watt Arri Fresnel was placed on a wooden crate and gelled amber for warm colored, muslin background.
Using a rose-colored gel for a lingerie spot, the gray background took on an entirely different hue and made it stand out from our model (see Figure 6.11). In Figure 6.12, we have our typical three point lighting setup with the background light being rose colored.

Figure 6.10: Arri Fresnel with amber gel.

Figure 6.11: Rose gel on background.

In Figures 6.13 and 6.14, we used the same rose gel (and three-point lighting) with a blonde and a brunette model—note the differences in the look. All of the following video shoots used a Lowel lighting kit with 1000-watt Totas and 650-watt Omnis (heat wasn’t really a concern).
Three-Point Lighting and the Sun
When you use three-point lighting, not every instrument has to be the same source. Why not mix sunlight with tungsten light (be sure to color balance correctly)? If your subject is sitting by a window, why not use sunlight as the key?
In Figure 6.15, I cheated slightly with my three-point lighting setup. My project was a 1930s period piece, and I wanted to duplicate the soft, glowing look the leading ladies received at that time in films. With our actor sitting by the window in wig and costume, we wanted natural day-light to be the key light, coming in through the window. The daylight still needed to be soft because the light was being diffused by the thin, semi-transparent curtains.
Using a 2000-watt Mole-Richardson Fresnel outside (gelled with daylight blue) 8 feet from the window, we had our daylight key. A 3-foot piece of Foam core to the actor’s left bounced some of the key’s light and acted as our fill. Obviously, we wanted the key side (the window) to be far brighter than the fill. The only illumination in the room was to be from the daylight pouring in through the curtain-filtered window.

Her backlight also was provided by the key light because she was turned and faced the window. In this case, our three-point lighting setup was accomplished using only one gelled 2000-watt key light.
In Figure 6.16, the key daylight source is on the left and the fill (Foam core again) was on the right. As it occurs naturally outdoors, the sun provides a very strong key and other objects supply the bounce needed for the fill. In this case, we just supplied our own tungsten lights (gelled blue) to be our sun.
In Figure 6.17, we used a 650-watt Lowel Omni as the key source (sunlight). Wanting it to look like evening, we chose to gel the tungsten light with amber. This made our orange light even more orange to simulate that particular time of day. Figure 6.18 shows the result on the wine glasses.
As mentioned earlier, the most important thing is to achieve the lighting “look” you want. Often this requires experimentation and placing the light(s) in many different positions. It took us over an hour to get the exact look we were after in Figure 6.15. What started out with four lights indoors on stands is drastically different from what we ended up using.
In the classroom, I often have the students try to light the same scene three different ways using the same instruments. Try raising the key and moving it farther to the left; rotate the fill slightly to get a little more shadow on the talent’s face; or intensify the backlight by spotting it more. Having the students do it themselves and see the results was far more effective than explaining how different it would look if the lights were moved.

Figure 6.17: Gelling Tungsten lights with amber gel.

What to Use
The question always asked is, “What type of instrument do I use for each function?” There are some common sense guidelines, but there are no hard and fast rules. Fresnels and broads make good backlights, but since these instruments may be too harsh for some scenes, you may wish to consider a zip. Fresnels and Lekos make good key lights, but again, they may be too harsh and a softlight may work instead. The fact is that lighting styles are changing, becoming more soft and cool. Today, softlights are often used for keys. Any instrument can be used for fill, providing you have sufficient diffusion material to soften the output. The selection of instrument type should be guided by the aesthetic requirements of the scene. If you do not have the ideal instrument for the job, you should have enough accessories to tailor the output of available instruments to create the quality of light you require. In the photo example of our subjects, I used the lighting instruments at my disposal and tailored them to suit my needs.
In some cases, you do not have much choice. If you want a hair light, you need an inky or small Fresnel with a snoot. Effects lights are best created using Lekos with gobos or a scene projector, but any specular source can be used in a pinch. The size of the cast shadow depends on the shadowing object and its relative distance from the lamp and background. You may use a tree branch or some special pattern you have cut from a foam core, or any other object around the set. If you want a reasonably sharp shadow, use a specular source and place the gobo as far from the instrument and as close as possible to the surface the shadow will be cast upon. If the light is at a right angle to the gobo and to the surface on which it is projected, you will achieve the sharpest possible results. Not all cast shadows should be crisp, so you can play with light angles and adjust the distance between lamp and gobo or gobo and the surface on which it is projected to create pleasing distortions of the original shadowing object.