Chapter 20
A First Look at PowerPoint 2013
IN THIS CHAPTER
Who uses PowerPoint and why?
What’s new in PowerPoint 2013?
Starting and exiting PowerPoint
Changing the view
Zooming in and out
Displaying and hiding screen elements
Working with presentation windows
A presentation is any kind of interaction between a speaker and audience, but it usually involves one or more of the following: computer-displayed slides, noncomputerized visual aids (such as transparencies or 35mm slides), hard-copy handouts, and/or speaker’s notes. PowerPoint enables you to create all of these types of visual aids, plus many other types that you’ll learn about as you go along.
In this chapter you’ll get a big-picture introduction to PowerPoint 2013, and then we’ll fire up the program and poke around a bit to help you get familiar with the interface. You’ll find out how to use the tabs and panes, learn about some of the new features, and see how to work with the various views and key screen settings.
Who Uses PowerPoint and Why?
PowerPoint is a popular tool for people who give presentations as part of their jobs and also for their support staff. With PowerPoint, you can create visual aids that help get the message across to an audience. Although the traditional kind of presentation is a live speech presented at a podium, advances in technology have made it possible to give presentations in numerous other ways, and PowerPoint has kept pace. With PowerPoint, you can present in these formats:
- Podium: For live presentations, PowerPoint helps the lecturer emphasize key points through the use of computer-based shows (from a notebook or tablet PC, for example) or overhead transparencies.
- Kiosk shows: These are self-running presentations that provide information in an unattended location. You have probably seen such presentations listing meeting times and rooms in hotel lobbies and as sales presentations at trade show booths.
- CDs and DVDs: You can package a PowerPoint presentation on a CD or DVD and distribute it with a press release, a marketing push, or a direct mail campaign. The presentation can be in PowerPoint format, or it can be converted to some other format, such as PDF or a video.
- Internet formats: You can use PowerPoint to create a show that you can present live over a network or the Internet, while each participant watches from their own computer. You can even store a self-running or interactive presentation on a website in a variety of formats and make it available for the public to download and run on a PC.
When you start your first PowerPoint presentation, you may not be sure which delivery method you will use. However, it’s best to decide the presentation format before you invest too much work in your materials because the audience’s needs are different for each medium.
Most people associate PowerPoint with sales presentations, but PowerPoint is useful for people in many other lines of work as well. Here’s a sampling of how real people use PowerPoint in their daily jobs:
- Sales: More people use PowerPoint for selling goods and services than for any other reason. Armed with a laptop computer and a PowerPoint presentation, a salesperson can make a good impression on a client anywhere in the world. Figure 20.1 shows a slide from a sample sales presentation. With PowerPoint, you can create a number of sales tools: live presentations in front of clients with the salesperson present and running the show, self-running presentations that flip through the slides at specified intervals so that passersby can read them or ignore them as they wish, and user-interactive product information demos distributed on CD/DVD that potential customers can view at their leisure on their own PCs.
FIGURE 20.1 PowerPoint offers unparalleled flexibility for presenting information to potential customers.

- Marketing: The distinction between sales and marketing can be rather blurred at times, but marketing generally refers to the positioning of a product in the media rather than its presentation to a particular company or individual. Marketing representatives are often called upon to write advertising copy, generate camera-ready layouts for print advertisements, design marketing flyers and shelf displays, and produce other creative selling materials. By combining the Office 2013 online clip art collection and drawing tools with some well-chosen fonts and borders, a marketing person can come up with some very usable designs in PowerPoint.
- Human Resources: Human resources personnel often deliver presentations to new employees to explain the policies and benefits of the company. A well-designed, attractive presentation gives a positive impression of the company, starting the new hires off on the right foot. One of the most helpful features in PowerPoint for the human resources professional is the SmartArt tool. With it, you can easily diagram the reporting structure of the company and make changes whenever necessary with a few mouse clicks.
- Education and Training: Most courses include a lecture section in which the instructor outlines the content, and PowerPoint can help make the lecture portion of the class go smoothly. PowerPoint’s interactive controls even let you create quizzes that each student can take on-screen to gauge their progress. Depending on the button the student clicks, you can set up the quiz to display a “Yes, you are correct!” or “Sorry, try again” slide.
- Hotel and Restaurant Management: Service organizations such as hotels and restaurants often need to inform their customers of various facts but need to do so unobtrusively so that the information will not be obvious except to those looking for it. For example, a convention center hotel might provide a printed list of the meetings taking place in its meeting rooms, or a restaurant might show pictures of the day’s specials on a video screen in the waiting area. You can use PowerPoint to do either.
What’s New in PowerPoint 2013?
PowerPoint 2013 is very much like PowerPoint 2010 in its basic functionality. It uses a tabbed Ribbon across the top, rather than a traditional menu system, and employs dialog boxes and a Quick Access Toolbar in the same ways that 2010 did.
This doesn’t mean that there aren’t changes and improvements though! The following sections outline the major differences you will see when you upgrade from PowerPoint 2010 to PowerPoint 2013.
Cloud integration
You can purchase Office 2013 (or the standalone PowerPoint 2013) either as a traditional boxed application, as a download (with an optional backup DVD) or as a cloud-based subscription called Office 365. There are several benefits to the cloud version, including lower price per user for small organizations, automatic updates, the ability to use Office on multiple PCs without paying extra (with some editions), and the ability to access your Office applications and files from multiple locations. The cloud-based version is marked primarily to businesses, but versions are also available (or soon to be available at this writing) for university students and home users too. See http://www.microsoft.com/en-us/office365/office-professional-plus.aspx for more information.
Start screen
In earlier PowerPoint versions, you started up in a blank new presentation, which some beginners found intimidating. PowerPoint 2013 opens with a Start screen (Figure 20.2), providing easy access to both local and online templates as well as recently used files.
FIGURE 20.2 PowerPoint 2013 opens with a Start screen that offers links to templates and recent files.

Improved shape merging
If you have ever tried to create anything with the drawing tools in an Office app, you know that it can be frustrating because the shapes provided don’t always match the shapes you want. Office 2013’s drawing tools contain several new commands and capabilities that make the process of creating just the right shapes much easier. You can find the Merge Shapes button on the Insert Shapes group of the Drawing Tools ⇒ Format tab when two or more shapes are selected. Clicking Merge Shapes opens a menu of merge types.
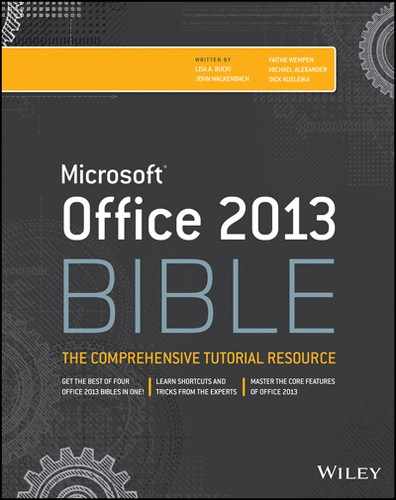
These new commands are all focused around merging two or more shapes into a single shape, using actions like Union, Combine, Intersect, Fragment, and Subtract. For example, suppose you want a shape that consists of a rounded rectangle with two arrows emerging from it. You could start with the three separate shapes shown at the left in Figure 20.3 and then use the Union command to join them into a single shape, as shown on the right.
FIGURE 20.3 Drawn shapes, before and after merging
Improved Smart Guides
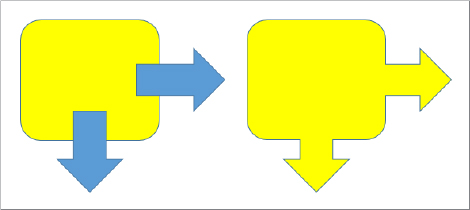
PowerPoint 2013 makes it easier than ever to precisely align and evenly space objects with one another. When you drag an object to position it, dotted guidelines called Smart Guides (or alignment guides) appear, showing its relationship to other objects on the slide and allowing you to easily snap the object into precise alignment and spacing. Earlier versions of PowerPoint had alignment commands, but you had to specifically issue them; Smart Guides present themselves automatically whenever they might be needed. Figure 20.4 shows an example. Smart Guides are covered in Chapter 24, “Using SmartArt Diagrams, Clip Art, and Pictures.”
FIGURE 20.4 Alignment guides make it easier to align objects and text on slides.
You can also create permanent drawing guides on the slide masters, making it easier to position content on slide masters and layout masters. Chapter 22, “Working with Layouts, Themes, and Masters,” covers modifying slide masters.
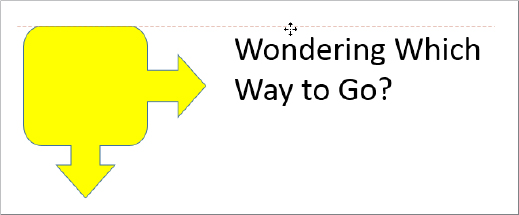
Improved comments
PowerPoint has included a Comments feature in the past, but it hasn’t been very robust. In PowerPoint 2013, there is a Comments pane that you can use in Normal view to display and manage comments. See Figure 20.5. Comments in PowerPoint work much like comments in Word, as described in Chapter 11, “Managing Document Security, Comments, and Tracked Changes.”
FIGURE 20.5 The Comments pane helps you display and respond to comments.
SkyDrive integration
SkyDrive is Microsoft’s online file storage service. Each user gets a certain amount of free space there, and you can purchase additional space.
In Office 2013 apps, you can save directly to the logged-in user’s SkyDrive, making it as easy to save files to your SkyDrive as it is to save to any local folder on your hard disk. Files saved to SkyDrive are private and secure, and you can access them from any Internet-connected computing device, no matter where you are. For more information about SkyDrive, see Chapter 39.
Online pictures and videos
PowerPoint 2013, like other Office 2013 applications, includes integration with online picture and video sharing services such as YouTube and Flickr, enabling you to easily access your own and other people’s online content for use in your presentations.
Microsoft’s clip art collection is now accessed entirely online from Office.com and is licensed for you to use for most purposes. You can also easily import pictures from your own SkyDrive and from a Bing image search. To help you avoid copyright problems, by default, the Bing image search returns only results licensed under Creative Commons (a public user license; you will need to check the terms of use for specific images you want to use).
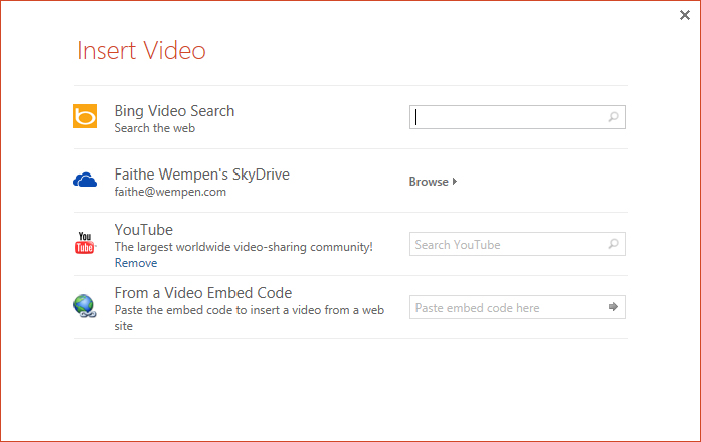
For videos, you can embed video code from any website that provides it. (PowerPoint 2010 also allowed this.) But what’s new now is that you can search for videos with Bing video search and select and embed clips directly from YouTube. See Figure 20.6.
FIGURE 20.6 You can insert or embed video content from online sources.
Improved presenter tools
PowerPoint 2013 improves on-screen presentation capabilities in several ways. First, the tools available to you in Slide Show view are now more robust, including the ability to zoom in on a particular area of a slide and to select a slide to jump to from an array of thumbnail images.
Presenter view can now be viewed on one monitor, allowing you to rehearse without connecting anything else. Presenter view has also been enhanced, with extra display settings and easier-to-use slide controls. See Figure 20.7.
FIGURE 20.7 Presenter view is now easier to use.

. . . And other new features
Besides the features I’ve just outlined, there are plenty more nice surprises awaiting upgraders:
- Theme variants: For many years now, PowerPoint users have complained that the templates PowerPoint provides are not customizable enough. For example, what if a certain template has a perfect background graphic but the colors are all wrong? PowerPoint 2013 solves this by providing color variants for many of the built-in themes.
- Touch controls: All of the Office 2013 apps, including PowerPoint, are more easily controlled with touch screens than their predecessors. You can use PowerPoint 2013 in the traditional way, with a mouse, or by pointing, tapping, swiping, and dragging on a touch screen.
- Eyedropper tool: Some graphics programs enable you to use an Eyedropper tool to pick up a color from one object and copy that color to another object. Now you can do that in Office applications too. For example, you could pick up a color from a photograph on a slide and apply it to the text on the slide so that everything matches. This is great for matching colors for themes. You’ll find the Eyedropper tool on the Shape Fill and Shape Outline buttons’ menus on the Drawing Tools Format tab when working with shapes.
- MP4 support: PowerPoint 2010 was revolutionary in that it allowed users to create their own video versions of their presentations. However, only one video format was supported. PowerPoint 2013 adds MP4 support, making the resulting videos much more widely shareable because MP4 is one of the most common video formats for online use. You can still save your presentation to the Windows Media Video (.wmv) format, too.
- Welcome Back: When you reopen a presentation that you were previously working on, the last slide you were editing automatically reappears. This is essentially the same as the Resume Reading feature in Word 2013.
Starting and Exiting PowerPoint
Now that you have seen some of the potential uses for PowerPoint and toured the new features, let’s get started using the program.
You can start PowerPoint just as you would any other program in Windows: from the Start screen (in Windows 8) or the Start menu (in Windows 7). Office 2013 runs only under those two desktop operating systems (as well as a couple of the server versions, which are not being covered in this book).
In Windows 8:
In Windows 7:
When PowerPoint 2013 opens, its own Start screen appears, as you saw back in Figure 20.2, offering help for opening existing files or starting new ones. If you want to bypass the Start screen and jump immediately to a new blank presentation (as in earlier versions of PowerPoint), just press the Esc key.
When you are ready to leave PowerPoint, click the Close (X) button in the top-right corner of the PowerPoint window. If you have any unsaved work, PowerPoint asks if you want to save your changes. Because you have just been playing around in this chapter, you probably do not have anything to save yet. (If you do have something to save, see “Saving Your Work” in Chapter 21 and Chapter 3, “Mastering Fundamental Operations,” to learn more about saving.) Click No to decline to save your changes, and you’re outta there.
Changing the View
A view is a way of displaying your presentation on-screen. PowerPoint comes with several views because at different times during the creation process, it is helpful to look at the presentation in different ways. For example, when you add a graphic to a slide, you need to work closely with that slide, but when you rearrange the slide order, you need to see the presentation as a whole.
PowerPoint offers the following presentation views:
- Normal: A combination of several resizable panes so you can see the presentation in multiple ways at once. Normal is the default view.
- Outline: A variant of Normal view in which slide content appears as a text outline in the left pane rather than as graphical slide thumbnails. This view is available only from the View tab.
- Slide Sorter: A light-table-type overhead view of all the slides in your presentation, laid out in sections and rows, suitable for big-picture rearranging.
- Slide Show: The view you use to show the presentation on-screen. Each slide fills the entire screen in its turn. This view is not available from the View tab, but it is available in several other places, including in the status bar and in the Quick Access Toolbar.
- Reading: Similar to Slide Show view, except it’s windowed and the status bar remains in view. You can use Reading view to check your work as if you were showing the slide show but still retain access to certain commands.
- Notes Page: A view with the slide at the top of the page and a text box below it for typed notes. (You can print these notes pages to use during your speech.) This view is available only from the View tab.
There are two ways to change a view: Click a button in the Presentation Views group of the View tab, or click one of the view buttons at the right end of the status bar at the bottom of the screen, shown in Figure 20.8. Not every view is available in both places.
FIGURE 20.8 Select a view from the View tab or from the viewing controls in the bottom-right corner of the screen.

Normal and Outline views
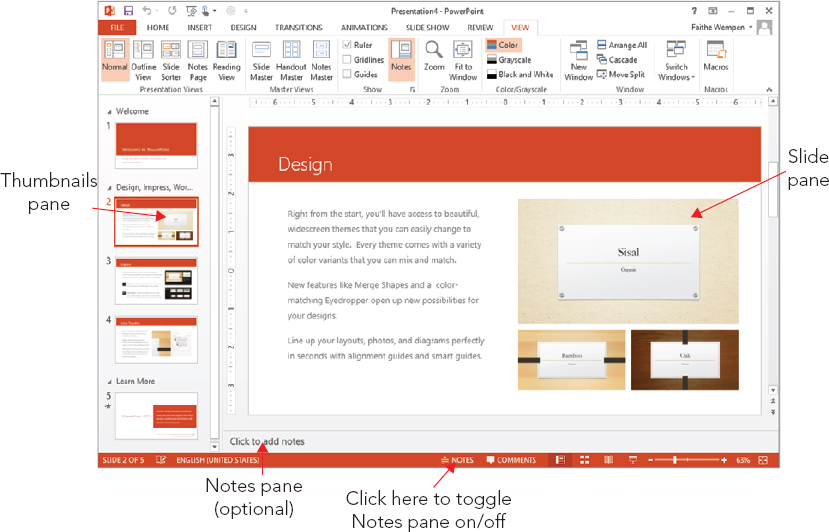
Normal view, shown in Figure 20.9, is a very flexible view that contains a little bit of everything. In the center is the Slide pane, where the active slide appears; and to its left is the Thumbnails pane, containing a set of thumbnail images that represent the presentation’s slides.
FIGURE 20.9 Normal view, the default, shows slide thumbnails at the left and an editing window at the right.
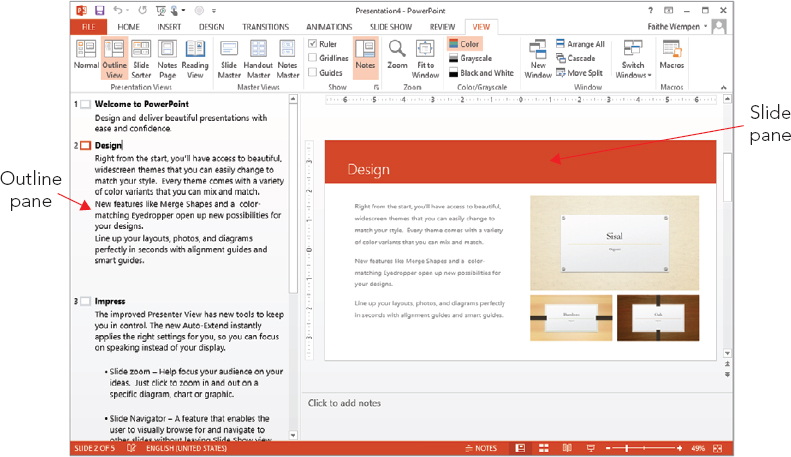
Outline view (shown in Figure 20.10) is identical to Normal view except instead of the slide thumbnails on the left, you see a text outline. (Note that the outline omits any sections created in the presentation.)
FIGURE 20.10 Outline view shows a text outline at the left and an editing window at the right.
An optional Notes pane is available at the bottom of the window; click Notes on the status bar to display or hide it. An optional Comments pane appears and disappears on the right when you click Comments on the status bar.
Each of the panes in Normal view has its own scroll bar, so you can move in it independently of the other panes. You can resize the panes by dragging the dividers between the panes. For example, to give the notes area more room, point the mouse pointer at the divider line between it and the slide area so that the mouse pointer becomes a double-headed arrow, and then hold down the left mouse button as you drag the line up to a new spot. To get the Thumbnails (or Outline) pane out of the way, drag the divider between it and the slide editing pane as far as possible to the left.
The left pane is useful because it lets you jump quickly to a specific slide by clicking its thumbnail (Normal view) or some of its text content (Outline view).
Slide Sorter view
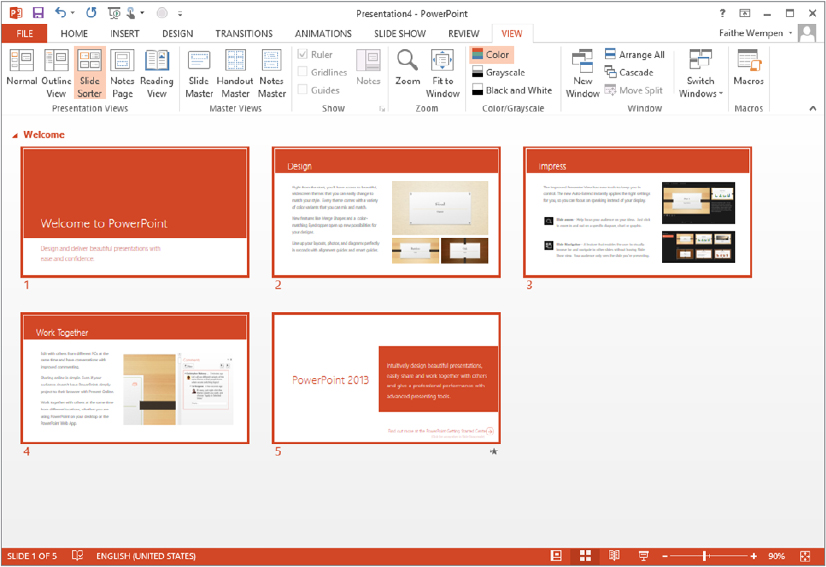
If you have ever worked with hard copies of slides, such as 35mm slides, you know that it can be helpful to lay the slides out on a big table and plan the order in which to show them. You rearrange them, moving this one here, that one there, until the order is perfect. You might even start a pile of backups that you will not show in the main presentation but will hold back in case someone asks a pertinent question. That’s exactly what you can do with Slide Sorter view, as shown in Figure 20.11. It lays out the slides in miniature, so you can see the big picture. You can drag the slides around and place them in the perfect order. You can also return to Normal view to work on a slide by double-clicking the slide.
FIGURE 20.11 Use the Slide Sorter view for a bird’s-eye view of the presentation.
Slide Show view and Reading views
When it’s time to rehearse the presentation, nothing shows you the finished product quite as clearly as Slide Show view does. In Slide Show view, the slide fills the entire screen. You can move from slide to slide by pressing the Page Up and Page Down keys or by using one of the other movement methods available (covered in Chapter 26).
Notice in Figure 20.12 the black bars above and below the slide. The default slide dimensions in PowerPoint 2013 are set for a wide-screen monitor (16:9 aspect ratio). If you are using a regular monitor (4:3) but showing wide-screen slides, black bars fill in the extra space at the top and bottom. You can correct this problem by changing the slide size on the Design tab. When you change the slide size, PowerPoint prompts you to specify how to adjust the existing content to fit the new format.
FIGURE 20.12 Slide Show view lets you practice the presentation in real life.
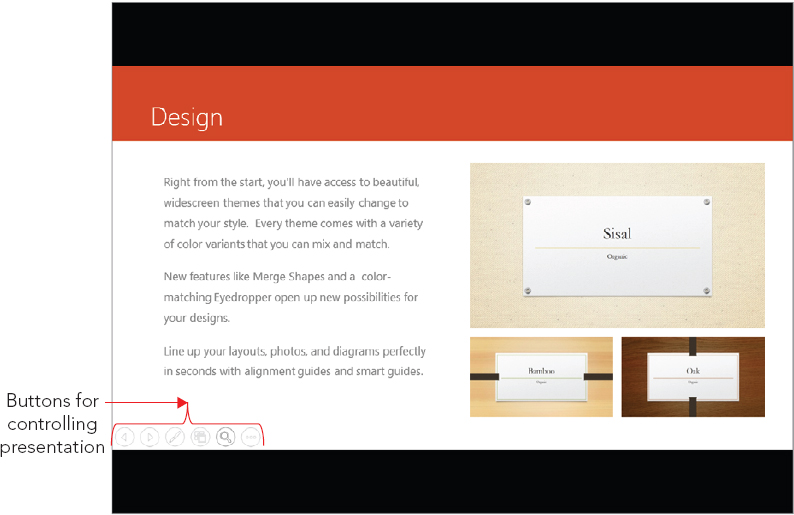
When you move your mouse in Slide Show view, buttons appear in the bottom-left corner for controlling the show without leaving it. To leave the slide show, choose End Show from the menu or just press the Esc key.
Reading view is like Slide Show view except it runs within the PowerPoint app window rather than full screen and it doesn’t have the powerful slide show tools that you get with Slide Show view (covered in Chapter 18), such as the ability to draw on a slide or skip to a certain slide. You still see the PowerPoint application’s title bar, and you still see the status bar at the bottom. You can move between slides by clicking with the mouse or by using the arrow keys on the keyboard. As with Slide Show view, you can exit from Reading view by pressing Esc to return to the previously accessed view.
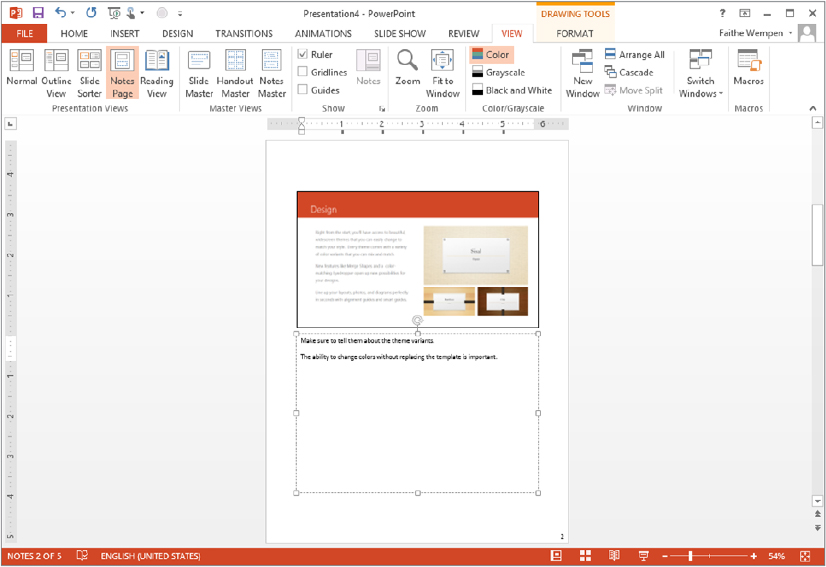
Notes Page view
When you give a presentation, your props usually include more than just your brain and your slides. You typically have all kinds of notes and backup material for each slide — figures on last quarter’s sales, sources to cite if someone questions your data, and so on. In the old days of framed overhead transparencies, people used to attach sticky notes to the slide frames for this purpose and hope that nobody asked any questions that required diving into the four-inch-thick stack of statistics they brought.
Today, you can type your notes and supporting facts directly in PowerPoint. As you saw earlier, you can type them directly into the Notes pane below the slide in Normal or Outline view. Just click the Notes button in the status bar to display the Notes pane, and start typing away. However, if you have a lot of notes to type, you might find it easier to work with Notes Page view instead.
Notes Page view is accessible only from the View tab. In this view, you see a single slide (uneditable) with an editable text area below it called the notes placeholder, which you can use to type your notes. See Figure 20.13. You can refer to these notes as you give an on-screen presentation, or you can print notes pages to stack neatly on the lectern next to you during the big event. If your notes pages run off the end of the page, PowerPoint even prints them as a separate page. If you have trouble seeing the text you’re typing, zoom in on it, as described in the next section.
FIGURE 20.13 Notes Page view offers a special text area for your notes, separate from the slides.
Zooming In and Out
If you need a closer look at your presentation, you can zoom the view in or out to accommodate almost any situation. For example, if you have trouble placing a graphic exactly at the same vertical level as some text in a box next to it, you can zoom in for more precision. (The new Smart Guides feature in PowerPoint 2013 helps with that situation too.) You can view your work at various magnifications on-screen without changing the size of the surrounding tools or the size of the print on the printout.
In Normal view, each of the panes has its own individual zoom. To set the zoom for the Thumbnails pane only, for example, select it first; then choose a zoom level. Or to zoom only in the Slide pane (the main editing pane), click it first. In a single-pane view, such as Notes Page or Slide Sorter, a single zoom setting affects the entire work area.
The larger the zoom number, the larger the details on the display. A zoom of 10% would make a slide so tiny that you couldn’t read it. A zoom of 400% would make a few letters on a slide so big they would fill the entire pane.
An easy way to set the zoom level is to drag the Zoom slider in the status bar, or click its plus or minus buttons to change the zoom level in increments, as shown in Figure 20.14. You can also hold down the Ctrl key and roll the scroll wheel on your mouse, if it has one.
FIGURE 20.14 Zoom in or out to see more or less of the slide(s) at once.

To resize the current slide so that it is as large as possible while still fitting completely in the Slides pane, click the Fit Slide to Current Window button, or Choose View ⇒ Zoom ⇒ Fit to Window.
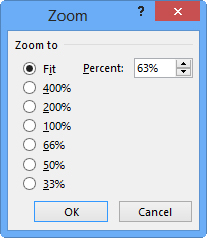
Another way to control the zoom is with the Zoom dialog box. Choose View ⇒ Zoom ⇒ Zoom to open it. (You can also open that dialog box by clicking the % next to the Zoom slider in the lower-right corner of the screen.) Make your selection, as shown in Figure 20.15, by clicking the appropriate button, and then click OK. Notice that you can type a precise zoom percentage in the Percent text box. You can specify any percentage you like, up to 400%. (Some panes and views will not go higher than 100%.)
FIGURE 20.15 You can zoom with this Zoom dialog box rather than the slider if you prefer.
Enabling Optional Display Elements
PowerPoint has a lot of optional screen elements that you may (or may not) find useful, depending on what you’re up to at the moment. The following sections describe them.
Ruler
Vertical and horizontal rulers around the Slide pane can help you place objects more precisely. To toggle them on or off, select or deselect the Ruler check box in the show group of the View tab, as shown in Figure 20.16. Rulers are available only in Normal, Outline, and Notes Page views.
FIGURE 20.16 Rulers and gridlines help position objects on a slide.
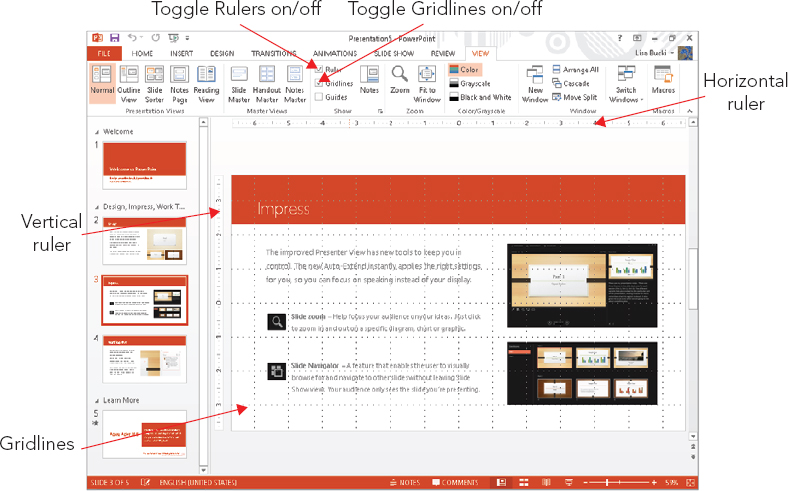
The rulers help with positioning no matter what content type you are working with, but when you are editing text in a text frame they have an additional purpose. The horizontal ruler shows the frame’s paragraph indents and any custom tab stops, and you can drag the indent markers on the ruler just as you can in Word.
Gridlines
Gridlines are nonprinting dotted lines at regularly spaced intervals that can help you line up objects on a slide. Figure 20.16 shows gridlines (and the ruler) enabled.
To turn gridlines on or off, use either of these methods:
- Press Shift+F9.
- On the View tab, in the Show group, select or deselect the Gridlines check box.
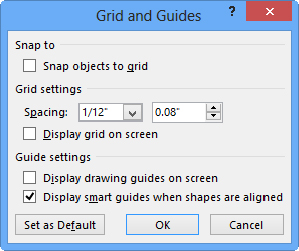
There are many options you can set for the gridlines, including whether objects snap to it, whether the grid is visible, and what the spacing should be between the gridlines. To set grid options, follow these steps:
FIGURE 20.17 Set grid options and spacing.
Guides
Guides are like gridlines except they are individual lines, rather than a grid of lines, and you can drag them to different positions on the slide. As you drag a guide, a numeric indicator appears to let you know the ruler position, as shown in Figure 20.18. Use the Grid and Guides dialog box shown in Figure 20.17 to turn guides on/off, or press Alt+F9.
FIGURE 20.18 Guides are movable, nonprinting lines that help with alignment.
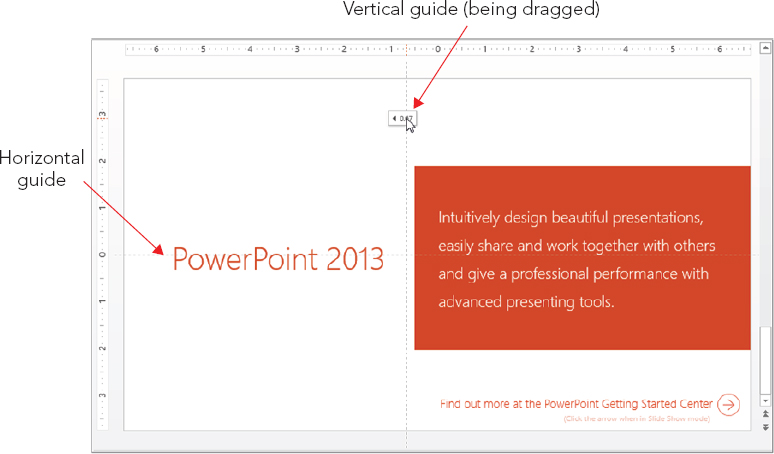
You can create additional sets of guide lines by holding down the Ctrl key while dragging a guide (to copy it). You can have as many horizontal and vertical guides as you like, all at positions you specify. You can also save your custom guides (new in PowerPoint 2013).
Color/Grayscale/Pure Black and White views
Most of the time you will work with your presentation in color. However, if you plan to print the presentation in black and white or grayscale (for example, on black-and-white handouts), you should check to see what it will look like without color.
Click the Grayscale or the Black and White button in the Color/Grayscale group of the View tab to switch to one of those views. When you do so, a Grayscale or Black and White tab becomes available. The Grayscale tab is shown in Figure 20.19. From its Change Selected Object group, you can fine-tune the grayscale or black-and-white preview. Choose one that shows the object to best advantage; PowerPoint will remember that setting when printing or outputting the presentation to a grayscale or black-and-white source.
FIGURE 20.19 Select a grayscale or a black-and-white preview type.

When you are finished, click the Back to Color View button on the Grayscale or Black and White tab. Changing the Black and White or Grayscale settings doesn’t affect the colors on the slides; it only affects how the slides will look and print in black and white or grayscale.
Opening a New Display Window for the Same Presentation
Have you ever wished you could be in two places at once? Well, in PowerPoint, you actually can. PowerPoint provides a way to view two spots in the presentation at the same time by opening a new window.
To display a new window, display the View tab and click New Window in the Window group. Then use Arrange All or Cascade to view both windows at once.
You can use any view with any window, so you can have two slides in Normal view at once, or Slide Sorter and Notes Pages view, or any other combination. Both windows contain the same presentation, so any changes you make in one window are reflected in the other window.
Arranging windows
When you have two or more windows open, whether they are for the same presentation or different ones, you need to arrange them for optimal viewing. You saw earlier in this chapter how to resize a window, but did you know that PowerPoint can do some of the arranging for you?
When you want to arrange the open windows, do one of the following:
- Tile the windows. On the View tab in the Window group, click Arrange All to tile the open windows so there is no overlap.
- Cascade the windows. On the View tab in the Window group, click Cascade to arrange the open windows so that the title bars cascade from upper left to lower right on the screen. Click a title bar to activate a window.
These commands do not apply to minimized windows. If you want to include a window in the arrangement, make sure you restore it from its minimized state first.
Switching among windows
If you have more than one window open and can see at least a corner of the window you want, click it to bring it to the front. If you have one of the windows maximized, on the other hand, or if another window is obscuring the one you want, click Switch Windows (in the Window group of the View tab) and select the window you want to view.
Summary
This chapter provided an introduction to PowerPoint. You learned about PowerPoint 2013’s new features, and now know how to:
- Start and exit PowerPoint.
- Navigate the user interface.
- Choose the best view for the type of work you need to do on the presentation.
- Work with other display features, such as zooming and rulers.
- Work with multiple open presentation windows.