Chapter 21
Creating a Presentation, Slides, and Text
IN THIS CHAPTER
Starting a new presentation
Saving your work
Setting passwords for file access
Closing and reopening presentations
Creating new slides
Inserting content from external sources
Managing slides
Using content placeholders
Creating text boxes manually
Working with text boxes
If you’re an experienced Windows and PowerPoint user, starting new presentations and saving files may be second nature to you. If so — great! You may not need this chapter. On the other hand, if you aren’t entirely certain about some of the finer points, such as saving in different formats or locations, stick around.
Even people who consider themselves “advanced” users may benefit from this chapter because it looks at some of the unique advanced saving features of Office applications and explains how to secure files with passwords.
In this chapter, you’ll learn how to build a simple text-based presentation by creating new slides and entering text on them. You’ll learn how to import content from other programs, and how to create, size, and position text boxes to hold the text for your presentation.
Starting a New Presentation
You can start a blank presentation, or you can base the new presentation on a template or on another presentation. Using a template or existing presentation can save you some time. However, if you have a specific vision you’re going for, starting a presentation from scratch gives you a clean canvas to work from.
Starting a blank presentation
When you open PowerPoint, a Start screen appears. From here you can click Blank Presentation, as shown in Figure 21.1, or you can just press Esc at the Start screen to access a blank presentation.
FIGURE 21.1 Use the Blank Presentation tile on the Start screen to start a new presentation.

If you want to start a blank presentation at some time other than when you start up PowerPoint, you can do the following:
A new blank presentation begins automatically with one slide. Just add your content to it, add more slides if needed, change the formatting (as you’ll learn in upcoming chapters), and go for it.
Starting a presentation from a template
A template is a file that contains starter settings — and sometimes starter content — on which you can base new presentations. Templates vary in their exact offerings but can include sample slides, a background graphic, custom color and font themes, and custom positioning for object placeholders.
The sample templates stored on your computer (such as the Welcome to PowerPoint template shown in Figure 21.1) appear as tiles on the Start screen along with tiles for the themes and on the New screen when you choose File ⇒ New, as in the preceding section. You can click whichever one you want to use.
Only a few sample templates are stored on your hard disk because Microsoft assumes that most people have an always-on Internet connection these days. When you are connected to the Internet, you can access the complete Office.com library of template files. Use the Search for online templates and themes box to search for templates in a particular category or with certain keywords associated with them.
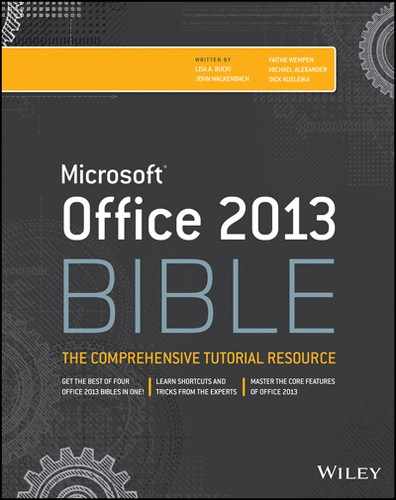
Follow these steps to locate a template and use it to start a new presentation:
FIGURE 21.2 Search for templates by keyword or click a category.

FIGURE 21.3 Preview a template before selecting it.
Using a personal template
In the section, “Saving in a different format,” later in this chapter, you will learn how to save a presentation file in template format so you can use it as a basis for new presentations. These are called personal templates in PowerPoint 2013.
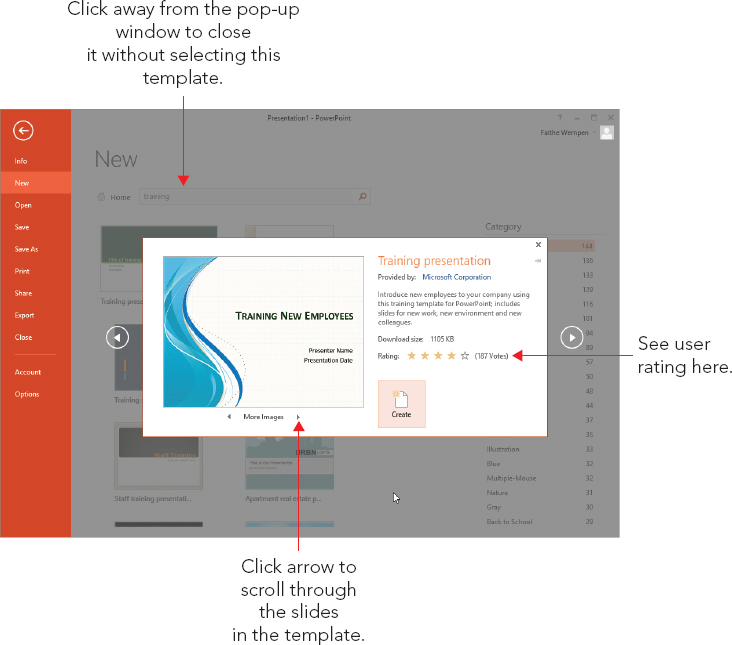
When you specify a default location for personal templates or download or create and save a template, the New screen has two categories below the suggested searches: Featured and Personal (or Custom). Personal appears if you have not specified a Workgroup Templates location (covered later in this chapter), and Custom appears instead if you have done so.
You can click Personal or Custom to see the locations that hold your own personal templates and themes. The Document Themes folder appears here (you’ll learn more about it in Chapter 22, “Working with Layouts, Themes, and Masters”) and also whatever folder you specified as the default personal templates location (see the preceding note). In addition, if you have specified a Workgroup Templates location, that folder appears here too.
To access your personal templates, follow these steps:
FIGURE 21.4 Choose Personal or Custom to see your personal template location.
Basing a new presentation on existing content
If you already have a presentation that’s similar to the new one you need to create, you can base the new presentation on the existing one. To do so, open the existing presentation and then use Save As (covered in the next section, “Saving Your Work”) to save it under a new name.
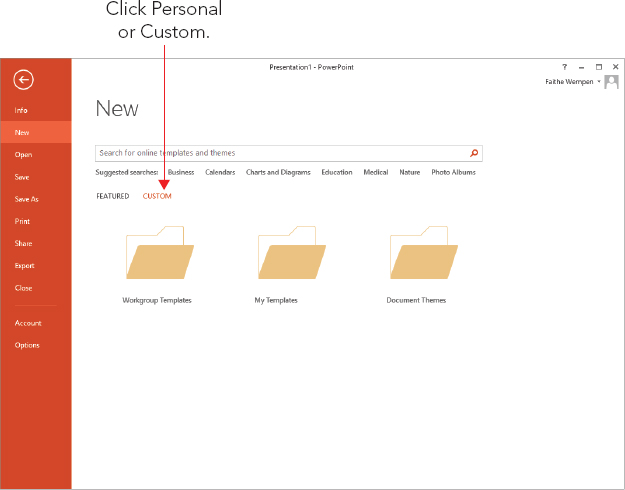
PowerPoint can open files in several formats other than its own, so you can start a new presentation based on some work you have done elsewhere. For example, you can open a Word outline in PowerPoint. The results might not be very attractive, but you can fix that later with some text editing, slide layouts, and design changes.
To open a file from another application, do the following:
FIGURE 21.5 By changing the file type you can select a file of another supported type, such as an outline document.
See the next section for more information about saving.
Saving Your Work
PowerPoint is typical of most Windows programs in the way that it saves and opens files. The entire PowerPoint presentation is saved in a single file incorporating any graphics, charts, or other elements. The first time you save a presentation, PowerPoint prompts you for a name and location. Thereafter, when you save that presentation, PowerPoint uses the same settings and does not prompt you for them again.
Understanding save locations
Where can you save your files? You can save files in any location on your local hard disk, on a removable drive such as a USB flash drive, to a network location, to your SkyDrive, or to a SharePoint server, just to name a few. A more pertinent question is, where should you save your files? That depends on your situation.
In most Office 2013 apps, the default save location is your SkyDrive. Your SkyDrive is a free online storage location that Microsoft provides to anyone who wants it. (You don’t even have to be a Windows or Office user.) Your SkyDrive is available no matter what computer you are logged into, as long as you have an Internet connection, so it’s a good choice for people who have multiple PCs that they alternate between. See Chapter 39 for more information about saving to your SkyDrive.
The main drawback to using your SkyDrive is that if your Internet connection isn’t available, neither are your files. People with intermittent or inconsistent Internet service may want to store files on the local hard drive, where they are always available. Saving to your Documents library is a safe bet, but you can also create your own folders on your hard drive and save there.
If you have a local network in your home or office, you might have a central file storage location on that network. For example, all the people in your department might save their files to the same network share so that the files are available to everyone at all times. Some companies maintain SharePoint servers for file sharing; others just make network drives and folders available to all the users who need them.
If you want local portability, consider saving to a removable drive such as a USB flash drive or an external hard drive. You can then plug the storage device into some other computer whenever you need file transport, and you don’t have to worry about a network or Internet connection being available.
Saving for the first time
If you haven’t previously saved the presentation you are working on, Save and Save As do the same thing: They open the Save As screen. From there, you can specify a name, file type, and file location. Follow these steps:
FIGURE 21.6 The Save As screen
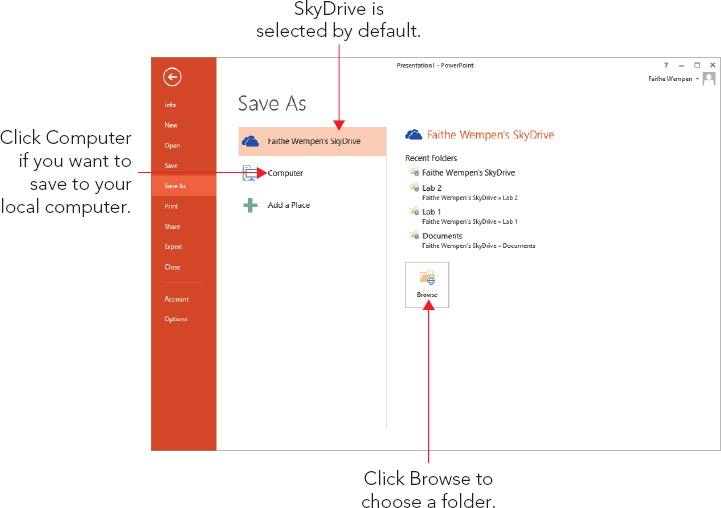
FIGURE 21.7 The Save As dialog box
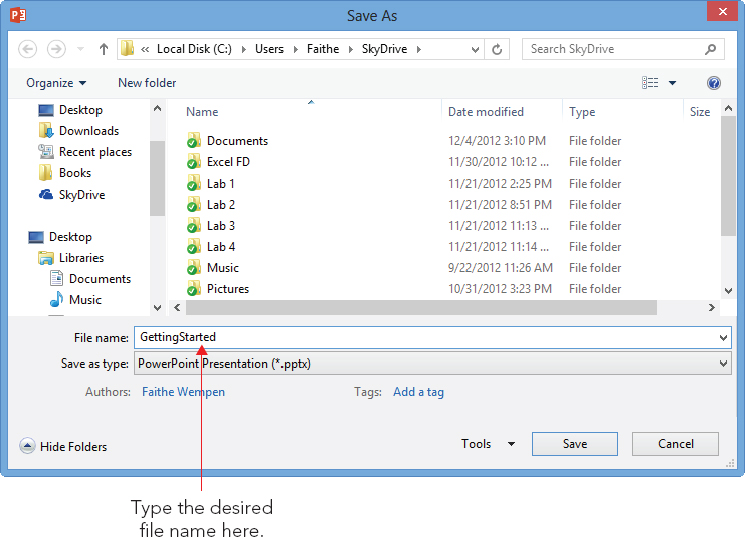
File names can be up to 255 characters. For practical purposes, however, keep the names short. You can include spaces in the file names and most symbols except <, >, ?, ∗, /, and . However, if you plan to post the file on a network or the Internet at some point, you should avoid using spaces; use the underscore character instead to simulate a space, if necessary. File names that include exclamation points also cause problems, so beware of that. Generally, it is best to avoid punctuation marks in file names.
Saving subsequent times
After you have saved a presentation once, you can resave it with the same settings (same file type, name, and location) in any of the following ways:
- Choose File ⇒ Save.
- Press Ctrl+S.
- Click the Save button on the Quick Access Toolbar.
If you need to save your presentation under a different name, as a different file type, or in a different location, use the Save As command instead. This reopens the Save As screen, as in the preceding steps, so that you can save differently. The originally saved copy will remain under the original name, type, and location.
Changing drives and folders
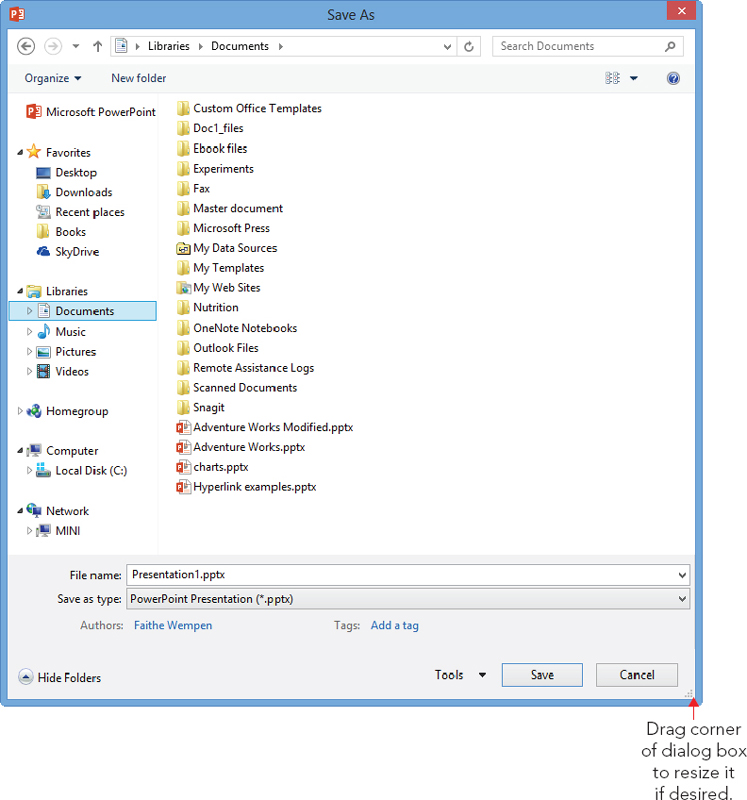
The Office applications enable you to save files to other locations besides your SkyDrive or the Documents library. These other locations can include local hard disk folders, USB flash drives and other flash media, other hard disks in the same PC, hard disks on other PCs in a network, hard disks on web servers on the Internet, or writeable CDs or DVDs.
The Navigation pane on the left side of the Save As dialog box is home to several collapsible/expandable categories. Double-click a category to open it and then make selections from within it (see Figure 21.8). You can choose from the following categories:
- Favorites: Shortcuts for popular locations such as Downloads and Desktop appear in the Favorites list, and you can also add your own shortcuts here.
- Libraries: Libraries are virtual folders that organize locations by the types of files they contain. Double-click Libraries and then click through a category such as Documents or Pictures.
FIGURE 21.8 The Save As dialog box contains a number of shortcuts for navigation in the left pane.
- Homegroup: Windows 7 and 8 have a home networking feature called Homegroup; if you use it to set up your network, you can browse other network computers by clicking here.
- Computer: Browse the complete drive and folder listing for your local PC here.
- Network: Browse to local network locations such as the folders on a networked external hard disk.
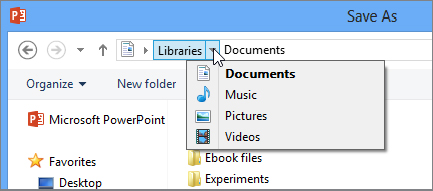
You can also navigate via the Address bar. The Address bar shows the path to the currently displayed location. You can jump directly to any of those levels by clicking the name there. You can also click the right-pointing arrow to the right of any level to see a menu of other folders within that location and jump to any of them from the menu, as shown in Figure 21.9.
FIGURE 21.9 Click an arrow on the Address bar to see a menu of locations at the chosen level within the current path.
Saving in a different format
All PowerPoint 2007, 2010, and 2013 files save by default in an XML-based file format called PowerPoint Presentation (*.pptx). eXtensible Markup Language (XML) is a text-based coding system similar to HTML that describes formatting by using inline bracketed codes and style sheets. XML-based data files are smaller than the data files from earlier PowerPoint versions, and they support all of the latest PowerPoint features. For best results, use this format whenever you don’t have a reason to use some other format.
There are also several variants of this format for specialty uses. For example, there’s a macro-enabled version with a .pptm filename extension. There are also “show” variants (.ppsx and .ppsm) that open in Slide Show view by default and template variants (.potx and .potm) that function as templates.
Not everyone has PowerPoint 2007 or higher; you might sometimes need to share files with people who have some earlier version of PowerPoint. Users of PowerPoint 2003 can download a compatibility pack that will allow them to accept the new files, but you can’t assume that everyone who has an earlier version of PowerPoint will download it. Therefore, you might need to save presentations in other file formats to share files with other people.
The available formats are shown in Table 21.1. In the Save As dialog box, open the Save as type drop-down list and select the desired format, as shown in Figure 21.10.
TABLE 21.1 PowerPoint Save As Formats
| Presentations | ||
| Format | File name extension | Usage notes |
| PowerPoint Presentation | .pptx | The default; use in most cases. Can open only in PowerPoint 2007 and higher (or on an earlier version with compatibility pack installed). |
| PowerPoint Macro-Enabled Presentation | .pptm | Same as .pptx, except it supports the storage of VBA or macro code. |
| PowerPoint 97–2003 Presentation | .ppt | A backward-compatible format for sharing files with users of PowerPoint 97, 2000, 2002 (XP), and 2003. |
| Produces files in Adobe PDF format, which is a hybrid of a document and a graphic. It shows each page exactly as it will be printed and yet allows the user to mark up the pages with comments and to search the document text. You must have a PDF reader such as Adobe Acrobat to view PDF files. | ||
| XPS Document | .xps | Much the same as PDF except it’s a Microsoft format. Windows Vista and higher comes with an XPS viewer application. |
| PowerPoint Template | .potx | A template file that is compatible with PowerPoint 2007 and higher. |
| PowerPoint Macro-Enabled Template | .potm | A template file that is compatible with PowerPoint 2007 and higher and that that supports the storage of VBA or macro code. |
| PowerPoint 97–2003 Template | .pot | A backward-compatible template file, also usable with PowerPoint 97, 2000, 2002 (XP), and 2003. |
| Office Theme | .thmx | Somewhat like a template, but it contains only theme settings (fonts, colors, and effects). Use this if you don’t want to save any of the content. Theme files can be used to supply the colors, fonts, and effects to Word and Excel files too. |
| PowerPoint Show | .ppsx | Just like a regular PowerPoint file, except it opens in Slide Show view by default; useful for distributing presentations to the audience on disk. |
| PowerPoint Macro-Enabled Show | .ppsm | Same as PowerPoint Show (.ppsx), except it supports the storage of VBA or macro code. |
| PowerPoint 97–2003 Show | .pps | Same as a regular backward-compatible presentation file, except it opens in Slide Show view by default. |
| PowerPoint Add-In | .ppam | A file that contains executable code (usually VBA) that extends PowerPoint’s capabilities. |
| PowerPoint 97–2003 Add-In | .ppa | Same as PowerPoint Add-In (.ppam), except the add-in is backward compatible. |
| PowerPoint XML Presentation | .xml | A presentation in XML format, suitable for integrating into an XML information storage system. |
| Graphics/other | ||
| MPEG-4 Video | .mp4 | A video version of the presentation using MPEG-4 format. |
| Windows Media Video | .wmv | A video version of the presentation using WMV format. |
| GIF Graphics Interchange Format | .gif | Static graphic. GIFs are limited to 256 colors. |
| JPEG File Interchange Format | .jpg | Static graphic. JPG files can be very small, making them good for web use. A lossy compression format, so picture quality may not be as good as with a lossless format. |
| PNG Portable Network Graphics Format | .png | Static graphic. Similar to GIF except without the color depth limitation. Uses lossless compression; takes advantage of the best features of both GIF and JPG. |
| TIFF Tagged Image File Format | .tif | Static graphic. TIF is a high-quality file format suitable for slides with high-resolution photos. A lossless compression format. |
| Device Independent Bitmap | .bmp | Static graphic. BMP is the native format for Windows graphics, including Windows background wallpaper. |
| Windows Metafile | .wmf | Static graphic. A vector-based format, so it can later be resized without distortion. Not Mac compatible. |
| Enhanced Windows Metafile | .emf | Enhanced version of WMF; not compatible with 16-bit applications. Also vector-based and not Mac compatible. |
| Outline/RTF | .rtf | Text and text formatting only; excludes all non-text elements. Only text in slide placeholders will be converted to the outline. Text in the Notes area is not included. |
| PowerPoint Picture Presentation | .pptx | Saves all the slides as pictures and puts them into a new blank presentation. |
| Strict Open XML Presentation | .pptx | A variant of XML that fully supports the Open XML standard. |
| OpenDocument Presentation | .odp | A presentation that conforms to the new OpenDocument standard for exchanging data between applications. |
FIGURE 21.10 Choose a different format, if necessary, from the Save As Type drop-down list.
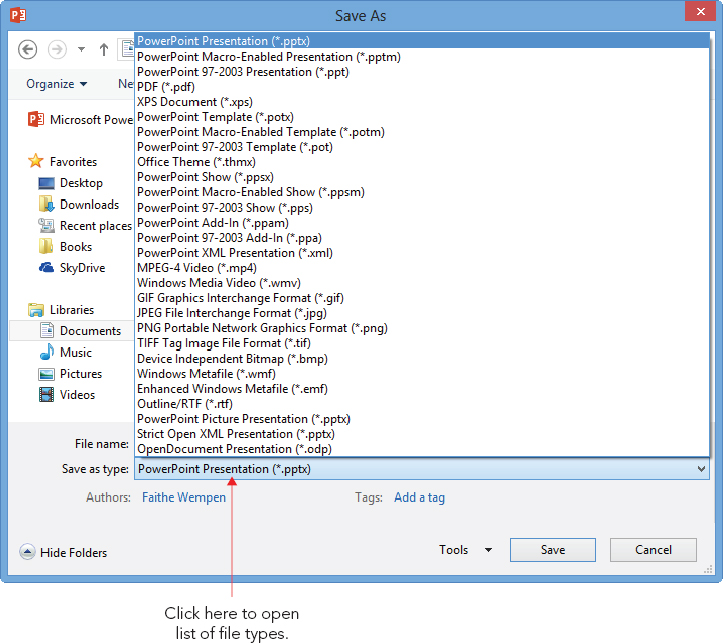
Table 21.1 lists a lot of choices, but don’t let that overwhelm you. You have three main decisions to make:
- PowerPoint 2007–2013 format or backward compatible with PowerPoint 97–2003: Unless compatibility is essential, go with the newer format because you get access to all of the new features. (See Table 21.2 to learn what you’ll lose with backward compatibility.) If you use a backward-compatible format, some of the features described in this book work differently or aren’t available at all.
TABLE 21.2 PowerPoint 2013 Features Not Supported in the PowerPoint 97–2003 File Format
Feature Issues SmartArt graphics Converted to uneditable pictures Charts (except Microsoft Graph charts) Converted to editable OLE objects, but the chart might appear different Custom slide layouts Converted to multiple masters Drop shadows Soft shadows converted to hard shadows Equations Converted to uneditable pictures Heading and body fonts Converted to non-theme formatting Effects: - 2-D or 3-D WordArt text
- Gradient outlines for shapes or text
- Strikethrough and double-strikethrough
- Gradient, picture, and texture fills on text
- Soft edges, reflections, some types of shadows
- Most 3-D effects
Converted to uneditable pictures Themes Converted to non-theme formatting Theme colors Converted to non-theme colors Theme effects Converted to non-theme effects Theme fonts Converted to non-theme fonts - Macro enabled or not: If you plan to create and store macros, use a macro-enabled format; if not, use a file format that does not include macro support, for a slightly safer file (because a file cannot carry viruses if it can’t carry macro code).
- Regular presentation or PowerPoint Show: The “show” variant starts the presentation in Slide Show view when it is loaded in PowerPoint; that’s the only difference between it and a regular presentation. You can build your presentation in a regular format and then save in show format right before distribution. PowerPoint shows can be opened and edited in PowerPoint the same as any other file.
Most of the other choices from Table 21.1 are special-purpose formats and not suitable for everyday use. The following sections explain some of those special file types.
Saving slides as graphics
If you save your presentation in one of the graphic formats shown in the Graphics/other section of Table 21.1, the result is a series of individually named graphic files, one per slide. (The original presentation continues to exist as a separate file.) If you choose one of these formats, you’re asked whether you want to export the current slide only or all slides. If you choose to export all slides, PowerPoint creates a new folder in the selected folder with the same name as the original presentation file and places the graphics files in it.
Saving slide text only
If you want to export the text of the slides to some other application, consider the Outline/RTF format, which creates an outline similar to what you see in the Outline pane in PowerPoint. This file can then be opened in Word or any other application that supports Rich Text format (RTF) text files. Only text in placeholders is exported, though, not text in manually inserted text boxes. If you aren’t sure which text will be included, view the presentation in the Outline pane; any text that doesn’t appear there will not be exported.
Specifying save options
The save options enable you to fine-tune the saving process for special needs. For example, you can employ save options to embed fonts, to change the interval at which PowerPoint saves AutoRecover information, and more.
There are two ways to access the Save options:
- Choose File ⇒ Options ⇒ Save.
- From the Save As dialog box, click Tools ⇒ Save Options.
The PowerPoint Options dialog box appears (Figure 21.11). Set any of the options you want to set and click OK when you are finished.
FIGURE 21.11 Set save options to match the way you want PowerPoint to save your work.
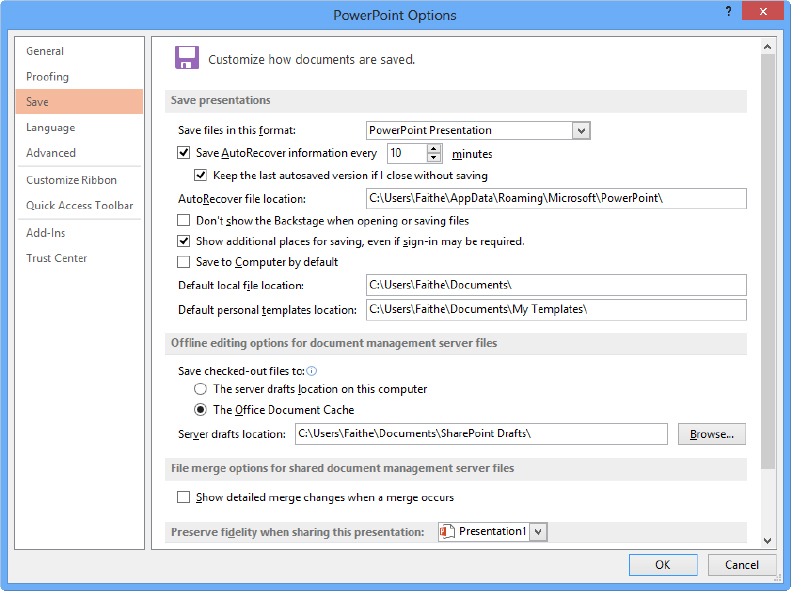
Table 21.3 summarizes the save options. One of the most important features described in Table 21.3 is AutoRecover, which is turned on by default. This means if a system error or a power outage causes PowerPoint to terminate unexpectedly, you do not lose all of your work. The next time you start PowerPoint, it opens the recovered file and asks if you want to save it.
TABLE 21.3 Save Options
| Feature | Purpose |
| Save files in this format | Sets the default file format to appear in the Save As dialog box. Your choices are a regular presentation, a macro-enabled presentation, or a 97–2003 backward-compatible presentation. |
| Save AutoRecover information every x minutes | PowerPoint saves your work every few minutes so that if the computer has problems and causes PowerPoint to terminate abnormally, you do not lose much work. Lower this number to save more often (for less potential data loss) or raise it to save less often (for less slowdown/delay related to repeated saving). |
| AutoRecover file location | Specify the location in which AutoRecover drafts should be saved. By default, it is C:Usersuser nameAppDataRoamingMicrosoftPowerPoint. |
| Don’t show the Backstage when opening or saving files | When enabled, bypasses Backstage view (that is, the default File menu choices for opening and saving) and goes directly to the Open or Save dialog boxes, respectively. |
| Show additional places for saving, even if sign-in may be required | When disabled, hides the SkyDrive sign-in option; disable this if you don’t intend to use SkyDrive to save your work. |
| Save to Computer by default | When enabled, saves to your default local file location (see the next option) by default. |
| Default local file location | Specify the location that you want to start from when saving with the Save As dialog box. By default, it is your Documents library. |
| Default personal templates location | Specify the location containing any templates you have created or acquired separately from the ones PowerPoint itself provides. |
| Save checked-out files to | Sets the location in which any drafts will be saved that you have checked out of a web server library such as SharePoint. If you choose “The server drafts location on this computer,” then you must specify what that location will be in the Server drafts location box. If you choose to save to the Office document cache, it’s not an issue because every save goes immediately back to the server. |
| Show detailed merge changes when a merge occurs | Shows full information about what was changed when you merge two PowerPoint files that are stored on a shared document management server. |
| Embed fonts in the file | Turn this on if you are saving a presentation for use on a different PC that might not have the fonts installed that the presentation requires. You can choose to embed the characters in use only (which minimizes the file size, but if someone tries to edit the presentation, they might not have all of the characters they need) or to embed all characters in the font set. Unlike the others, this setting applies only to the current presentation file. |
Setting Passwords for File Access
If a presentation contains sensitive or confidential data, you can encrypt the file and protect it with a password. Encryption is a type of “scrambling” done to the file so that nobody can see it, either from within PowerPoint or with any other type of file-browsing utility.
You can enter two separate passwords for a file: the Open password and the Modify password. Use an Open password to prevent unauthorized people from viewing the file at all. Use a Modify password to prevent people from making changes to the file.
You can use one, both, or neither of the password types. For example, suppose you have a personnel presentation that contains salary information. You might use an Open password and distribute that password to a few key people in the human resources department who need access to it. But then you might use a Modify password to ensure that none of those people make any changes to the presentation as they are viewing it.
For the Open password, you can specify an encryption method and strength. Many encryption codes are available, and the differences between them are significant mostly to high-end technical users. However, if you do have a preference, you can choose it when you choose the Open password.
To manage a file’s passwords and other security settings, follow these steps:
FIGURE 21.12 Set a password to prevent unauthorized access.
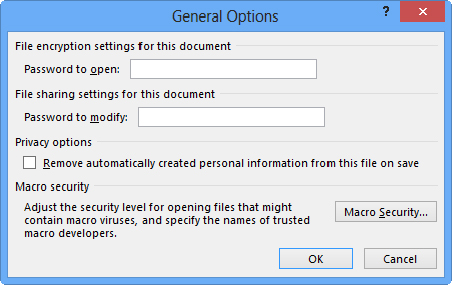
When you (or someone else) open the file, a Password prompt appears. The Open password must be entered to open the presentation file. The Modify password will not work. After that hurdle, if you have set a separate Modify password, a prompt for that appears. Your choices are to enter the Modify password, to cancel, or to click the Read-Only option to open the presentation in Read-Only mode.
Closing and Reopening Presentations
You can have several presentation files open at once and switch freely between them, but this can bog down your computer’s performance somewhat. Unless you are doing some cut-and-paste work, it’s best to have only one presentation file open — the one you are actively working on. It’s easy to close and open presentations as needed.
Closing a presentation
When you exit PowerPoint, the open presentation file automatically closes and you’re prompted to save your changes if you have made any. If you want to close a presentation file without exiting PowerPoint, follow these steps:
Opening a presentation
To open a recently used presentation, choose File ⇒ Open and click one of the presentations on the Recent Presentations list on the right. Up to 25 can appear by default (see Figure 21.13).
FIGURE 21.13 Recently opened presentations appear when you select Open from the File menu.

If the presentation you want to open does not appear on the Recent Presentations list, follow these steps to find and open it:
To open more than one presentation at once, hold down the Ctrl key as you click each file you want to open. When you click the Open button, they all open in their own windows. For more information, see the sidebar “Working with Multiple Presentations” later in this chapter.
The Open button in the Open dialog box has its own drop-down list from which you can select commands that open the file in different ways. See Figure 21.14, and refer to Table 21.4 for an explanation of the available options.
FIGURE 21.14 The Open button’s menu contains several special options for opening a file.
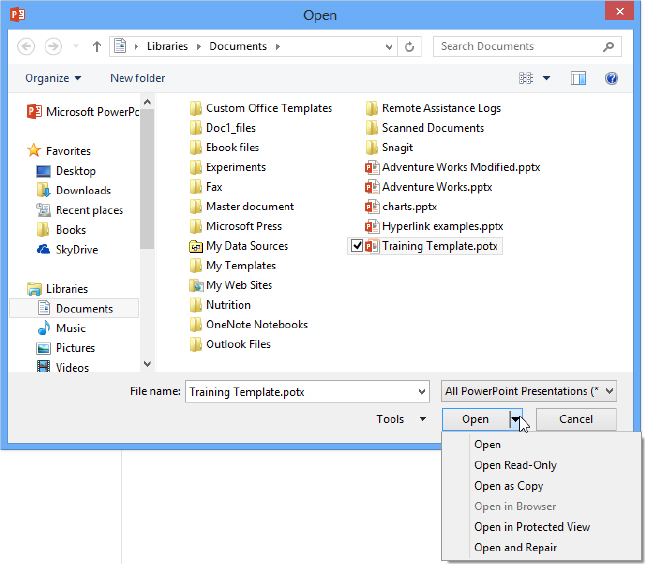
TABLE 21.4 Open Options
| Open button setting | Purpose |
| Open | The default; simply opens the file for editing. |
| Open Read-Only | Allows changes but prevents those changes from being saved under the same name. |
| Open as Copy | Opens a copy of the file, leaving the original untouched. |
| Open in Browser | Applicable only for web-based presentations; opens it for viewing in a web browser. PowerPoint 2013 does not save in web format, so it applies only to web-based presentations created in earlier versions of PowerPoint that supported that feature. |
| Open in Protected View | Opens the file in an uneditable view. This option not only prevents you from saving any changes to the file, it also prevents you from making changes. |
| Open and Repair | Opens the file, and identifies and repairs any errors it finds in it. |
| Show Previous Versions | Applicable only if the presentation file is stored on an NTFS volume under Windows 7, this feature enables you to access the Versions feature in Windows 7 that stores previous versions of files. It is not applicable to Windows 8, which does not store previous versions in the same way. |
Opening a file from a different program
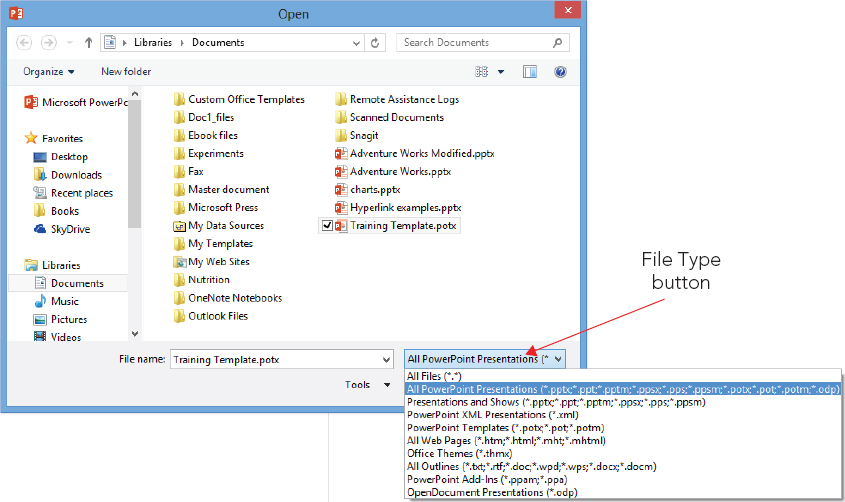
Just as you can save files in various program formats, you can open files from various programs. PowerPoint can detect the type of file and convert it automatically as you open it, so you do not have to know the exact file type. (For example, if you have an old PowerPoint file with a .ppt filename extension, you don’t have to know what version it came from.) The only problem is with files that have filename extensions that PowerPoint doesn’t automatically recognize. In that case, you must change the File Type setting in the Open dialog box to All Files so that the file to be opened becomes available on the file list, as shown in Figure 21.15. The change is valid for only this one use of the Open dialog box; the file type reverts to All PowerPoint Presentations, which is the default, the next time you open the dialog box.
FIGURE 21.15 To open files from different programs, change the File Type setting to All Files.
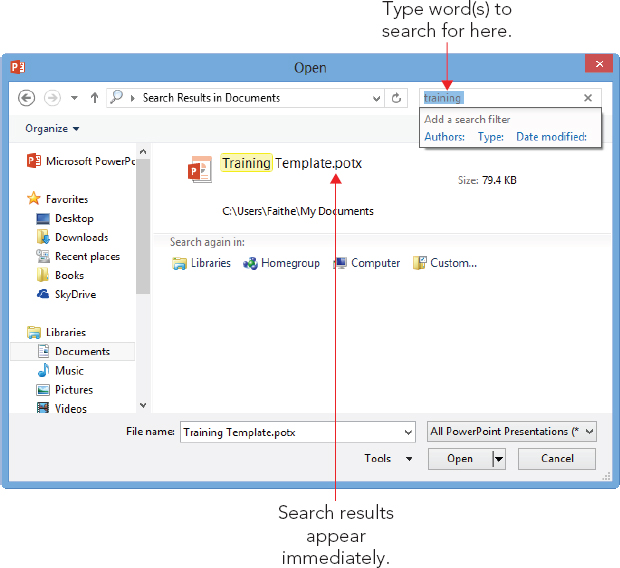
Finding a presentation file to open
If you have forgotten where you saved a particular presentation file, you’re not out of luck. The Open dialog box includes a Search box that can help you locate it, as shown in Figure 21.16.
FIGURE 21.16 Use the Search box in the Open dialog box to look for a file.
To search for a file, follow these steps:
Setting File Properties
File properties are facts about each file that can help you organize them. If you have a lot of PowerPoint files, using file properties can help you search intelligently for them using the Search feature you learned about in the preceding section. For example, you can specify an author, a manager, and a company for each file and then search based on those values.
You can set a file’s properties by doing the following:
FIGURE 21.17 Enter information to store in the file’s properties.
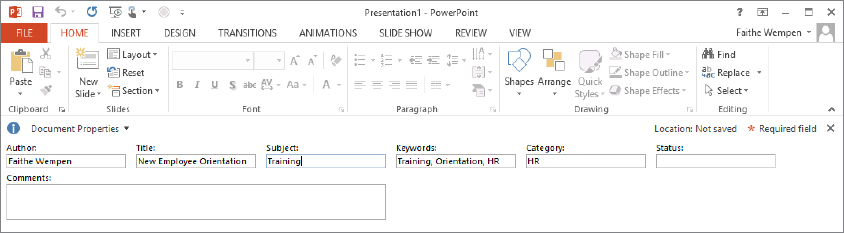
FIGURE 21.18 The Summary tab has many of the same fields as the Ribbon.

Now you can use the contents of the properties fields when performing a search.
Creating New Slides
Different templates start a presentation with different numbers and types of slides. A blank presentation has only a single slide, and you must create any others that you want.
There are several ways to create new slides. For example, you can type new text in the outline and then promote it to slide status, or you can add slides with the New Slide button that is on the Home tab. You can also copy existing slides, either within the same presentation or from other sources. The following sections outline these procedures in more detail.
Creating new slides from Outline view
As discussed in Chapter 20, Outline view shows the text from the presentation’s slides in a hierarchical tree, with the slide titles at the top level (the slide level) and the various levels of bulleted lists on the slides displaying as subordinate levels. Text that you type in the Outline pane appears on the slide, and vice versa, as shown in Figure 21.19.
FIGURE 21.19 When you type text into the Outline pane, it automatically appears on the current slide.

Follow these steps to create a new slide from Outline view:
You can also create a new slide by starting a new line in the Outline pane and then promoting it to slide level by pressing Shift+Tab. Follow these steps to insert a new slide in this way:
After creating the slide, you can continue creating its content directly in the Outline pane. Press Enter to start a new line, and then use Tab to demote, or Shift+Tab to promote, the line to the desired level. You can also right-click the text and choose Promote or Demote. Promoting a line all the way to the top level changes the line to a new slide title.
Creating a slide from the Thumbnails pane
Here’s a very quick method for creating a new slide, based on the default layout. It doesn’t get much easier than this:
The drawback to creating a slide in any of the ways you have learned about so far in this chapter is that you cannot specify the layout. You have to change the layout afterwards if you don’t get the kind you want. To choose a layout other than the default one, see the next section.
Creating a slide from a layout
A slide layout is a layout guide that tells PowerPoint what placeholder boxes to use on a particular slide and where to position them. Although slide layouts can contain placeholders for text, they also contain graphics, charts, tables, and other useful elements. After you create a new slide with placeholders, you can click a placeholder to open whatever controls you need to insert that type of object.
When you create new slides using one of the methods described in the preceding sections, the new slides use the Title and Content layout, which consists of a slide title and a single, large placeholder box for content. If you want to use another layout, such as a slide with two adjacent but separate frames of content, you must either switch the slide to a different layout after its creation (using the Layout button’s menu on the Home tab), or you must specify a different layout when you initially create the slide.
To specify a certain layout as you are creating a slide, follow these steps:
- To add a new slide using the same layout as the selected slide, click the top (graphical) portion of the New Slide button in the Slides group.
- To add a new slide using another layout, click the bottom (text) portion of the New Slide button and then select the desired layout from the menu, as shown in Figure 21.20.
FIGURE 21.20 Create a new slide, based on the layout of your choice.

Copying slides
Another way to create a new slide is to copy an existing one in the same presentation. This is especially useful when you are using multiple slides to create a progression because one slide is typically identical to the next slide in a sequence, except for a small change.
There are several ways to copy one or more slides. One way is to use the Windows Clipboard, as in the following steps:
PowerPoint also has a Duplicate Selected Slides command that does the same thing as a copy and paste. Although it may be a little faster, it gives you less control as to where the pasted copies will appear. PowerPoint pastes the slides immediately after the last slide in the selection. For example, if you selected slides 1, 3, and 6 and issued the Duplicate Selected Slides command, then the copies are placed after slide 6.
Follow these steps to try out the Duplicate Selected Slides command.
Inserting Content from External Sources
Many people find that they can save a lot of time by copying text or slides from other programs or from other PowerPoint presentations to form the basis of a new presentation. There’s no need to reinvent the wheel each time! The following sections look at various ways to bring in content from external sources.
Copying slides from other presentations
There are several ways to copy slides from other presentations. You can:
- Open the presentation, save it under a different name, and then delete the slides that you don’t want, leaving a new presentation with the desired slides ready for customization.
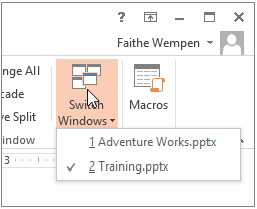
- Open two PowerPoint windows side-by-side and drag-and-drop slides between them.
- Open two PowerPoint presentations, copy slides from one of them to the Clipboard (Ctrl+C), and then paste them into the other presentation (Ctrl+V).
- Use the Reuse Slides feature in PowerPoint, as described next.
To reuse slides from other presentations with the Reuse Slides feature, follow these steps:
FIGURE 21.21 Choose individual slides to copy to the current presentation.
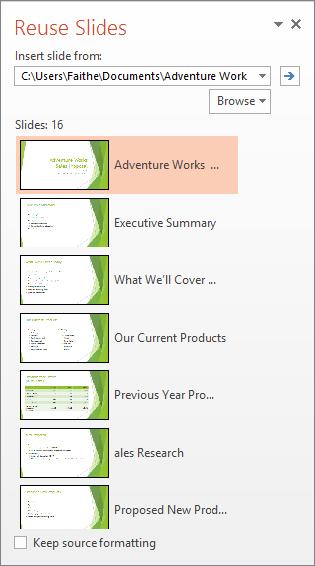
- To insert a single slide, click it.
- To insert all slides at once, right-click any slide and choose Insert All Slides.
- To copy only the theme (not the content), right-click any slide in the Reuse Slides pane and choose Apply Theme to All Slides, or Apply Theme to Selected Slides.
Inserting new slides from an outline
All of the Microsoft Office applications work well together, so it’s easy to move content between them. For example, you can create an outline for a presentation in Microsoft Word and then import it into PowerPoint. PowerPoint uses the heading styles that you assigned in Word to decide which items are slide titles and which items are slide content. The top-level headings (Heading 1) form the slide titles.
To try this out, open Word, switch to Outline view (View ⇒ Views ⇒ Outline), and then type a short outline of a presentation. Press Tab to demote, or Shift+Tab to promote, a selected line. Then save your work, go back to PowerPoint, and follow these steps to import it:
If there were already existing slides in the presentation, they remain untouched. (This includes any blank slides, and so you might need to delete the blank slide at the beginning of the presentation after importing.) All of the Heading 1 lines from the outline become separate slide titles, and all of the subordinate headings become bullet points in the slides.
Tips for better outline importing
Although PowerPoint can import any text from any Word document, you may not always get the results that you want or expect. For example, you may have a document that consists of a series of paragraphs with no heading styles applied. When you import this document into PowerPoint, it might look something like Figure 21.22.
FIGURE 21.22 A Word document consisting mainly of plain paragraphs makes for an unattractive presentation.

Figure 21.22 is a prime example of what happens if you don’t prepare a document before you import it into PowerPoint. PowerPoint makes each paragraph its own slide and puts all of the text for each one in the title placeholder. It can’t tell which ones are actual headings and which ones aren’t because there are no heading styles in use. The paragraphs are too long to fit on slides, and so they overrun their placeholders. Extra blank lines are interpreted as blank slides. Quite a train wreck, isn’t it? Figure 21.22 also illustrates an important point to remember: Regular paragraph text does not work very well in PowerPoint. PowerPoint text is all about short, snappy bulleted lists and headings. The better that you prepare the outline before importing it, the less cleanup you will need to do after importing. Here are some tips:
- Apply heading styles to the text that you want to import. Paragraphs formatted using non-heading styles in Word do not import into PowerPoint unless you use no heading styles at all in the document (as in Figure 21.22).
- Stick with basic styles only in the outline: for example, just Heading 1, Heading 2, and so on.
- Delete all blank lines above the first heading. If you don’t, you will have blank slides at the beginning of your presentation.
- Strip off as much manual formatting as possible from the Word text, so that the text picks up its formatting from PowerPoint. To strip off formatting in Word, select the text and press Ctrl+spacebar.
- Do not leave blank lines between paragraphs. These will translate into blank slides or blank bulleted items in PowerPoint.
- Delete any graphic elements, such as clip art, pictures, charts, and so on. They will not transfer to PowerPoint anyway and may confuse the import utility.
Importing from other text-based formats
In addition to Word, PowerPoint also imports from plain text files, from WordPerfect (5.x or 6.x), from Microsoft Works, from Rich Text Format, and from web pages. The procedure is the same as in the preceding steps. By default, the file type in the Insert Outline dialog box is set to All Files, so you should see all usable files automatically, provided they have the correct extensions.
If you are setting up a plain text file for import, you obviously won’t have the outlining tools from Word at your disposal. Instead, you must rely on tabs. Each line that should be a title slide should start at the left margin; first-level bullet paragraphs should be preceded by a single Tab; second-level bullets should be preceded by two Tabs, and so on.
Post-import cleanup
After importing text from an outline, there will probably be a few minor corrections that you need to make. Run through this checklist:
- The first slide in the presentation might be blank. If it is, then delete it.
- The Title Slide layout may not be applied to the first slide; apply that layout, if necessary. You can use the Layout list in the Slides group of the Home tab.
- A theme may now be applied; choose one from the Design tab, if necessary, or format your slide masters and layouts as desired. See Chapter 22 for more information about working with themes.
- Some of the text might contain manual formatting that interferes with the theme formatting and creates inconsistency. Remove any manual formatting that you notice. One way to do this is to switch to Outline view, select all of the text in the Outline pane by pressing Ctrl+A, and then strip off the manual formatting by pressing Ctrl+Spacebar or by clicking the Reset button in the Slides group on the Home tab.
- If some of the text is too long to fit comfortably on a slide, change to a different slide layout, such as a two-column list, if necessary. You might also need to split the content into two or more slides.
- There might be some blank bullet points on some slides (if you missed deleting all of the extra paragraph breaks before importing). Delete these bullet points.
Opening a Word document as a new presentation
Instead of importing slides from a Word document or other text-based document, as described in the preceding section, you can simply open the Word document in PowerPoint. PowerPoint starts a new presentation file to hold the imported text. This saves some time if you are starting a new presentation anyway, and you don’t have any existing slides to merge with the incoming content.
To open a Word document in PowerPoint, follow these steps:
Importing text from web pages
PowerPoint accepts imported text from several web-page formats, including HTML and MHTML (Single File Web Page). It is helpful if the data is in an orderly outline format, or if it was originally created from a PowerPoint file, because there will be less cleanup needed.
There are several ways to import from a web page:
- Open a web-page file as you would an outline (see the preceding section), but set the file type to All Web Pages.
- Insert the text from the web page as you would a Word outline (in the Home tab, click Slides ⇒ New Slide ⇒ Slides from Outline).
- Reuse slides from a web presentation as you would from any other presentation (in the Home tab, click Slides ⇒ New Slide ⇒ Reuse Slides).
When importing from a web page, don’t expect the content to appear formatted the same way that it was on the web page. We’re talking strictly about text import here. The formatting on the web page comes from HTML tags or from a style sheet, neither of which you can import. If you want an exact duplicate of the web page’s appearance, take a picture of the page with the Shift+PrintScreen command, and then paste it into PowerPoint (Ctrl+V) as a graphic.
If you are importing an outline from an MHTML-format web page that contains pictures, the pictures are also imported into PowerPoint. If importing from a regular HTML file, you cannot import the pictures.
Managing Slides
After inserting a few slides into a presentation, and perhaps building some content on them, you might decide to make some changes, such as rearranging, deleting, and so on. The following sections explain how to manage and manipulate the slides in a presentation.
Selecting slides
Before you can issue a command that acts upon a slide or a group of slides, you must select the slides that you want to affect. You can do this from either Normal or Slide Sorter view, but Slide Sorter view makes it easier because you can see more slides at once. From Slide Sorter view, or from the Thumbnails pane in Normal view, you can use any of these techniques to select slides:
- To select a single slide, click it.
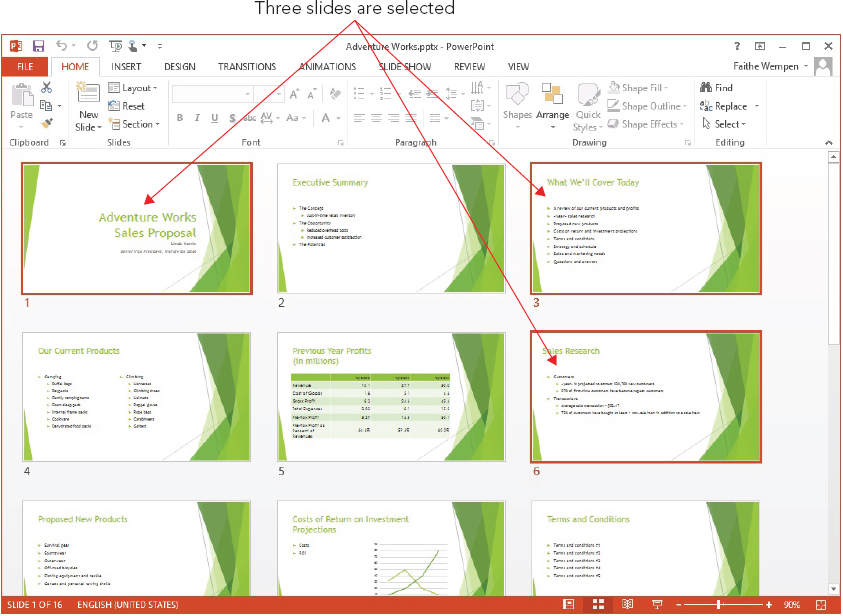
- To select multiple slides, hold down the Ctrl key as you click each one. Figure 21.23 shows slides 1, 3, and 6 selected, as indicated by the shaded border around the slides.
FIGURE 21.23 Select slides in Slide Sorter view by holding down the Ctrl key and clicking each slide.
- To select a contiguous group of slides (for example, slides 1, 2, and 3), click the first slide, and then hold down the Shift key as you click the last one. All of the slides in between are selected as well.
To cancel the selection of multiple slides, click anywhere outside of the selected slides.
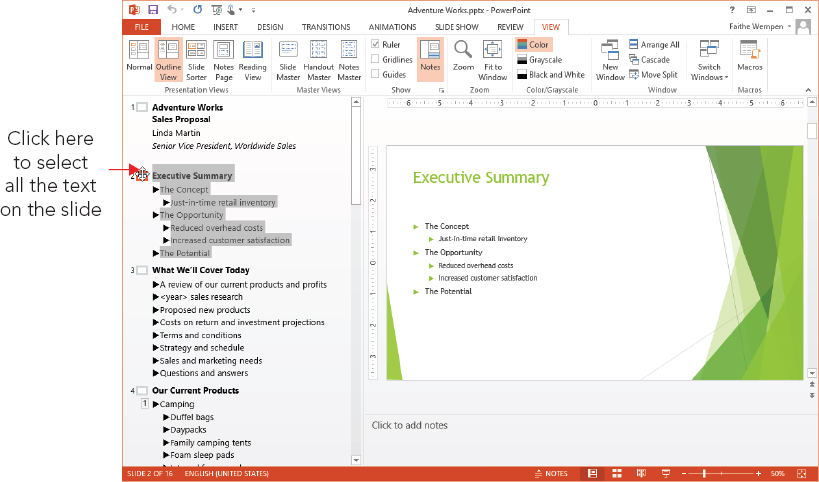
To select slides from Outline view, click the slide icon to the left of the slide’s title; this selects the entire slide, as shown in Figure 21.24. It’s important to select the entire slide and not just part of its content before issuing a command such as Delete, because otherwise, the command only affects the portion that you selected.
FIGURE 21.24 Select slides in the Outline pane by clicking the slide icon to the left of the slide title.
Deleting slides
You may want to get rid of some of the slides, especially if you created your presentation using a template that contained a lot of sample content. For example, the sample presentation may be longer than you need, or you may have inserted your own slides instead.
Select the slide or slides that you want to delete, and then do either of the following:
- Right-click the selection and choose Delete Slide.
- Press the Delete key on the keyboard.
Undoing mistakes
Here’s a command that can help you in almost all of the other chapters in this book: undoing. The Undo command allows you to reverse past actions. For example, you can use it to reverse all of the deletions that you made to your presentation in the preceding section. The easiest way to undo a single action is to click the Undo button on the Quick Access Toolbar or press Ctrl+Z. You can click it as many times as you like; each time you click it, you undo one action.
You can undo multiple actions at once by opening the Undo button’s drop-down list, as shown in Figure 21.25. Just drag the mouse across the actions that you want to undo (you don’t need to hold down the mouse button). Click when the desired actions are selected, and presto, they are all reversed. You can select multiple actions to undo, but you can’t skip around. For example, to undo the fourth item, you must undo the first, second, and third ones, as well.
FIGURE 21.25 Use the Undo button to undo your mistakes and the Redo button to reverse an Undo operation.
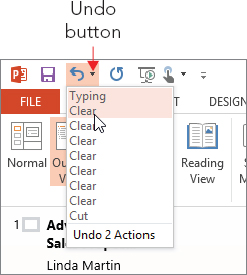
The Redo command is the opposite of Undo. If you make a mistake with the Undo button, you can fix the problem by clicking the Redo button. Like the Undo button, it has a drop-down list, and so you can redo multiple actions at once.
The Redo command is available only immediately after you use the Undo command. If Redo isn’t available, a Repeat button appears in its place. The Repeat command enables you to repeat the last action that you performed (and it doesn’t have to be an Undo operation). For example, you can repeat some typing, or some formatting. Figure 21.26 shows the Repeat button.
FIGURE 21.26 The Repeat button appears when Redo is not available, and enables you to repeat actions.

Rearranging slides
The best way to rearrange slides is to do so in Slide Sorter view. In this view, the slides in your presentation appear in thumbnail view, and you can move them around on the screen to different positions, just as you would manually rearrange pasted-up artwork on a table. Although you can also do this from the Thumbnails pane in Normal view, you are able to see fewer slides at once. As a result, it can be more challenging to move slides around, for example, from one end of the presentation to another. To rearrange slides, use the following steps:
FIGURE 21.27 As you drag a slide, its new position is indicated by slides shifting in the view.

You can also rearrange slides in Outline view. This is not quite as easy as using Slide Sorter view, but it’s more versatile. Not only can you drag entire slides from place to place, but you can also move individual bullets from one slide to another.
Follow these steps to move content in Outline view:
There are also keyboard shortcuts for moving a slide up or down in the Outline pane that may be faster than clicking the toolbar buttons. You can press the Alt+Shift+Up Arrow keys to move a slide up, and the Alt+Shift+Down Arrow keys to move a slide down.
These shortcuts work equally well with single bullets from a slide. Just click to the left of a single line to select it, instead of clicking the Slide icon in step 3.
Using Content Placeholders
Now that you know something about inserting and managing entire slides, let’s take a closer look at the content within a slide. The default placeholder type is a multipurpose content placeholder, as shown in Figure 21.28.
FIGURE 21.28 A content placeholder can contain a variety of different elements.

Inserting content into a placeholder
To type text into a content placeholder, click inside the placeholder box and start typing. You can enter and edit text as you would in any word-processing program. To insert any other type of content into a placeholder, click one of the icons shown in Figure 21.28. A dialog box opens to help you select and insert that content type.
A content placeholder can hold only one type of content at a time. If you click in the placeholder and type some text, the icons for the other content types disappear. To access them again, you must delete all of the text from the placeholder.
Placeholders versus manually inserted objects
You can insert content on a slide independently of a placeholder by using the Insert tab’s buttons and menus. This technique allows you to insert an item in its own separate frame on any slide, to coexist with any placeholder content. You can learn how to insert each content type in the chapters in which they are covered.
Creating Text Boxes Manually
The difference between a placeholder-inserted object and a manually inserted one is most significant with text boxes. Although you might think that text boxes are all alike, there are actually some significant differences between placeholder text boxes and manually inserted ones.
Here are some of the characteristics of a text placeholder:
- You cannot create new text placeholder boxes on your own, except in Slide Master view.
NoteYou learn how to use Slide Master view to create your own layouts that contain custom text placeholders in Chapter 22. If you move or resize any type of placeholder on a slide in Normal view, that may disconnect it from future formatting changes you make in the slide master. The best practice is to make design and layout changes in the slide master rather than on individual slides.
- If you delete all of the text from a text placeholder, the placeholder instructions return (in Normal or Outline view).
- A text placeholder box has a fixed size on the slide, regardless of the amount or size of text that it contains. You can resize it manually, but if you reapply the layout, the placeholder box snaps back to the original size.
- AutoFit is turned on by default in a text placeholder, so that if you type more text than will fit, or resize the frame so that the existing text no longer fits, the text shrinks in size.
- The text that you type in a text placeholder box appears in the Outline pane in Outline view.
A manual text box, on the other hand, is one that you create yourself using the Text Box tool in the Text group of the Insert tab. Here are some characteristics of a manual text box:
- You can create a manual text box anywhere, and you can create as many as you like, regardless of the layout.
- If you delete all of the text from a manual text box, the text box remains empty or disappears completely. No placeholder instructions appear.
- A manual text box starts out small vertically, and expands as you type more text into it.
- A manual text box does not use AutoFit by default; the text box simply becomes larger to make room for more text.
- You cannot resize a manual text box so that the text that it contains no longer fits; PowerPoint refuses to make the text box shorter vertically until you delete some text from it. (However, you can decrease its horizontal width.)
- Text typed in a manual text box does not appear in the Outline pane in Outline view.
Figure 21.29 shows two text placeholders (one empty) and a text box in Outline view. Notice that the empty placeholder contains filler text to help you remember that it is there. Notice also that only the text from the placeholder appears in the Outline pane; the text-box text does not. Empty text boxes and placeholders do not show up in Slide Show view, so you do not have to worry about deleting any unneeded ones.
FIGURE 21.29 Two text placeholders and a text box

When should you use a manual text box?
Graphical content such as photos and charts can work well either in placeholders or as manually inserted objects. However, when it comes to text, you should stick with placeholders as often as possible. Placeholder text appears in the Outline pane in Outline view, whereas text in a manually inserted text box does not. When the bulk of a presentation’s text is in manually created text boxes, Outline view becomes less useful because it doesn’t contain the complete presentation text. In addition, when you change to a different formatting theme that includes different positioning for placeholders — for example, to accommodate a graphic on one side — the manual text boxes do not shift. As a result, they might end up overlapping the new background graphic with unattractive results. In a case such as this, you would need to manually go through each slide and adjust the positioning of each text box.
However, there are times when a manually created text box is preferable or even necessary. For example, suppose that you have a schematic diagram of a machine and you need to label some of the parts. Manually placed text boxes are perfect for these little snippets of text that are scattered over the surface of the picture. Manual text boxes are also useful for warnings, tips, and any other information that is tangential to the main discussion. Finally, if you want to vary the placement of the text on each slide (consciously circumventing the consistency provided by layouts), and you want to precisely position each box, then manual text boxes work well because they do not shift their position when you apply different themes or templates to the presentation.
Creating a manual text box
To manually place a text box on a slide, follow these steps:
- To create a text box that automatically enlarges itself horizontally as you type more text, but does not automatically wrap text to the next line, click once where you want the text to start, and begin typing.
- To create a text box with a width that you specify, and that automatically wraps text to the next line and grows in height as needed, click and drag to draw a box where you want the text box to be. Its height will initially snap back to a single line’s height, regardless of the height that you initially draw; however, it will grow in height as you type text into it.
Working with Text Boxes
Text boxes (either placeholder or manual) form the basis of most presentations. Now that you know how to create them, and how to place text in them, let’s take a look at how to manipulate the boxes themselves.
Selecting text boxes
On the surface, this topic might seem like a no-brainer. Just click it, right? Well, almost. A text box has two possible “selected” states. One state is that the box itself is selected, and the other is that the insertion point is within the box. The difference is subtle, but it becomes clearer when you issue certain commands. For example, if the insertion point is in the text box and you press Delete, PowerPoint deletes the single character to the right of the insertion point. However, if you select the entire text box and press Delete, PowerPoint deletes the entire text box and everything in it.
To select the entire text box, click its border. You can tell that it is selected because the border appears as a solid line. To move the insertion point within the text box, click inside the text box. You can tell that the insertion point is there because you can see it flashing inside.
In the rest of this book, when you see the phrase “select the text box,” it means the box itself should be selected, and the insertion point should not appear in it. For most of the upcoming sections it does not make any difference, although in a few cases it does.
You can select more than one text box at once by holding down the Shift key as you click additional text boxes. This technique is useful when you want to select more than one text box, for example, so that you can format them in the same way, or so that you can resize them by the same amount.
Sizing a text box
The basic techniques for sizing text boxes in PowerPoint are the same for every object type (for that matter, they are also the same as in other Office applications). To resize a text box, or any object, follow these steps:
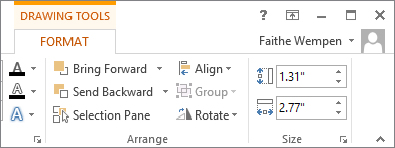
You can also set a text box’s size from the Size group on the Drawing Tools ⇒ Format tab. When the text box is selected, its current dimensions appear in the Height and Width boxes, as shown in Figure 21.30. You can change the dimensions within these boxes.
FIGURE 21.30 You can set an exact size for a text box from the Format tab’s Size group.
You can also set the size of a text box from the Size and Position task pane:
FIGURE 21.31 You can adjust the size of the text box from the Size controls in the Format Shape pane.

Positioning a text box
To move an object, drag it by any part of its border other than a selection handle. Select the object, and then position the mouse pointer over a border so that the pointer turns into a four-headed arrow. Then drag the object to a new position. With a text box, you must position the mouse pointer over a border and not over the inside of the frame; with all other object types, you don’t have to be that precise; you can move an object by dragging anywhere within it.
You can also set an exact position by using the Format Shape task pane:
FIGURE 21.32 You can adjust the position with the Position controls.

Changing a text box’s AutoFit behavior
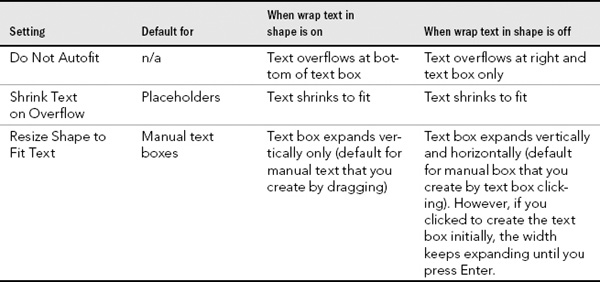
When there is too much text to fit in a text box, there are three things that may happen:
- Do not AutoFit. The text and the box can continue at their default sizes, and the text can overflow out of the box or be truncated.
- Shrink text on overflow. The text can shrink its font size to fit in the text box. This is the default setting for placeholder text boxes.
- Resize shape to fit text. The text box can enlarge to the size needed to contain the text. This is the default setting for manual text boxes.
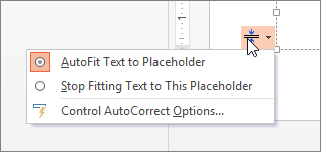
Whenever there is too much text in a placeholder box, the AutoFit icon appears in the bottom-left corner. Click that icon to display a menu, as shown in Figure 21.33. From that menu, you can turn AutoFit on or off. Depending on the text-box type, you might not have all the menu items shown in Figure 21.33.
FIGURE 21.33 You can use the AutoFit icon’s menu to change the AutoFit setting for a text box.
With a manual text box, the AutoFit icon does not appear, and so you must adjust the AutoFit behavior in the text box’s properties. The following method works for both manual and placeholder boxes:
FIGURE 21.34 Click the Text Box icon to change text box options, including AutoFit behavior.

One other setting that also affects AutoFit behavior is the Wrap Text in Shape option. This on/off toggle, which appears as a check box in Figure 21.34, enables text to automatically wrap to the next line when it reaches the right edge of the text box. By default, this setting is On for placeholder text boxes and for manual text boxes that you create by dragging. However, it is Off by default for manual text boxes that you create by clicking.
Table 21.5 summarizes the various AutoFit behaviors and how they interact with one another.
TABLE 21.5 AutoFit and Resize Shape to Fit Text Behaviors
Summary
In this chapter, you mastered core skills such as how to create presentations and add textual content to slides. You can now confidently:
- Create new presentations from scratch and from templates.
- Save, open, close, and delete PowerPoint presentation files.
- Save files in different formats and search for missing presentations.
- Create a new slide with the desired layout.
- Select, rearrange, and delete slides.
- Add text content on a slide and use content from outside sources.
- Understand the difference between a content placeholder and a manually inserted object such as a text box.
- Create and work with your own text boxes.