Chapter 34
Creating Access Tables
IN THIS CHAPTER
Creating a new database
Creating a new table
Navigating in the table
Entering field names and descriptions
Selecting a field data type
Working with field properties
Specifying the primary key
Adding data to a table
Saving a table’s design
In this chapter, you learn how to create a new Access database and its tables. You establish the database container to hold your tables, forms, queries, reports, and code that you build as you learn Access. You learn how to design your table, add the fields, and enter the data next.
The Access Start Screen
If you open Access 2013 (via the Windows 8 Start screen or the Windows 7 Start menu), you’ll see the default Access Start screen shown in Figure 34.1. The Start screen gives you several options for opening an existing Access database or creating a new database.
FIGURE 34.1 The Access welcome screen provides a number of ways to start working with Access.
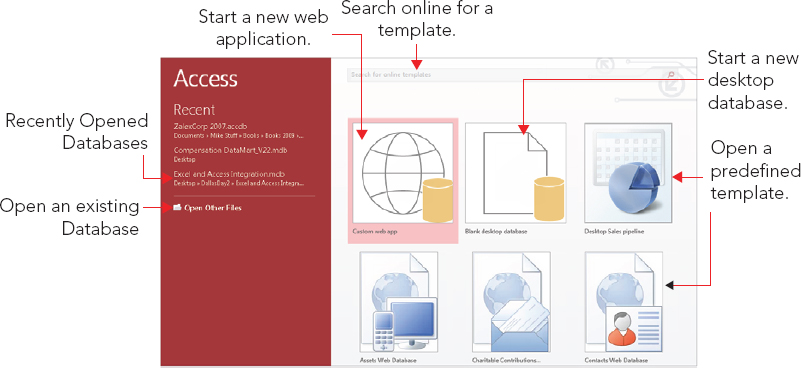
In the upper-left corner of the welcome screen, you’ll notice the Recent section. The files listed here are databases that you’ve previously opened through Access 2013. You can click any of the database files listed there to open them.
Below the Recent section, you’ll see the Open Other Files choice. Click it to browse for and open databases on your computer or network.
At the top of the Start screen, you can search for Access database templates online. These templates are typically starter databases that have various purposes. Microsoft makes them available free of charge.
In the center of the Start screen, you’ll see various predefined templates that you can click on to download and use. Microsoft established the online templates repository as a way to provide people with the opportunity to download partially or completely built Access applications. The template databases cover many common business requirements, such as inventory control and sales management. You may want to take a moment to explore the online templates, but they aren’t covered in this book.
In the center of the Start screen, you’ll also see two tiles: Custom web app and Blank desktop database. These two options allow you to create a database from scratch. If your aim is to create a new Access database that will be used on a PC (either yours or your users’), choose Blank Desktop Database. If you’ll eventually be publishing your Access application via SharePoint, choose the Custom Web App database.
How to Create a Blank Desktop Database
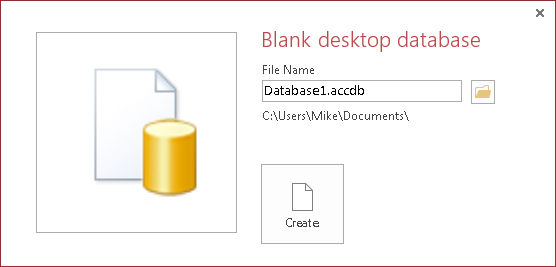
To create a new blank database, you can click Blank desktop database option on the Start screen (refer to Figure 34.1). When you do, the dialog box shown in Figure 34.2 appears, allowing you to specify the name and location of your database. The default location of the new database will be your Documents folder. If you want to use a different folder, click the Browse button (it looks like a File Explorer folder) to the right of the File Name text box to browse to the location you want to use. After you specify the name and save location, click Create.
FIGURE 34.2 Enter the name of the new database in the File Name box.
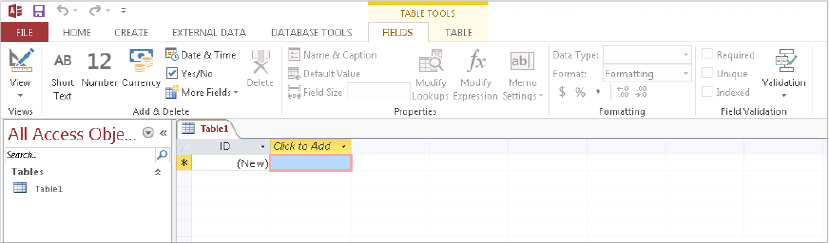
When the new database is created, Access automatically opens it for you. In Figure 34.3, notice that Access opens the new database with a blank table already added to the database, ready to be filled in with fields and other design details.
FIGURE 34.3 Your new database is created.
- Access 2007–2013 .accbd format
- Access 2002–2003 .mdb format
- Access 2000 .mdb format
- Access 97 .mdb format
The Access 2013 Environment
After you create or open a new database, the Access screen will look similar to Figure 34.4. Across the top of the screen is the Ribbon, which was introduced in Access 2007. On the left, you see the Navigation pane. These two components make up the bulk of the Access interface. In addition, you have at your disposal the Quick Access Toolbar, which you can customize with the commands you use most frequently.
FIGURE 34.4 The Access interface includes the Ribbon at the top and the Navigation pane at the left.
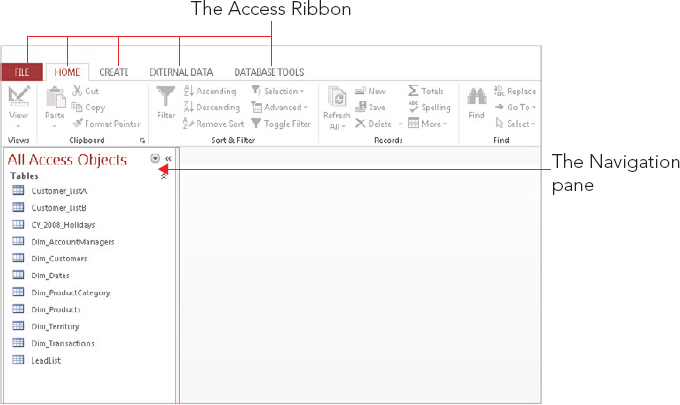
The Navigation pane
The Navigation pane, at the left of the screen, is your primary navigation aid when working with Access. The Navigation pane shows queries, forms, reports, and other Access object types. It can also display a combination of different types of objects.
Click the drop-down list in the Navigation pane’s title bar to reveal the navigation options (see Figure 34.5).
FIGURE 34.5 Choosing an alternate display for the Navigation pane

The navigation options are divided into two categories: Navigate to Category and Filter by Group. First, you choose an option under Navigate to Category, and then you choose an option under Filter by Group. The Filter By Group options you’re presented with depend on the Navigate to Category option you select. We cover each of the Navigate to Category options in the following sections, along with the corresponding Filter by Group options.
- Custom: The Custom option creates a new tab in the Navigation pane. This new tab is titled Custom Group 1 by default and contains objects that you drag and drop into the tab’s area. Items added to a custom group still appear in their respective object type view, as described in the next bullet. When you select Custom, the Filter By Group category is populated with all the custom groups you’ve previously created. You can use the Filter By Group category to filter to any of the created custom groups.
- Object Type: The Object Type option is most similar to previous versions of Access. When you select Object Type, the following choices appear under Filter By Group: Tables, Queries, Forms, Reports, and All Access Objects. By default, the Navigation pane shows all objects in the current database. Select All Access Objects when you’ve been working with one of the filtered views and want to see every object in the database.
- Tables and Related Views: The Tables and Related Views option requires a bit of explanation. Access tries very hard to keep the developer informed of the hidden connections between objects in the database. For example, a particular table may be used in a number of queries or referenced from a form or report. In previous versions of Access, these relationships were very difficult to determine, and no effective tool was built into Access to help you understand these relationships. Selecting Tables and Related Views allows you to understand which objects are affected by each table. When you select Tables and Related Views, the Filter By Group category is populated with the objects in your database. Clicking each object in the Filter By Group category will filter the list to that object and all the other dependent and precedent objects related to it.
- Created Date and Modified Date: This option groups the database objects by the created date or modified date, under these groups: Today, Yesterday, Last Week, Two Weeks Ago, and Older. This setting is useful when you need to know when an object was created or last modified.
The Ribbon
The Ribbon occupies the top portion of the main Access screen and is divided into five tabs, each tab containing any number of controls and commands (refer to Figure 34.5):
- File: When you click the File tab, the Backstage view opens. Backstage view contains a number of options for creating databases, opening databases, saving databases, and configuring databases.
- Home: The theme of the Home tab is “frequently used.” Here, you find generally unrelated commands that are repeatedly called upon during the course of working with Access.
- Create: The Create tab contains commands that create the various objects in Access. This tab is where you’ll spend most of your time. Here, you can initiate the creation of tables, queries, forms, reports, and macros. As you read this part of the book, you’ll be using the Create tab all the time.
- External Data: The External Data tab is dedicated to integrating Access with other sources of data. On this tab, you find commands that allow you to import and export data, establish connections to outside databases, and work with SharePoint or other platforms.
- Database Tools: The Database Tools tab contains the commands that deal with the inner workings of your database. Here, you find tools to create relationships between tables, analyze the performance of your database, document your database, and compact and repair your database.
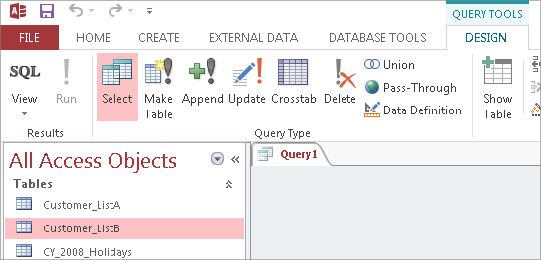
In addition to the standard five tabs on the Access Ribbon, you’ll also see contextual tabs. Contextual tabs are special types of tabs that appear only when a particular object is selected. For example, when you’re working with the query builder, you’ll see the Query Tools ⇒ Design tab shown in Figure 34.6.
FIGURE 34.6 Contextual tabs contain commands that are specific to whichever object is active.
Creating a new table
Creating database tables is as much art as it is science. Acquiring a good working knowledge of the user’s requirements is a fundamental step for any new database project.
It’s always a good idea to plan tables on paper first, before you use the Access tools to add tables to the database. Many tables, especially small ones, really don’t require a lot of forethought before adding them to the database. After all, not much planning is required to design a table holding lookup information, such as the names of cities and states. However, more complex entities, such as customers and products, usually require considerable thought and effort to implement properly.
Although you can create the table interactively without any forethought, carefully planning a database system is a good idea. You can make changes later, but doing so wastes time; generally, the result is a system that’s harder to maintain than one that you’ve planned well from the beginning.
The importance of naming conventions
Most Access developers eventually adopt a naming convention to help identify database objects. Most naming conventions are relatively simple and involve nothing more than adding a prefix indicating an object’s type to the object’s name. For example, an employee’s form might be named frmEmployees.
As your databases grow in size and complexity, the need to establish a naming convention for the objects in your databases increases. Even with the Name AutoCorrect option turned on (click File ⇒ Options ⇒ Current Database ⇒ Name AutoCorrect), Access only corrects the most obvious name changes. Changing the name of a table breaks virtually every query, form, and report that uses the information from that table. Your best defense is to adopt reasonable object names, use a naming convention early on as you begin building Access databases, and stick with the naming convention throughout the project.
Access imposes very few restrictions on the names assigned to database objects. Therefore, it’s entirely possible to have two distinctly different objects (for example, a form and a report, or a table and a macro) with the same name. (You can’t, however, have a table and a query with the same name, because tables and queries occupy the same namespace in the database.)
Although simple names like Contacts and Orders are adequate, as a database grows in size and complexity, you might be confused about which object a particular name refers to. For example, when working with Visual Basic for Applications (VBA), the programming language built into Access, there must be no ambiguity or confusion between referenced objects. Having both a form and a report named Contacts might be confusing to you and your code.
The simplest naming convention is to prefix object names with a three- or four-character string indicating the type of object carrying the name. Using this convention, tables are prefixed with tbl and queries with qry. The generally accepted prefixes for forms, reports, macros, and modules are frm, rpt, mcr, and bas or mod, respectively.
In this book, most compound object names appear in camel case: tblBookOrders, tblCustomers, and so on. Most people find camel-case names easier to read and remember than names that appear in all-uppercase or all-lowercase characters (such as TBLBOOKORDERS or tblbookorders).
Also, at times, we use informal references for database objects. For example, the formal name of the table containing contact information in the previous examples is tblContacts. An informal reference to this table might be “the Contacts table.”
In most cases, your users never see the formal names of database objects. One of your challenges as an application developer is to provide a seamless user interface that hides all data-management and data-storage entities that support the user interface. You can easily control the text that appears in the title bars and surfaces of the forms, reports, and other user-interface components to hide the actual names of the data structures and interface constituents.
Access allows table names up to 64 characters. Take advantage of this to give your tables, queries, forms, and reports descriptive, informative names. There is no reason why you should confine a table name to BkOrd when tblBookOrders is handled just as easily and is much easier to understand.
Descriptive names can be carried to an extreme, of course. There’s no point in naming a form frmUpdateContactInformation if frmUpdateInfo does just as well. Long names are more easily misspelled or misread than shorter names, so use your best judgment when assigning names.
Although Access lets you use spaces in database object names, you should avoid spaces at all costs. Spaces don’t add to readability and can cause major headaches, particularly when upsizing to client/server environments or using OLE automation with other applications. Even if you don’t anticipate extending your Access applications to client/server or incorporating OLE or DDE automation into your applications, get into the habit of not using spaces in object names.
Finally, you can use some special characters, like an underscore, in your table names. Some developers use an underscore to separate words in a table name as part of a larger naming convention. Unless you use a specific convention that includes special characters, you should avoid them.
Designing tables
Designing a table is a multistep process. By following the steps in order, your table design can be created readily and with minimal effort:
Generally speaking, some tables are never really finished. As users’ needs change or the business rules governing the application change, you might find it necessary to open an existing table in Design view. This book, like most books on Access, describes the process of creating tables as if every table you ever work on is brand new. The truth is, however, that most of the work that you do on an Access application is performed on existing objects in the database. Some of those objects you’ve added yourself, while other objects may have been added by another developer at some time in the past. However, the process of maintaining an existing database component is exactly the same as creating the same object from scratch.
Adding a new table to the database
Begin by selecting the Create tab on the Ribbon. The Create tab (shown in Figure 34.7) contains all the tools necessary to create not only tables, but also forms, reports, and other database objects.
FIGURE 34.7 The Create tab contains tools necessary for adding new objects to your Access database.

There are two main ways to add new tables to an Access database from the Tables group on the Create tab:
- Clicking the Table button: Adds a table in Datasheet view to the database with one AutoNumber field named ID.
- Clicking the Table Design button: Adds a table in Design view to the database.
The later example was created using the Table Design button, but first, let’s take a look at the Table button.
Clicking the Table button adds a new table to the Access environment. The new table appears in Datasheet view in the area to the right of the Navigation Pane. The new table is shown in Figure 34.8. Notice that the new table appears in Datasheet view, with an ID column already inserted and a Click to Add column to the right of the ID field.
FIGURE 34.8 The new table in Datasheet view

The Click to Add column is intended to permit users to quickly add fields to a table. All you have to do is begin entering data in the new column. You assign the field a name by right-clicking the field’s heading, selecting Rename Field, entering a name for the field, and pressing Enter. In other words, building an Access table can be very much like creating a worksheet in Excel. This approach is usually referred to as “creating a table in Datasheet view.”
Once you’ve added the new column, the tools on the Table Tools ⇒ Fields tab of the Ribbon (shown in Figure 34.9) allow you to set the specific data type for the field, along with its formatting, validation rules, and other properties.
FIGURE 34.9 Field design tools are located on the Table Tools ⇒ Fields tab of the Ribbon.

The second method of adding new tables is to click the Table Design button in the Tables group on the Create tab. Access opens a new table in Design view, allowing you to add fields to the table’s design. Figure 34.10 shows a new table’s design after a few fields have been added. Table Design view provides a somewhat more deliberate approach to building Access tables.
FIGURE 34.10 A new table added in Design view
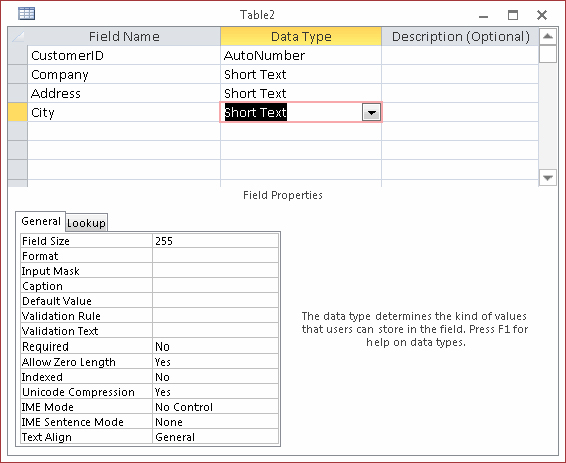
The Table Designer is quite easy to understand, and each column is clearly labeled. At the far left is the Field Name column, where you input the names of fields you add to the table. You assign a Data Type to each field in the table and (optionally) provide a Description for the field in the columns of those names.
For example, say you wanted to create the Customers table for a Collectible Mini Cars database. The basic field design for this table is outlined in Table 34.1. The “Creating an Example Table” section, later in this chapter, gives an overview of how to create a table, mentioning the fields in Table 34.1 as an example. If desired, you can practice creating a table using the fields listed in Table 34.1.
TABLE 34.1 The Collectible Mini Cars Customers Table Fields
| Field name | Data type | Description |
| CustomerID | AutoNumber | Primary key |
| Company | Short Text | Contact’s employer or other affiliation |
| Address | Short Text | Contact’s address |
| City | Short Text | Contact’s city |
| State | Short Text | Contact’s state |
| ZipCode | Short Text | Contact’s zip code |
| Phone | Short Text | Contact’s phone |
| Fax | Short Text | Contact’s fax |
| Short Text | Contact’s e-mail address | |
| WebSite | Short Text | Contact’s web address |
| OrigCustDate | DateTime | Date the contact first purchased something from Collectible Mini Cars |
| CreditLimit | Currency | Customer’s credit limit in dollars |
| CurrentBalance | Currency | Customer’s current balance in dollars |
| CreditStatus | Short Text | Description of the customer’s credit status |
| LastSalesDate | DateTime | Most recent date the customer purchased something from Collectible Mini Cars |
| TaxRate | Number (Double) | Sales tax applicable to the customer |
| DiscountPercent | Number (Double) | Customary discount provided to the customer |
| Notes | Long Text | Notes and observations regarding this customer |
| Active | Yes/No | Whether the customer is still buying or selling to Collectible Mini Cars |
The Short Text fields in the preceding table use the default 255 character Field Size. While it’s unlikely that anyone’s name will occupy 255 characters, there’s no harm in providing for very long names. Access only stores as many characters as are actually entered into a text field. So, allocating 255 characters doesn’t actually use 255 characters for every name in the database.
Looking once again at Figure 34.10, you see that the Table Design window consists of two areas:
- The Field Entry Area: Use the field entry area, at the top of the window, to enter each field’s name and data type. You can also enter an optional description. “Specifying a data type” later in this chapter explains the various data types.
- The Field Properties Area: The area at the bottom of the window is where the field’s properties are specified. These properties include Field Size, Format, Input Mask, and Default Value, among others. The actual properties displayed in the properties area depend upon the data type of the field.
Using the Table Tools ⇒ Design tab
The Table Tools ⇒ Design tab shown in Figure 34.11 contains many controls that assist in creating a new table definition.
FIGURE 34.11 The Design tab of the Ribbon

The controls on the Design tab affect the important table design considerations. Only a few of the controls shown in Figure 34.11 are described in the following sections. You’ll learn much more about the other buttons in the “Creating an Example Table” section later in this chapter.
Primary Key
Click this button in the Tools group to designate which of the fields in the table you want to use as the table’s primary key. Traditionally, the primary key appears at the top of the list of fields in the table, but it could appear anywhere within the table’s design.
Although it makes very little difference to the database engine, many developers are fussy about the sequence of fields in a table. Many of the wizards in Access display the fields in the same order as the table. Keeping an address field above a city field, for example, can make development easier.
Clicking the Insert Rows button in the Tools group inserts a blank row just above the position occupied by the insertion point. For example, if the insertion point is currently in the second row of the Table Designer, clicking the Insert Row button inserts an empty row in the second position, moving the existing second row to the third position.
Delete Rows
Clicking the Delete Rows button in the Tools group removes a row from the table’s design.
Property Sheet
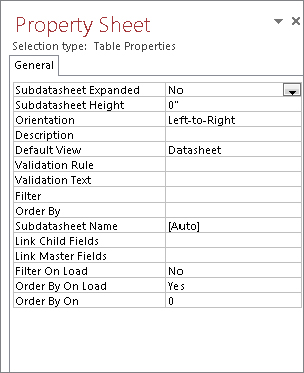
Clicking the Property Sheet button in the Show/Hide group opens the table’s Property Sheet (shown in Figure 34.12). These properties enable you to specify important table characteristics, such as a validation rule to apply to the entire table, or an alternate sort order for the table’s data.
FIGURE 34.12 The Property Sheet
Indexes
Indexes are discussed in much more detail in the “Indexing Access Tables” section, later in this chapter. Clicking the Indexes button in the Show/Hide group opens the Indexes dialog box, which enables you to specify the details of indexes on the fields in your table.
Working with fields
You create fields by entering a field name and a field data type in the upper entry area of the Table Design window. The (optional) Description property indicates the field’s purpose. The description appears in the status bar at the bottom of the screen during data entry and may be useful to people working with the application. After entering each field’s name and data type, you can further specify how each field is used by entering properties in the property area.
Naming a field
A field name should be descriptive enough to identify the field to you as the developer, to the user of the system, and to Access. Field names should be long enough to quickly identify the purpose of the field, but not overly long. (Later, as you enter validation rules or use the field name in a calculation, you’ll want to save yourself from typing long field names.)
To enter a field name, position the pointer in the first row of the Table Design window under the Field Name column. Then type a valid field name, observing these rules:
- Field names can be from 1 to 64 characters in length.
- Field names can include letters, numbers, and many special characters.
- Field names can include spaces. Spaces should be avoided in field names for some of the same reasons you avoid them in table names.
- Field names can’t include a period (.), exclamation point (!), brackets ([ ]), or accent grave (‘).
- You can’t use low-order ASCII characters — for example Ctrl+J or Ctrl+L (ASCII values 0 through 31).
- You can’t start with a blank space.
- You can’t use a double quotation mark (“”) in the name of a Microsoft Access project file.
You can enter field names in uppercase, lowercase, or mixed case. If you make a mistake while typing the field name, position the insertion point where you want to make a correction and type the change. You can change a field name at any time, even if the table contains data.
Specifying a data type
When you enter a field, you must also decide what type of data each of your fields will hold. In Access, you can choose any of several data types. The available data types are shown in Table 34.2.
TABLE 34.2 Data Types Available in Microsoft Access
| Data type | Type of data stored | Storage size |
| Short Text | Alphanumeric characters | 255 characters or less |
| Long Text | Alphanumeric characters | 1GB of characters or less |
| Number | Numeric values | 1, 2, 4, or 8 bytes; 16 bytes for Replication ID (GUID) |
| Date/Time | Date and time data | 8 bytes |
| Currency | Monetary data | 8 bytes |
| AutoNumber | Automatic number increments | 4 bytes; 16 bytes for Replication ID (GUID) |
| Yes/No | Logical values: Yes/No, True/False | 1 bit (0 or −1) |
| OLE Object | Pictures, graphs, sound, video | Up to 1GB (disk space limitation) |
| Hyperlink | Link to an Internet resource | 1GB of characters or less |
| Attachment | A special field that enables you to attach external files to an Access database | Varies by attachment |
| Lookup Wizard | Displays data from another table | Generally 4 bytes |
Figure 34.13 shows the Data Type drop-down list used to select the data type for the field you just created.
FIGURE 34.13 The Data Type drop-down list
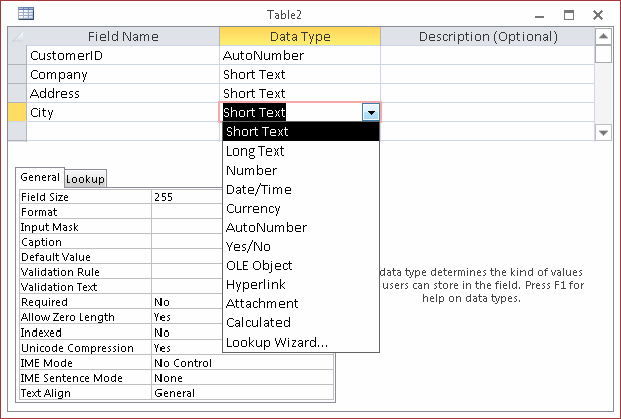
One of these data types must be assigned to each of your fields. Some of the data types have additional options, such as Field Size for Short Text fields and Number fields.
Here are the basic questions to consider when choosing the data type for new fields in your tables:
- What is the data type? The data type should reflect the data stored in the field. For example, you should select one of the numeric data types to store numbers like quantities and prices. Don’t store data like phone numbers or Social Security numbers in numeric fields, however; your application won’t be performing numeric operations like addition or multiplication on phone numbers. Instead, use text fields for common data, such as Social Security numbers and phone numbers.
- What are the storage requirements of the data type you’ve selected? Although you can use the Long Integer data type in place of Integer or Byte, the storage requirements of Long Integer (4 bytes) is twice that of Integer. This means that twice as much memory is required to use and manipulate the number and twice as much disk space is required to store its value. Whenever possible, use Byte or Integer data types for simple numeric data.
- Will you want to sort or index the field? Because of their binary nature, Long Text and OLE Object fields can’t be sorted or indexed. Use Long Text fields sparingly. The overhead required to store and work with Long Text fields is considerable.
- What is the impact of the data type on sorting requirements? Numeric data sorts differently from sorting text data. Using the numeric data type, a sequence of numbers will sort as expected: 1, 2, 3, 4, 5, 10, 100. The same sequence stored as text data will sort like this: 1, 10, 100, 2, 3, 4, 5. If it’s important to sort text data in a numeric sequence, you’ll have to first apply a conversion function to the data before sorting.
- Is the data text or date data? When working with dates, you’re almost always better off storing the data in a Date/Time field than as a Short Text field. Text values sort differently from dates (dates are stored internally as numeric values), which can upset reports and other output that rely on chronological order.
- Don’t be tempted to store dates in one Date/Time field and time in another Date/Time field. The Date/Time field is specifically designed to handle both dates and times, and, as you’ll see throughout this book, it’s quite easy to display only the date or time portion of a Date/Time value.
- A Date/Time field is also meant to store a discrete date and time, and not a time interval. If keeping track of durations is important, you could use two Date/Time fields — one to record the start and the other at the end of a duration — or one Long Integer field to store the number of elapsed second, minutes, hours, and so forth.
- What reports will be needed? You won’t be able to sort or group memo or OLE data on a report. If it’s important to prepare a report based on memo or OLE data, add a Tag field like a date or sequence number, which can be used to provide a sorting key, to the table.
Short Text data type
The Short Text data type holds information that is simply characters (letters, numbers, punctuation). Names, addresses, and descriptions are all text data, as are numeric data that are not used in a calculation (such as telephone numbers, Social Security numbers, and zip codes).
Although you specify the size of each Short Text field in the property area, you can enter no more than 255 characters of data in any Short Text field. Access uses variable length fields to store text data. If you designate a field to be 25 characters wide and you use only 5 characters for each record, then only enough room to store 5 characters is used in your database.
You’ll find that the .accdb database file might quickly grow quite large, but text fields are not the usual cause. However, it’s good practice to limit Short Text field widths to the maximum you believe is likely for the field. Names can be quite tricky because fairly long names are common in some cultures. However, it’s a safe bet that a postal code will be less than 12 characters, while a U.S. state abbreviation is always 2 characters. By limiting a Short Text field’s width, you also limit the number of characters users can enter when the field is used in a form.
Long Text data type
The Long Text data type holds a variable amount of data up to 1GB. Long Text fields use only as much memory as necessary for the data stored. So, if one record uses 100 characters, another requires only 10, and yet another needs 3,000, you use only as much space as each record requires.
You don’t specify a field size for the Long Text data type. Access allocates as much space as necessary for the data.
Number data type
The Number data type enables you to enter numeric data — that is, numbers that will be used in mathematical calculations or represent scalar quantities such as inventory counts. (If you have data that will be used in monetary calculations, you should use the Currency data type, which performs calculations without rounding errors.)
The exact type of numeric data stored in a number field is determined by the Field Size property. Table 34.3 lists the various numeric data types, their maximum and minimum ranges, the decimal points supported by each numeric data type, and the storage (bytes) required by each numeric data type.
TABLE 34.3 Numeric Field Settings
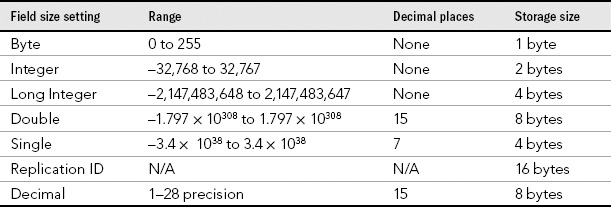
Design your tables very conservatively, and allow for larger values than you ever expect to see in your database. This is not to say that using the Double data type for all numeric fields is a good idea. The Double data type is very large (8 bytes) and might be somewhat slow when used in calculations or other numeric operations. Instead, the Single data type is probably best for most floating-point calculations, and Long Integer is a good choice where decimal points are irrelevant.
Date/Time data type
The Date/Time data type is a specialized number field for holding dates or times (or dates and times). When dates are stored in a Date/Time field, it’s easy to calculate days between dates and other calendar operations. Date data stored in Date/Time fields sort and filter properly as well. The Date/Time data type holds dates from January 1, 100, to December 31, 9999.
Currency
The Currency data type is another specialized number field. Currency numbers are not rounded during calculations and preserve 15 digits of precision to the left of the decimal point and 4 digits to the right. Because Currency fields use a fixed decimal point position, they’re faster in numeric calculations than doubles.
AutoNumber
The AutoNumber field is another specialized Number data type. When an AutoNumber field is added to a table, Access automatically assigns a long integer (32-bit) value to the field (beginning at 1) and increments the value each time a record is added to the table. Alternatively (determined by the New Values property), the value of the AutoNumber field is a random integer that is automatically inserted into new records.
Only one AutoNumber field can appear in a table. Once assigned to a record, the value of an AutoNumber field can’t be changed programmatically or by the user. AutoNumber fields are stored as a Long Integer data type and occupy 4 bytes. The range of possible values for AutoNumber fields is from 1 to 4,294,967,296 — more than adequate as the primary key for most tables.
Yes/No fields accept only one of two possible values. Internally stored as 1 (Yes) or 0 (No), the Yes/No field is used to indicate yes/no, on/off, or true/false. A Yes/No field occupies a single bit of storage.
OLE Object
The OLE Object field stores OLE data, highly specialized binary objects such as Word documents, Excel spreadsheets, sound or video clips, and images. The OLE object is created by an application that Windows recognizes as an OLE server and can be linked to the parent application or embedded in the Access table. OLE objects can only be displayed in bound object frames in Access forms and reports. OLE fields can’t be indexed.
Attachment
The Attachment data type was introduced in Access 2007. In fact, the Attachment data type is one of the reasons Microsoft changed the format of the Access data file. The older MDB format is unable to accommodate attachments.
The Attachment data type is relatively complex, compared to the other types of Access fields, and it requires a special type of control when displayed on Access forms. For details on this interesting type of field, turn to “Understanding Attachment Fields,” later in this chapter.
Hyperlink data type
The Hyperlink data type field holds combinations of text and numbers stored as text and used as a hyperlink address. It can have up to three parts:
- The text that appears in a control (usually formatted to look like a clickable link)
- The Internet address — the path to a file or web page
- Any sub-address within the file or page. An example of a sub-address is a picture on a web page. Each part of the hyperlink’s address is separated by the pound sign (#).
Access hyperlinks can even point to forms and reports in other Access databases. This means that you can use a hyperlink to open a form or report in an external Access database and display the form or report on the user’s computer.
Lookup Wizard
The Lookup Wizard data type inserts a field that enables the end-user to choose a value from another table or from the results of a SQL statement. The values may also be presented as a combo box or list box. At design time, the Lookup Wizard leads the developer through the process of defining the lookup characteristics when this data is assigned to a field.
As you drag an item from the Lookup Wizard field list, a combo box or list box is automatically created on the form. The list box or combo box also appears on a query data sheet that contains the field.
Entering a field description
The field description is completely optional; you use it only to help you remember a field’s uses or to let another developer understand the field’s purpose. Often, you don’t use the Description column at all, or you use it only for fields whose purpose is not obvious. If you enter a field description, it appears in the status bar whenever you use that field in Access — in the datasheet or in a form. The field description can help clarify a field whose purpose is ambiguous or give the user a more complete explanation of the appropriate values for the field during data entry.
Specifying data validation rules
The last major design decision concerns data validation, which becomes important as users enter data. You want to make sure that only good data (data that passes certain defined tests) gets into your system. You have to deal with several types of data validation. You can test for known individual items, stipulating that the Gender field can accept only the values Male, Female, or Unknown, for example. Or you can test for ranges, specifying that the value of Weight must be between 0 and 1,500 pounds.
Creating an Example Table
Working with the different data types, you should be ready to create a first table. If you want, you can create the fields presented in Table 34.1 for the tblCustomers (Customers) table.
Using AutoNumber fields
Access gives special considerations to AutoNumber fields. You can’t change a previously defined field from another type to AutoNumber if any data has been added to the table. If you try to change an existing field to an AutoNumber, you’ll see an error that says:
Once you enter data in a table, you can’t change the data type of any field to AutoNumber, even if you haven’t yet added data to that field.You’ll have to add a new AutoNumber field and begin working with it instead of changing an existing field to AutoNumber.
Completing the table
Once you create a new table in Design view, you’re ready to add its fields. Table 34.1, shown earlier in this chapter, lists the field definitions for the example tblCustomers table. If you want to work with those example fields, enter the field names and data types as shown in Table 34.1. The next few pages explain how to change existing fields (which includes rearranging the field order, changing a field name, and deleting a field).
Here are the steps for adding a field to a table structure in Design view:
Repeat each of these steps to create each of the data entry fields for your table (or the example tblCustomers table). You can press the Down Arrow key to move between rows, or use the mouse and click on any row. Pressing F6 switches the focus from the top to the bottom of the Table Design window, and vice versa.
Setting the Primary Key
Every table should have a primary key — one or a combination of fields with a unique value for each record. (This principle is called entity integrity in the world of database management.) In tblCustomers, the CustomerID field is the primary key. Each customer has a unique CustomerID value so that the database engine can distinguish one record from another. CustomerID 17 refers to one and only one record in the Contacts table. If you don’t specify a primary key (unique value field), Access can create one for you.
Choosing a primary key
Without a field such as the CustomerID field in the example table, you’d have to rely on another field or combination of fields for uniqueness. You couldn’t use the Company field because two customers could easily have the same company name. In fact, you couldn’t even use the Company and City fields together (in a multi-field key), for the same reason — it’s entirely possible that two customers with the same name exist in the same city. You need to come up with a field or combination of fields that makes every record unique.
The easiest way to solve this problem is to add an AutoNumber field to serve as the table’s primary key. The primary key in tblCustomers is CustomerID, an AutoNumber field.
If you don’t designate a field as a primary key, Access can add an AutoNumber field and designate it as the table’s primary key. AutoNumber fields make very good primary keys because Access creates the value for you, the number is never reused within a table, and you can’t change the value of an AutoNumber field.
Good primary keys:
- Uniquely identify each record
- Cannot be null
- Must exist when the record is created
- Must remain stable (You should never change a primary key value once it’s established.)
- Should be simple and contain as few attributes as possible
In addition to uniquely identifying rows in a table, primary keys provide other benefits:
- A primary key is always an index.
- An index maintains a presorted order of one or more fields that greatly speeds up queries, searches, and sort requests.
- When you add new records to your table, Access checks for duplicate data and doesn’t allow any duplicates for the primary key field.
By default, Access displays a table’s data in the order of its primary key.
By designating a field such as CustomerID as the primary key, data is displayed in a meaningful order. In our example, because the CustomerID field is an AutoNumber, its value is assigned automatically by Access in the order that a record is put into the system.
The ideal primary key is, then, a single field that is immutable and guaranteed to be unique within the table. For these reasons, the example Collectible Mini Cars database uses the AutoNumber field exclusively as the primary key for all tables.
Creating the primary key
The primary key can be created in any of three ways. With a table open in Design view:
- Select the field to be used as the primary key and click the Primary Key button (the key icon) in the Tools group on the Design tab of the Ribbon.
- Right-click the field and select Primary Key from the shortcut menu.
- Save the table without creating a primary key, and allow Access to automatically create an AutoNumber field.
After you designate the primary key, a key icon appears in the gray selector area to the left of the field’s name to indicate that the primary key has been created.
Creating composite primary keys
You can designate a combination of fields to be used as a table’s primary key. Such keys are often referred to as composite primary keys. As indicated in Figure 34.14, select the fields that you want to include in the composite primary key; then click the Primary Key button in the Tools group of the Design tab of the Ribbon. It helps, of course, if the fields lie right next to each other in the table’s design.
FIGURE 34.14 Creating a composite primary key

Composite primary keys are primarily used when the developer strongly feels that a primary key should be comprised of data that occurs naturally in the database. There was a time when all developers were taught that every table should have a natural primary key (data that occurs naturally in the table).
Composite primary keys are seldom used these days because developers have come to realize that data is highly unpredictable. Even if your users promise that a combination of certain fields will never be duplicated in the table, things have a way of turning out differently from planned. Using a surrogate primary key (a key field that does not naturally occur in the table’s data, such as a Social Security Number or Employee ID), such as an AutoNumber, separates the table’s design from the table’s data. The problem with natural primary keys is that, eventually, given a large enough data set, the values of fields chosen as the table’s primary key are likely to be duplicated.
Furthermore, when using composite keys, maintaining relationships between tables becomes more complicated because the fields comprising the primary key must be duplicated in all the tables containing related data. Using composite keys simply adds to the complexity of the database without adding stability, integrity, or other desirable features.
Indexing Access Tables
Data is rarely, if ever, entered into tables in a meaningful order. Usually, records are added to tables in random order (with the exception of time-ordered data). For example, a busy order-entry system will gather information on a number of different customer orders in a single day. Most often, this data will be used to report orders for a single customer for billing purposes or for extracting order quantities for inventory management. The records in the Orders table, however, are in chronological order, which is not necessarily helpful when preparing reports detailing customer orders. In that case, you’d rather have data entered in customer ID order.
To further illustrate this concept, consider the Rolodex card file many people use to store names, addresses, and phone numbers. Assume for a moment that the cards in the file were fixed in place. You could add new cards, but only to the end of the card file. This limitation would mean that “Jones” might follow “Smith,” which would in turn be followed by “Baker.” In other words, there is no particular order to the data stored in this file.
An unsorted Rolodex like this would be very difficult to use. You’d have to search each and every card looking for a particular person, a painful and time-consuming process. Of course, this isn’t how you use address card files. When you add a card to the file, you insert it into the Rolodex at the location where it logically belongs. Most often, this means inserting the card in alphabetical order, by last name, into the Rolodex.
Records are added to Access tables as described in the fixed card file example earlier. New records are always added to the end of the table, rather than in the middle of the table where they may logically belong. However, in an order-entry system, you’d probably want new records inserted next to other records on the same customer. Unfortunately, this isn’t how Access tables work. The natural order of a table is the order in which records were added to the table. This order is sometimes referred to as entry order or physical order to emphasize that the records in the table appear in the order in which they were added to the table.
Using tables in natural order is not necessarily a bad thing. Natural order makes perfect sense if the data is rarely searched or if the table is very small. Also, there are situations where the data being added to the table is highly ordered to start with. If the table is used to gather sequential data (like readings from an electric meter) and the data will be used in the same sequential order, there is no need to impose an index on the data.
But for situations where natural order doesn’t suffice, Access provides indexing to help you find and sort records faster. You specify a logical order for the records in a table by creating an index on that table. Access uses the index to maintain one or more internal sort orders for the data in the table. For example, you may choose to index the LastName field that will frequently be included in queries and sorting routines.
Access uses indexes in a table as you use an index in a book: To find data, Access looks up the data’s location in the index. Most often, your tables will include one or more simple indexes. A simple index is one that involves a single field in the table. Simple indexes may arrange the table’s records in ascending or descending order. Simple indexes are created by setting the field’s Indexed property to one of the following values:
- Yes (Duplicates OK)
- Yes (No Duplicates)
By default, Access fields are not indexed, but it’s hard to imagine a table that doesn’t require some kind of index. The next section discusses why indexing is important to use in Access tables.
The importance of indexes
Microsoft’s data indicates that more than half of all tables in Access databases contain no indexes. This number doesn’t include the tables that are improperly indexed — it includes only those tables that have no indexes at all. It appears that a lot of people don’t appreciate the importance of indexing the tables in an Access database.
In a number of repeated tests, the indexed table consistently finds a word in less than 20 milliseconds, while the unindexed search takes between 200 and 350 milliseconds. It goes without saying that the actual time required to run a query depends very much on the computer’s hardware, but performance enhancements of 500 percent and more are not at all uncommon when adding an index to a field.
Because an index means that Access maintains an internal sort order on the data contained in the indexed field, you can see why query performance is enhanced by an index. You should index virtually every field that is frequently involved in queries or is frequently sorted on forms or reports.
Without an index, Access must search each and every record in the database looking for matches. This process is called a table scan and is analogous to searching through each and every card in a Rolodex file to find all the people who work for a certain company. Until you reach the end of the deck, you can’t be sure you’ve found every relevant card in the file.
As mentioned earlier in this chapter, a table’s primary key field is always indexed. This is because the primary key is used to locate records in the table. Indexing the primary key makes it much easier for Access to find the required tables in either the current table or a foreign table related to the current table. Without an index, Access has to search all records in the related table to make sure it has located all the related records.
Multiple-field indexes
Multiple-field indexes (also called composite indexes) are easy to create. In Design view, click the Indexes button in the Show/Hide group of the Design tab or choose View ⇒ Indexes. The Indexes dialog box (shown in Figure 34.15) appears, allowing you to specify the fields to include in the index.
FIGURE 34.15 Multiple-field (composite) indexes can enhance performance.

Enter a name for the index (CityState in Figure 34.15) and tab to the Field Name column. Use the drop-down list to select the fields to include in the index. In this example City and State are combined as a single index. Any row appearing immediately below this row that does not contain an index name is part of the composite index. Access considers both these fields when creating the sort order on this table, speeding queries and sorting operations that include both the City and State fields.
As many as ten fields can be included in a composite index. As long as the composite index is not used as the table’s primary key, any of the fields in the composite index can be empty.
Figure 34.16 shows how to set the properties of an index. The insertion point is placed in the row in the Indexes dialog box containing the name of the index. Notice the three properties appearing below the index information in the top half of the Indexes dialog box.
FIGURE 34.16 It’s easy to set the properties of an index.

The index properties are quite easy to understand (these properties apply to single-field and composite indexes equally):
- Primary: When set to Yes, Access uses this index as the table’s primary key. More than one field can be designated as the primary key, but keep the rules governing primary keys in mind, particularly those requiring each primary key value to be unique and that no field in a composite primary key can be empty. The default for the Primary property is No.
- Unique: When set to Yes, the index must be unique within a table. A Social Security number field is a good candidate for a unique index because the application’s business rules may require one and only one instance of a Social Security number in the table. In contrast, a last name field should not be uniquely indexed, because many last names, like Smith and Jones, are very common, and having a unique index on the last name field will only cause problems.
- Ignore Nulls: If a record’s index field contains a null value (which happens in a composite index only if all fields in the composite index are null) the record’s index won’t contribute anything to the overall indexing. In other words, unless a record’s index contains some kind of value, Access doesn’t know where to insert the record in the table’s internal index sort lists. Therefore, you might want to instruct Access to ignore a record if the index value is null. By default, the Ignore Nulls property is set to No, which means Access inserts records with a Null index value into the indexing scheme along with any other records containing Null index values.
You should test the impact of the index properties on your Access tables and use the properties that best suit the data handled by your databases.
A field can be both the primary key for a table and part of a composite index. You should index your tables as necessary to yield the highest possible performance without worrying about over-indexing or violating some arcane indexing rules. For example, in a database such as Collectible Mini Cars, the invoice number in tblSales is frequently used in forms and reports and should be indexed. In addition, there are many situations in which the invoice number is used in combinations with other fields, such as the sales date or salesperson ID. You should consider adding composite indexes combining the invoice number with sales date, and salesperson ID, to the sales table.
When to index tables
Depending on the number of records in a table, the extra overhead of maintaining an index may not justify creating an index beyond the table’s primary key. Though data retrieval is somewhat faster than it is without an index, Access must update index information whenever you enter or change records in the table. In contrast, changes to nonindexed fields do not require extra file activity. You can retrieve data from nonindexed fields as easily (although not as quickly) as from indexed fields.
Generally speaking, it’s best to add secondary indexes when tables are quite large and when indexing fields other than the primary key speeds up searches. Even with large tables, however, indexing can slow performance if the records in tables will be changed often or new records will be added frequently. Each time a record is changed or added, Access must update all indexes in the table.
Given all the advantages of indexes, why not index everything in the table? What are the drawbacks of indexing too many fields? Is it possible to over-index tables?
First, indexes increase the size of the Access database somewhat. Unnecessarily indexing a table that doesn’t really require an index eats up a bit of disk space for each record in the table. More important, indexes extract a performance hit for each index on the table every time a record is added to the table. Because Access automatically updates indexes each time a record is added (or removed), the internal indexing must be adjusted for each new record. If you have ten indexes on a table, Access makes ten adjustments to the indexes each time a new record is added or an existing record is deleted, causing a noticeable delay on large tables (particularly on slow computers).
Sometimes changes to the data in records cause adjustments to the indexing scheme. This is true if the change causes the record to change its position in sorting or query activities. Therefore, if you’re working with large, constantly changing data sets that are rarely searched, you may choose not to index the fields in the table, or to minimally index by indexing only those few fields that are likely to be searched.
As you begin working with Access tables, you’ll probably start with the simplest one-field indexes and migrate to more complex ones as your familiarity with the process grows. Do keep in mind, however, the trade-offs between greater search efficiency and the overhead incurred by maintaining a large number of indexes on your tables.
It’s also important to keep in mind that indexing does not modify the physical arrangement of records in the table. The natural order of the records (the order in which the records were added to the table) is maintained after the index is established.
Printing a Table Design
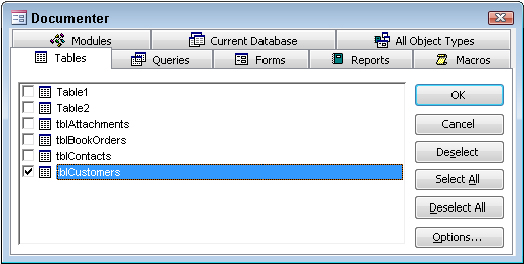
You can print a table design by clicking the Database Documenter button in the Analyze group on the Database Tools tab of the Ribbon. The Analyze group contains a number of tools that make it easy to document your database objects. When you click the Database Documenter button, the Documenter dialog box appears, letting you select objects to print. In Figure 34.17, tblCustomers is selected on the Tables tab of the Documenter dialog box.
FIGURE 34.17 The Documenter dialog box
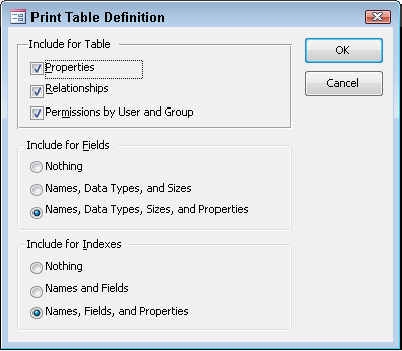
You can also set various options for printing. When you click the Options button, the Print Table Definition dialog box (shown in Figure 34.18) appears, enabling you to select which information from the Table Design to print. You can print the various field names, all their properties, the indexes, and even network permissions.
FIGURE 34.18 Printing options in the Print Table Definition dialog box
After you select which data you want to view, Access generates a report. You can view the report in a Print Preview window or send it to a printer. You may want to save the report within the database as part of the application’s documentation.
Saving the Completed Table
You can save the completed table design by choosing File ⇒ Save or by clicking the Save button on the Quick Access Toolbar in the upper-left corner of the Access window. If you’re saving the table for the first time, Access asks for its name. Table names can be up to 64 characters long and follow standard Access object naming conventions — they may include letters and numbers, can’t begin with a number, and can’t include punctuation. You can also save the table when you close it.
If you’ve saved this table before and you want to save it with a different name, choose File ⇒ Save Object As and enter a different table name. This action creates a new table design and leaves the original table with its original name untouched. If you want to delete the old table, select it in the Navigation pane and press the Delete key.
Manipulating Tables
As you add many tables to your database, you may want to use them in other databases or make copies of them as backups. In many cases, you may want to copy only the table’s design and not include all the data in the table. You can perform many table operations in the Navigation pane, including renaming, deleting, and copying tables. You perform these tasks by direct manipulation or by using menu items.
Renaming tables
Rename a table by right-clicking its name in the Navigation pane and selecting Rename from the shortcut menu; type the new name and press Enter. After you change the table name, it appears in the Tables list, which re-sorts the tables in alphabetical order.
Deleting tables
Delete a table by right-clicking its name in the Navigation pane and selecting Delete from the shortcut menu or by selecting the table in the Navigation pane and pressing the Delete key. Like most delete operations, you have to confirm the delete by clicking Yes in a confirmation box.
Copying tables in a database
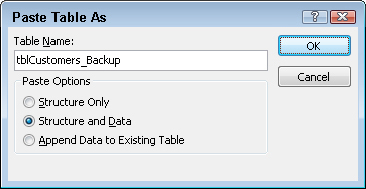
The copy and paste options in the Clipboard group on the Home tab allow you to copy any table in the database. When you paste the table back into the database, the Paste Table As dialog box appears, asking you to choose from three options:
- Structure Only: Clicking the Structure Only button creates a new, empty table with the same design as the copied table. This option is typically used to create a temporary table or an archive table to which you can copy old records.
- Structure and Data: When you click Structure and Data, a complete copy of the table design and all its data is created.
- Append Data to Existing Table: Clicking the Append Data to Existing Table button adds the data of the selected table to the bottom of another table. This option is useful for combining tables, such as when you want to add data from a monthly transaction table to a yearly history table.
Follow these steps to copy a table:
FIGURE 34.19 Pasting a table opens the Paste Table As dialog box
Copying a table to another database
Just as you can copy a table within a database, you can copy a table to another database. There are many reasons why you may want to do this. Maybe you share a common table among multiple systems, or maybe you need to create a backup copy of your important tables within the system.
When you copy tables to another database, the relationships between tables are not copied. Access copies only the table design and the data to the other database. The method for copying a table to another database is essentially the same as for copying a table within a database:
Adding Records to a Database Table
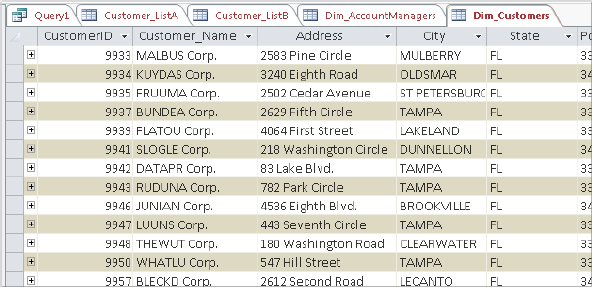
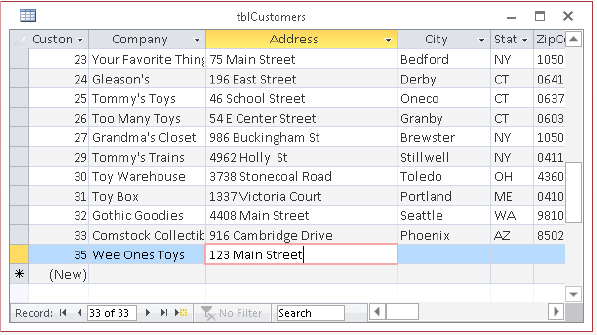
Adding records to a table is as simple as clicking the table in the Navigation pane to open the table in Datasheet view. Once the table is opened, enter values for each field. Figure 34.20 shows adding records in datasheet mode to the table. In the case of the example tblCustomers table shown in the figure, you can enter information into all fields except CustomerID. AutoNumber fields automatically provide a number for you.
FIGURE 34.20 Using Datasheet view to add records to a table
Although you can add records directly into the table through the Datasheet view, it isn’t the most efficient way. (Nevertheless, you’re going to learn a bit more about forms now so that you’ll be comfortable working in them.) Adding records using forms is better because code behind a form can dynamically provide default values (perhaps based on data already added to the form) and communicate with the user during the data entry process.
Opening a Datasheet
Follow these steps to open a datasheet from the Database window:
An alternative method for opening the datasheet is to right-click a table in the Navigation pane and select Open from the shortcut menu.
Moving within a datasheet
You easily move within the Datasheet window using the mouse to indicate where you want to change or add to your data — just click a field within a record. In addition, the scroll bars and Navigation buttons make it easy to move among fields and records. Think of a datasheet as a worksheet without the row numbers and column letters. Instead, columns have field names, and rows are unique records that have identifiable values in each cell.
Table 34.4 lists the navigational keys you use for moving within a datasheet.
TABLE 34.4 Navigating in a Datasheet
| Navigational direction | Keystrokes |
| Next field | Tab |
| Previous field | Shift+Tab |
| First field of current record | Home |
| Last field of current record | End |
| Next record | Down Arrow |
| Previous record | Up Arrow |
| First field of first record | Ctrl+Home |
| Last field of last record | Ctrl+End |
| Scroll up one page | PgUp |
| Scroll down one page | PgDn |
Using the Navigation buttons
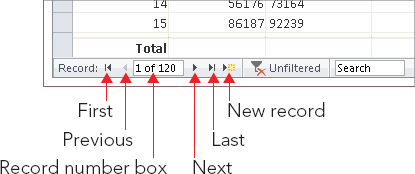
The Navigation buttons (shown in Figure 34.21) are the six controls located at the bottom of the Datasheet window, which you click to move between records. The two leftmost controls move you to the first record or the previous record in the datasheet. The three rightmost controls position you on the next record, last record, or new record in the datasheet. If you know the record number (the row number of a specific record), you can click the record-number box, enter a record number, and press Enter.
FIGURE 34.21 The Navigation buttons of a datasheet
Entering New Data
All the records in your table are visible when you first open it in Datasheet view. If you just created your table, the new datasheet doesn’t contain any data. Figure 34.22 shows an empty datasheet and the Table Tools ⇒ Fields tab of the Ribbon. When the datasheet is empty, the first row contains an asterisk (*) in the record selector — indicating it’s a new record.
FIGURE 34.22 An empty datasheet. Notice that the first record is blank and has an asterisk in the record selector.
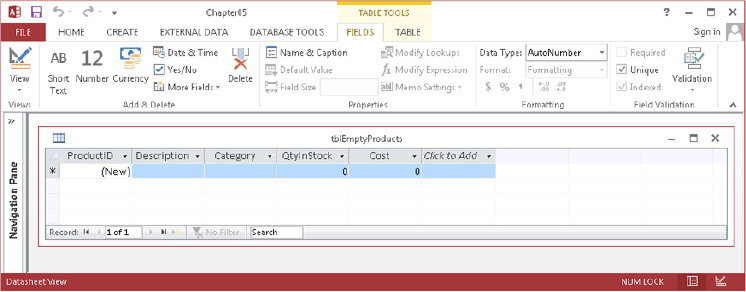
The Table Tools ⇒ Fields contextual tab includes virtually all the tools needed to build a complete table. You can specify the data type, default formatting, indexing, field and table validation, and other table construction tasks from the controls in the Table Tools ⇒ Fields tab.
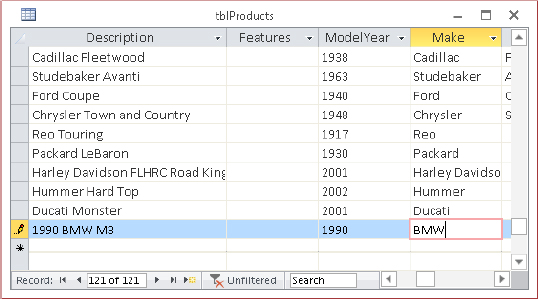
The new row appears at the bottom of the datasheet when the datasheet already contains records. Click the New button in the Record group of the Home tab, or click the New Record button in the group of navigation buttons at the bottom of the datasheet to move the insertion point to the new row — or simply click on the last row, which contains the asterisk. The asterisk turns into a pencil when you begin entering data, indicating that the record is being edited. A new row — containing an asterisk — appears below the one you’re entering data into. The new record pointer always appears in the last row of the datasheet. Figure 34.23 shows adding a new record to tblProducts.
FIGURE 34.23 Entering a new record in Datasheet view of a table
To add a new record to the open Datasheet view of a table, follow these steps:
When adding or editing records, you might see three different record pointers:
- Record being edited: A pencil icon
- Record is locked (multiuser systems): A padlock icon
- New record: A pencil icon
Saving the record
Moving to a different record saves the record you’re editing. Tabbing through all the fields, clicking on the Navigation buttons, clicking Save in the Record group of the Home tab, and closing the table all write the edited record to the database. You’ll know the record is saved when the pencil disappears from the record selector.
To save a record, you must enter valid values into each field. The fields are validated for data type, uniqueness (if indexed for unique values), and any validation rules that you’ve entered into the Validation Rule property. If your table has a primary key that’s not an AutoNumber field, you’ll have to make sure you enter a unique value in the primary key field to avoid the error message shown in Figure 34.24. One way to avoid this error message while entering data is to use an AutoNumber field as the table’s primary key.
FIGURE 34.24 The error message Access displays when attempting to save a record with a duplicate primary key value entered into the new record. Use an AutoNumber field as your primary key to avoid this error.

Now you know how to enter, edit, and save data in a new or existing record. In the next section, you learn how Access validates your data as you make entries into the fields.
Understanding automatic data-type validation
Access validates certain types of data automatically. Therefore, you don’t have to enter any data validation rules for these data types when you specify table properties. The data types that Access automatically validates include:
- Number/Currency
- Date/Time
- Yes/No
Access validates the data type when you move off the field. When you enter a letter into a Number or Currency field, you don’t initially see a warning not to enter these characters. However, when you tab out of or click on a different field, you get a warning like the one shown in Figure 34.25. This particular warning lets you choose to enter a new value or change the column’s data type to Text. You’ll see this message if you enter other inappropriate characters (symbols, letters, and so on), enter more than one decimal point, or enter a number too large for the specified numeric data type.
FIGURE 34.25 The warning Access displays when entering data that doesn’t match the field’s data type. Access gives you a few choices to correct the problem.

Access validates Date/Time fields for valid date or time values. You’ll see a warning similar to the one shown in Figure 34.25 if you try to enter a date such as 14/45/05, a time such as 37:39:12, or an invalid character in a Date/Time field.
Yes/No fields require that you enter one of these defined values:
- Yes: Yes, True, On, −1, or a number other than 0 (which displays as −1)
- No: No, False, Off, or 0
Of course, you can define your own acceptable values in the Format property for the field, but generally these values are the only acceptable ones. If you enter an invalid value, the warning appears with the message to indicate an inappropriate value.
Navigating Records in a Datasheet
Wanting to make changes to records after you’ve entered them is not unusual. You might need to change records because you receive new information that changes existing values or you discover errors in existing values.
When you decide to edit data in a table, the first step is to open the table, if it isn’t already open. From the list of tables in the Navigation pane, double-click the table object to open it in Datasheet view. If you’re already in Design view for the table, click the Datasheet View button in the Views group of the Home tab to switch views.
When you open a datasheet in Access that has related tables, a column with a plus sign (+) is added to indicate the related records, or subdatasheets. Click a row’s plus sign to open the subdatasheet for the row.
Moving between records
You can move to any record by scrolling through the records and clicking on the desired record. With a large table, scrolling through all the records might take a while, so you’ll want to use other methods to get to specific records quickly.
Use the vertical scroll bar to move between records. The scroll bar arrows move one record at a time. To move through many records at a time, drag the scroll box or click the areas between the scroll thumb and the scroll bar arrows.
Use the five Navigation buttons (refer to Figure 34.21) to move between records. You simply click these buttons to move to the desired record. If you know the record number (the row number of a specific record), click the record number box, enter a record number, and press Enter.
Also, use the Go To command in the Find group of the Home tab to navigate to the First, Previous, Next, Last, and New records.
Finding a specific value
Although you can move to a specific record (if you know the record number) or to a specific field in the current record, usually you’ll want to find a certain value in a record. You can use one of these methods for locating a value in a field:
- Select the Find command (a pair of binoculars) from the Find group of the Home tab.
- Press Ctrl+F.
- Use the Search box at the bottom of the Datasheet window.
The first two methods display the Find and Replace dialog box (shown in Figure 34.26). To limit the search to a specific field, place your insertion point in the field you want to search before you open the dialog box. Change the Look In combo box to Current Document to search the entire table for the value.
FIGURE 34.26 The Find and Replace dialog box. The fastest way to activate it is to simply press Ctrl+F.
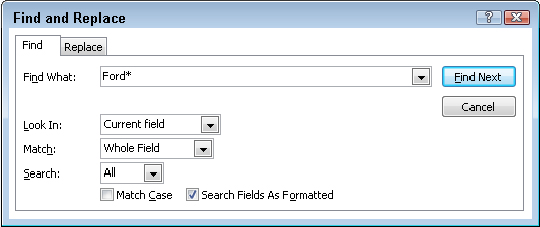
The Find and Replace dialog box lets you control many aspects of the search. Enter the value you want to search for in the Find What combo box — which contains a list of recently used searches. You can enter a specific value or choose to use wildcard characters. Table 34.5 lists the wildcard characters available in the Find dialog box.
TABLE 34.5 Wildcard Characters
| Character | Description | Example |
| ∗ (asterisk) | Matches any number of characters | Ford∗ finds Ford Mustang |
| ? (question mark) | Matches any single character | F?rd finds Ford |
| [ ] (brackets) | Matches one of a list of characters | 19[67]1 finds 1961 and 1971 |
| ! (exclamation point) | With brackets, excludes a list of characters | 19[!67]1 finds 1951 but not 1961 |
| - (hyphen) | With brackets, matches a range of characters | 196[2–8] finds 1962 to 1968 |
| # (hash) | Matches one number | 1:## finds 1:18 but not 1:9 |
You can combine wildcard characters for more robust searches. For example, 196[!2–8] will find 1961 and 1969, but nothing in between.
The Match drop-down list contains three choices that eliminate the need for wildcards:
- Any Part of Field: If you select Any Part of Field, Access searches to see whether the value is contained anywhere in the field. This search finds the Ford anywhere in the field, including values like Ford Mustang, 2008 Ford F-150, and Ford Galaxy 500.
- Whole Field: The default is Whole Field, which finds fields containing exactly what you’ve entered. For example, the Whole Field option finds Ford only if the value in the field being searched is exactly Ford, and nothing else.
- Start of Field: A search for Ford using the Start of Field option searches from the beginning of the field and returns all the rows containing Ford as the first four characters of the description.
In addition to these combo boxes, you can use two check boxes at the bottom of the Find and Replace dialog box:
- Match Case: Match Case determines whether the search is case sensitive. The default is not case sensitive (not checked). A search for SMITH finds smith, SMITH, or Smith. If you check the Match Case check box, you must then enter the search string in the exact case of the field value. (The data types Number, Currency, and Date/Time don’t have any case attributes.)
- Search Fields As Formatted: The Search Fields As Formatted check box, the selected default, finds only text that has the same pattern of characters as the text specified in the Find What box. Clear this box to find text regardless of the formatting. For example, if you’re searching the Cost field for a value of $16,500, you must enter the comma if Search Fields as Formatted is checked. Uncheck this box to search for an unformatted value (16500).
The search begins when you click the Find Next button. If Access finds the value, Access highlights it in the datasheet. To find the next occurrence of the value, click the Find Next button again. The dialog box remains open so that you can find multiple occurrences. Choose one of three search direction choices (Up, Down, or All) in the Search drop-down list to change the search direction. When you find the value that you want, click Close to close the dialog box.
Use the search box at the bottom of the Datasheet window to quickly search for the first instance of a value. When using the search box, Access searches the entire datasheet for the value in any part of the field. If you enter FORD in the search box, the datasheet moves to the closest match as you type each letter. First, it finds a field with F as the first character, then it finds FO, and so on. Once it finds the complete value, it stops searching. To find the next instance, press the Enter key.
Changing Values in a Datasheet
If the field that you’re in has no value, you can type a new value into the field. When you enter new values into a field, follow the same rules as for a new record entry.
Manually replacing an existing value
Generally, you enter a field with either no characters selected or the entire value selected. If you use the keyboard (Tab or Arrow keys) to enter a field, you select the entire value. (You know that the entire value is selected when it’s highlighted) When you begin to type, the new content replaces the selected value automatically.
When you click in a field, the value is not selected. To select the entire value with the mouse, use any of these methods:
- Click just to the left of the value when the mouse pointer is shown as a large plus sign.
- Click to the left of the value, hold down the left mouse button, and drag the mouse to select the whole value.
- Click in the field and press F2.
If you want to change an existing value instead of replacing the entire value, use the mouse and click in front of any character in the field to activate Insert mode; the existing value moves to the right as you type the new value. If you press the Insert key, your entry changes to Overstrike mode; you replace one character at a time as you type. Use the arrow keys to move between characters without disturbing them. Erase characters to the left by pressing Backspace, or to the right of the insertion point by pressing Delete.
Table 34.6 lists editing techniques.
TABLE 34.6 Editing Techniques
| Editing operation | Keystrokes |
| Move the insertion point within a field. | Press the Right Arrow and Left Arrow keys. |
| Insert a value within a field. | Select the insertion point and type new data. |
| Toggle entire field and insertion point. | Press F2. |
| Move insertion point to the beginning of the field. | Press Ctrl+Left Arrow key or press the Home key. |
| Move insertion point to the end of the field. | Press Ctrl+Right Arrow key or press the End key. |
| Select the previous character. | Press Shift+Left Arrow key. |
| Select the next character. | Press Shift+Right Arrow key. |
| Select from the insertion point to the beginning. | Press Ctrl+Shift+Left Arrow key. |
| Select from the insertion point to the end. | Press Ctrl+Shift+Right Arrow key. |
| Replace an existing value with a new value. | Select the entire field and type a new value. |
| Replace a value with the value of the previous field. | Press Ctrl+’ (apostrophe). |
| Replace the current value with the default value. | Press Ctrl+Alt+Spacebar. |
| Insert a line break in a Short Text or Long Text field. | Press Ctrl+Enter. |
| Save the current record. | Press Shift+Enter or move to another record. |
| Insert the current date. | Press Ctrl+; (semicolon). |
| Insert the current time. | Press Ctrl+: (colon). |
| Add a new record. | Press Ctrl++ (plus sign). |
| Delete the current record. | Press Ctrl+− (minus sign). |
| Toggle values in a check box or option button. | Press Spacebar. |
| Undo a change to the current field. | Press Esc or click the Undo button. |
| Undo a change to the current record. | Press Esc or click the Undo button a second time after you undo the current field. |
Fields that you can’t edit
Some fields can’t be edited, such as:
- AutoNumber fields: Access maintains AutoNumber fields automatically, calculating the values as you create each new record. AutoNumber fields can be used as the primary key.
- Calculated fields: Forms or queries may contain fields that are the result of expressions. These values are not actually stored in your table and are not editable.
- Fields in multiuser locked records: If another user is editing a record, it can be locked, and you can’t edit any fields in that record.
Understanding Attachment Fields
Microsoft recognizes that database developers must deal with many different types of data. Although the traditional Access data types (Text, Currency, OLE Object, and so on) are able to handle many different types of data, until recently there was no way to accommodate complete files as Access data without performing some transformation on the file (such as conversion to OLE data).
Since Access 2010, Access has included the Attachment data type, enabling you to bring entire files into your Access database as “attachments” to a table. When you click an attachment field, a small Attachments dialog box (shown in Figure 34.27) appears, enabling you to locate files to attach to the table.
FIGURE 34.27 Managing attachments in an Attachment field
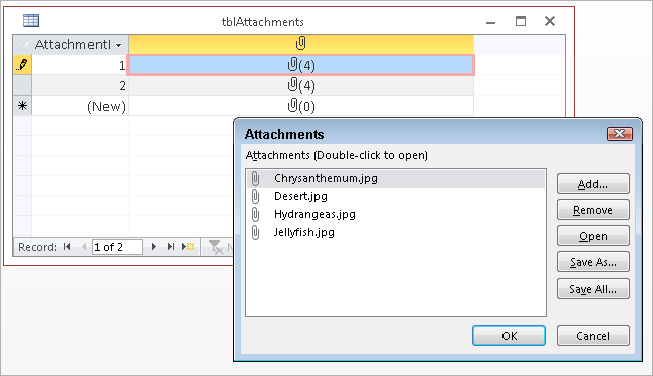
The Add button in Figure 34.27 opens the familiar Choose File dialog box, enabling you to search for one or more files to attach to the field. The selected files are added to the list you see in Figure 34.27. Notice also that the Attachments dialog box includes buttons for removing attachments from the field, and for saving attachments back to the computer’s disk.
The significant thing to keep in mind about the Attachment data type is that a single attachment field in a table can contain multiple files of different types. It’s entirely possible to store a Word document, several audio or video clips, and a number of photographs, within a single attachment field.
Summary
This chapter has covered the important topics of creating new Access databases and adding tables to Access databases. At this point you should understand:
- How to create a database and move around Access.
- How to create a table.
- Which fields to use and how to add them in Table design view.
- How and why to set a primary key.
- How to add data and save the table.
- How to navigate the datasheet and edit table data.