Chapter 32
Designing Dazzling Publications with Publisher
IN THIS CHAPTER
Adding eye appeal with BorderArt, drop caps, and WordArt
Inserting a building block into the publication
Updating the publication background, page, and color settings
Aligning and grouping objects
Working with text wrapping and hyphenation
Adding and numbering pages
Checking and printing the publication
Prepping for a professional print job or online photo center printing
Starting your design with one of Publisher’s templates virtually guarantees that you will create a nice-looking publication. You know your message and your audience best, so you can improve on a template by adding graphics and changing aspects of the overall document design. You can use special graphic features that emphasize or decorate text, add predesigned objects such as coupons, and work with page options such as the color scheme for the publication. From there, you can fine-tune objects and page settings and then wrap up and print the publication. This chapter shows you how to do all that to add your own razzle-dazzle to a publication.
Adding Special Effects
One of the advantages of using Publisher to design your publications is that Publisher makes laying out and designing document text easier. Linked text boxes give you much control over where information appears in a document. Beyond dealing with that aspect of text design, Publisher also provides you with tools to dress up text to catch your reader’s eye—BorderArt, drop caps, WordArt, and special new text formatting choices and effects.
BorderArt
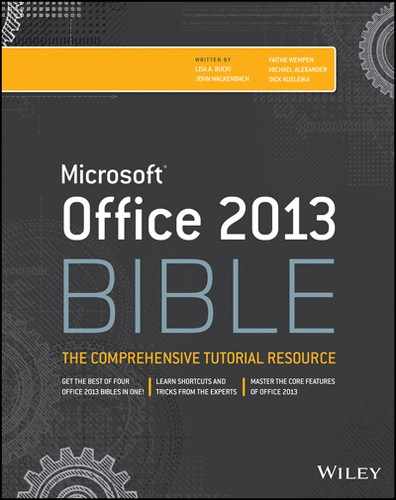
You learned in Chapter 31 that you can right-click on an inserted picture, clip art, or table object and select a format command that opens a formatting dialog box. Similarly, you can right-click on any text box in a publication and click Format Text Box to open the Format Text Box dialog box (Figure 32.1). You can use the tabs in this dialog box to add fills and outlines to the text box, and more. In addition, you can click the BorderArt button on the Colors and Lines tab to open the BorderArt dialog box.
FIGURE 32.1 Overall text box formatting settings appear in the Format Text Box dialog box.
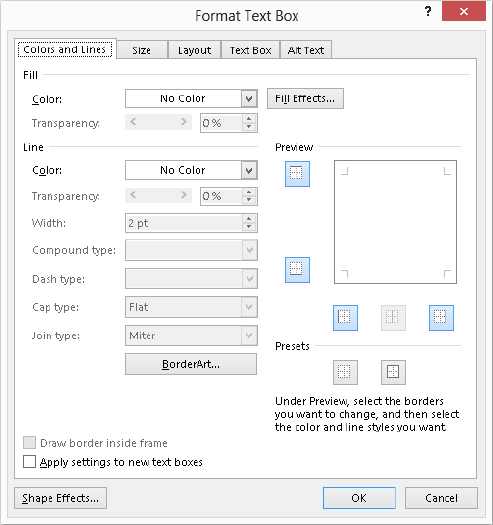
Rather than placing a plain-colored line around your text box, BorderArt applies a border made up of small graphics. The graphics range from geometric forms that apply a formal, decorative feel to items that set a fun mood or tone, such as ladybugs or candy corn. The available BorderArt designs fit any number of occasions, making them ideal to use in almost any of your publications, including invitations and greeting cards, for example.
As shown in Figure 32.2, you can preview any border by selecting it in the Available Borders list at the left side of the dialog box. The border design appears in the Preview area at the right, using its default settings. By default, Publisher stretches the border graphics to fill the border area a little more completely. If you prefer to turn off this feature, click the Don’t stretch pictures option button near the lower-left corner of the dialog box. Each border has an automatic size, shown in the Preview. If you want to control the border width yourself, click to uncheck the Always apply at default size check box before continuing.
FIGURE 32.2 You can preview a border in the BorderArt dialog box.
When you’ve selected the BorderArt and changed any settings as needed, click OK to close the BorderArt dialog box and return to the Format Text Box dialog box. Change the Width entry on the Colors and Lines tab to set the border width if needed. You also can modify the border color in the Line area, but you may not want to do so if the BorderArt graphics already include great colors. Click OK to close the dialog box and finish applying the BorderArt. As shown in the party invitation in Figure 32.3, the BorderArt can make even simple text pop from the page.
FIGURE 32.3 Party time! Seasonal or theme-oriented BorderArt works well for greeting cards and invitations.

You can create your own BorderArt using any graphic image stored on your hard disk or available as clip art. Click Create Custom in the BorderArt dialog box. To open a file from the hard disk, click the Select Picture in the Create Custom Border dialog box. Use the Insert Pictures window that appears to select a saved picture (use the Browse link beside from a file), to search for a clip art image on Office.com Clip Art (as described in Chapter 31), or to select a file from your SkyDrive; then click Insert. Publisher converts the picture into a border. Type a name for the new border into the Name Custom Border dialog box and click OK. The new border appears in the Available Borders list in the BorderArt dialog box until you select the border and click Delete.
Drop caps
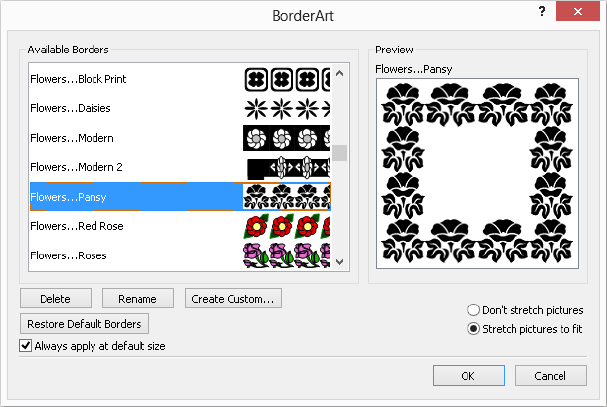
Formatting the first letter or word of a story or paragraph as a drop cap draws the eye to that spot in your publication. Setting up a letter or word as a drop cap increases its size, causing it to stand above the first line of text or have the first few lines wrap around it, or both. The drop cap style you choose might also use a contrasting color or other text formatting to give it a fancy appearance. Figure 32.4 shows a story with a drop cap applied.
FIGURE 32.4 Attract readers to a story by setting the first paragraph off with a drop cap.
Follow these steps to create a drop cap in a story:
FIGURE 32.5 Make sure that the drop cap fits your text by checking the Preview.
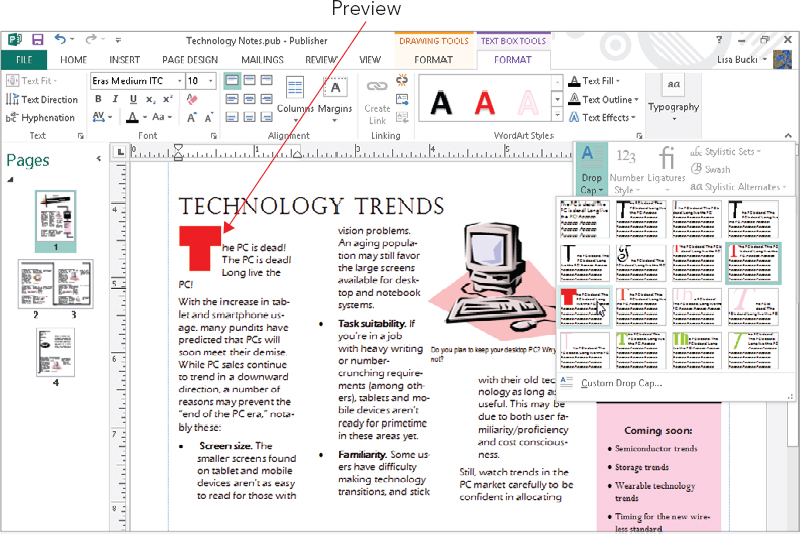
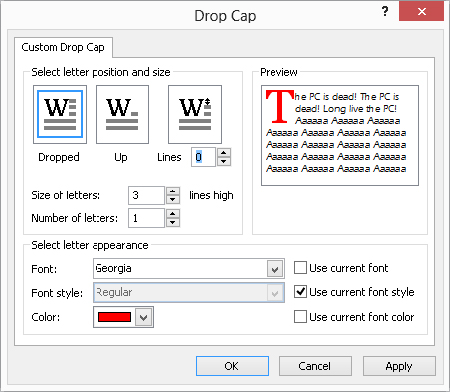
If none of the available drop cap styles is quite what you’re looking for, you can click Custom Drop Cap at the bottom of the Drop Cap gallery to open the Drop Cap dialog box to display the settings for creating your own custom drop cap or for customizing a drop cap that you’ve already applied, as shown in Figure 32.6. You can work with the drop cap position, size, and text appearance. As you try on various setting combinations, the Preview at the right shows you how your paragraph will look with the custom drop cap. Click OK to apply the custom drop cap and close the dialog box.
FIGURE 32.6 For a truly custom drop cap, work with the settings here.
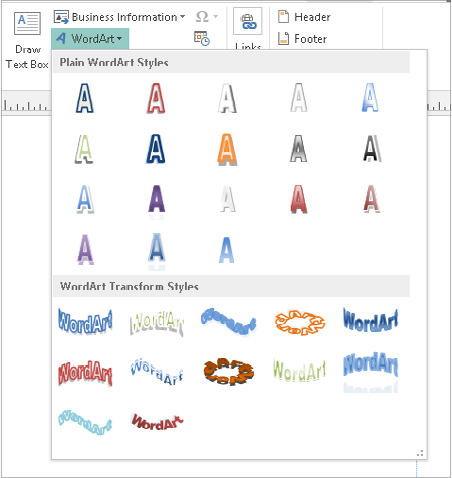
WordArt
The last several versions of some Office applications have all included WordArt, a feature that enables you to convert a word or phrase to a colorful graphic object. For example, rather than have “just” a title for your newsletter, you can create a WordArt object that really pops, like the example shown in Figure 32.7.
FIGURE 32.7 No mere text attracts attention the way that WordArt can.

To create a WordArt object in a publication, follow these steps:
FIGURE 32.8 Give some text WordArt style — simple, wavy, shadowed, vertical, or 3-D.
When you select any WordArt object, the WordArt Tools ⇒ Format contextual tab appears. It offers buttons for editing the WordArt’s text, changing the WordArt’s style and shape, and more. Work with the settings here as needed to finish designing and positioning the WordArt object.
Text formatting and typography tools
The Text Box Tools ⇒ Format contextual tab, shown in Figure 32.9, offers some text enhancement settings that were not available in previous versions. The Effects group offers Shadow, Outline, Engrave, and Emboss treatments that you can add to selected text. These effects should be used sparingly because they can affect readability, so they are probably best reserved for headlines, advertisements, titles, and other situations in which you need to emphasize a word or phrase.
FIGURE 32.9 Use the settings in the WordArt Styles and Typography groups to enhance text.

The choices that become available in the Typography group (with the exception of the Drop Cap command) will depend on the font applied to the selected text. (At lower screen resolutions, you will have to click the Typography button shown in Figure 32.9 to display the group’s choices.) Some fonts following newer font standards offer advanced typography features. You can take advantage of these features when present by using the Number Style, Ligatures, Stylistic Sets, Swash, and Stylistic Alternates choices in the Typography group. You can experiment with the various choices in this group in combination with different fonts to see what typographic enhancements are possible. For example, Figure 32.10 shows two ligatures.
FIGURE 32.10 The connections in the ft and fi letter pairs are ligatures.
Using Building Blocks
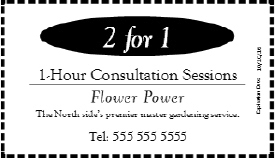
Publications often include special elements not typically found in ordinary business documents. For example, a new product brochure might include a coupon. A flyer might need phone number tear-off tabs along the bottom. A newsletter might need a masthead with certain information or a volunteer sign-up form. Building these types of elements from scratch by layering graphics, text boxes, and borders could be time-consuming, but you don’t have to bother. Instead, you can add any of a number of predesigned items from the building blocks galleries to your publication and then customize the item with your own text.
Follow these steps to add a building block object to a publication:
FIGURE 32.11 Inspire your readers to action with building block objects.
Updating a Publication
Not only can you change settings for the text and objects in a publication, you also can make many changes to upgrade the publication itself. You can change the background fill for the pages, change how the page information is arranged, and choose another color scheme.
To make some publication-wide design changes, work with the Format Publication task pane. To make other publication-wide changes, use Page Design tab commands.
Changing the background
Many publication designs purposely do not have a background color. That’s because for years few computer printers could print bleeds—in which color prints all the way to the edge of the page. Some color printers now can handle bleeds. If that applies in your case or if you’re sending the publication for commercial printing (or you don’t really care if your background doesn’t print all the way to the edges of the page), you can apply a background to your publication. You also may want to add a background if you’re using Publisher to design a web page.
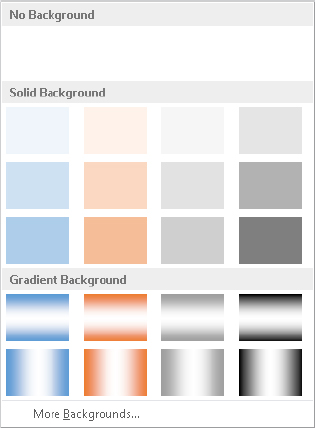
To apply or remove a background, click the Page Design tab on the Ribbon, and then click Background in the Page Background group. The Background gallery appears (Figure 32.12). The available choices depend on the color scheme applied to the document. Click on a specific background choice to apply it. The publication immediately previews the background choice. To remove any applied background, redisplay the gallery and click the blank area directly below No Background at the top.
FIGURE 32.12 Pump up your pages with a background color or pattern.
Changing page settings
The Page Design tab offers a variety of settings for changing the layout of the page or pages in your publication. For example, you can use the choices in the Page Setup group to specify Margins, Page Orientation, and Page Size. These choices now work the same as they do in Word, so you can refer to Chapter 8 to learn more.
Publications based on a template may have other page choices available. For a newsletter, for example, you might be able to specify the number of columns per page. To change the columns options for a publication page, first display the page to change. Click the Page Design tab, and then click the Options button in the Template group. In the Page Content dialog box that appears, select the options that you want and click OK.
Changing colors
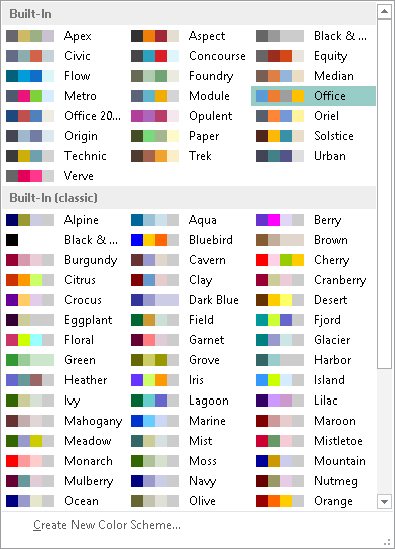
In addition to an overall font scheme, every publication has an overall color scheme. The color scheme defines a main color and several accent colors for use throughout the publication. It’s best to stick with the colors in the scheme for the text and objects as this helps keep the publication design coherent.
To choose another color scheme for your publication, click the Page Design tab on the Ribbon, and then click the More button in the Schemes group to open the Color Schemes gallery, as shown in Figure 32.13. Click on the desired color scheme. When you do so, Publisher automatically replaces the previous main and accent colors with those from the new scheme, so you can see the impact of the change on your publication. You can continue applying other color schemes until you’ve found one that suits your needs.
FIGURE 32.13 Bring new colors into your publication by choosing another color scheme here.
Fine-Tuning Objects
If you can’t find just the right building block object or other object settings to meet your needs, or if you just like noodling around with design possibilities in your publications, you may find yourself creating and positioning many objects. Although you can drag with the mouse and use tools such as ruler guides to help you size and position objects, other shortcuts might be more appropriate in some cases. This section shows you some more tricks — aligning and grouping objects, and wrapping and hyphenating text.
Aligning objects
Aligning objects can be a little frustrating, especially if you have a finicky mouse or are working with a notebook touchpad to drag objects. You can use the arrow keys to move a selected object, but each press of a key merely nudges the object a very small distance in the indicated direction. Plus, if you’re trying to do something trickier such as align multiple selected objects, you have no precise way to do it with the mouse.
Use the commands on the Arrange group of the Home tab to align multiple selected objects. After you Shift+click to select the desired objects, click Align in the Arrange group, and then select one of the commands on the menu that appears to align the objects’ left, center, and right horizontal dimensions, or top, middle, and bottom vertical dimensions. You also can use the Distribute Horizontally or Distribute Vertically choice to space the objects equally.
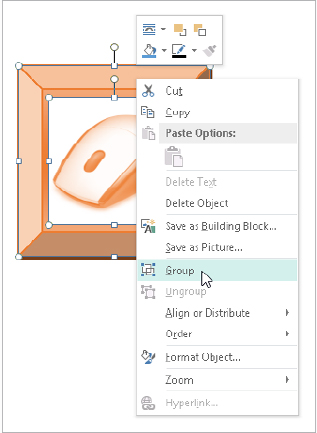
Figure 32.14 shows an example of how you can use the Align menu commands to work with publication objects. After selecting both objects, both the Align Center and Align Middle commands were selected. These commands placed the center point of the mouse clip art image right over the center point of the beveled frame shape.
FIGURE 32.14 Move objects into position using alignment commands.
You also can keep your eyes peeled for pink alignment guidelines that may appear as you move around objects. These appear to indicate when you have reached an alignment point, such as centering an object on a column. For good alignment, release the object when you see one of these guides.
Grouping objects
After you’ve placed multiple objects into the position you want, such as in the example in Figure 32.14, you should group the objects so that you can move them around as a unit without accidentally misaligning one or more of them. When you use Shift+click to select multiple objects, the Group choice in the Arrange group of the Home tab becomes active. You can use that button or right-click on the object and click Group, as shown in Figure 32.15. To ungroup a selected group, click the Ungroup button in the Arrange group of the Home tab, or right-click on the group and click Ungroup.
FIGURE 32.15 Use the Group command to make the selected objects stick together as a single unit.
Wrapping and hyphenating text
Your text will read much better if you make sure that you’ve chosen the right text-wrapping settings for objects and have chosen whether to use hyphenation in a story.
You can apply one of several text-wrapping styles to objects, typically shapes or picture objects that you want to appear within the text. Wrapping style options include Square, Tight, Through, Top and Bottom, and None. For example, Figure 32.16 illustrates the Tight wrapping style used for a grouped object. To choose a wrapping setting, click the Drawing Tools ⇒ Format tab or the Picture Tools ⇒ Format tab, click Wrap Text in the Arrange group, and then click on a wrapping option.
FIGURE 32.16 The right wrapping setting makes sure that text remains readable when it flows around the object.

If you’re wrapping text tightly around an object or have a narrow text box with large text, Publisher may by default hyphenate words to try to fill the space as well as possible. Many readers prefer not to see hyphens because they become tiring to read in longer stories. You can use these steps to turn the automatic hyphenation off in any story:
FIGURE 32.17 Control hyphenation in any story by using this dialog box.

Working with Pages
Many publications you create will be multipage documents, either to hold all the information that you want to present, as for a newsletter, or to come out in the proper format when folded, as for a greeting card. You can add any number of pages as needed to any publication.
Adding pages
The Page Navigation pane at the left side of Publisher shows a numbered icon for each page in the publication. To go to another page, just click on the icon for that page. You can insert more pages as needed to expand the contents of the publication.
If you want to insert a new page before or after a particular page that’s already in the publication, click on the thumbnail for that page in the pane. Then click the Insert tab of the Ribbon, click the down arrow portion of the Page button in the Pages group, and click Insert Blank Page (Ctrl+Shift+N). This immediately inserts a blank page. However, if you want a bit more control, click Insert Page, instead.
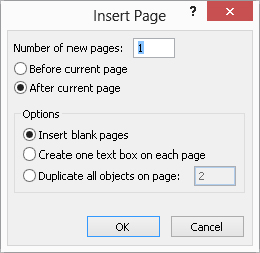
The Insert Page dialog box that appears after you click Insert Page varies depending on the type of publication you’re working in. For example, when you’re inserting a page in a file that was created as a blank publication, the dialog box looks like the one shown in Figure 32.18. Specify how many pages to insert and whether to insert before or after the current page; choose any other options you want, and then click OK. Publisher will choose the appropriate left-hand or right-hand layout for the inserted page.
FIGURE 32.18 If you started with a blank publication, Publisher assumes that you want to insert more blank pages.
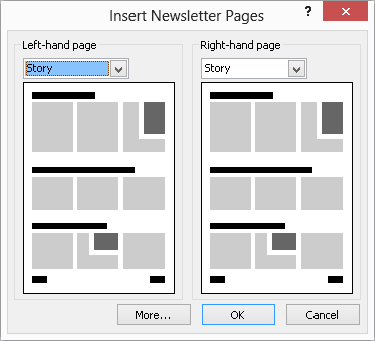
If you are inserting a page in a file that was based on a more complicated template, such as a newsletter, Publisher assumes that you want to insert pages consistent with the layout of the existing pages and may even assume that you want to insert a pair of facing pages, so it displays a dialog box like the one shown in Figure 32.19. You can either use the drop-down list at the top of the dialog box to choose another type of page, as shown for Right-Hand Page at the top of Figure 32.19, or you can click the More button to display the Insert Page dialog box as shown in Figure 32.18. After you make your choice, click OK to insert the page(s).
FIGURE 32.19 In other types of publications, Publisher assumes that you want to insert pages that follow the template design.
To create an exact duplicate of the current page, use the Insert Duplicate Page command (Ctrl+Shift+U) on the Page menu in the Pages group of the Insert tab.
Numbering pages
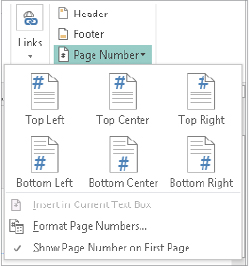
As a courtesy to your readers, you should always include page numbers for multipage documents. Including page numbers has the added benefit of giving anyone printing the document a heads-up about the order in which to place the pages. The process for adding page numbers places them in the header or footer area (above or below the rest of the text) in the position that you specify.
Select Page Number in the Header & Footer group of the Insert tab to open a gallery of page number position choices (Figure 32.20). Click on one of the choices to finish adding the page numbers.
FIGURE 32.20 You can add page numbers in the position you specify.
Checking and Printing
Printing your publication can be a thrilling moment—or an absolute dud if you discover that you’ve missed something and have to go back and fix it. So before you print, take the time to use the Design Checker. After that, it’s off to the printer!
Using the Design Checker
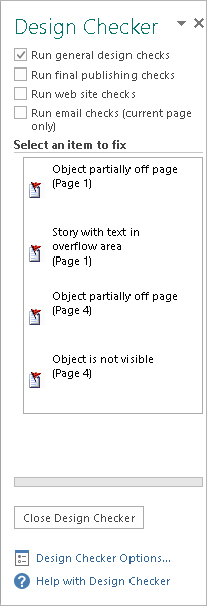
Publisher’s Design Checker checks a publication for boo-boos such as empty text boxes and spacing errors. Running the Design Checker so that you can uncover and fix these errors saves you toner, paper, and printing time. Among the problems Design Checker looks for are text in overflow areas, disproportional pictures, empty frames, covered objects, objects partially off the page, objects in nonprinting regions, blank space at the top of the page, spacing between sentences, and (for websites) a page unreachable by hyperlinks.
Select File ⇒ Info ⇒ Run Design Checker to run Design Checker. When it finishes, results appear in the Design Checker pane, as shown in Figure 32.21. To correct each error, click on the error in the list. Publisher displays the location where the error occurs so that you can correct it.
FIGURE 32.21 Yep, Design Checker caught a number of errors in this publication.
If you plan to have the document commercially printed, click the Run Commercial Printing Checks check box at the top of the Design Checker task pane to check that option. The Design Checker then immediately displays any errors that might cause a problem at a commercial printer, such as the publication’s being in the wrong color mode. When you click on this type of error, a drop-down arrow appears beside it. Click on that error to display a drop-down menu with options for correcting or learning more about the error.
Printing
When you’re satisfied that your publication is as near to perfect as you can make it, you’re ready to print. Printing is pretty much the same as in any Office application, choose File ⇒ Print or press Ctrl+P. Review the preview in the Backstage view carefully, and then select a printer, a range of pages to print, and the number of copies you want. Click Print to finish and send the job to the printer.
Preparing for Outside Printing
Sometimes you want to be able to send your publication to a print shop for printing on a professional press rather than on your own printer. Publisher can help you prepare your files for that purpose.
- Know and adhere to the print shop’s requirements.
- If you have questions but want to do the work yourself, consult Publisher’s extensive help on this subject and ask the printer for tips.
- Most print shops will review a file for problems before printing it. Sending your file for such an advanced checkup provides time to fix problems.
- Be professional. A professional admits to errors and is willing to learn and change. If you keep submitting bad files to the print shop, you’ll keep getting poorly printed materials.
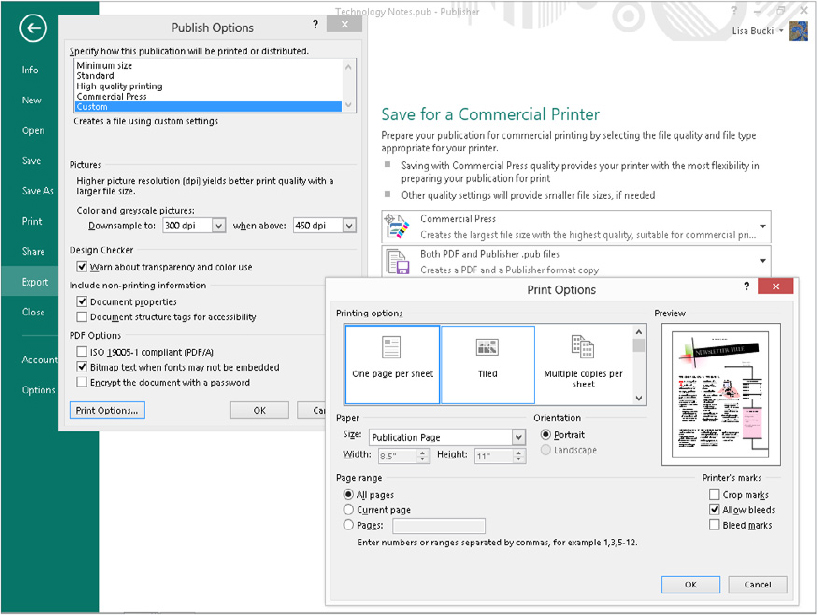
To start preparing a publication for commercial printing, choose File ⇒ Export ⇒ Save for a Commercial Printer. At the right side of the Backstage view, make the choices you want from the top and bottom drop-down lists, which specify the overall type of printer and whether the preparation process will create just a Publisher file or both a Publisher file and a PDF file. (Some printers prefer that you submit your files as PDF files.) Generally speaking, you should choose either Commercial Press or High Quality Printing from the top drop-down list. If you choose Custom, Publisher opens a Publish Options dialog box (Figure 32.22), where you can choose more specific options, such as the resolution at which pictures should print. If you click Print Options in that dialog box, the Print Options dialog box offers even more choices, such as adding crop marks and whether to allow bleeds. Click OK after you make your choices in each of these dialog boxes.
FIGURE 32.22 The settings here are important for commercial printing and advanced print jobs of your own.
Once you’ve selected the needed output settings, click the Pack and Go Wizard button. Specify where you want to save the file(s), click Next, and follow the prompts to finish the process of preparing your files for offsite professional printing, including embedding fonts, including linked graphics, creating links for embedded graphics, compressing your publication, and adding an unpacking utility for uncompressing it when it gets to its destination. In most cases, you will want to pack the files on a CD or DVD disc, unless your printer allows you to upload files to its location over the Internet or enables you to submit them on a USB flash drive.
Saving a Publication for Online Photo Center Printing
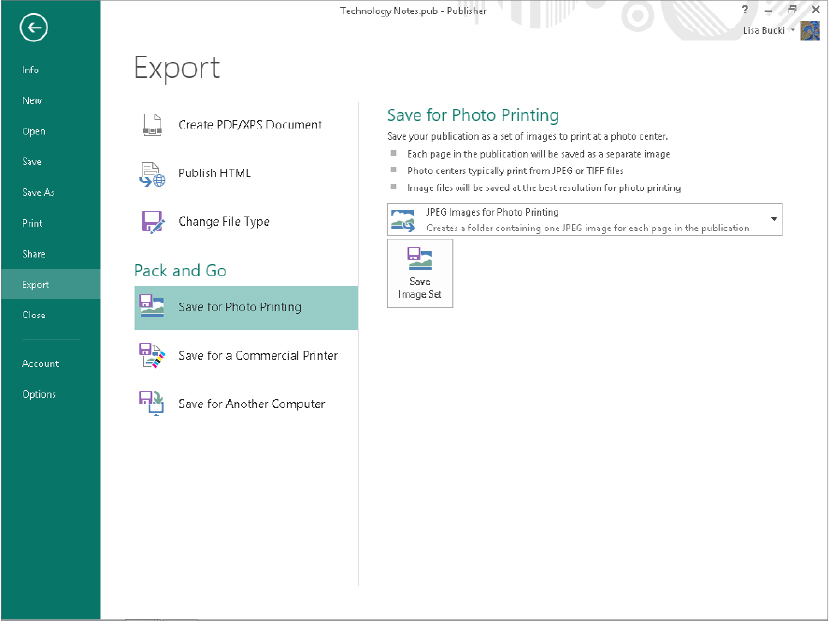
Publisher 2013 includes a new feature for saving publication as JPEG or TIFF files so that you can upload it to an online photo printing service, such as Snapfish or Shutterfly; the photo printing services offered by retailers such as Walgreens or CVS; or any number of local or regional online photo printing services. When you use this feature, Publisher saves each page of the publication as a separate JPEG or TIFF file, and places all the files in a single folder. You can choose the format you want based on the quality of output that you want. TIFF files are not compressed and retain more of the original image information, so they may be the best choice in situations such as when you want the pages printed as large format posters. You may choose JPEG for smaller jobs or to make the files faster to upload.
To save a publication for online photo printing, choose File ⇒ Export ⇒ Save for Photo Printing. At the right side of the Backstage view under Save for Photo Printing (Figure 32.23), choose the desired file format from the drop-down list. Click Save Image Set. In the Choose Location dialog box that appears, navigate to a folder and click it, and then click Select folder. Within the selected folder, Publisher creates a new folder with the same name as the publication file. Publisher then saves each page as a separate file within the new folder, naming the files sequentially (page01, page02, and so on) and adds the appropriate file name extension based on the format you selected. From there, you can rename the files if desired, and then upload them for printing.
FIGURE 32.23 The new options for saving a publication for online photo printing
Summary
This final Microsoft Office 2013 Bible chapter about Microsoft Publisher gave you the information you need to improve the content and design for a publication, add missing elements, and finalize and print the publication. The chapter showed you how to:
- Use special effects such as BorderArt, drop caps, and WordArt.
- Add a building block object.
- Change overall page and publication design settings such as the color scheme.
- Better align objects and wrap text around them, as well as how to group them.
- Work with pages and page numbering before seeing how to check the design and print.
- Adhere to good practices for preparing a publication for commercial printing.
- Convert a publication to individual JPEG or TIFF files that you can send to an online photo printing service.