Chapter 11
Managing Document Security, Comments, and Tracked Changes
IN THIS CHAPTER
Understanding document protection
Using digital signatures and signature lines
Protecting a document with a password
Inserting comments
Tracking changes
Reviewing comments and changes
Comparing two documents using “legal blackline”
Combining documents that contain tracked changes
Word offers a variety of kinds of protection (although nothing is 100 percent secure). Some of the protection tools work hand in hand with other tools that facilitate collaboration and reviewing. For example, you can limit formatting or allow users only to enter tracked changes or comments.
This chapter looks at the types of document protection and review tools available to Word users and describes how to use them.
Protection Types
Word 2013’s privacy settings aren’t centrally located. To save you the trouble of searching to find what you can control, here’s the definitive list of the different types of protection (and pseudo-protection) Word 2013 offers and where to find them:
- Permission: Restrict a document so it can be opened and/or changed only by specific individuals. Select File ⇒ Info ⇒ Protect Document ⇒ Restrict Access. For this to work, your system must be set up for Information Rights Management so it can connect to a Digital Rights Management server, a topic that’s beyond the scope of this book.
- Digital signature: Sign a document with a digital signature to provide assurance that you are the source of the document. Select File ⇒ Info ⇒ Protect Document ⇒ Add a Digital Signature.
- Inspect Document: Inspect the document to see if it contains private or sensitive information or data. Select File ⇒ Info ⇒ Check for Issues ⇒ Inspect Document.
- Mark as Final: Mark a document as final to let recipients know that the document is considered the final revision. This setting makes the document read-only and makes it unavailable for additional typing, editing, proofing, or tracking changes. Note that this setting is advisory only — you can click the big Edit Anyway button — this removes the Mark as Final setting. Recipients with earlier versions of Word who have installed the Office 2010 Compatibility Pack won’t even see the file as read-only. Hence, this kind of gentle protection would have to be combined with something more substantial to be meaningful. Select File ⇒ Info ⇒ Protect Document ⇒ Mark As Final.
- Style formatting restrictions: Limit formatting to a selection of styles as well as block Theme, Scheme, or Quick Style Set switching. Protection here is by password, and is therefore less secure and robust than when using permissions. Select File ⇒ Info ⇒ Protect Document ⇒ Restrict Editing ⇒ Limit formatting to a selection of styles.
- Editing restrictions — Read only: This offers password protection, which is not very secure, along with exceptions of specific areas of the document. Exceptions can be made wholesale, or you can limit them to individuals with specific Microsoft account–associated e-mail addresses. Select File ⇒ Info ⇒ Protect Document ⇒ Restrict Editing ⇒ Allow only this type of editing in the document ⇒ No changes (read only).
- Editing restrictions — Tracked changes: This type of protection allows only tracked changes to be made. Select File ⇒ Info ⇒ Protect Document ⇒ Restrict Editing ⇒ Allow only this type of editing in the document ⇒ Tracked changes.
- Editing restrictions — Fill-in forms: This type of protection allows filling in of form fields and content controls. Select File ⇒ Info ⇒ Protect Document ⇒ Restrict Editing ⇒ Allow only this type of editing in the document ⇒ Filling in forms.
- Editing restrictions — Comments: This type of protection allows only comments. Exceptions can be made for selected areas of the document, for everyone, or for specific individuals (using Microsoft account-associated e-mail addresses). Select File ⇒ Info ⇒ Protect Document ⇒ Restrict Editing ⇒ Allow only this type of editing in the document ⇒ Comments.
- Password to open/modify: This type of protection lets you specify a password to open and/or modify the document. This protection is not the same as the Editing restrictions’ No Changes setting. You must choose one or the other. Select File ⇒ Save As ⇒ Computer ⇒ Browse ⇒ Tools ⇒ General Options.
The rest of this section looks at these settings, showing how you enable protection and assessing the degree of protection provided.
Using digital signatures
A digital signature is an electronic certificate that provides a way for recipients to verify that a document or e-mail actually came from the sender. Digital signatures do not provide 100 percent guaranteed authentication that a document is from a non-malicious sender, but generally speaking, a document signed by someone you know and trust is likely to be more trustworthy than an unsigned document from an unknown or suspicious source.
Before you can digitally sign a document, you must have a digital signature installed on your system. To get a signature, choose File ⇒ Info ⇒ Protect Document ⇒ Add a Digital Signature. If this is the first time you’ve used this feature, Word displays the dialog box shown in Figure 11.1. Click Yes to obtain a certificate. Your system’s web browser launches and displays Microsoft’s Available Digital IDs page, listing partner organizations through which you can obtain a digital ID and download and install a certificate on your system.
FIGURE 11.1 If you don’t already have a digital signing certificate, click Yes to learn about for-fee and for-free services.

How to digitally sign a Word document
After you’ve obtained a digital signature, follow these steps to digitally sign a Word document:
FIGURE 11.2 Specify signature details here.
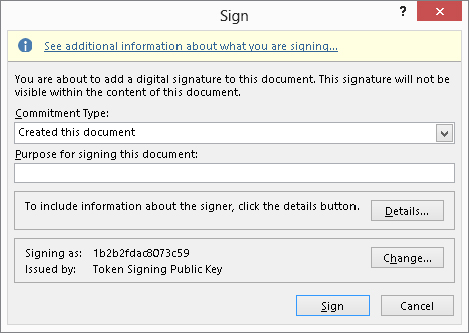
FIGURE 11.3 Don’t sign a document until you’re finished making changes to it.
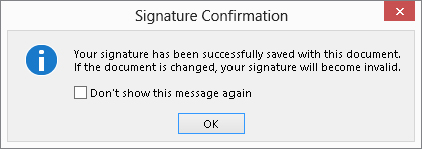
FIGURE 11.4 The Backstage view now identifies the file as a signed document.

Removing a signature
Once you’ve signed a document, the document is locked against further changes until the signature is removed. Unlike document permissions, a digital signature can be removed from a Word document by anyone with the appropriate version of Word. Once a signature has been removed, however, it can only be signed again by the owner of the original signing certificate. Hence, if I send you a signed file and you remove my signature, you can edit the file I sent you and make any changes you want. However, you will not be able to restore my signature.
When you open a signed document, the messages shown in Figure 11.5 appear at the top of the document. You can click Edit Anyway if you want to make changes to the document.
FIGURE 11.5 Messages tell you when a document you open has been marked as final and signed.

To view and work with signatures in the document, click the View Signatures button in the Message Bar, or choose File ⇒ Info ⇒ View Signatures. The Signatures pane opens at the right side of the document window. To remove a signature, move your mouse pointer over it, click the drop-down list arrow that appears, and click Remove Signature as shown in Figure 11.6. (Note that you also can view details about the signature.) At the prompt that asks whether you want to remove the signature permanently, click Yes.
FIGURE 11.6 View and work with digital signatures in the Signatures pane.

Don’t let the words “permanently” and “cannot be undone” in the Remove Signature message box throw you. This simply means that you can’t remove someone’s signature, change that $1,000 fee to $100,000, and then reaffix their signature. Once you remove someone’s signature, only they can put it back.
Adding a signature line
Word 2013 now includes the ability to specify a signature line to prompt for a recipient’s signature. You can include a signature line on a contract, a proposal, a change order verification, or any other type of document that requires a signature to indicate agreement or approval. To add a signature line in a document:
FIGURE 11.7 Set up the signature information here.
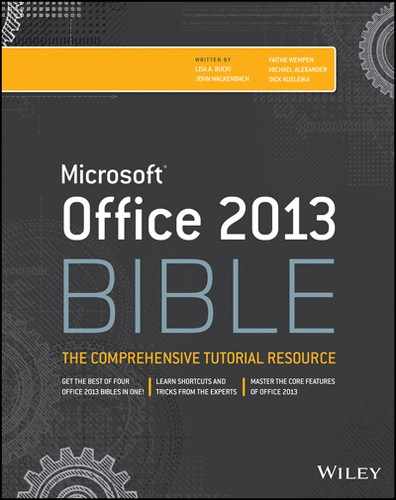
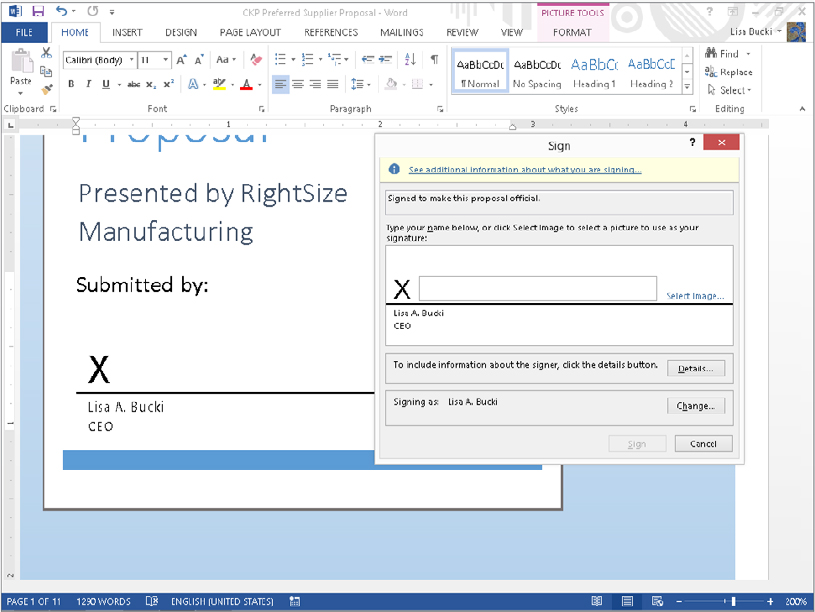
As shown in Figure 11.8, the signature line is a special object in the document. To use it to sign the document, double-click it. The Sign dialog box appears. If you previously scanned your actual signature and saved it as a graphic file, you can click Select Image and use the Browse choice in the Insert Picture window that appears to select and insert the signature file. Otherwise, just click in the text box, type your signature, and click Sign.
FIGURE 11.8 Double-click the signature line to open the Sign dialog box so you can add your signature.
Document Inspector (removing private/personal information)
You can use the Document Inspector to see what private or personal information resides in a file and remove it. The Document Inspector checks for the kinds of information and content shown in Figure 11.9. To display the Document Inspector, choose File ⇒ Info ⇒ Check for Issues ⇒ Inspect Document ⇒ Inspect Document. By default, all eight areas are checked. Remove checks if you don’t want those kinds of information removed. For example, if the purpose for sending a document to someone is to convey the XML data it contains, then remove the check next to Custom XML Data. On the other hand, if the document might contain “colorful” comments about someone’s draft, you probably do want to inspect it for those. When the right checks are checked and the wrong checks are unchecked, click Inspect.
FIGURE 11.9 Use the Document Inspector to remove private/proprietary information before passing a document along to someone else.

The Document Inspector inspects the current document for each of the types of material or data indicated. If it finds any, the Document Inspector dialog box is redisplayed, with Remove All buttons next to each type of content that was found, as shown in Figure 11.10.
FIGURE 11.10 A red exclamation mark means that the Document Inspector found potentially sensitive content, and the check mark indicates that the specified type of content was not found.
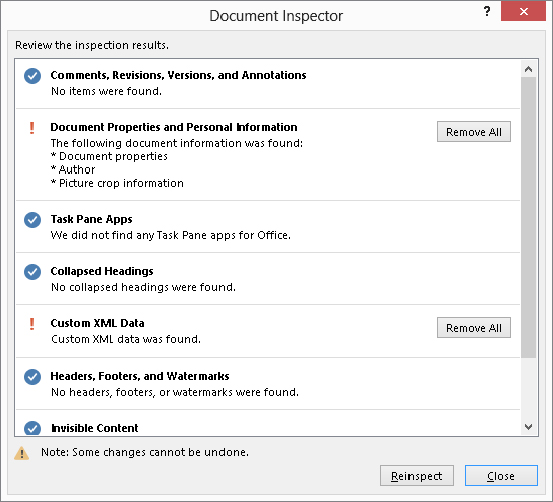
The Document Inspector does not provide further details about exactly what it found. You have two options: Click Remove All to remove the found items, or click Close and review the types of items found by Document Inspector. You can remove the content yourself manually or you can return to the Document Inspector and use Remove All once you’re satisfied that you want something removed.
Formatting and editing restrictions
The Restrict Formatting and Editing settings can provide a measure of protection for your document. You can limit the type of formatting that users can apply, limit the types of changes most users can make, and apply exceptions for trusted users. Specify these settings in the Restrict Editing pane, which you can display in one of two ways:
- Choose File ⇒ Info ⇒ Protect Document ⇒ Restrict Editing.
- Click the Review tab, and click Restrict Editing in the Protect group.
Limit formatting to a selection of styles
To limit formatting to certain styles, in the Restrict Editing pane shown in Figure 11.11, click to place a check next to Limit formatting to a selection of styles. To choose which styles, click Settings. The Formatting Restrictions dialog box now appears, also shown in Figure 11.11.
FIGURE 11.11 With Limit formatting to a selection of styles checked, click Settings to choose those limits.

The Formatting Restrictions dialog box provides the following options:
- Checked styles are currently allowed: Place a check next to each style you want to allow. Remove checks for styles you want to disallow. Note that the styles listed might be limited based on settings in the Manage Styles dialog box, discussed in Chapter 7, “Using Styles to Create a Great Looking Document,” so consult that earlier discussion if you need to display additional styles here. Note that Normal is not included in the list. As much as you might like to, you can’t deny access to the Normal style.
- Recommended Minimum: If the list is too inclusive, click Recommended Minimum, and then add or remove checks as needed.
- None: If the style list is way too inclusive, then choose None, and place a check next to just those you want to allow.
- All: If the style list is way too restrictive, then click All and remove the check next to those you want to disallow.
- Allow AutoFormat to override formatting restrictions: If AutoFormat’s rules and practices are sufficiently rigorous for your purposes, click to allow this option.
- Block Theme or Scheme switching: Choose this option to limit formatting to the currently applied theme or scheme.
- Block Quick Style Set switching: Choose this option to use style definitions from the current document and template only.
When you’re ready to proceed, click OK in the Formatting Restrictions dialog box. Word next displays the message box asking whether to remove disallowed styles from the document. Click Yes to remove disallowed styles or formatting. Note that if any styles are removed, text will be reformatted using the Normal style.
Finally, click Yes, Start Enforcing Protection in the Restrict Editing pane. The Start Enforcing Protection dialog box prompts you to password-protect your formatting restrictions, if desired. Either type the password twice in the text boxes provided and then click OK, or click OK without entering passwords. Even if the level of protection isn’t as strong as rights management, applying passwords to your restrictions is still better than nothing.
With formatting restrictions applied, a number of formatting tools, commands, and keystrokes on the Home tab are grayed out as unavailable.
No changes (Read only)
You can protect all or part of a document against changes. You can make different exceptions for different users. Suppose, for example, that you have a document that has been written by a group of people. You want each individual to be able to edit his or her own section, but not that of others. At the same time, you don’t want to have to manage different documents.
The solution is to create a document with a specific area for each individual. You make the entire document read-only, but you make an exception for each individual’s section so that the individual responsible can make changes as needed.
To set a document as read-only, open the Restrict Editing pane. In the Editing restrictions section, click the check box to Allow only this type of editing in the document, and use the accompanying drop-down list to set it to No changes (Read only).
To make an exception, select the part of the document to which you want to allow changes by someone (or everyone). This selection can be any part of the document — a single letter, word, sentence, line, paragraph, and so on. If you want the exception to apply to everyone, click the check box next to Everyone. Or, if other groups are listed, you can place a check next to any of them.
To make an exception for individuals, if they are listed, click to place a check by their names. If the individuals aren’t listed (or if no individuals are listed at all), click More Users. In Add Users, type the user IDs or e-mail addresses for the individuals you want to exempt from the read-only proscription, and click OK. Word attempts to verify the names/addresses you added. If they are verified, they are added to the list of individuals.
Back in the Restrict Formatting and Editing pane, you need to place a check by the name(s) and e-mail address(es) you added. As shown in Figure 11.12, Word highlights and bookmarks the text that you’ve indicated the checked user can edit. Add exceptions for other users as desired, and then click Yes, Start Enforcing Protection. Add and confirm a password if desired, as shown in Figure 11.13, noting that the document is not encrypted and is susceptible to hacking by malicious users. If you enable User authentication, Word will use Information Rights Management to control the permissions. Click OK to finish applying the permissions.
FIGURE 11.12 The user [email protected] has been granted an exception to edit the Executive Summary information.
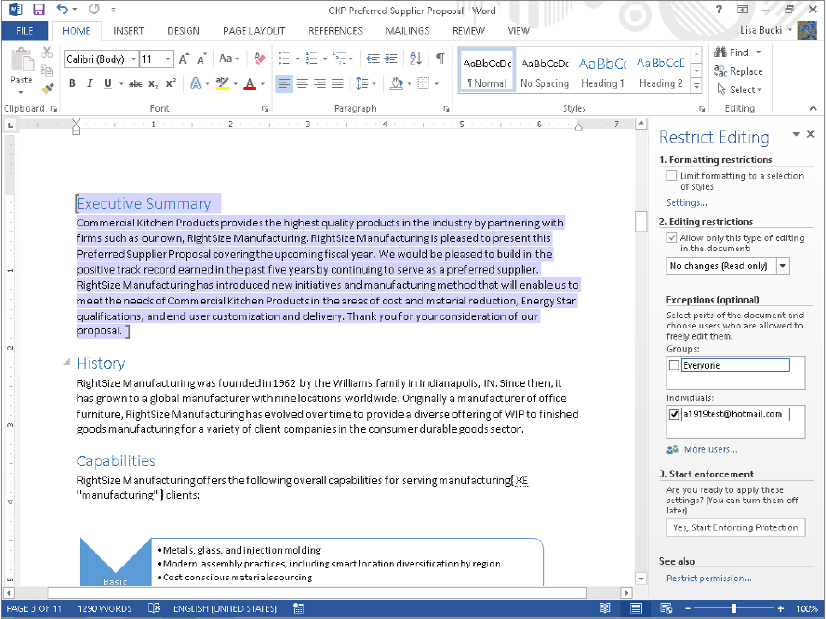
FIGURE 11.13 Applying a password to the protections

Comments
Choosing this protection option from the Editing restrictions drop-down list in the Restrict Editing pane results in protection identical to the No changes (Read only) option, except that all users can insert comments wherever they want to. Refer to the preceding discussion to see how to apply this protection, substituting Editing restrictions at the appropriate point.
Tracked changes
Another option is to allow editing but only tracked changes. That way, you can see who changed what, and when. This is an important feature in controlling the editing/revision process. To protect a document for tracked changes, open the Restrict Editing pane, click to enable Editing restrictions, and choose Tracked changes.
To turn protection on, click Yes, Start Enforcing Protection. The Start Enforcing Protection dialog box appears, where you can set and confirm a password. Note that User authentication is not available for this kind of protection. When you click OK, protection is enabled, and the document switches into Track Changes mode. To turn protection off — which is necessary for accepting/rejecting tracked changes — click Stop Protection at the bottom of the Restrict Editing pane.
Filling in forms
To protect a fill-in form that you’ve created in Word by adding fields and content controls or by downloading and modifying a template with fields and controls, click Restrict Editing in the Protect group of the Review tab of the Ribbon. In the Restrict Editing pane, click to enable Allow only this type of editing in the document, open the drop-down list, and click Filling in Forms. Click Yes, Start Enforcing Protection.
Applying a password to open/modify a Word document
A final kind of password protection is well hidden in Word 2013. This legacy feature offers the same weak protection already noted in that passwords aren’t impossibly difficult to hack and crack. The bottom line: Rely on this kind of password protection at your own risk. It offers minimal, if any, protection. Worse, it offers the illusion of protection, and thinking a document is well protected when it’s not is perhaps worse than no protection at all, because you are unlikely to be as careful with the document as you would be if you knew it was completely unprotected.
You can set two different passwords: one that enables a user to open the document, and another that enables the user to make changes. To enable this kind of password protection, choose File ⇒ Save As ⇒ Computer ⇒ Browse. In the lower-right corner of the Save As dialog box, choose Tools ⇒ General Options, to display the General Options dialog box shown in Figure 11.14. Type a password in Password to open, and/or in Password to modify. Both are optional.
FIGURE 11.14 Applying Open and Modify passwords to a Word document
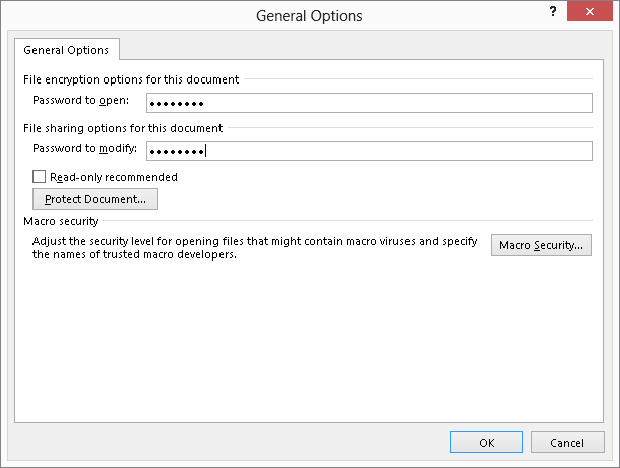
The Read-only recommended option applies only if there is no password for modifying the document. If this option is enabled, the user is provided with a read-only recommendation when the file is opened and an easy way to select read-only.
When you click OK, you are prompted to confirm any passwords and are returned to the Save As dialog box. Click Save to save the document with the password settings.
When you try to open a password-protected file, Word prompts you to enter the relevant passwords. If you know the password to open but not the password to modify, you can click Read Only to open the document in “read only” mode. Why the quotes? Because it’s only the file itself that is read only. The document window can be edited willy-nilly, unlike when using other kinds of protection discussed earlier. If you save the file under a new name, the new file will inherit the password settings, but if you copy the file to the Clipboard and save under a new name, the protection is history.
Comments and Tracked Changes
Comments and tracked changes are two ways Word provides for reviewing others’ Word documents. Comments themselves are easy to explain: They are notes, questions, suggestions, and other details that a reader offers to the author of the Word document. Although a commenter might suggest a particular edit within a comment, the Comments feature does not integrate any edits or changes into the text. It’s not unusual to copy the text of a suggestion from inside a comment and paste it into the text, but comments themselves aren’t part of the flow.
Tracked changes, however, are part of the flow. Tracked changes are insertions and deletions made to a Word document. You can see what was inserted or deleted, by whom, and when. That way, if you have multiple reviewers making changes in a document, you can see who made which changes, which helps in deciding how to integrate inconsistent edits.
Viewing comments and tracked changes
Because comments are not part of the main text, Word has a lot of flexibility in how it can display them. This section looks at your display options, as well as how to add and work with comments as needed. Use the choices in the Tracking and Comments groups of the Review tab to work with comments.
Word includes two views for working with comments and tracked changes: Simple Markup (the new default view) and All Markup. Choose the overall view using the Display for Review drop-down menu in the Tracking group of the Review tab.
In the default Simple Markup view, shown in Figure 11.15, a comment balloon in the right margin shows you that there’s a comment. A red line appears in the left margin beside any line(s) with tracked changes. To see the comment text and author, click the comment balloon. Click the balloon again to hide the comment information.
FIGURE 11.15 The Simple Markup view initially hides comment text and tracked changes.

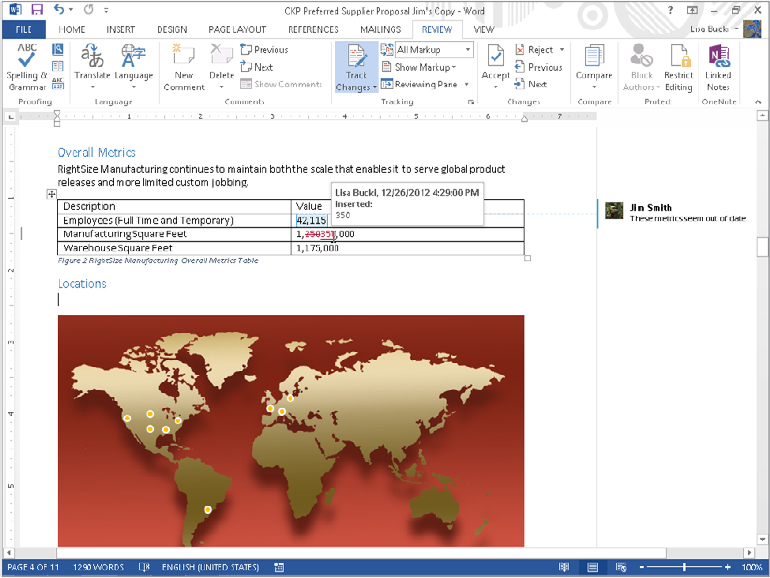
In All Markup view, shown in Figure 11.16, a comment area appears at the right side of the screen, and comment text appears there with a dashed line and highlight showing you the selected text that the comment refers to. These are also considered comment “balloons,” although they don’t look as much like balloons as they do in Simple Markup view. Tracked changes are marked up using a highlight color, strikethrough for deleted information, and underlining for inserted information. If you move your mouse pointer over a tracked change, a tooltip appears to show you who made the change and when.
FIGURE 11.16 Hover the mouse over a tracked change to find out who made the change.
If you also want tracked changes to display as balloons in the right margin, in the Review tab’s Tracking group, choose Show Markup ⇒ Balloons ⇒ Show Revisions in Balloons. To set comments to display inline (which isn’t really correct, because comments themselves do not display inline), choose Show Markup ⇒ Balloons ⇒ Show All Revisions Inline. When you make this choice, no comment balloon of any type appears. Instead, the commented text is highlighted and the reviewer’s initials appear in brackets beside the comment. You can right-click the initials and click Edit Comment to see the comment in the Revisions pane at left. For the sake of consistency, this chapter assumes you are not working in the Revisions pane.
Inserting, editing, replying to, and deleting comments
To insert a new comment, first select the text that you want to comment about. In some cases, you can even click on a graphic object and insert a comment about it, but that doesn’t work in all instances. Click the Review tab, and then click New Comment in the Comments group. (You also can insert a comment with Insert ⇒ Comments ⇒ Comment, but this method displays the Revisions pane, which as noted above is more cumbersome to work with than comment balloons.) In Simple Markup view, type your comment inside the yellow Comments box that opens, and then click the Close (X) button on the box. In All Markup view, a balloon appears in the right comment area. Type the comment, and then click in the text to return to normal editing.
To edit a comment, click its balloon in either Simple Markup or All Markup, and make changes in the comment box, and then click the Close (X) button or click in the text to finish.
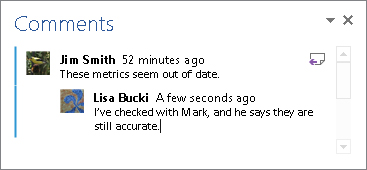
Word 2013 includes the new ability to reply to a comment. Click the comment, and then click the Reply button (page with an arrow) at the right side of the box (see Figure 11.17). Type the comment text in the reply comment that appears, as shown in Figure 11.17, and then click Close (X) or click in the text to continue.
FIGURE 11.17 Click the page with the arrow in the Comments box to reply to a comment.
If you’ve taken the action recommended in a comment by another reviewer and want to leave it it place but indicate that it is no longer active, you can right-click the comment in the comment balloon or box, and click Mark Comment Done. This grays out the comment text.
To delete a comment, click the comment in either view, and then in the Comments group of the Review tab, click Delete. In All Markup view, you can right-click the comment and click Delete Comment. Click the arrow on the Delete button in the Comments group and then click Delete All Comments in Document if you’re ready to remove all changes.
Tracking changes by various editors
Unlike comments, tracked changes can be displayed inline. You also have a variety of options regarding which aspects of tracked changes to display.
Track Changes Options
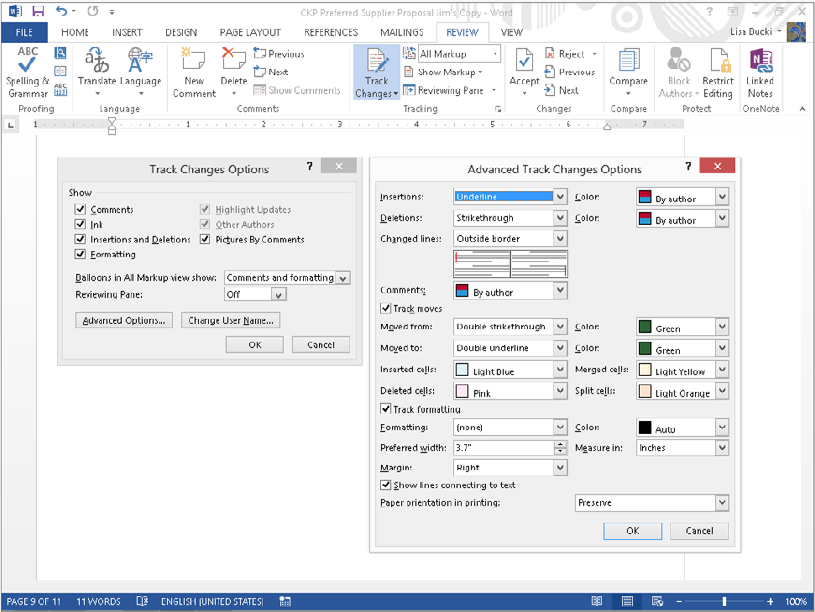
To see the main set of tracking options, click the dialog box launcher in the Tracking group of the Review tab. In the initial Track Changes Options dialog box that appears (see the left side of Figure 11.18) you can change some overall options such as what to show or hide. If you click Advanced Options, more detailed choices appear in the Advanced Track Changes Options dialog box shown at the right in Figure 11.18. Make the desired changes, and then click OK to close each dialog box. Options in the Advanced Track Changes Options dialog box include:
- Markup: These options control the formatting and colors to use when displaying insertions, deletions, and comments, as well as how to display lines indicating where changes have been made. Default formatting is to use underlining for insertions and strikethrough for deletions. If Color is set to By author, Word automatically chooses different colors for different authors. Note, however, that whereas your comments might display as green on your computer, they might display as magenta on somebody else’s. Therefore, if you’re describing a change in a phone conversation, don’t assume the other party is seeing exactly what you’re seeing.
- Track moves: These options control the formatting and colors to use when displaying text that was moved from one location to another in the document. If you don’t want to track moves, remove the check next to Track Moves.
- Track formatting: These options control how formatting changes are represented. If you don’t want to track formatting changes, remove the check next to Track formatting. Note that this doesn’t affect the display of tracked formatting. It controls whether formatting is tracked at all. When you turn this off, existing tracked formatting changes remain in the document, but subsequent formatting changes are not tracked at all. To hide tracked formatting changes, choose Show Markup in the Tracking group of the Review tab and remove the check next to Formatting.
FIGURE 11.18 Use Track Changes Options to change how/if changes are tracked and displayed.
Turning on Track Changes
To enable tracked changes, click the Track Changes button in the Tracking group of the Review tab. Notice that the upper and lower portions of that button are separate. Use the upper portion to toggle tracked changes, and use the lower portion to choose Track Changes or Lock Tracking. Lock Tracking enables you to add a password to prevent other users from turning off change tracking.
Alternatively, if Track Changes is displayed in the status bar, you can click it to toggle tracking on and off. If Track Changes is not displayed, right-click the status bar and click to place a check next to Track Changes. Then click outside the menu to close it. Once it’s on the status bar, click Track Changes to turn tracking on or off. Track Changes can also be toggled using Ctrl+Shift+E.
Show Markup
If your comments don’t display, it’s possible that they are turned off. In the Review tab, click the drop-down arrow next to Show Markup in the Tracking group to display the options shown in Figure 11.19.
FIGURE 11.19 Click Show Markup in the Review tab to control the kinds of markup that Word displays.
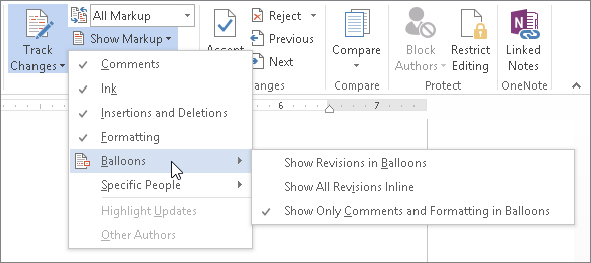
Show Markup options affect only the display of markup. They do not affect whether changes are tracked. Display options are as follows:
- Comments: Choose to display or not display comments.
- Ink: When using a tablet, touch-enabled, or other system that supports pen annotations, use this option to choose whether to display the original ink markup (in addition to the text conversion thereof).
- Insertions and Deletions: Use this setting to control the display of textual edits (insertions and deletions). Some users prefer to deal separately with textual and formatting edits. With this option enabled and Formatting display turned off, you can selectively focus.
- Formatting: Use this setting to hide or show formatting changes.
- Balloons: Use this setting to control the use of balloons for revisions and comments as described earlier.
- Specific People: Use this setting to selectively show or hide specific reviewers’ edits and comments.
- Highlight Updates: When you are co-authoring a document on a SharePoint server or Office365, this option highlights updates by the other author(s).
- Other Authors: When you are co-authoring, this option lists other authors currently working on the same document.
Display for Review
Use the Display for Review menu in the Tracking group of the Review tab to determine exactly what displays when a document contains tracked changes. As noted earlier, you use this drop-down to change between All Markup and Simple Markup views, which were discussed in the “Viewing comments and tracked changes” section earlier. Its other two options are:
- No Markup: All markup is hidden, and you see the document as it would appear if all changes were accepted. This view is useful when a document has been heavily edited. You can read a “clean” copy of the new version without the change tracking markup slowing you down.
- Original: All markup is hidden, and you see the document as it appeared before any markup occurred. This is how the document would appear if all changes were rejected.
Accepting and Rejecting Changes
Use the Changes group of the Review tab, shown in Figure 11.20, to review changes to determine whether you want to accept or reject them. Use Next or Previous to navigate to the nearest comment or change. Use Accept and Reject to integrate or remove changes. You can also right-click a change and choose Accept or Reject.
FIGURE 11.20 Accept All Changes Shown is available only when some changes are hidden.
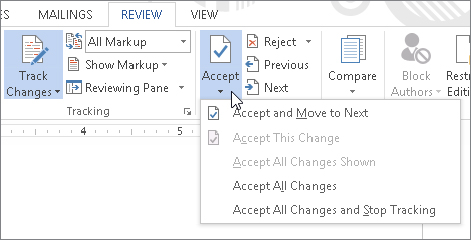
Here is a brief overview of what happens when you choose Accept or Reject:
- When you accept an insertion, it is converted from a tracked change into regular text.
- When you reject an insertion, it is deleted.
- When you accept a deletion, it is removed entirely from the document.
- When you reject a deletion, the original text is restored.
- When you accept formatting changes, they are applied to the final version of the text.
- When you reject formatting changes, the formatting is removed.
Note that the Accept and Reject buttons in the Changes group of the Review tab both have upper and lower sections. The lower section of the Accept button features the options shown in Figure 11.20. Reject has similar options. Note that the third option, Accept All Changes Shown, is available only if one or more kinds of changes are hidden in the Show Markup tool.
Combining Collaborative Documents
Word can compare and combine different versions of the same document. If the document was revised without tracking turned on, you learn how to compare the two different versions. If a document was revised by multiple people, whether or not Track Changes was turned on, you learn how to combine all of the different edits into a single (hopefully manageable) document.
Comparing Documents
Word enables you to compare two documents, usually different versions of the same document, using what Microsoft calls legal blackline. Basically, you feed Word two documents, designating one as the original document and the other as the revised document. Microsoft then creates a third document (the default setting) with markup indicating the changes. Perhaps not surprisingly, this new document contains tracked changes, and you can use Word’s Review tab tools to manage the document, to decide what to keep and what to zap.
In a nutshell, suppose that you have two versions of the same document, and the second was accidentally edited without Track Changes turned on. The Compare feature enables you to correct that “oversight” by creating a new document that shows what the original document would look like if the revisions had been made with Track Changes turned on.
To initiate the comparison, in the Review tab, click Compare in the Compare group.
Word displays the Compare dialog box. Click the More button to display the full Compare Documents dialog box shown in Figure 11.21. When you first click the More button, you see the default settings for Compare. By default, all of the Comparison settings are enabled: Show changes at is set to Word level, and Show changes in is set to New document. Use the Original and Revised document drop-down arrows to choose the documents you want to compare. If the documents you seek aren’t in the alphabetical list of recent files shown, choose Browse, either in the list or by clicking the Browse button to the right of the drop-down list.
FIGURE 11.21 By default, the result of the comparison is placed into a new document.
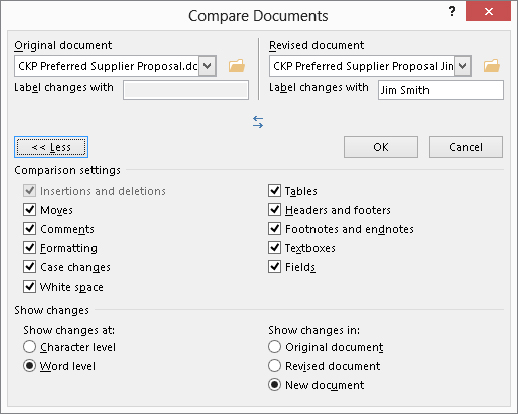
Under the Revised document choice, Label changes with is set to the current default user name (from Word’s Popular Options). You can change that to whatever you like — it doesn’t even have to be a user’s name.
Under Comparison settings, choose the elements you want included in the comparison. Under Show changes at, you can choose to compare character by character or word by word. Choose Character level if you want to see the exact edits that were performed. For example, if the original document has “word” and the revised document has “world,” in which the “l” was inserted, then the Word level setting would simply show you that “word” was replaced by “world,” whereas Character level would show the fact that an “l” was inserted.
As noted, by default, Compare puts the changes into a new document. However, if it suits your purposes better, you can route the changes into the document designated as either the Original document or the Revised document under Show changes in at lower right. Note that if you’ve now changed your mind about which is which, you can click the Swap Documents tool.
When you’re ready to make the comparison, click OK. If either of the two documents being compared contains tracked changes, for purposes of the comparison, Word displays a message telling you that it assumes that the changes are accepted. Click Yes to continue the comparison.
Word arranges the Compared Document (the Show changes in document), the Original, and the Revised into a document window, along with the Revisions pane, as shown in Figure 11.22. If you chose the Save to a new document option, note that the tentative file name is Compare Result #.
FIGURE 11.22 Word shows you exactly what editing has taken place.

In this view, notice that the three document windows scroll at the same time. The idea is to show the original, revised, and resulting edits at the same time. Depending on screen size as well as how large the Word window is, this can be difficult. However, Word makes a valiant effort.
Use the Review tab tools, as described earlier in this chapter, to set the view as needed, and to move to the Next or Previous changes, accepting or rejecting changes as you see fit. When you’re done, if you want to save the compared result, choose File ⇒ Save As (or Save, but read this section’s Warning first), and save as usual.
Protection
You cannot compare two documents if either of them is protected for tracked changes. When you try, Word will advise you that it can’t “merge” the documents due to document protection. In fact, any kind of document protection will produce the objection shown in Figure 11.23. If you see this message, unprotect the documents you are trying to compare and try again, assuming you have the necessary permissions to unprotect the documents.
FIGURE 11.23 You can’t compare two documents if either of them has protection enabled.

Gaining more screen real estate
If you find that the default view offered by the Compare feature doesn’t give you enough room to maneuver, you can selectively display (or not) the Original and Revised documents. In the Compare group in the Review tab, click Compare, and then click Show Source Documents. You can click Hide Source Documents to close those windows. You can also close the Original and Revised documents by clicking the Xs. If you change your mind, click Compare ⇒ Show Source Documents and click Show Both to redisplay the source documents.
Combining Documents That Contain Tracked Changes
When you have multiple documents containing tracked changes and you need to keep track of who changed what (and when), use the Combine command to merge the tracked changes two at a time until all of the different reviewers’ changes have been incorporated into one document. As with the Compare command, documents are combined two at a time. If any document in the paired combinations is protected, you cannot continue. Before you invest a lot of time doing comparisons, make sure that you can use the documents you’re planning to compare.
Combining multiple documents containing changes
When combining or merging changes from multiple documents, it doesn’t matter if the changes have been tracked. At the end of the process, changes attributable to any given reviewer will be tracked due to the way the documents are combined.
Suppose, for example, that document A is the original document written by Lisa Bucki, and that document B has changes that were made by Jim Smith — some of them tracked and some of them not. When you combine document A and document B, everything that is different in document B will be attributed to Jim Smith, whether tracked or not.
When you combine documents, you have the same options you have when you compare them, in terms of where the combined changes go. It works best if you always combine changes into the same document, preferably the original to which the other changes were applied. Suppose that you start with document A and give it to four reviewers. Each of them takes a whack at it at the same time, so you end up with four different revisions to document A. Let’s call those revisions Bob, Jim, Ted, and Lisa. There is no temporal sequence, and it doesn’t matter when each is compared with the original, A.
One way to proceed is as follows (keeping in mind that the order for combining with Bob, Jim, Ted, and Lisa doesn’t matter):
- Compare A with Bob’s version, putting the results in A. Save A.
- Compare A with Jim’s version, putting the results in A. Save A.
- Compare A with Ted’s version, putting the results in A. Save A.
- Compare A with Lisa’s version, putting the results in A.
At the end of the process, A will contain tracked changes from each of the four reviewers. It won’t necessarily be easy to sort out, but all of the changes will be in a single document.
Running the Combine Documents command
To kick off the process, in the Review tab’s Compare group, click the Compare button arrow, and then click Combine. The Combine Documents dialog box that appears is essentially identical to the Compare Documents dialog box in Figure 11.21. Set Original document to the earliest version you have, and set Revised document to a revised version of the original. Choose the desired options and set Show changes in to New document or Original document (but make a backup copy of the original before you combine the documents). Click OK to combine that set.
After the Combined Document appears, resolve any formatting changes and then repeat the process for the next revision. Continue until each of the revised versions has been combined. Finally, you’ll have a version that contains all of the changes, as well as the reviewers’ names. If the originals contain tracked changes, you’ll also have the times the changes were made. For untracked changes in the revised versions, the revision time will be the time that the combine operation occurred for that revision and hence won’t be meaningful.
Summary
In this chapter, you’ve learned about the many different kinds of document protection and security available in Word. You should now have a good idea about which forms of protection and security are useful, and which ones give only partial security. You’ve also learned about tracking changes and commenting on Word documents, as well as how to compare and combine documents. You should now be able to do the following:
- Protect a document so that only a specific kind of editing can be performed.
- Use Word’s legacy password protection, while understanding its limitations.
- Add comments and enable Track Changes in a document.
- Navigate and work with comments and tracked changes.
- Set options that let you display a variety of elements when tracking changes in a document.
- Compare two documents that contain no tracked changes, automatically marking up one so you can review the changes.
- Combine an original document with independently revised versions to create a version that contains tracking.