Chapter 10
Data Documents and Mail Merge
IN THIS CHAPTER
Reviewing data sources you can use with Word
Formatting source data
Attaching a data source to a data document
Editing data
Assembling a data document
Merging to a printer
Using the Mail Merge Wizard
This chapter shows you how to create specialized types of documents — such as envelopes, labels, form letters, mass e-mail, catalogs, and directories — by combining a main document with a list called a data source. Merging can save a lot of time once you are familiar with the process, but it does require careful setup for both the data source and the main document. This chapter covers how to bring your data and document together without errors so you can save time and let Word do some of the heavy lifting for you.
Previewing the Mail Merge Process
Let’s say you need to send a letter about a new product to 20 clients, and you already have the client names and addresses typed into Excel. Rather than manually retyping each name and address into a separate copy of the letter, you can write the letter, specify where the name and address information from the list should go, and perform the mail merge to create 20 versions of the letter — each personally addressed for a specific recipient. Even better, you can quickly create a matching set of addressed envelopes or labels to use for the mailing.
You also can use mail merge to create updateable versions of other long documents. For example, let’s say you maintain a directory of contact information for your department at work. You have access to the main employee database from the HR department, but you only need to list the employees for your department. During the merge process, you can select which items to use based on certain criteria, so Word easily pulls out just the list of colleagues from your department for the merge into the main directory document you’ve set up.
Setting up a mail merge main document and data source and merging them together involves a number of steps, some of which must be done before others can happen:
Data Considerations
It might seem odd to discuss the data source first, but the data source is often the most important consideration for a merge and typically receives the least attention. Once you’ve identified and correctly set up your data source, the rest of the merge process is made much easier.
Some data considerations, such as usability (does the data set contain what you need?) and accuracy pretty much go without saying. Other considerations are equally important, such as whether the data source will be available when you need it, the ease of updating the data source, and access to the data source both for other data users as well as data creators.
Sometimes, your computer isn’t the only device that needs to access data. For some documents, you will need access to data in other places — for example, on a laptop (notebook), for a presentation while traveling, on a different desktop computer at home, or elsewhere.
You can take several approaches to solving the need to either access data from another location or take the data with you. For the former, especially if the data source is large, unwieldy, or nonportable for other reasons, some kind of server solution will provide the answer. This might take the form of a data file residing on a SharePoint or other server, or you might place it in your SkyDrive so you can download it and reattach it as needed from any location. To see what’s involved with using your SkyDrive, see Chapter 39, “Collaborating in the Cloud with SkyDrive.” If you work in an enterprise, your company might have other kinds of server facilities that can serve as data sources for Word.
For portability, the answer often will be to extract a portion of a full data set — either a limited number of data records or a sample containing just the data fields you need. Every database has some unit or focus, such as individuals (for example, contact records) or products. Each person or product in a given database is called a data record.
Each piece of information about a person or product is called a data field. For example, a person’s name, telephone number, address, e-mail address, and date of birth each would be data fields. For a product, data fields typically include name, SKU, shipping weight, price, color, description, and cost.
Unless a data set was constructed explicitly for a single purpose, most data sets will contain more records than you need, as well as more data fields than you need for a specific data-driven Word document. Often, it’s possible to extract just what you need and take it with you. You have a variety of ways of doing that, as you see in this chapter.
Reviewing Data File Formats
Word enables you to use data from a variety of formats. You can create a data source directly from Word as part of the mail merge process or use an existing source. If you use an existing data source document, your options include the following:
- Outlook contacts
- Office Database Connections (*.odc)
- Access 2010 and later Databases (*.accdb, *.accde)
- Access 2007 Databases (*.mdb, *.mde)
- Microsoft Office Address Lists (*.mdb)
- Microsoft Office List Shortcuts (*.ols)
- Microsoft Data links (*.udl)
- ODBC File DSNs (*.dsn)
- Excel Files (*.xlsx, *.xlsm, *.xlsb, *.xls)
- Web Pages (*.htm, *.html, *.asp, *.mht, *.mhtml)
- Rich Text Format (*.rtf)
- Word Documents (*.docx, *.doc, *.docm, *.dot)
- Text Files (*.txt, *.prn, *.csv, *.tab, *.asc)
- Database Queries (*.dqy, *.rqy)
- OpenDocument Text Files (*.odt)
Using most of the data source formats works in a similar fashion, so there’s no need to go through each and every type in detail. However, this chapter will cover the most common formats. Keep in mind that although the chapter examples repeatedly use names and addresses, you’re by no means limited to those. Your list could be a list of products, an inventory, planetary information for a school project, and more. The idea is to use Word to present and format data in some fashion; it doesn’t matter to Word what the data pertains to.
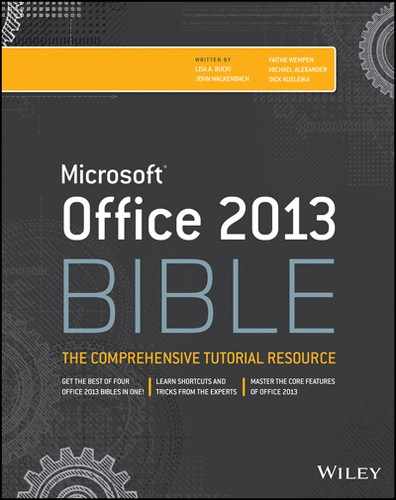
To begin, on the Mailings tab in the Start Mail Merge group, click the Select Recipients tool, exposing the options shown in Figure 10.1.
FIGURE 10.1 When selecting a data file, you can create it from Word, use a variety of other formats, or select data from Outlook Contacts.
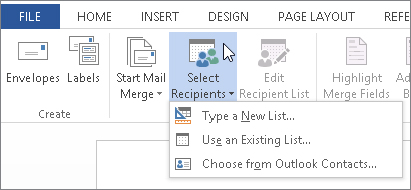
Typing a new list
To create a new list (a somewhat generic euphemism for “data document”) in Word for a mail merge document:
FIGURE 10.2 Build your merge data source in this dialog box.
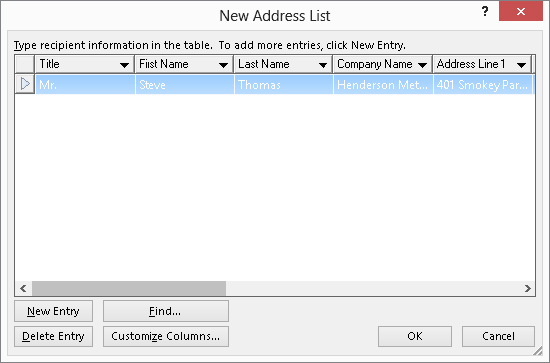
FIGURE 10.3 Word saves new data source lists in the Microsoft Office Address Lists format.
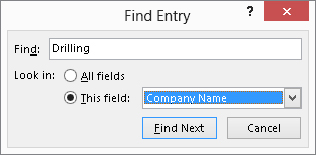
While you’re working in the New Address List dialog box, if you’ve entered a lot of data and need to find a particular entry, click Find to display the Find Entry dialog box shown in Figure 10.4. Type the search text into the Find field. To search in a particular field, click the This field option button and select the desired field from the accompanying drop-down list. Click Find Next to find the next entry that matches the Find text in the field(s) specified. When the last matching entry is found, click OK to close the message. Click Cancel at any time to dismiss the Find Entry dialog box.
FIGURE 10.4 Once your data set is a bit larger, you might need some help finding a record.
If you want to create a list that consists of data other than a name and address list, click the Customize Columns button near the bottom of the New Address List dialog box. As shown in Figure 10.5, you can use the tools in the Customize Address List dialog box that appears to change the fields in your list.
FIGURE 10.5 Use Customize Address List to specify your own fields for a merge data source.

- To add a field select the field above where you want to add the new field, and click Add; type the field name in the Add Field dialog box that appears, and click OK. To delete a field select the field and click Delete; click Yes in the dialog box that prompts you to confirm the deletion.
- To rename a field, select it, click Rename, type a new name in the To text box of the Rename Field dialog box, and click OK. (To add a field at the beginning, select the first field and click Add, as before. The added field will be second on the list, not first. Select the added field and then click Move Up.)
TipTo save time, rather than delete all of the existing fields and create new ones, rename the existing fields. They are not tied to particular types of data, so it doesn’t matter what they’re called.
- To rearrange the fields, click a field you want to move, and then click Move Up or Move Down, as needed.
When you’re done customizing the list fields, click OK. Then you can make entries in the list as described earlier.
Word and text files
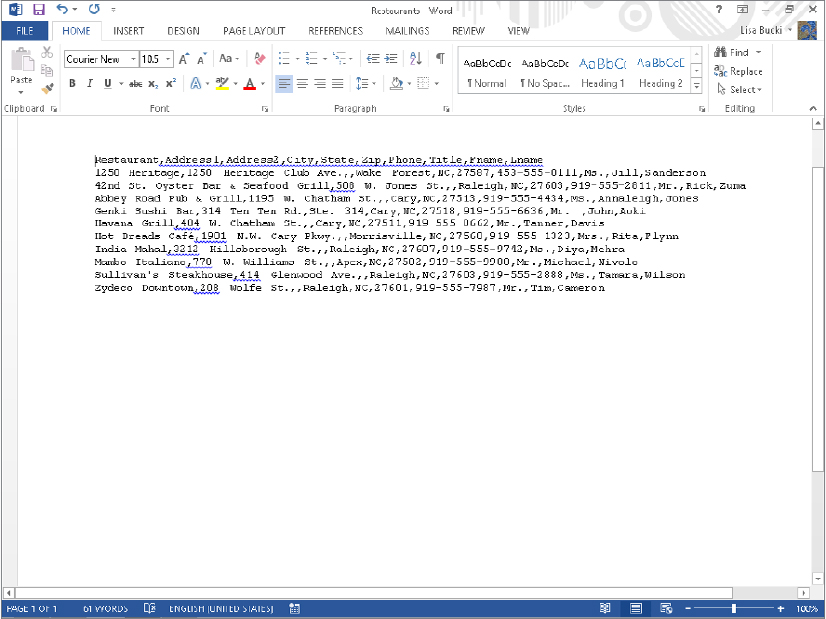
You can also use a Word document as your data source. Using a Word file as the data source usually works best when the data is stored in a table, but that’s by no means essential. You can use a plain Word document in which the fields are separated by tabs, commas, slashes, or another delimiter. Plain text (∗.txt) or comma-separated value (∗.csv) files also should be delimited. Regardless of how the data file is formatted, Word assumes that the data file contains a header row or a header line containing the field names. The header itself should be formatted the same way the data is formatted — separated by tabs, commas, in a table row, and so on.
Figure 10.6 shows a merge data source properly entered as a table in Word. Notice that the first row of the table is the header row with the field names. Each column holds a single field (such as Restaurant), and each row holds a single record (all the fields for one restaurant).
FIGURE 10.6 A merge data source document created as a Word table

Headerless data files
After you attach a data source file, you can check it by clicking Edit Recipient List in the Start Mail Merge group of the Mailings tab. (You’ll learn more about editing a data source later in the chapter.)
Word assumes that the first row of data contains the column headers. If your data source file doesn’t include column headers in the first data record, you’ll run into problems, as shown in the Mail Merge Recipients dialog box in Figure 10.7. And if a field in the top record is empty, Word displays AutoMergeField as the field title.
FIGURE 10.7 Beware of data files that don’t contain a header row!
If the recipient list doesn’t look as expected, click OK to close the Mail Merge Recipients dialog box. Open your data source document, and add the missing header row. Then return to the main document and reattach the file.
Understanding delimited files
Figure 10.8 shows a comma-separated value (*.csv) file opened in Word. The first row has the field names separated by commas, and each subsequent row contains one record, with the record’s field entries separated by commas. Note that if a field is empty, two commas appear to keep the fields properly synchronized. When you attach a delimited file, you may be prompted to convert the file and confirm the encoding to use. In most cases, you can simply click OK to continue.
FIGURE 10.8 A delimited data source file can use commas, tabs, or another type of separating character.
If your data file is not properly delimited or Word is unclear on the delimiter used, the Header Record Delimiters dialog box shown in Figure 10.9 appears when you attempt to attach the data source file. If not, select the proper delimiters from the Field delimiter and Record delimiter drop-down lists, and click OK.
FIGURE 10.9 If the data file doesn’t contain a table, Word asks you to confirm the nature of the field and record delimiters (separators).

Outlook
You can use contacts that you’ve entered in Outlook to perform a merge. To use data from Outlook, click Select Recipients in the Start Mail Merge group and select Choose from Outlook Contacts. The first time you do so, the Choose Profile dialog box may appear. Select a Profile Name and click OK. In Select Contacts, shown in Figure 10.10, if multiple contact folders are displayed, click the one you want to use and click OK.
FIGURE 10.10 When you select an Outlook contact folder, Word imports it.

After you click OK, the Mail Merge Recipients list appears, as shown in Figure 10.11. Notice in the lower-left corner that the Data Source list shows Contacts as the source for the records. See the later section “Selecting recipients” to learn how to select and limit which contacts you use from the list.
FIGURE 10.11 Imported Outlook contacts display correctly.

Excel
As in a Word table used for a data source, each column should hold one field and each row a single record; if you would like to include field names in row 1 as the header row, you can, but this is optional with Excel. If the workbook file has multiple tabs, the Select Table dialog box shown in Figure 10.12 appears. Click to select the table containing the data you want, and check or uncheck First row of data contains column headers as applicable.
FIGURE 10.12 Before attaching an Excel data source to a Word document, select the table you want to use.

Access
As for Outlook contacts, when you select an Access file or another type of database as the data source, generally Word will have no trouble interpreting the data, as it’s by definition set up correctly. Similar to when you attach an Excel data source, when you attach an Access data source, you will need to select the table or query that holds the records to merge. In the Select Table dialog box, click a table or query, and then click OK.
HTML files
When working with HTML files as data sources, note that they cannot reside on the Internet. You must first save the file to your local hard drive (or at least somewhere on your LAN or in your workgroup).
In addition, using HTML files as data sources almost never works unless the data has been carefully formatted. For best results, the data should be in a table and should contain a header row, and there should be no information above the table. If there is, the Header Record Delimiters dialog box shown in Figure 10.9 will appear, cuing you that the data won’t import correctly.
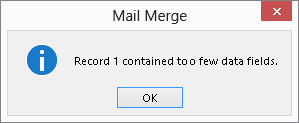
Another problem occurs if Word can’t recognize a consistent data pattern in the file or when the data source is inconsistently formatted, such as when some rows (records) contain different numbers of columns (data fields). When that is the case and you try to attach the file, an error message like the one shown in Figure 10.13 appears. Unfortunately, when this happens, the only recourse might be to edit the file to fix the problem, which ultimately means that the original data source is probably not going to be a reliable source of additional data or updates.
FIGURE 10.13 Word displays this message when different data records contain different numbers of data fields.
Choosing the Data Document Type
After you’re sure you’ve properly set up your data source file, you can move on to work with the main data document. Either open the document to use or start a new blank file. To choose the type of data document, in the Mailings tab click Start Mail Merge in the Start Mail Merge group, as shown in Figure 10.14. Some of the options are obvious; others are not. There are basically two kinds of data documents you can design. For one kind, each data record in the data source will result in a personalized copy of the data document, such as a form letter, a mass e-mail, a product specification sheet, or an invoice. For the other kind, a single document is produced in which multiple records can appear on any given page. This approach is needed for creating directories, catalogs, and sheets of labels.
FIGURE 10.14 Letters, e-mail messages, and envelopes use one record per output document, whereas labels and directories use multiple records for each output document.
Contrast, for example, using an envelope (with a different address on each envelope) with using a sheet of labels (with a different address on each label). If you have only one address and want to print only one envelope or label, you don’t need a data document, you can create an envelope within the current document by clicking Envelopes in the Create group of the Mailings tab, specifying address information in the Envelopes and Labels dialog box, and then clicking Add to Document. When you plan to crank out stacks of envelopes, each with a different address, or sheets of labels for which no two contain the same information, you need the approach described next.
As shown in Figure 10.14, Word offers five flavors of the two basic types of data documents:
- Letters: Use this option for composing and designing mass mailings for which only the recipient information varies from page to page. Use this approach too when you’re preparing sheets containing product or other item specifications with one piece of paper per product or item. You might use this approach, for example, not only when sending out a form letter or invoices, but also when producing a job manual wherein each page describes a different job title, and job information is stored in a database.
- E-mail Messages: This is identical in concept to the form letter, except that it is geared to paperless online distribution. Contrast this with using multiple e-mail addresses in the To, Cc, or Bcc field. Using E-mail merge, each recipient can receive a personalized e-mail. Using multiple addresses, each recipient receives the identical e-mail.
- Envelopes: This is also identical in concept to the form letter, except that the resulting document will be envelopes. As a result, when you choose this option, Word begins by displaying the Envelope Options dialog box.
- Labels: Use this option to print to one or more sheets of labels. This combines Word’s capability to print to any of hundreds of different label formats with the capability to associate a database with a document, printing many addresses (data records) on the same page, rather than the same address on each label.
- Directory: This is similar in concept to labels, in that you print from multiple data records on a single page. Use the directory approach when printing a catalog or any other document that requires printing multiple records per page.
To specify the kind of document, choose Start Mail Merge in the Mailings tab, and click the kind of document you want to create.
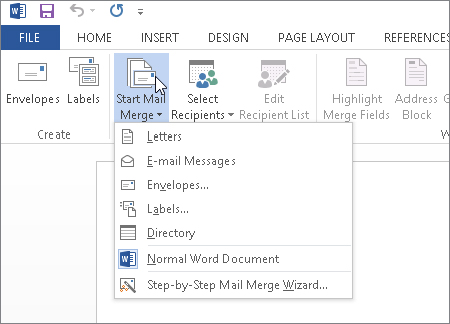
If you want step-by-step guidance through the process, note an additional option at the bottom of the Start Mail Merge list — Step-by-Step Mail Merge Wizard. Use this option if you’re unfamiliar with the mail merge process. The Mail Merge Wizard process is described later in this chapter.
Restoring a Word document to Normal
Sometimes, by accident, temporary need, or whatever, a Word document becomes associated with a data file, and you want to restore the document to normal non–mail-merge status. To restore a Word document to normal, in the Mailings tab, choose Start Mail Merge in the Start Mail Merge group, and then click Normal Word Document. Note that when you restore a document to normal status, a number of tools on the Mailings toolbar that were formerly available become grayed out as unavailable. If you later decide that you need to again make the document into a data document, you will need to reestablish the data connection.
Attaching a Data Source
To associate a Word file as the data file:
FIGURE 10.15 Selecting a data source for a merge

Note that once you’ve attached a data source to the document, Edit Recipient List and a number of other tools on the Mailings tab are no longer grayed out. If you plan to use the entire database, you can skip the following section.
Selecting recipients
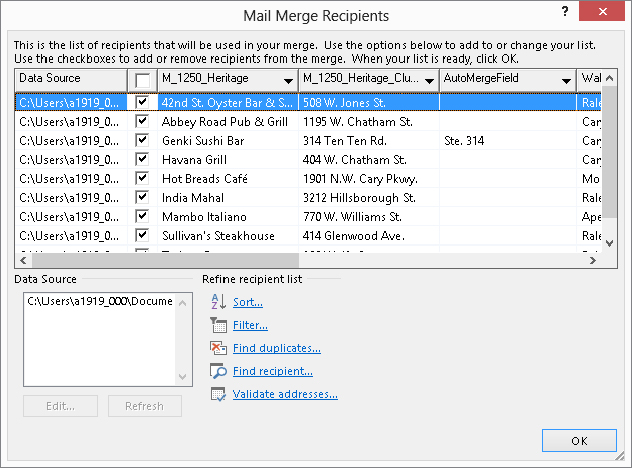
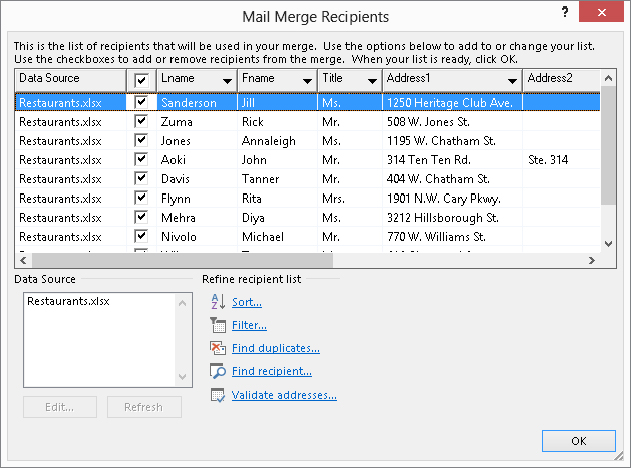
If you don’t plan to use the entire database, you can use the Mail Merge Recipients dialog box, shown in Figure 10.16, to select just the recipients you want to use. To open the dialog box, click Edit Recipient List in the Start Mail Merge group of the Mailings tab. Use the check boxes shown to include or exclude records. To quickly deselect all records, clear or select the check box at the top of the list, just to the right of Data Source.
FIGURE 10.16 Select just the target recipients using the Mail Merge Recipients dialog box.
Editing a data source
Depending on your data source, you sometimes can edit the contents of the file by clicking the file in the Data Source box of the Mail Merge Recipients dialog box and then clicking Edit. Make the changes you need in the Edit Data Source dialog box, and click OK. Then click Refresh to ensure the data is updated for the merge. When your data source is Outlook contacts, note that Edit is not an option. To change your Outlook data, you must use Outlook. Once you’ve made your change in Outlook, you can then refresh the records you see in the Mail Merge Recipients list by highlighting the data source and clicking Refresh.
Sorting records
When editing non-Outlook data, you can sort using Word controls. Click the arrow next to a field to drop down a list of sort options, shown in Figure 10.17. For example, if you want to filter out records for which the contents are blank, click the drop-down list arrow for that field and choose Blanks. To select only records for which the e-mail address is not blank, click Nonblanks. To restore the list to show all records, choose the All option.
FIGURE 10.17 Quickly select records for which the current field is blank or nonblank by choosing Blanks or Nonblanks.

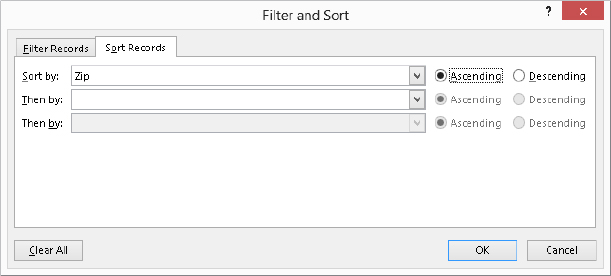
To sort by multiple fields at the same time, in the Mail Merge Recipients dialog box, choose Sort under Refine recipient list. This displays the Filter and Sort dialog box, shown in Figure 10.18. Use this dialog box to sort by multiple criteria. For example, if letters are being hand-delivered within a company, it might be useful to sort by floor and then by room number, assuming those are separate fields. (Often, sorting just by room number accomplishes both at the same time.)
FIGURE 10.18 You can sort by up to three fields.
Filtering records
Word also enables you to filter records to either include or exclude records with data fields matching specific criteria. To filter records, click Filter under Refine recipient list. The Filter and Sort dialog box appears with its Filter Records tab selected, as shown in Figure 10.19. Use the options shown to filter by specific values. As shown here, you can use it to include specific Zip codes. Although the dialog box initially shows just six filter fields, you are not limited to that many. Just keep applying filters, and new rows will appear as needed.
FIGURE 10.19 You can specify multiple filter criteria.
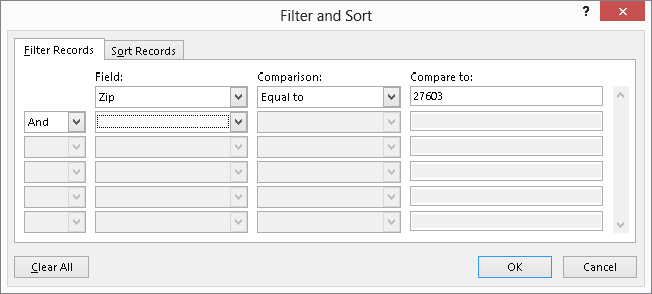
The dialog box shown in Figure 10.19 shows the Equal to comparison. Additional operators include Not equal to, Less than, Greater than, Less than or equal, Greater than or equal, Is blank, Is not blank, Contains, and Does not contain. The latter entries help you filter by text entries in the field. Also note that you can filter a list using the field’s column heading, as shown in Figure 10.17. Click the column heading drop-down list entry, and then click the column contents to filter for. To remove the filter, reopen the drop-down and click (All).
Understanding And and Or
When setting up filters, you can make two kinds of comparisons: And and Or. If all we had were one or the other, there would be no problem, but we have both, and we don’t have parentheses to help clarify the comparisons.
It helps to understand that And and Or apply to each pair of rules. You also need to understand that the And rule is harder to satisfy in that it requires that two conditions be met. Depending on what comes before or follows, each and/or effectively divides the list of filters into sets of filters that are being evaluated. However, by being careful with filters, you can avoid combinations that are impossibly difficult to understand.
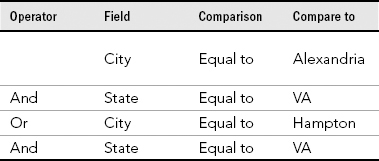
Suppose the filters contained the comparisons shown in Table 10.1. The first And applies to the Alexandria and VA filters. The second And applies to the Hampton and VA filters. This set of filters requires that records must be in Alexandria, VA, or in Hampton, VA.
TABLE 10.1 Understanding Or and And Operators
Finally, understand that it’s perfectly possible to set up filters that make no logical sense. Hence, Table 10.1 could have been set up with all of the Operators set to And. There would be no matching records, of course. It’s up to you to examine the collection of resulting data records to make sure that your logic is being applied as you think it should be.
Duplicates
Databases often contain duplicate records. When mailing or e-mailing, especially, you want to avoid sending the same person duplicate messages. When sending invoices to large companies, this can cause problems, especially if they are received and processed by different people, resulting in double payment, and further paperwork downstream.
To find duplicates, click the Find duplicates link in the lower section of the Mail Merge Recipients dialog box. Word displays the Find Duplicates dialog box, shown in Figure 10.20. Remove the checks beside a valid duplicate to exclude it from the data merge. Look carefully, however, because Word’s criteria for what constitutes a duplicate might be different from your own.
FIGURE 10.20 Uncheck duplicate records to exclude them from the merge.

Validating addresses
The Validate addresses choice in the Mail Merge Recipients dialog box works with third-party software, such as that provided with stamps.com and other electronic postage services. If you don’t have such software installed, you’ll see an error message if you click the link. These services vary, but basically they check against a huge database of valid street addresses to determine whether the selected address and Zip code combination really exists. This can save considerably on costs, because it can prevent you from mailing to addresses that don’t exist or are missing information such as suite number.
Assembling a Merge Document
Regardless of which merge document type you choose (letter, e-mail, envelopes, labels, or directory), the process for building it is similar. There are some additional considerations for multi-record-per-page documents, however, so we will look at those separately after discussing the common elements.
When designing a letter or e-mail you plan to send to multiple recipients using the merge feature, it’s often a good idea to draft the document as you want it to appear, using placeholders in square brackets for information pertaining to the intended recipient, as shown in the following example:
When you’re done, edit your document and substitute merge fields for the placeholders.
Adding merge fields
After setting the data document type (using Start Mail Merge), associating a database with it (using Select Recipients), narrowing the list of recipients or records just to those records you plan to use, and drafting the data document, the next step is to insert merge fields into your document where you want the corresponding data fields to appear.
To insert a merge field, position the insertion point where you want the field to appear (or select the placeholder if you’re replacing a placeholder with a merge field). From the Mailings tab, choose Insert Merge Field, as shown in Figure 10.21. Click the field you want to insert. Using a combination of text and merge fields that you insert, complete the assembly and wording of your document. Note that in addition to individual merge fields that you can insert using the Insert Merge Field tool, you can use special sets of merge fields to save time: Address Block and Greeting Line.
FIGURE 10.21 Merge fields are data tokens that you use where you want actual data fields to appear in the data document.

Address Block
You can insert an Address Block field, which can contain a number of elements that you can select from the Insert Address Block dialog box. To determine the contents of the Address Block, position the insertion point where you want to insert the field and click Address Block in the Write & Insert Fields group of the Mailings tab. The Insert Address Block dialog box shown in Figure 10.22 appears.
FIGURE 10.22 Use the Address Block tool in the Write & Insert Group of the Mailings tab to launch the Insert Address Block dialog box.

Notice that it contains three sections for selecting, previewing, and correcting your address block information (if there are problems). Make your selections as indicated, and then click OK.
- Specify address elements: Use this section to tell Word how to define the address block. You can include the recipient’s name (click one of the listed formats to select it), the company name, the postal address, as well as the country or region. If desired, you can suppress the country or region, always include it, or include it only if it’s different from the country selected. You can also tell Word to format the address according to the destination country or region.
- Preview: Use the First, Previous, Next, and Last buttons to preview different addresses as they will appear with the selected options. It’s a good idea to preview a good sampling in case some parts of the address are treated differently from how you expect, or if there are problems with missing data that will leave “holes” in the address block. (Click Preview Results if you see merge field names instead of data.)
- Correct Problems: If the preview isn’t what you expect, click Match Fields. Use the drop-down lists in the Match Fields dialog box to change the different data elements with which each of the fields listed is associated, as shown in Figure 10.23. If you plan to reuse the address block data either for the same database or for other databases that contain the same field names, click to enable the Remember this matching... check box. Then click OK.
FIGURE 10.23 Use the Match Fields dialog box to associate each of 11 items with data fields from your database for the Address Block.

After you finish choosing Address Block settings, click OK to insert the field in the document.
Match Fields
If you preview your recipients and the merged data still looks off, click Match Fields in the Write & Insert Fields group of the mailing tab to display the Match Fields dialog box shown in Figure 10.23. Change the specified fields from your data source as needed to match up with the field names that Word uses for merge elements, and click OK.
Greeting Line
The Greeting Line merge field, like the Address Block field, is a collection of different data elements and plain text designed to save you entry time when composing data documents. Click Greeting Line in the Write & Insert Fields group of the Mailings tab. This displays the Insert Greeting Line dialog box shown in Figure 10.24. Use the Greeting line format choices to set up the greeting line, and choose a greeting line for invalid recipient names. Use the Preview buttons to test your selected greeting line options against your actual data. If something doesn’t look quite right, click Match Fields, use the previously shown controls to associate the Greeting Line components with the correct merge data fields, and click OK. Back in the Insert Greeting Line dialog box, click OK to insert the Greeting Line field code at the insertion point.
FIGURE 10.24 Set and preview greeting line components.

Rules
In assembling a data document, you sometimes need to control or modify how data and records are processed. Word provides nine commands to help you do that, as shown in Figure 10.25. The entries shown in the Rules drop-down box show how those rule keywords are displayed in the data document.
FIGURE 10.25 Use the Rules drop-down list of Word fields to control how data is merged with the data document.

These rules, which are tied to specific Word field codes, are explained in Table 10.2. Note that many of these are supported by dialog boxes that guide you through proper syntax, making them easy to use and understand.
TABLE 10.2 Merge Rules
| Field | Usage/Purpose |
| ASK | This field prompts you to provide information and assigns a bookmark to the answer you provide; the information is stored internally. A reference to the bookmark can then be used in the mail merge document to reproduce the information you type. A default response to the prompt can also be included in the field. The ASK field displays as an empty bookmark in the mail merge document. You might use this field in conjunction with an IF field to prompt for missing information during a merge. |
| FILLIN | This field prompts you to enter text, and then uses your response in place of the field in the mail merge document. This is similar to the ASK field, except that the information can be used only in one place. |
| IF | This is used in mail merge documents to control the flow and to create a conditional statement that controls whether specific mail merge fields are printed or included in the merged document. |
| MERGESEQ | This field provides a counter of mail merge documents that actually result from a merge. If you merge the entire database and do not change the base sorting, and if no records are skipped, then MERGESEQ and MERGEREC will be identical. |
| MERGEREC | When doing a mail merge, the MERGEREC field serves as a counter of records in the data file and doesn’t count the number of documents actually printed. This field is incremented by the presence of NEXT and NEXTIF fields. If you skip records using SKIPIF, MERGEREC is incremented nonetheless. |
| NEXT | The NEXT field is used to include more than one record in a given document. Ordinarily, when doing a mail merge, one document is printed for each record. With the NEXT field, however, you can include multiple records in a single document. This can be useful when you need to refer to several addresses from a data file. When doing a label merge, the NEXT field is provided automatically, and appears as <<Next Record>>. |
| NEXTIF | The NEXTIF statement works like the NEXT field except that it advances to the next record only if an expression being evaluated is true. A typical use is to skip a given record if a particular key field is blank. For example, in an e-mail merge, if you haven’t otherwise excluded records with blank e-mail addresses, you can use NEXTIF to do it. |
| SET | The SET field is used to change the text referred to by a bookmark. SET often is used in conjunction with IF to conditionally change how particular text is defined based on external factors, such as the current date, or internal factors, such as the value(s) of particular fields. |
| SKIPIF | The SKIPIF field is used to cancel processing of the current database record during a mail merge. For example, you might use it to screen out a particular ZIP code. |
Update Labels
When the data document type is Labels, the process for properly populating the fields into the document differs a bit. After selecting Labels from the Start Mail Merge drop-down list, the Label Options dialog box appears so you can select a label type and other options. After you do so and click OK, use these steps to set up the label merge document:
FIGURE 10.26 When you insert a merge field into the first label cell, Word automatically puts the Next Record control into each of the other cells.

Preview Results
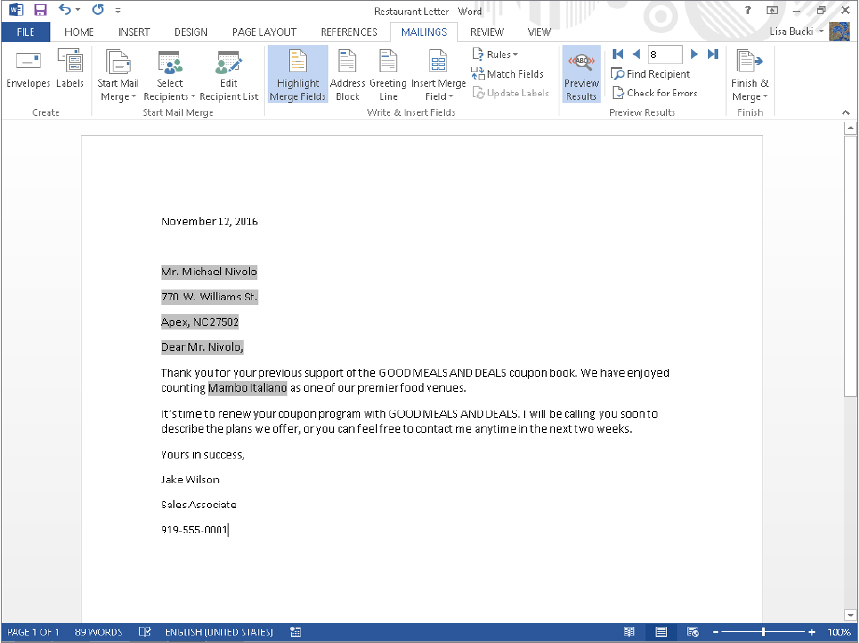
At any time as you go along, if you want to see what actual data will look like in your document, click the Preview Results button in the Preview Results group of the Mailings tab to toggle between the merge field codes in double angle brackets and actual data. Figure 10.27 shows field codes, while Figure 10.28 shows the preview data. Use the First, Previous, Next, Last, and Go To Record tools in the Preview Results group to move between the data records, and click Preview Results again to return to viewing field codes.
FIGURE 10.27 Data merge fields appear in double angle brackets.
FIGURE 10.28 Use the Preview Results tools to ensure that the merge will produce the results you want.

In Figure 10.28, you can see that the restaurant’s address appears in the body of the document, where you clearly want the restaurant’s name to appear. This can happen due to an error in either the field or the data record. You can check both and correct whichever is necessary. This shows how valuable Preview Results can be. To more easily catch errors, you can also use Highlight Merge Fields and Check for Errors, which will be discussed in the next few sections.
Find Recipient
To search for a specific data record or for records whose data you want to preview (with the Preview button active), click the Find Recipient tool in the Preview Results group. This displays the Find Entry dialog box shown in Figure 10.29. Type the search text in the Find field, choose All fields or click This field and select a specific field, and then click Find Next. Note that the search is not case sensitive. If there are matches, Word highlights the first matching document, and the Find Entry dialog box stays on-screen. Click Find Next to move to successive matches in the merged information, and then click Cancel when finished.
FIGURE 10.29 Use Find Entry to search for a matching record in the merged data.

Return to this tool later, after your data document has been constructed, to preview specific data records. It’s better to iron out problems before committing your merge to paper or e-mail.
Highlight Merge Fields
Use the Highlight Merge Fields tool in the Write & Insert Fields group of the Mailings tab to highlight all of the merge fields when previewing data, as shown in Figure 10.30. This can be useful if you’re working on a complex document and need to recheck the logic and placement of merge fields. If, for example, you expect a given merge field result to appear in two places in the document, this tool enables you to find those locations more easily so you can verify that the correct text appears. If you’re using conditional rules, such as Skip Record If, Next Record If, and If, this also helps you focus on the results so you can verify that the rules are working as expected.
FIGURE 10.30 When previewing, you can turn on highlighting to see which data is merged.
Check for Errors
To avoid wasting paper and other resources, when you think you’re done, click Check for Errors in the Preview Results group of the Mailings tab to display the options shown in Figure 10.31.
FIGURE 10.31 Rather than waste paper or send out errant e-mails, use the error checking tool to avoid logical errors or other unwanted surprises.
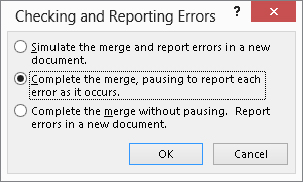
The options in the Checking and Reporting Errors dialog box work as follows:
- Simulate the merge and report errors in a new document: Use this option to examine any and all errors in a new document.
- Complete the merge, pausing to report each error as it occurs: Use this option once you’ve determined that there are errors, so you can observe the error in action.
- Complete the merge without pausing. Report errors in a new document: Use this option to go ahead and complete the merge without stopping at each error, sending the error report to a new document.
Finishing the merge
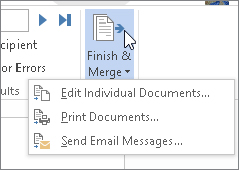
Once the data document is ready and has been thoroughly debugged and certified as error free, it’s time to go through the final motions. The Finish & Merge drop-down list in the Finish group of the Mailings tab provides three options, shown in Figure 10.32, regardless of the type of data document chosen.
FIGURE 10.32 Choose how you want to finish the merge.
Editing individual documents
From the Finish & Merge drop-down list in the Finish group of the Mailings tab, choose the Edit Individual Documents option if you want to save your merged results for future use. For example, suppose you have a set of labels that seldom changes and which you need to print out every week. Rather than go through the mail merge exercise each week, save the merge labels in a separate Word document, and then print them each time you need them. That way, you don’t need to go through the whole mail merge routine unless the underlying database has changed.
You might also choose this option if you don’t trust other ways of proofing the results. Instead of printing from the Mailings tab, send the results to a new document where you can examine each of them, and then print when you’re ready.
When you choose this option, Word displays the Merge to New Document dialog box shown in Figure 10.33. If you want Word to create a limited number of output documents, choose either Current record or indicate a From/To range. Click OK to create a new Word document with the merged data.
FIGURE 10.33 Select the desired records to merge and click OK.

Printing documents
From the Finish & Merge drop-down list in the Finish group of the Mailings tab, choose the Print Documents option when you’re certain that the merge will give you the results you want. When you click Print Documents, Word displays a dialog box with similar options to those shown earlier in Figure 10.33, this time sporting a Merge to Printer title bar. Specify which records to merge and click OK to launch the Print dialog box. Make any additional choices and decisions, including which printer to use, cross your fingers, and click OK.
Sending e-mail messages
From the Finish & Merge drop-down list in the Finish group of the Mailings tab, choose the Send E-Mail Messages option if you’re working on an e-mail merge. When you click Send E-mail Messages, Word displays the Merge to E-mail dialog box, shown in Figure 10.34.
FIGURE 10.34 Add a Subject line for the merged e-mail messages here.
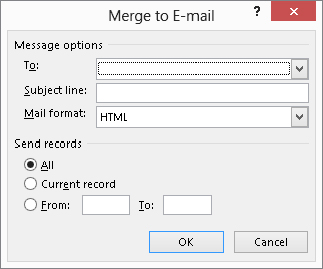
In addition to the Send Records options (All, Current Record, and From/To), Word provides three additional options for which you should make selections before clicking OK to merge and send the messages:
- To: Select the data source field that holds recipient e-mail addresses.
- Subject line: This is very important. Studies show that 73.4 percent of all non-spam e-mail merges sent omit the subject line. Don’t become a statistic! Replace that blank subject line. (This statistic was made up by the author. Nonetheless, don’t send subjectless e-mails!)
- Mail format: Many e-mail recipients wisely have their e-mail options set up to read all e-mail as plain text (this gives them a shot at preventing any automatic naughtiness from being executed when e-mail is opened). Options provided are Attachment, Plain Text, and HTML, the latter being the default. Though Attachment seems like a good compromise for formatted e-mail, this option provides no way for you to include any message text for the body of the e-mail. When and if you use that option, make sure the subject line isn’t blank.
Mail Merge Pane/Wizard
If you’d rather not use the individual tools in the Mailings tab of the Ribbon and prefer a little more assistance when performing a mail merge, Word provides the Mail Merge Wizard. Start a new blank document (or open a document you want to use as the basis for a data document). Click the Mailings tab, click the Start Mail Merge button in the Start Mail Merge group, and choose Step-by-Step Mail Merge Wizard. This opens the Mail Merge pane, shown in Figure 10.35. Just follow along its steps from there.
FIGURE 10.35 Choosing the Wizard opens the Mail Merge pane.
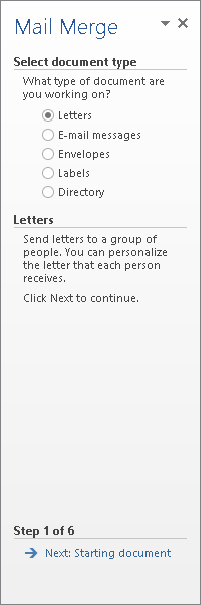
Step 1: Select document type
In Step 1, shown in Figure 10.35, choose the type of data document you want to create under Select document type. Click the Next: Starting document link at the bottom of the pane to move to the next wizard step.
Step 2: Starting document
The Mail Merge task pane next presents three options under Select starting document. Note that when you choose any of these options, Word explains the option in the lower part of the task pane. The options are as follows:
- Use the current document: Start from the current document and use the Mail Merge wizard to add recipient information (merge fields).
- Start from a template: Start from a template, which you can customize as needed by adding merge fields and/or other contents. If you choose this option, click Select Template to be shown a list of all of the available templates (at least the ones that Word knows about). Note that despite the option’s wording, it does not present you with a list of “ready-to-use mail merge” templates.
- Start from existing document: Open an existing mail merge or other document and change it to fit the current need by changing the contents or recipients. Recent mail merge documents, if any, will be listed. If the one you want isn’t listed, click Open to navigate to the one you want, select it, and then click Open.
After making your selection, choose Next: Select recipients at the bottom of the task pane.
Step 3: Select recipients
In Step 3, select from Use an existing list, Select from Outlook contacts, and Type a new list. These options, shown in Figure 10.36, correspond to the identical options described in detail earlier in the chapter. If you leave Use an existing list selected, click Browse to find the data source file, and choose a table or worksheet if prompted. In the Mail Merge Recipients dialog box that opens, use it to work with the records as described earlier. Click Next: Write your letter at the bottom of the pane to move on.
FIGURE 10.36 Select the desired recipients option and then click Next: Write your letter.

Step 4: Write your letter
In Step 4, you are greeted with four options:
- Address block: This enables you to insert an Address Block field as described earlier. See the discussion under “Address Block” for additional details.
- Greeting line: The Greeting line option enables you to insert a Greeting Line merge field. See the “Greeting Line” section for more information.
- Electronic postage: As indicated previously, the functioning of this option requires the installation of third-party software that enables you to apply postage to items you send.
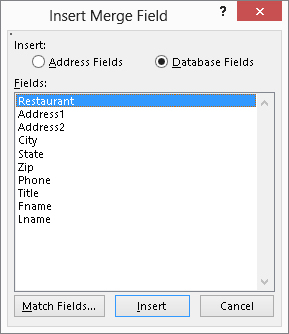
- More items: This option displays the Insert Merge Field dialog box shown in Figure 10.37. Leave Database Fields selected to see the fields in your data source. Before displaying Insert Merge Field, move the insertion point to the document location where you want a merge field to appear, click More items, select the field, and click Insert. Dismiss the dialog box and repeat this series of actions for each merge field. In practice, however, if you know which fields you want to insert, select (with Shift+click or Ctrl+click) and insert them all at once, and then cut and paste them where you want them to go.
FIGURE 10.37 The associated fields in your data source are listed when you choose Database Fields.
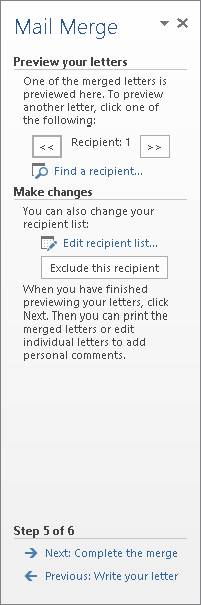
Step 5: Preview your letters
In Step 5, shown in Figure 10.38, use the controls shown to move from record to record in your database. Note that the << and >> tools correspond to the Previous and Next button in the Preview Results group of the Mailings tab. When you finish previewing the merge, click Next: Complete the merge.
FIGURE 10.38 Use the final wizard steps to preview the data document and complete the merge.
Step 6: Complete the merge
The contents of the final Mail Merge pane vary depending on the document type. When the document type is a letter, the options are to send the merged results to the printer or to send them to “individual letters.” Actually, that’s not at all what the option does. Instead, it sends all of the merged letter results to a single new document, in which the individual letters are separated by section breaks.
Summary
In this chapter, you’ve learned about data considerations when preparing a data source document in Word or another application. You then learned how to use each of the mail merge tools in the Mailings tab to begin a mail merge document, attach a data source with records to a merge document, insert merge fields, and complete a data merge. You’ve also seen that this feature isn’t just for mail merge but has many other uses as well. You should now be able to do the following:
- Create a new data source file and prepare data from various sources.
- Create a new data source list within Word.
- Use Outlook contacts as a source for mail merge data.
- Select a Word, HTML, Access, Excel, and other data file for the merge data source.
- Select just the records you want for the merge.
- Insert composite merge fields, such as the Address Block and Greeting Line, as well as control how those fields are constituted.
- Integrate the merge fields with your other document content.
- Update labels.
- Finish by merging to a document or printer.
- Use the Mail Merge Wizard.