Chapter 2
Life on the Network
In This Chapter
![]() Using local resources and network resources
Using local resources and network resources
![]() Playing the name game
Playing the name game
![]() Logging on to a network
Logging on to a network
![]() Using shared folders
Using shared folders
![]() Going places with networks
Going places with networks
![]() Mapping your network drives
Mapping your network drives
![]() Using a network printer
Using a network printer
![]() Logging off the network
Logging off the network
After you hook up your PC to a network, it’s not an island anymore, separated from the rest of the world like some kind of isolationist fanatic waving a “Don’t tread on me” flag. The network connection changes your PC forever. Now your computer is part of a system, connected to other computers on the network. You have to worry about annoying network details, such as using local and shared resources, logging on and accessing network drives, using network printers, logging off, and who knows what else.
Oh, bother.
This chapter brings you up to speed on what living with a computer network is like. Unfortunately, this chapter gets a little technical at times, so you may need your pocket protector.
Distinguishing between Local Resources and Network Resources
In case you don’t catch this statement in Chapter 1, one of the most important differences between using an isolated computer and using a network computer lies in the distinction between local resources and network resources. Local resources are items — such as hard drives, printers, and CD or DVD drives — that are connected directly to your computer. You can use local resources whether you’re connected to the network or not. Network resources, on the other hand, are the hard drives, printers, optical drives, and other devices that are connected to the network’s server computers. You can use network resources only after your computer is connected to the network.
Whenever you use a computer network, you need to know which resources are local resources (belong to you) and which are network resources (belong to the network). In most networks, your C: drive is a local drive, as is your My Documents folder. If a printer is sitting next to your PC, it’s probably a local printer. You can do anything you want with these resources without affecting the network or other users on the network (as long as the local resources aren’t shared on the network). Keep these points in mind:
![]() You can’t tell just by looking at a resource whether it’s a local resource or a network resource. The printer that sits right next to your computer is probably your local printer, but then again, it may be a network printer. The same statement is true for hard drives: The hard drive in your PC is probably your own, but it (or part of it) may be shared on the network, thus enabling other users to access it.
You can’t tell just by looking at a resource whether it’s a local resource or a network resource. The printer that sits right next to your computer is probably your local printer, but then again, it may be a network printer. The same statement is true for hard drives: The hard drive in your PC is probably your own, but it (or part of it) may be shared on the network, thus enabling other users to access it.
![]() Because dedicated network servers are full of resources, you may say that they’re not only dedicated (and sincere), but also resourceful. (Groan. Sorry. This is yet another in a tireless series of bad computer-nerd puns.)
Because dedicated network servers are full of resources, you may say that they’re not only dedicated (and sincere), but also resourceful. (Groan. Sorry. This is yet another in a tireless series of bad computer-nerd puns.)
What’s in a Name?
Just about everything on a computer network has a name: The computers themselves have names, the people who use the computers have names, the hard drives and printers that can be shared on the network have names, and the network itself has a name. Knowing all the names used on your network isn’t essential, but you do need to know some of them.
Here are some additional details about network names:
![]() Every person who can use the network has a username (sometimes called a user ID). You need to know your username to log on to the network. You also need to know the usernames of your buddies, especially if you want to steal their files or send them nasty notes.
Every person who can use the network has a username (sometimes called a user ID). You need to know your username to log on to the network. You also need to know the usernames of your buddies, especially if you want to steal their files or send them nasty notes.
You can find more information about usernames and logging on in the section “Logging On to the Network,” later in this chapter.
![]()
 Letting folks on the network use their first names as their usernames is tempting but not a good idea. Even in a small office, you eventually run into a conflict. (And what about Mrs. McCave — made famous by Dr. Seuss — who had 23 children and named them all Dave?)
 Create a consistent way of creating usernames. For example, you may use your first name plus the first two letters of your last name. Then Wally's username is
 wallycl, and Beaver's is beavercl. Or you may use the first letter of your first name followed by your complete last name. Then Wally's username is wcleaver, and Beaver's is bcleaver. (In most networks, capitalization doesn't matter in usernames. Thus, bcleaver is the same as BCleaver.)
![]() Every computer on the network must have a unique computer name.
Every computer on the network must have a unique computer name.
You don’t have to know the names of all the computers on the network, but it helps if you know your own computer’s name and the names of any server computers you need to access.
The computer's name is sometimes the same as the username of the person who uses the computer, but that's usually a bad idea because in many companies, people come and go more often than computers. Sometimes the names indicate the physical location of the computer, such as office-12 or back-room. Server computers often have names that reflect the group that uses the server most, like acctng-server or cad-server.
Some network nerds like to assign techie-sounding names, like BL3K5-87a. And some like to use names from science fiction movies; HAL, Colossus, M5, and Data come to mind. Cute names like Herbie aren't allowed. (However, Tigger and Pooh are entirely acceptable — recommended, in fact. Networks are what Tiggers like the best.)
 Usually, the sensible approach to computer naming is to use names that have numbers, such as
 computer001 or computer002.
![]() Network resources, such as shared disk folders and printers, have names. For example, a network server may have two printers, named
Network resources, such as shared disk folders and printers, have names. For example, a network server may have two printers, named laser and inkjet (to indicate the type of printer), and two shared disk folders, named AccountingData and MarketingData.
![]() Server-based networks have a username for the network administrator.
Server-based networks have a username for the network administrator.
If you log on using the administrator's username, you can do anything you want: add new users, define new network resources, change Wally's password, anything. The administrator's username is usually something clever such as Administrator.
![]() The network itself has a name.
The network itself has a name.
The Windows world has two basic types of networks:
• Domain networks are the norm for large corporate environments that have dedicated servers with IT staff to maintain them.
• Workgroup networks are more common in homes or in small offices that don’t have dedicated servers or IT staff.
A domain network is known by — you guessed it — a domain name. And a workgroup network is identified by — drum roll, please — a workgroup name. Regardless of which type of network you use, you need to know this name to gain access to the network.
Logging On to the Network
To use network resources, you must connect your computer to the network, and you must go through the supersecret process of logging on, which is how you let the network know who you are so that it can decide whether you’re one of the good guys.
Logging on is a little bit like cashing a check. You must have two forms of identification:
![]() Your username: The name by which the network knows you.
Your username: The name by which the network knows you.
Your username is usually some variation of your real name, like Beav for the Beaver.
Everyone who uses the network must have a username.
![]() Your password: A secret word that only you and the network know. If you type the correct password, the network believes that you are who you say you are.
Your password: A secret word that only you and the network know. If you type the correct password, the network believes that you are who you say you are.
Every user has a different password, and the password should be a secret.
In the early days of computer networking, you had to type a logon command at a stark MS-DOS prompt and then supply your user ID and password. Nowadays, the glory of Windows is that you get to log on to the network through a special network logon screen. Figure 2-1 shows the Windows 8 version of this dialog box.
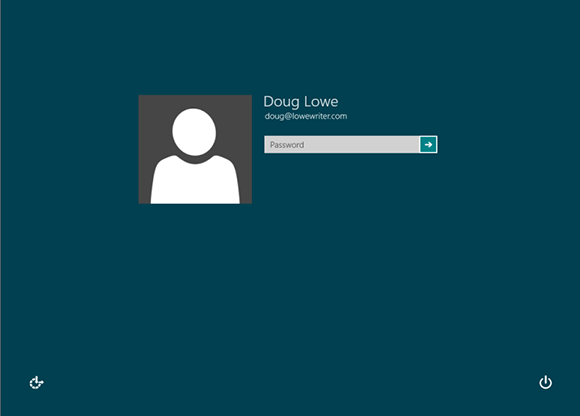
Figure 2-1: Logging in to a Windows 8 system.
Here are some more logon points to ponder:
![]() The terms user ID and logon name are sometimes used instead of username. They all mean the same thing.
The terms user ID and logon name are sometimes used instead of username. They all mean the same thing.
![]() As long as we’re talking about words that mean the same thing, log in and log on mean the same thing, as do (respectively) log out and log off as ways of saying, “I’m outta here.” Although you see both out there in the world, this book uses log on and log off throughout — and if there’s any exception, the book says why and grouses about it a bit.
As long as we’re talking about words that mean the same thing, log in and log on mean the same thing, as do (respectively) log out and log off as ways of saying, “I’m outta here.” Although you see both out there in the world, this book uses log on and log off throughout — and if there’s any exception, the book says why and grouses about it a bit.
![]() As far as the network’s concerned, you and your computer aren’t the same thing. Your username refers to you, not to your computer. That’s why you have a username and your computer has a computer name. You can log on to the network by using your username from any computer that’s attached to the network. Other users can log on at your computer by using their own usernames.
As far as the network’s concerned, you and your computer aren’t the same thing. Your username refers to you, not to your computer. That’s why you have a username and your computer has a computer name. You can log on to the network by using your username from any computer that’s attached to the network. Other users can log on at your computer by using their own usernames.
When others log on at your computer by using their own usernames, they can’t access any of your network files that are protected by your password. However, they can access any local files that you haven’t protected. Be careful which people you allow to use your computer.
![]() If you’re logging on to a domain network on a Windows Vista, Windows 7, or Windows 8 computer, you must type the domain name before your username, separated from it by a backslash. For example:
If you’re logging on to a domain network on a Windows Vista, Windows 7, or Windows 8 computer, you must type the domain name before your username, separated from it by a backslash. For example:
lowewriterdlowe
Here, the domain name is lowewriter, and the username is dlowe.
Note that Windows remembers the domain and username from your last login, so ordinarily all you have to enter is your password. To log on to a different domain or as a different user, you must click Switch User. Then you can click the Other User icon and enter a different domain name and username, along with the password for the user you want to log on as.
![]() On an older Windows XP system, the logon dialog box has a field in which you can enter the domain name you want to log on to.
On an older Windows XP system, the logon dialog box has a field in which you can enter the domain name you want to log on to.
![]() Your computer may be set up so that it logs you on automatically whenever you turn it on. In that case, you don’t have to type your username and password. This setup makes the task of logging on more convenient but takes the sport out of it. And it’s a terrible idea if you’re the least bit worried about bad guys getting into your network or personal files.
Your computer may be set up so that it logs you on automatically whenever you turn it on. In that case, you don’t have to type your username and password. This setup makes the task of logging on more convenient but takes the sport out of it. And it’s a terrible idea if you’re the least bit worried about bad guys getting into your network or personal files.
![]() Guard your password with your life. I’d tell you mine, but then I’d have to shoot you.
Guard your password with your life. I’d tell you mine, but then I’d have to shoot you.
Understanding Shared Folders
Long ago, in the days Before Network (B.N.), your computer probably had just one hard drive, known as the C: drive. Maybe it had two — C: and D:. The second drive might be another hard disk, or possibly a CD-ROM or DVD-ROM drive. Even to this day, the descendants of those drives are physically located inside your PC. They’re your local drives.
Now that you’re on a network, however, you may have access to drives that aren’t located inside your PC but are located instead in one of the other computers on the network. These network drives can be located on a dedicated server computer or, in the case of a peer-to-peer network, on another client computer.
In some cases, you can access an entire network drive over the network. But in most cases, you can’t access the entire drive. Instead, you can access only certain folders on the network drives. Either way, the shared drives or folders are known in Windows terminology as shared folders.
Here’s where it gets confusing: The most common way to access a shared folder is to assign a drive letter to it. Suppose that a server has a shared folder named Marketing. You can assign drive letter M to this shared folder. Then you access the Marketing folder as drive M:. The M: drive is then called a network drive because it uses the network to access data in a shared folder. Assigning a drive letter to a shared folder is mapping a drive.
Shared folders can be set up with restrictions on how you can use them. For example, you may be granted full access to some shared folders so that you can copy files to or from them, delete files on them, or create or remove folders on them. On other shared folders, your access may be limited in certain ways. For example, you may be able to copy files to or from the shared folder but not delete files, edit files, or create new folders. You may also be asked to enter a password before you can access a protected folder. The amount of disk space you’re allowed to use on a shared folder may also be limited. For more information about file-sharing restrictions, see Chapter 12.
In addition to accessing shared folders that reside on other people’s computers, you can designate your computer as a server to enable other network users to access folders that you share. To find out how to share folders on your computer with other network users, see Chapter 3.
Four Good Uses for a Shared Folder
After you know which shared network folders are available, you may wonder what you’re supposed to do with them. This section describes four good uses for a network folder.
Store files that everybody needs
A shared network folder is a good place to store files that more than one user needs to access. Without a network, you have to store a copy of the file on everyone’s computer, and you have to worry about keeping the copies synchronized (which you can’t do, no matter how hard you try). Or you can keep the file on a disk and pass it around. Or you can keep the file on one computer and play Musical Chairs; whenever someone needs to use the file, he goes to the computer that contains the file.
On a network, you can keep one copy of the file in a shared folder on the network, and everyone can access it.
Store your own files
You can also use a shared network folder as an extension of your own hard drive storage. For example, if you filled up all the free space on your hard drive with pictures, sounds, and movies that you downloaded from the Internet, but the network server has billions and billions of gigabytes of free space, you have all the drive space you need. Just store your files on the network drive!
Here are a few guidelines for storing files on network drives:
![]() Using the network drive for your own files works best if the network drive is set up for private storage that other users can’t access. That way, you don’t have to worry about the nosy guy down in Accounting who likes to poke around in other people’s files.
Using the network drive for your own files works best if the network drive is set up for private storage that other users can’t access. That way, you don’t have to worry about the nosy guy down in Accounting who likes to poke around in other people’s files.
![]() Don’t overuse the network drive. Remember that other users have probably filled up their own hard drives, so they want to use the space on the network drive too.
Don’t overuse the network drive. Remember that other users have probably filled up their own hard drives, so they want to use the space on the network drive too.
![]() Before you store personal files on a network drive, make sure that you have permission. A note from your mom will do.
Before you store personal files on a network drive, make sure that you have permission. A note from your mom will do.
![]() On domain networks, a drive (typically, drive H:) is commonly mapped to a user’s home folder. The home folder is a network folder that’s unique for each user. You can think of it as a network version of My Documents. If your network is set up with a home folder, use it rather than My Documents for any important work-related files. That’s because the home folder is usually included in the network’s daily backup schedule. By contrast, most networks do not back up data you store in My Documents.
On domain networks, a drive (typically, drive H:) is commonly mapped to a user’s home folder. The home folder is a network folder that’s unique for each user. You can think of it as a network version of My Documents. If your network is set up with a home folder, use it rather than My Documents for any important work-related files. That’s because the home folder is usually included in the network’s daily backup schedule. By contrast, most networks do not back up data you store in My Documents.
Make a temporary resting place for files on their way to other users
“Hey, Wally, could you send me a copy of last month’s baseball stats?”
“Sure, Beav.” But how? If the baseball stats file resides on Wally’s local drive, how does Wally send a copy of the file to Beaver’s computer? Wally can do it by copying the file to a network drive. Then Beaver can copy the file to his local hard drive.
Here are some tips to keep in mind when you use a network drive to exchange files with other network users:
![]() Remember to delete files that you saved to the network drive after they’re picked up! Otherwise, the network drive quickly fills up with unnecessary files.
Remember to delete files that you saved to the network drive after they’re picked up! Otherwise, the network drive quickly fills up with unnecessary files.
![]() Create a folder on the network drive specifically intended for holding files en route to other users. I like to name this folder
Create a folder on the network drive specifically intended for holding files en route to other users. I like to name this folder PITSTOP.
In many cases, it’s easier to send files to other network users by e-mail than by using a network folder. Just send a message to the other network user and attach the file you want to share. The advantage of sending a file by e-mail is that you don’t have to worry about details like where to leave the file on the server and who’s responsible for deleting the file.
Back up your local hard drive
If enough drive space is available on the file server, you can use it to store backup copies of the files on your hard drive. Just copy the files that you want to back up to a shared network folder.
Obviously, if you copy all your data files to the network drive — and everybody else follows suit — it can fill up quickly. Check with the network manager before you start storing backup copies of your files on the server. The manager may have already set up a special network drive that’s designed just for backups. And if you’re lucky, your network manager may be able to set up an automatic backup schedule for your important data so that you don’t have to remember to back it up manually.
I hope that your network administrator also routinely backs up the contents of the network server’s disk to tape. (Yes, tape — see Chapter 20 for details.) That way, if something happens to the network server, the data can be recovered from the backup tapes.
Oh, the Network Places You’ll Go
Windows enables you to access network resources, such as shared folders, by browsing the network. In Windows XP, you do this by double-clicking the My Network Places icon that resides on your desktop. In Windows Vista and Windows 7, choose Network from the Start menu. In Windows 8, open Windows Explorer (click File Explorer on the taskbar) and then click Network. Figure 2-2 shows the Windows 8 version of the network browser.
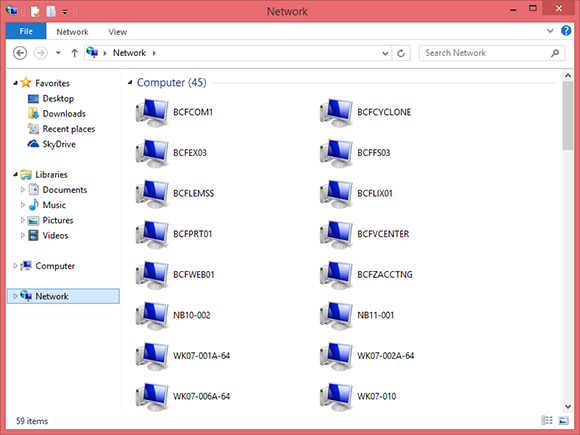
Figure 2-2: Browsing the network in Windows 8.
The network shown in Figure 2-2 consists of 45 computers, with names such as BCFCOM1, BCFFS03, and so on. You can open one of the computers by double-clicking its icon to reveal a list of shared resources available on the computer. For example, Figure 2-3 shows the resources shared by the BCFFS03 computer.
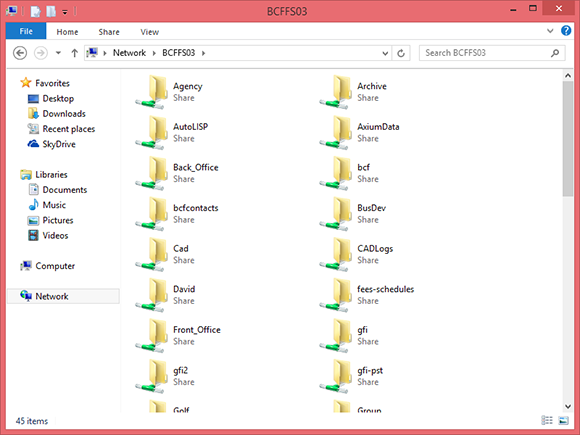
Figure 2-3: The resources available on a server computer.
You can also browse the network from any Windows application program. For example, you may be working with Microsoft Word 2010 and want to open a document file that’s stored in a shared folder on your network. All you have to do is use the Open command to bring up the dialog box. (In Office 2003 and 2010, this command is on the File menu. In Office 2007, you’ll find it by clicking the Office button.) Choose Network in the list that appears in the pane on the left of the Open dialog box to browse the network, as shown in Figure 2-4.
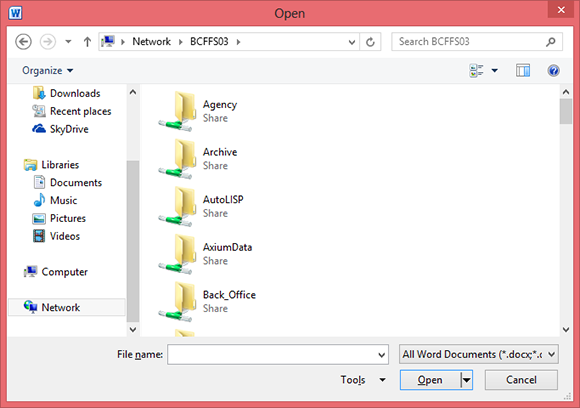
Figure 2-4: Browsing the network in Office 2010.
Mapping Network Drives
If you often access a particular shared folder, you may want to use the special trick known as mapping to access the shared folder more efficiently. Mapping assigns a drive letter to a shared folder. Then you can use the drive letter to access the shared folder as though it were a local drive. In this way, you can access the shared folder from any Windows program without having to browse the network.
For example, you can map a shared folder named Data on the server named SERVER01 Files to drive K: on your computer. Then, to access files stored in the shared Data folder, you look on drive K.
To map a shared folder to a drive letter, follow these steps:
1. Open File Explorer.
• Windows Vista or 7: Choose Start⇒Computer.
• Windows 8: Open the desktop and click the File Explorer icon on the taskbar, and then click Computer in the Location list on the left side of the screen.
2. Open the Map Network Drive dialog box.
• Windows Vista and 7: Access this dialog by clicking the Map Network Drive button located on the toolbar.
• Windows 8: Click Map Network Drive on the ribbon.
Figure 2-5 shows the Map Network Drive dialog box for Windows 8. The dialog box for earlier versions of Windows is similar.

Figure 2-5: The Map Network Drive dialog box.
3. (Optional) Change the drive letter in the Drive drop-down list.
You probably don’t have to change the drive letter that Windows selects (in Figure 2-5, drive R). If you’re picky, though, you can select the drive letter from the Drive drop-down list.
4. Click the Browse button.
This step summons the dialog box shown in Figure 2-6.
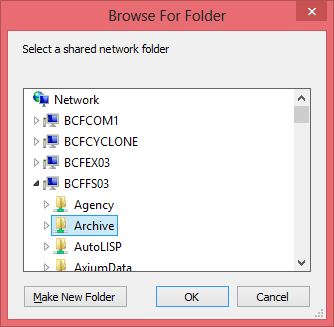
Figure 2-6: Browsing for the folder to map.
5. Use the Browse for Folder dialog box to find and select the shared folder you want to use.
You can navigate to any shared folder on any computer in the network.
6. Click OK.
The Browse for Folder dialog box is dismissed, and you return to the Map Network Drive dialog box (refer to Figure 2-5).
7. (Optional) If you want this network drive to be automatically mapped each time you log on to the network, select the Reconnect at Sign-in check box.
If you leave the Reconnect at Logon check box deselected, the drive letter is available only until you shut down Windows or log out of the network. If you select this option, the network drive reconnects automatically each time you log on to the network.
Be sure to select the Reconnect at Logon check box if you use the network drive often.
8. Click OK.
You return to the Computer window, as shown in Figure 2-7. Here, you can see the newly mapped network drive.
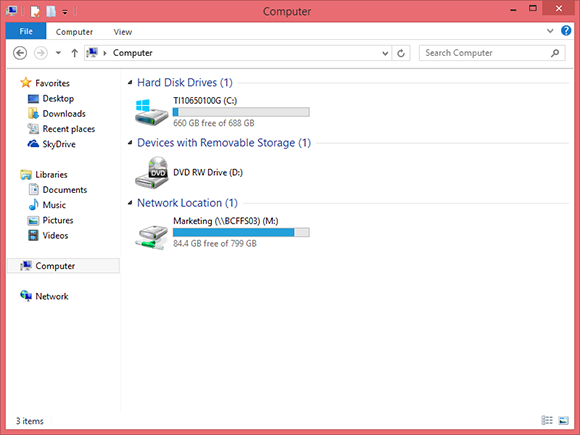
Figure 2-7: The Computer folder shows a mapped network drive.
Your network administrator may have already set up your computer with one or more mapped network drives. If so, you can ask her to tell you which network drives have been mapped. Or you can just open the Computer folder (My Computer on Windows XP) and have a look.
Here are a few additional tips:
![]() If you’re using Windows XP, the procedure for mapping a network drive is similar to the one for Windows Vista. Start by opening My Computer and choosing Tools⇒Map Network Drive. Then follow the preceding set of steps, starting at Step 3.
If you’re using Windows XP, the procedure for mapping a network drive is similar to the one for Windows Vista. Start by opening My Computer and choosing Tools⇒Map Network Drive. Then follow the preceding set of steps, starting at Step 3.
![]() Assigning a drive letter to a network drive is called mapping the drive, or linking the drive, by network nerds. “Drive Q: is mapped to a network drive,” they say.
Assigning a drive letter to a network drive is called mapping the drive, or linking the drive, by network nerds. “Drive Q: is mapped to a network drive,” they say.
![]() Network drive letters don’t have to be assigned the same way for every computer on the network. For example, a network drive that’s assigned drive letter M on your computer may be assigned drive letter Z on someone else’s computer. In that case, your drive M: and the other computer’s drive Z: refer to the same data. This arrangement can be confusing. If your network is set up this way, put pepper in your network administrator’s coffee.
Network drive letters don’t have to be assigned the same way for every computer on the network. For example, a network drive that’s assigned drive letter M on your computer may be assigned drive letter Z on someone else’s computer. In that case, your drive M: and the other computer’s drive Z: refer to the same data. This arrangement can be confusing. If your network is set up this way, put pepper in your network administrator’s coffee.
![]() Accessing a shared network folder through a mapped network drive is much faster than accessing the same folder by browsing the network. Windows has to browse the entire network to list all available computers whenever you browse the network. By contrast, Windows doesn’t have to browse the network to access a mapped network drive.
Accessing a shared network folder through a mapped network drive is much faster than accessing the same folder by browsing the network. Windows has to browse the entire network to list all available computers whenever you browse the network. By contrast, Windows doesn’t have to browse the network to access a mapped network drive.
![]() If you select the Reconnect at Logon option for a mapped drive (refer to Figure 2-5), you receive a warning message if the drive isn’t available when you log on. In most cases, the problem is that the server computer isn’t turned on. Sometimes, however, this message is caused by a broken network connection. For more information about fixing network problems such as this one, see Chapter 19.
If you select the Reconnect at Logon option for a mapped drive (refer to Figure 2-5), you receive a warning message if the drive isn’t available when you log on. In most cases, the problem is that the server computer isn’t turned on. Sometimes, however, this message is caused by a broken network connection. For more information about fixing network problems such as this one, see Chapter 19.
Using a Network Printer
Using a network printer is much like using a network hard drive: You can print to a network printer from any Windows program by choosing the Print command to call up a Print dialog box from any program and choosing a network printer from the list of available printers. In Office 2003 and 2010, this command is on the File menu. In Office 2007, you can reach it by clicking the Office button.
Keep in mind, however, that printing on a network printer isn’t exactly the same as printing on a local printer; you have to take turns. When you print on a local printer, you’re the only one using it. When you print to a network printer, however, you are (in effect) standing in line behind other network users, waiting to share the printer. This line complicates the situation in several ways:
![]() If several users print to the network printer at the same time, the network has to keep the print jobs separate from one another. If it didn’t, the result would be a jumbled mess, with your 268-page report getting mixed in with the payroll checks. That would be bad. Fortunately, the network takes care of this situation by using the fancy print spooling feature.
If several users print to the network printer at the same time, the network has to keep the print jobs separate from one another. If it didn’t, the result would be a jumbled mess, with your 268-page report getting mixed in with the payroll checks. That would be bad. Fortunately, the network takes care of this situation by using the fancy print spooling feature.
![]() Network printing works on a first-come, first-served basis (unless you know some of the tricks that I discuss in Chapter 3). Invariably, when I get in line at the hardware store, the person in front of me is trying to buy something that doesn’t have a product code on it. I end up standing there for hours waiting for someone in Plumbing to pick up the phone for a price check. Network printing can be like that. If someone sends a two-hour print job to the printer before you send your half-page memo, you have to wait.
Network printing works on a first-come, first-served basis (unless you know some of the tricks that I discuss in Chapter 3). Invariably, when I get in line at the hardware store, the person in front of me is trying to buy something that doesn’t have a product code on it. I end up standing there for hours waiting for someone in Plumbing to pick up the phone for a price check. Network printing can be like that. If someone sends a two-hour print job to the printer before you send your half-page memo, you have to wait.
![]() You may have access to a local printer and several network printers. Before you were forced to use the network, your computer probably had just one printer attached to it. You may want to print some documents on your cheap (oops, I mean local) inkjet printer but use the network laser printer for important stuff. To do that, you have to find out how to use your programs’ functions for switching printers.
You may have access to a local printer and several network printers. Before you were forced to use the network, your computer probably had just one printer attached to it. You may want to print some documents on your cheap (oops, I mean local) inkjet printer but use the network laser printer for important stuff. To do that, you have to find out how to use your programs’ functions for switching printers.
Adding a network printer
Before you can print to a network printer, you have to configure your computer to access the network printer that you want to use. From the Start menu, open the Control Panel and then double-click the Printers icon. If your computer is already configured to work with a network printer, an icon for the network printer appears in the Printers folder. You can tell a network printer from a local printer by the shape of the printer icon. Network printer icons have a pipe attached to the bottom of the printer.
If you don’t have a network printer configured for your computer, you can add one by using the Add Printer Wizard. Just follow these steps:
1. Open the Control Panel.
• Windows 7 or earlier: Choose Start⇒Control Panel.
• Windows 8: Press the Windows key, type Control, and then click the Control Panel icon.
2. Click Devices and Printers.
3. Click the Add a Printer button on the toolbar.
This step starts the Add Printer Wizard, as shown in Figure 2-8.
4. Click the printer you want to use.
If you can’t find the printer you want to use, ask your network administrator for the printer’s UNC path, which is the name used to identify the printer on the network, or its IP address. Then click The Printer That I Want Isn’t Listed and enter the UNC or IP address for the printer when prompted.
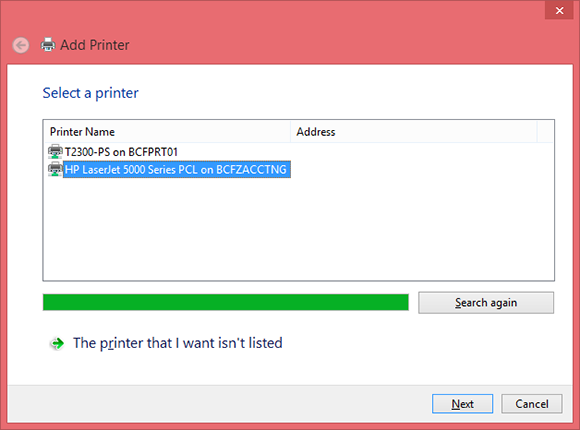
Figure 2-8: The Add Printer Wizard asks you to pick a printer.
5. Click Next to add the printer.
The wizard copies to your computer the correct printer driver for the network printer. (You may be prompted to confirm that you want to add the driver. If so, click Install Driver to proceed.)
The Add Printer Wizard displays a screen that shows the printer’s name and asks whether you want to designate the printer as your default printer.
6. (Optional) Designate the printer as your default printer.
7. Click Next to continue.
A final confirmation dialog box is displayed.
8. Click Finish.
You’re done!
Many network printers, especially newer ones, are connected directly to the network by using a built-in Ethernet card. Setting up these printers can be tricky. You may need to ask the network administrator for help in setting up this type of printer. (Some printers that are connected directly to the network have their own web addresses, such as Printer.CleaverFamily.com. If that's the case, you can often set up the printer in a click or two: Use your browser to go to the printer's web page and then click a link that enables you to install the printer.)
Printing to a network printer
After you install the network printer in Windows, printing to the network printer is a snap. You can print to the network printer from any Windows program by using the Print command to summon the Print dialog box, which is usually found on the File menu. For example, Figure 2-9 shows the Print dialog box for WordPad (the free text-editing program that comes with Windows). The available printers are listed near the top of this dialog box. Choose the network printer from this list and then click OK to print your document. That’s all there is to it!
Playing with the print queue
After you send your document to a network printer, you usually don’t have to worry about it. You just go to the network printer, and voilà! Your printed document is waiting for you.
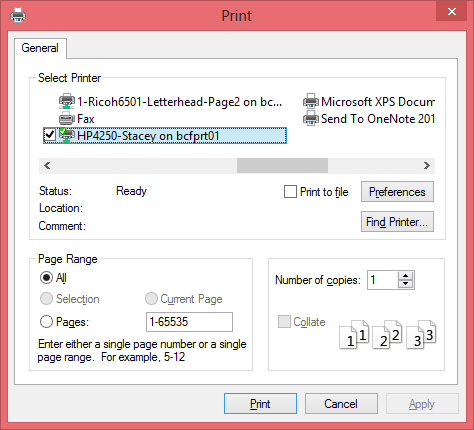
Figure 2-9: A typical Print dialog box.
That’s what happens in the ideal world. In the real world, where you and I live, all sorts of things can happen to your print job between the time you send it to the network printer and the time it prints:
![]() You discover that someone else already sent a 50 trillion–page report ahead of you that isn’t expected to finish printing until the national debt is paid off.
You discover that someone else already sent a 50 trillion–page report ahead of you that isn’t expected to finish printing until the national debt is paid off.
![]() The price of a framis valve suddenly goes up by $2, rendering foolish the recommendations you made in your report.
The price of a framis valve suddenly goes up by $2, rendering foolish the recommendations you made in your report.
![]() Your boss calls and tells you that his brother-in-law will be attending the meeting, so won’t you please print an extra copy of the proposal for him? Oh, and a photocopy won’t do. Originals only, please.
Your boss calls and tells you that his brother-in-law will be attending the meeting, so won’t you please print an extra copy of the proposal for him? Oh, and a photocopy won’t do. Originals only, please.
![]() You decide to take lunch, so you don’t want the output to print until you get back.
You decide to take lunch, so you don’t want the output to print until you get back.
Fortunately, your print job isn’t totally beyond your control just because you already sent it to the network printer. You can easily change the status of jobs that you already sent. You can change the order in which jobs print, hold a job so that it doesn’t print until you say so, or cancel a job.
You can probably make your network print jobs do other tricks, too: shake hands, roll over, and play dead. But the basic tricks — hold, cancel, and change the print order — are enough to get you started.
To play with the printer queue, open the Control Panel by choosing Start⇒Control Panel in Windows 7 or earlier; or press the Windows key, type Control, and the click the Control Panel icon. Then click Devices and Printers and double-click the icon for the printer that you want to manage. A window similar to the one shown in Figure 2-10 appears. You can see that just one document has been sent to the printer.
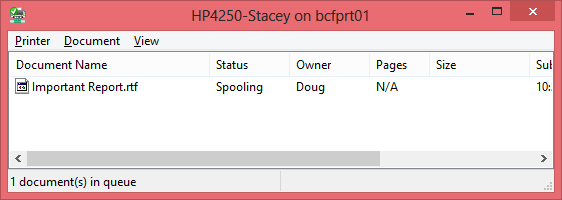
Figure 2-10: Managing a print queue.
To manipulate the print jobs that appear in the print queue or in the printer itself, use these tricks:
![]() To temporarily stop a job from printing: Select the job and choose Document⇒Pause Printing. Choose the same command again to release the job from its state of frustration and print it out, already.
To temporarily stop a job from printing: Select the job and choose Document⇒Pause Printing. Choose the same command again to release the job from its state of frustration and print it out, already.
![]() To delete a print job: Select the job and choose Document⇒Cancel Printing.
To delete a print job: Select the job and choose Document⇒Cancel Printing.
![]() To stop the printer: Choose Printer⇒Pause Printing. To resume, choose the command again.
To stop the printer: Choose Printer⇒Pause Printing. To resume, choose the command again.
![]() To delete all print jobs: Choose Printer⇒Purge Print Documents.
To delete all print jobs: Choose Printer⇒Purge Print Documents.
![]() To cut to the front of the line: Drag to the top of the list the print job that you want to print.
To cut to the front of the line: Drag to the top of the list the print job that you want to print.
All these tips apply to your print jobs only. Unfortunately, you can’t capriciously delete other people’s print jobs.
The best thing about Windows printer management is that it shelters you from the details of working with different network operating systems. Whether you print on a NetWare printer, a Windows 2003 network printer, or a shared Windows printer, the Printer window icon manages all print jobs in the same way.
Logging Off the Network
After you finish using the network, log off. Logging off the network makes the network drives and printers unavailable. Your computer is still physically connected to the network (unless you cut the network cable with pruning shears; it’s a bad idea — don’t do it!), but the network and its resources are unavailable to you.
Here are a few other tips to keep in mind when you log off:
![]() After you turn off your computer, you’re automatically logged off the network. After you start your computer, you have to log on again.
After you turn off your computer, you’re automatically logged off the network. After you start your computer, you have to log on again.
Logging off the network is a good idea if you’re going to leave your computer unattended for a while. As long as your computer is logged in to the network, anyone can use it to access the network. And because unauthorized users can access it under your user ID, you get the blame for any damage they do.
![]() In Windows, you can log off the network by clicking the Start button and choosing the Log Off command. This process logs you off the network without restarting Windows:
In Windows, you can log off the network by clicking the Start button and choosing the Log Off command. This process logs you off the network without restarting Windows:
• In Windows XP: You can reach this command directly from the Start menu.
• In Windows Vista or 7: Click Start and then click the right-facing arrow that appears next to the little padlock icon.
• In Windows 8: Press Ctrl+Alt+Del and then choose Sign Out.