Chapter 6
Oh, What a Tangled Web We Weave: Cables, Switches, and Routers
In This Chapter
![]() Getting a whiff of Ethernet
Getting a whiff of Ethernet
![]() Checking out the different types of network cable
Checking out the different types of network cable
![]() Installing twisted-pair cable
Installing twisted-pair cable
![]() Working with hubs and switches
Working with hubs and switches
![]() Examining routers
Examining routers
Cable is the plumbing of your network. In fact, working with network cable is a lot like working with pipe: You have to use the right pipe (cable), the right valves and connectors (switches and routers), and the right fixtures (network interface cards).
And network cables have an advantage over pipes: You don’t get wet when they leak.
This chapter tells you far more about network cables than you probably need to know. I introduce you to Ethernet, the most common system of network cabling for small networks. Then you find out how to work with the cables used to wire an Ethernet network. You also find out how to install a network interface card (NIC), which enables you to connect the cables to your computer.
What Is Ethernet?
Ethernet is a standardized way of connecting computers to create a network.
 Obligatory filler about network topology
A networking book wouldn’t be complete without the usual textbook description of the three basic network topologies. One type of network topology is a bus, in which network nodes (that is, computers) are strung together in a line, like this:
![]()
A bus is the simplest type of topology, but it has some drawbacks. If the cable breaks somewhere in the middle, the whole network breaks.
A second type of topology is the ring:

A ring is very much like a bus except with no end to the line: The last node on the line is connected to the first node, forming an endless loop.
A third type of topology is a star:

In a star network, all the nodes are connected to a central hub. In effect, each node has an independent connection to the network, so a break in one cable doesn’t affect the others.
Ethernet networks are based on a bus design. However, fancy cabling tricks make an Ethernet network appear to be wired like a star when twisted-pair cable is used.
You can think of Ethernet as a kind of municipal building code for networks: It specifies what kind of cables to use, how to connect the cables, how long the cables can be, how computers transmit data to one another by using the cables, and more.
Although Ethernet is now the overwhelming choice for networking, that wasn’t always the case. In ye olde days, Ethernet had two significant competitors:
![]() Token Ring: This IBM standard for networking is still in some organizations (especially where IBM mainframe or midrange systems are in use).
Token Ring: This IBM standard for networking is still in some organizations (especially where IBM mainframe or midrange systems are in use).
![]() ARCnet: This standard is still commonly used for industrial network applications, such as building automation and factory robot control.
ARCnet: This standard is still commonly used for industrial network applications, such as building automation and factory robot control.
But these older networks are now pretty much obsolete, so you don’t need to worry about them. Ethernet is now the only real choice for new networks — small or large.
Here are a few tidbits you’re likely to run into at parties where the conversation is about Ethernet standards:
![]() Ethernet is a set of standards for the infrastructure on which a network is built. All the operating systems that I discuss in this book can operate on an Ethernet network. If you build your network on a solid Ethernet base, you can change network operating systems later.
Ethernet is a set of standards for the infrastructure on which a network is built. All the operating systems that I discuss in this book can operate on an Ethernet network. If you build your network on a solid Ethernet base, you can change network operating systems later.
![]() Ethernet is often referred to by network gurus as 802.3 (pronounced “eight-oh-two-dot-three”), which is the official designation used by the IEEE (pronounced “eye-triple-ee,” not “aieeee!”), a group of electrical engineers who wear bow ties and have nothing better to do than argue all day long about things like inductance and cross-talk — and it’s a good thing they do. If not for them, you couldn’t mix and match Ethernet components made by different companies.
Ethernet is often referred to by network gurus as 802.3 (pronounced “eight-oh-two-dot-three”), which is the official designation used by the IEEE (pronounced “eye-triple-ee,” not “aieeee!”), a group of electrical engineers who wear bow ties and have nothing better to do than argue all day long about things like inductance and cross-talk — and it’s a good thing they do. If not for them, you couldn’t mix and match Ethernet components made by different companies.
![]() The original vintage Ethernet transmits data at a rate of 10 million bits per second, or 10 Mbps. (Mbps is usually pronounced “megabits per second.”) Because 8 bits are in a byte, that translates into roughly 1.2 million bytes per second. In practice, Ethernet can’t move information that fast because data must be transmitted in packages of no more than 1,500 bytes, called packets. So 150KB of information has to be split into 100 packets.
The original vintage Ethernet transmits data at a rate of 10 million bits per second, or 10 Mbps. (Mbps is usually pronounced “megabits per second.”) Because 8 bits are in a byte, that translates into roughly 1.2 million bytes per second. In practice, Ethernet can’t move information that fast because data must be transmitted in packages of no more than 1,500 bytes, called packets. So 150KB of information has to be split into 100 packets.
Ethernet’s transmission speed has nothing to do with how fast electrical signals move on the cable. The electrical signals travel at about 70 percent of the speed of light, or as Captain Kirk would say, “Warp factor point-seven-oh.”
![]() A faster version of Ethernet, called 100 Mbps Ethernet or Fast Ethernet, moves data ten times as fast as normal Ethernet.
A faster version of Ethernet, called 100 Mbps Ethernet or Fast Ethernet, moves data ten times as fast as normal Ethernet.
![]() The most common version of Ethernet today is gigabit Ethernet, which moves data at 1,000 Mbps.
The most common version of Ethernet today is gigabit Ethernet, which moves data at 1,000 Mbps.
![]() Most networking components that you can buy these days support 10, 100 Mbps and 1,000 Mbps. These components are called 10/100/1000 Mbps components.
Most networking components that you can buy these days support 10, 100 Mbps and 1,000 Mbps. These components are called 10/100/1000 Mbps components.
All about Cable
Although you can use wireless technology to create networks without cables, most networks still use cables to physically connect each computer to the network. Over the years, various types of cables have been used with Ethernet networks. Almost all networks are now built with twisted-pair cable. In this type of cable, pairs of wires are twisted around each other to reduce electrical interference. (You almost need a PhD in physics to understand why twisting the wires helps to reduce interference, so don’t feel bad if this concept doesn’t make sense.)
You may encounter other types of cable in an existing network; for example, on older networks, you may encounter two types of coaxial cable (also known as coax, pronounced “COE-ax”). The first type, which resembles television cable, is RG-58 cable. The second type is a thick, yellow cable that used to be the only type of cable used for Ethernet. You may also encounter fiber optic cables that span long distances at high speeds or thick twisted-pair bundles that carry multiple sets of twisted-pair cable between wiring closets in a large building. Most networks, however, use simple twisted-pair cable.
Twisted-pair cable is sometimes called UTP. (The U stands for unshielded, but “twisted-pair” is the standard name.) Figure 6-1 shows a twisted-pair cable.

Figure 6-1: Twisted-pair cable.
When you use UTP cable to construct an Ethernet network, you connect the computers in a star arrangement, as Figure 6-2 illustrates. In the center of this star is a switch. Depending on the model, Ethernet switches enable you to connect 4 to 48 computers (or more) by using twisted-pair cable.
 In the UTP star arrangement, if one cable goes bad, only the computer attached to that cable is affected. The rest of the network continues to chug along.
Cable categories
Twisted-pair cable comes in various grades: categories. These categories are specified by the ANSI/EIA Standard 568. (ANSI stands for American National Standards Institute; EIA stands for Electronic Industries Association). The standards indicate the data capacity — bandwidth — of the cable. Table 6-1 lists the various categories of twisted-pair cable.
Although higher-category cables are more expensive, the real cost of installing Ethernet cabling is the labor required to pull the cables through the walls. You should never install anything less than Category (Cat) 5e cable. And if at all possible, invest in Cat 6 cable to allow for upgrades to your network.
To sound like the cool kids, say “Cat 6” rather than “Category 6.”

Figure 6-2: A network cabled with twisted-pair cable.
Table 6-1 Twisted-Pair Cable Categories
|
Category |
Maximum Data Rate |
Intended Use |
|
1 |
1 Mbps |
Voice only |
|
2 |
4 Mbps |
4 Mbps Token Ring |
|
3 |
16 Mbps |
10BaseT Ethernet |
|
4 |
20 Mbps |
16 Mbps Token Ring |
|
5 |
100 Mbps (2-pair) |
100BaseT Ethernet |
|
1000 Mbps (4-pair) |
1000BaseTX |
|
|
5e |
1000 Mbps (2-pair) |
1000BaseT |
|
6 |
1000 Mbps (2-pair) |
1000BaseT and faster broadband applications |
|
6a |
10000 Mbps (2-pair) |
Future standard that will provide for 10 Gbps Ethernet |
What’s with the pairs?
Most twisted-pair cable has four pairs of wires, for a total of eight wires. Standard Ethernet uses only two of the pairs, so the other two pairs are unused. You may be tempted to save money by purchasing cable with just two pairs of wires, but that’s a bad idea. If a network cable develops a problem, you can sometimes fix it by switching over to one of the extra pairs. If you use two-pair cable, though, you don’t have any spare pairs to use.
 Don’t use the extra pairs for some other purpose, such as a voice line or a second data line. The electrical “noise” in the extra wires can interfere with your network.
To shield or not to shield
Unshielded twisted-pair cable (UTP) is designed for normal office environments. When you use UTP cable, you must be careful not to route cable close to fluorescent light fixtures, air conditioners, or electric motors (such as automatic door motors or elevator motors). UTP is the least expensive type of cable.
In environments that have a lot of electrical interference (such as factories), you may want to use shielded twisted-pair cable (STP). Because STP can be as much as three times more expensive than regular UTP, you don’t want to use STP unless you have to. With a little care, UTP can withstand the amount of electrical interference found in a normal office environment.
Most STP cable is shielded by a layer of aluminum foil. For buildings with unusually high amounts of electrical interference, the more expensive braided-copper shielding offers even more protection.
When to use plenum cable
The outer sheath of shielded and unshielded twisted-pair cable comes in two kinds:
![]() PVC: The most common and least expensive type.
PVC: The most common and least expensive type.
![]() Plenum: A special type of fire-retardant cable designed for use in the plenum space (definition coming right up) of a building. Plenum cable has a special Teflon coating that not only resists heat, but also gives off fewer toxic fumes if it does burn. Unfortunately, plenum cable costs more than twice as much as ordinary PVC cable.
Plenum: A special type of fire-retardant cable designed for use in the plenum space (definition coming right up) of a building. Plenum cable has a special Teflon coating that not only resists heat, but also gives off fewer toxic fumes if it does burn. Unfortunately, plenum cable costs more than twice as much as ordinary PVC cable.
Most local building codes require plenum cable when the wiring is installed in the building’s plenum space (a compartment that’s part of the building’s air-distribution system, usually the space above a suspended ceiling or under a raised floor).
The area above a suspended ceiling is not a plenum space if both the delivery and return lines of the air-conditioning and heating systems are ducted. Plenum cable is required only if the air-conditioning and heating systems aren’t ducted. When in doubt, have the local inspector look at your facility before you install cable.
Sometimes solid, sometimes stranded
The actual copper wire that makes up the cable comes in two varieties: solid and stranded. Your network will have some of each:
![]() Stranded: Each conductor is made from a bunch of very small wires that are twisted together. Stranded cable is more flexible than solid cable, so it doesn’t break as easily. However, stranded cable is more expensive than solid cable and isn’t very good at transmitting signals over long distances. Stranded cable is best used for patch cables (such as patch panels to hubs and switches).
Stranded: Each conductor is made from a bunch of very small wires that are twisted together. Stranded cable is more flexible than solid cable, so it doesn’t break as easily. However, stranded cable is more expensive than solid cable and isn’t very good at transmitting signals over long distances. Stranded cable is best used for patch cables (such as patch panels to hubs and switches).
Strictly speaking, the cable that connects your computer to the wall jack is a station cable — not a patch cable — but it’s an appropriate use for stranded cable. (Although not technically correct, most people refer to the cable that connects a computer to a wall jack as a “patch cable.”)
![]() Solid: Each conductor is a single, solid strand of wire. Solid cable is less expensive than stranded cable and carries signals farther, but it isn’t very flexible. If you bend it too many times, it breaks. Typically, you find solid cable in use as permanent wiring within the walls and ceilings of a building.
Solid: Each conductor is a single, solid strand of wire. Solid cable is less expensive than stranded cable and carries signals farther, but it isn’t very flexible. If you bend it too many times, it breaks. Typically, you find solid cable in use as permanent wiring within the walls and ceilings of a building.
Installation guidelines
The hardest part of installing network cable is the physical task of pulling the cable through ceilings, walls, and floors. This job is just tricky enough that I recommend you don’t attempt it yourself, except for small offices. For large jobs, hire a professional cable installer. You may even want to hire a professional for small jobs if the ceiling and wall spaces are difficult to access.
Keep these pointers in mind if you install cable yourself:
![]() You can purchase twisted-pair cable in prefabricated lengths, such as 10, 15, or 20 feet. Longer lengths, such as 50 feet or 100 feet, are also available.
You can purchase twisted-pair cable in prefabricated lengths, such as 10, 15, or 20 feet. Longer lengths, such as 50 feet or 100 feet, are also available.
![]() Alternatively, you can purchase cable in bulk rolls, cut them to length, and attach the connectors yourself.
Alternatively, you can purchase cable in bulk rolls, cut them to length, and attach the connectors yourself.
![]() Always use a bit more cable than you need, especially if you’re running cable through walls. For example, when you run a cable up a wall, leave a few feet of slack in the ceiling above the wall. That way, you have plenty of cable if you need to make a repair.
Always use a bit more cable than you need, especially if you’re running cable through walls. For example, when you run a cable up a wall, leave a few feet of slack in the ceiling above the wall. That way, you have plenty of cable if you need to make a repair.
![]() When running cable, avoid sources of interference, such as fluorescent lights, big motors, X-ray machines, nuclear reactors, cyclotrons, or other gadgets you may have hidden in behind closed doors in your office.
When running cable, avoid sources of interference, such as fluorescent lights, big motors, X-ray machines, nuclear reactors, cyclotrons, or other gadgets you may have hidden in behind closed doors in your office.
Fluorescent lights are the most common sources of interference for cables behind ceiling panels. Give light fixtures a wide berth. Three feet should do it.
![]() The maximum allowable cable length between the hub and the computer is 100 meters (about 328 feet).
The maximum allowable cable length between the hub and the computer is 100 meters (about 328 feet).
![]() If you must run cable across the floor where people walk, cover the cable so no one trips over it. Cable protectors are available at most hardware stores.
If you must run cable across the floor where people walk, cover the cable so no one trips over it. Cable protectors are available at most hardware stores.
![]() When running cables through walls, label each cable at both ends. Most electrical supply stores carry pads of cable labels that are perfect for the job. These pads contain 50 sheets or so of precut labels with letters and numbers. They look much more professional than wrapping a loop of masking tape around the cable and writing on the tape with a marker.
When running cables through walls, label each cable at both ends. Most electrical supply stores carry pads of cable labels that are perfect for the job. These pads contain 50 sheets or so of precut labels with letters and numbers. They look much more professional than wrapping a loop of masking tape around the cable and writing on the tape with a marker.
Alternatively, you can just write directly on the label with a permanent marker.
![]() If you’re installing cable in new construction, label each end of the cable at least three times, leaving about a foot of space between the labels. The drywallers or painters will probably spray mud or paint all over your cables, making the labels difficult to find.
If you’re installing cable in new construction, label each end of the cable at least three times, leaving about a foot of space between the labels. The drywallers or painters will probably spray mud or paint all over your cables, making the labels difficult to find.
![]() When several cables come together, tie them with plastic cable ties. Avoid masking tape if you can; the tape doesn’t last, but the sticky glue stuff does. It’s a mess a year later. Cable ties are available at electrical supply stores.
When several cables come together, tie them with plastic cable ties. Avoid masking tape if you can; the tape doesn’t last, but the sticky glue stuff does. It’s a mess a year later. Cable ties are available at electrical supply stores.
![]() Cable ties have all sorts of useful purposes. Once, on a backpacking trip, I used a pair of cable ties to attach an unsuspecting buddy’s hat to a high tree limb. He wasn’t impressed with my innovative use of the cable ties, but my other hiking companions were.
Cable ties have all sorts of useful purposes. Once, on a backpacking trip, I used a pair of cable ties to attach an unsuspecting buddy’s hat to a high tree limb. He wasn’t impressed with my innovative use of the cable ties, but my other hiking companions were.
![]() When you run cable above suspended ceiling panels, use cable ties, hooks, or clamps to secure the cable to the ceiling or to the metal frame that supports the ceiling tiles. Don’t just lay the cable on top of the panels.
When you run cable above suspended ceiling panels, use cable ties, hooks, or clamps to secure the cable to the ceiling or to the metal frame that supports the ceiling tiles. Don’t just lay the cable on top of the panels.
The tools you need
Of course, to do a job right, you must have the right tools:
![]() Start with a basic set of computer tools, which you can get for about $15 from any computer store and most office-supply stores. These kits include socket wrenches and screwdrivers to open your computers and insert adapter cards.
Start with a basic set of computer tools, which you can get for about $15 from any computer store and most office-supply stores. These kits include socket wrenches and screwdrivers to open your computers and insert adapter cards.
The computer tool kit probably contains everything you need if
• All your computers are in the same room.
• You’re running the cables along the floor.
• You’re using prefabricated cables.
If you don’t have a computer tool kit, make sure that you have several flat-head and Phillips screwdrivers of various sizes.
![]() If you’re using bulk cable and plan on attaching your own connectors, you also need the following tools in addition to the basic computer tool kit:
If you’re using bulk cable and plan on attaching your own connectors, you also need the following tools in addition to the basic computer tool kit:
• Wire cutters: You need big ones for coax; smaller ones work for twisted-pair cable. For yellow cable, you need the Jaws of Life.
• A crimp tool: You need the crimp tool to attach the connectors to the cable. Don’t use a cheap $25 crimp tool. A good crimp tool costs $100 and will save you many headaches in the long run.
 When you crimp, you mustn’t scrimp.
• Wire stripper: You need this tool only if the crimp tool doesn’t include a wire stripper.
![]() If you plan on running cables through walls, you need these additional tools:
If you plan on running cables through walls, you need these additional tools:
• A hammer
• A keyhole saw: This one is useful if you plan on cutting holes through walls to route your cable.
• A flashlight
• A ladder
• Someone to hold the ladder
• Fish tape: Possibly. A fish tape is a coiled-up length of stiff metal tape. To use it, you feed the tape into one wall opening and fish it toward the other opening, where a partner is ready to grab it when the tape arrives. Next, your partner attaches the cable to the fish tape and yells something like “Let ’er rip!” or “Bombs away!” Then you reel in the fish tape and the cable along with it. (You can find fish tape in the electrical section of most well-stocked hardware stores.)
If you plan on routing cable through a concrete subfloor, you need to rent a jackhammer and a backhoe and then hire someone to hold a yellow flag while you work. Better yet, find some other route for the cable.
Pinouts for twisted-pair cables
Each pair of wires in a twisted-pair cable is one of four colors: orange, green, blue, or brown. The two wires that make up each pair are complementary: one is white with a colored stripe; the other is colored with a white stripe. For example, the orange pair has an orange wire with a white stripe (the orange wire) and a white wire with an orange stripe (the white/orange wire). Likewise, the blue pair has a blue wire with a white stripe (the blue wire) and a white wire with a blue stripe (the white/blue wire).
When you attach a twisted-pair cable to a modular connector or jack, you must match up the right wires to the right pins. It’s harder than it sounds; you can use any of several different standards to wire the connectors. To confuse matters further, you can use one of the two popular standard ways of hooking up the wires: EIA/TIA 568A or EIA/TIA 568B, also known as AT&T 258A. Both of these wiring schemes are shown in Table 6-2.
It doesn’t matter which of these wiring schemes you use, but pick one and stick with it. If you use one wiring standard on one end of a cable and the other standard on the other end, the cable doesn’t work.

Ethernet only uses two of the four pairs, connected to Pins 1, 2, 3, and 6. One pair transmits data; the other receives data. The only difference between the two wiring standards is which pair transmits and which receives. In the EIA/TIA 568A standard, the green pair is used for transmit, and the orange pair is used for receive. In the EIA/TIA 568B and AT&T 258A standards, the orange pair is used for transmit and the green pair for receive.
If you want, you can get away with connecting only Pins 1, 2, 3, and 6. However, I suggest that you connect all four pairs, as indicated in Table 6-2.
RJ-45 connectors
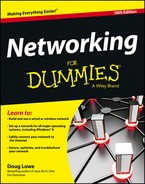
RJ-45 connectors for twisted-pair cables aren’t too difficult to attach if you have the right crimping tool. The only trick is making sure that you attach each wire to the correct pin and then press the tool hard enough to ensure a good connection.
Here’s the procedure for attaching an RJ-45 connector:
1. Cut the end of the cable to the desired length.
Make sure that you make a square cut — not a diagonal cut.
2. Insert the cable into the stripper portion of the crimp tool so that the end of the cable is against the stop.
Squeeze the handles and slowly pull out the cable, keeping it square. This strips off the correct length of outer insulation without puncturing the insulation on the inner wires.
3. Arrange the wires so that they lie flat and line up according to Table 6-2.
You have to play with the wires a little bit to get them to lay out in the right sequence.
4. Slide the wires into the pinholes on the connector.
Double-check to make sure all the wires are slipped into the correct pinholes.
5. Insert the plug and wire into the crimping portion of the tool and then squeeze the handles to crimp the plug.
Squeeze it tight!
6. Remove the plug from the tool and double-check the connection.
You’re done!
Here are a few other points to remember when dealing with RJ-45 connectors and twisted-pair cable:
![]() The pins on the RJ-45 connectors aren’t numbered.
The pins on the RJ-45 connectors aren’t numbered.
You can tell which is Pin 1 by holding the connector so that the metal conductors are facing up, as shown in Figure 6-3. Pin 1 is on the left.
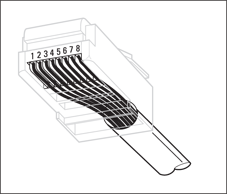
Figure 6-3: Attaching an RJ-45 connector to twisted-pair cable.
![]() Some people wire the cable differently — using the green-and-white pair for Pins 1 and 2, and the orange-and-white pair for Pins 3 and 6. Doing it this way doesn’t affect the operation of the network (the network is color blind) as long as the connectors on both ends of the cable are wired the same way!
Some people wire the cable differently — using the green-and-white pair for Pins 1 and 2, and the orange-and-white pair for Pins 3 and 6. Doing it this way doesn’t affect the operation of the network (the network is color blind) as long as the connectors on both ends of the cable are wired the same way!
![]() When you attach the connectors, don’t untwist more than half an inch of cable. And, don’t try to stretch the cable runs beyond the 100-meter maximum. When in doubt, have the cable professionally installed.
When you attach the connectors, don’t untwist more than half an inch of cable. And, don’t try to stretch the cable runs beyond the 100-meter maximum. When in doubt, have the cable professionally installed.
Crossover cables
A crossover cable can directly connect two devices without a hub or switch. You can use a crossover cable to connect two computers directly to each other, but crossover cables are more often used to daisy-chain hubs and switches to each other.
If you want to create your own crossover cable, you must reverse the wires on one end of the cable, as shown in Table 6-3. This table shows how you should wire both ends of the cable to create a crossover cable. Connect one of the ends according to the Connector A column and the other according to the Connector B column.
Note that you don’t need to use a crossover cable if one of the switches or hubs that you want to connect has a crossover port, usually labeled Uplink or Daisy-chain. If the hub or switch has an Uplink port, you can daisy-chain it by using a normal network cable. For more information about daisy-chaining hubs and switches, see the section “Daisy-Chaining Switches,” later in this chapter.
If you study Table 6-3 long enough and then compare it with Table 6-2, you may notice that a crossover cable is a cable that’s wired according to the 568A standard on one end and the 568B standard on the other end.
Table 6-3 Creating a Crossover Cable
|
Pin |
Connector A |
Connector B |
|
1 |
White/green |
White/orange |
|
2 |
Green |
Orange |
|
3 |
White/orange |
White/green |
|
4 |
Blue |
Blue |
|
5 |
White/blue |
White/blue |
|
6 |
Orange |
Green |
|
7 |
White/brown |
White/brown |
|
8 |
Brown |
Brown |
Wall jacks and patch panels
If you want, you can run a single length of cable from a network hub or switch in a wiring closet through a hole in the wall, up the wall to the space above the ceiling, through the ceiling space to the wall in an office, down the wall, through a hole, and all the way to a desktop computer. That’s not a good idea. For example, every time someone moves the computer or even cleans behind it, the cable will get moved a little bit. Eventually, the connection will fail, and the RJ-45 plug will have to be replaced. Then the cables in the wiring closet will quickly become a tangled mess.
The alternative is to put a wall jack in the wall at the user’s end of the cable and connect the other end of the cable to a patch panel. Then the cable itself is completely contained within the walls and ceiling spaces. To connect a computer to the network, you plug one end of a patch cable (properly called a station cable) into the wall jack and plug the other end into the computer’s network interface. In the wiring closet, you use a patch cable to connect the wall jack to the network hubs or switches. Figure 6-4 shows how this arrangement works.
Connecting a twisted-pair cable to a wall jack or a patch panel is similar to connecting it to an RJ-45 plug. However, you don’t usually need any special tools. Instead, the back of the jack has a set of slots that you lay each wire across. You then snap a removable cap over the top of the slots and press it down. This action forces the wires into the slots, where little metal blades pierce the insulation and establish the electrical contact.
When you connect the wire to a jack or a patch panel, be sure to untwist as little of the wire as possible. If you untwist too much of the wire, the signals that pass through the wire may become unreliable.
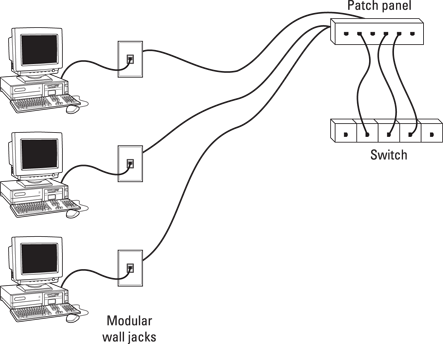
Figure 6-4: Using wall jacks and patch panels.
Working with Switches
When you use twisted-pair cable to wire a network, you don’t plug the computers into each other. Instead, each computer plugs into a separate device called a switch.
You need to know only a few details when working with switches. Here they are:
![]() Installing a switch is usually very simple. Just plug in the power cord and then plug in patch cables to connect the network.
Installing a switch is usually very simple. Just plug in the power cord and then plug in patch cables to connect the network.
![]() Each port on the switch has an RJ-45 jack and a single LED indicator, labeled Link, that lights up when a connection is made on the port.
Each port on the switch has an RJ-45 jack and a single LED indicator, labeled Link, that lights up when a connection is made on the port.
If you plug one end of a cable into the port and the other end into a computer or other network device, the Link light should come on. If it doesn’t, something is wrong with the cable, the hub or switch port, or the device on the other end of the cable.
![]() Each port may have an LED indicator that flashes to indicate network activity.
Each port may have an LED indicator that flashes to indicate network activity.
If you stare at a switch for a while, you can find out who uses the network most by noting which activity indicators flash the most.
![]() The ports may also have a collision indicator that flashes whenever a packet collision occurs on the port.
The ports may also have a collision indicator that flashes whenever a packet collision occurs on the port.
It’s perfectly acceptable for the collision indicator to flash now and then, but if it flashes a lot, you may have a problem with the network:
• Usually, the flashing means that the network is overloaded and should be segmented with a switch to improve performance.
• In some cases, the flashing may be caused by a faulty network node that clogs the network with bad packets.
Daisy-Chaining Switches
If a single switch doesn’t have enough ports for your entire network, you can connect switches by daisy-chaining them, as shown in Figure 6-5.
You can often increase the overall performance of your network by using two (or more) connections between switches. For example, you may use two patch cables to create two connections between a pair of switches.
Don’t chain more than two switches together. If you do, the network may not transmit your data reliably. However, you can get around this rule by using stackable switches (switches with a special cable connector that connects two or more switches so that they function as a single switch). Stackable switches are musts for large networks.
If your building is prewired and has a network jack near each desk, you can use a small switch to connect two or more computers to the network by using a single jack. Just use one cable to plug the daisy-chain port of the hub into the wall jack and then plug each computer into one of the hub’s ports.
Figure 6-5: You can daisy-chain switches together.
Using a Router
A router is a device that is capable of passing data between two networks. The most common reason for using a router is to connect a LAN to the Internet. However, routers can perform many other functions as well. For example, a router can filter data based on its content, allowing some types of data to pass through while blocking other types.
You can configure a network with several routers that can work cooperatively. For example, some routers can monitor the network to determine the most efficient path for sending a message to its ultimate destination. If a part of the network is extremely busy, a router can automatically route messages along a less-busy route. In this respect, the router is kind of like a traffic reporter flying in a helicopter. The router knows that the 101 is bumper to bumper all the way through Sunnyvale, so it sends the message on the 280 instead.
Here’s some additional information about routers:
![]() Routers used to be expensive and used only on large networks. However, the price of small routers has dropped substantially in recent years, so they’re now becoming common even on small networks.
Routers used to be expensive and used only on large networks. However, the price of small routers has dropped substantially in recent years, so they’re now becoming common even on small networks.
![]() The functional distinctions between bridges and routers — and switches and hubs, for that matter — get blurrier all the time. Multifunction routers (which combine the functions of routers, bridges, hubs, and switches) are often used to handle some chores that used to require separate devices.
The functional distinctions between bridges and routers — and switches and hubs, for that matter — get blurrier all the time. Multifunction routers (which combine the functions of routers, bridges, hubs, and switches) are often used to handle some chores that used to require separate devices.
![]() A pair of routers can be used to create a secure connection between two locations that are geographically distant from each other.
A pair of routers can be used to create a secure connection between two locations that are geographically distant from each other.
![]() One of the main reasons for using routers is to connect a LAN to the Internet. Figure 6-6 shows a router used for this purpose.
One of the main reasons for using routers is to connect a LAN to the Internet. Figure 6-6 shows a router used for this purpose.
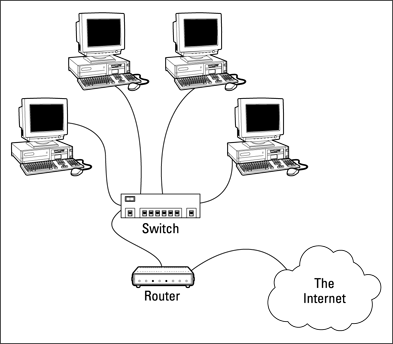
Figure 6-6: Using a router to connect a LAN to the Internet.