Chapter 13
Managing Exchange Server 2010
In This Chapter
![]() Working with the Exchange Server consoles
Working with the Exchange Server consoles
![]() Managing mailboxes
Managing mailboxes
![]() Granting mailbox access
Granting mailbox access
Although not strictly a part of Windows Server 2012, Exchange Server 2010 is the mail server software that’s used on most Windows networks. Yes, I know Microsoft doesn’t call Exchange Server a “mail server.” It’s a “messaging and collaboration server.” But the basic reason for Exchange Server’s existence is e-mail. The other messaging and collaboration features are just icing on the cake.
In this chapter, you discover how to perform the most commonly requested maintenance chores for Exchange Server, such as how to create a new mailbox, grant a user access to an additional mailbox, and deal with mailbox size limits.
Creating a Mailbox
In previous versions of Exchange, you created user mailboxes using Active Directory Users and Computers (ADUC). With Exchange 2010, however, Microsoft has removed the Exchange management features of ADUC. So instead, you create and manage user mailboxes using Exchange Management Console, which you can find in Server Manager on the Tools menu.
The Exchange Management Console lets you create a mailbox for an existing Active Directory (AD) user. (Refer to Chapter 11 for information about creating Active Directory users.) Or you can use Exchange Management Console to create a new user with a mailbox. Because that’s the most likely case, the following procedure describes the steps you should follow to create a new AD user with a mailbox:
1. From Server Manager, choose Tools⇒Microsoft Exchange Server 2010⇒Exchange Management Console.
This fires up the Exchange Management Console, as shown in Figure 13-1.
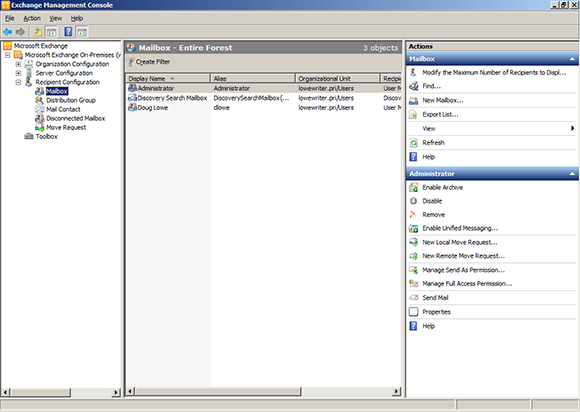
Figure 13-1: The Exchange Management Console.
2. In the Navigation pane (left side of the window), navigate to Microsoft Exchange⇒Microsoft Exchange On-Premises⇒Recipient Configuration.
If you have more than one Exchange server, pick the Microsoft Exchange On-Premises node for the server you want to add the user to.
3. Right-click the Mailbox node in the navigation pane and choose New Mailbox.
This summons the New Mailbox Wizard, as shown in Figure 13-2. From here, the first page of the wizard, you choose among several different types of mailbox accounts you can create.
4. Select the User Mailbox radio button and then click Next.
This brings up the User Type page, as shown in Figure 13-3. Here, you indicate whether you want to create a new user account or add a mailbox for an existing AD user.
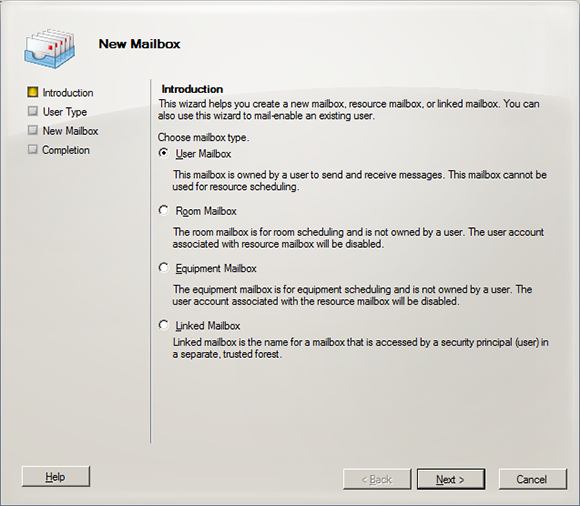
Figure 13-2: Creating a user mailbox.
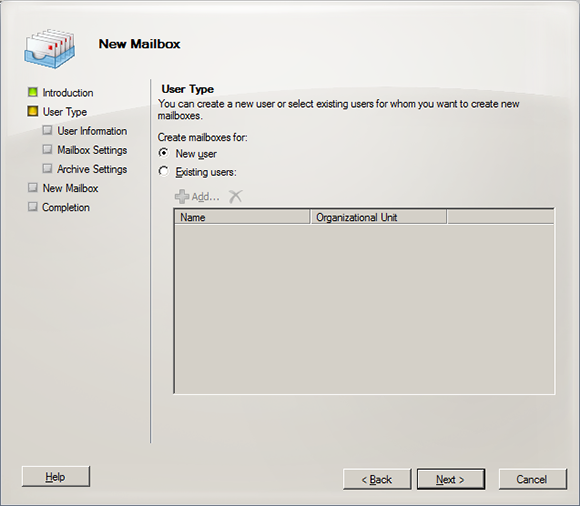
Figure 13-3: The User Type page of the New Mailbox Wizard.
5. Select the New User radio button and then click Next.
The User Information page is displayed, as shown in Figure 13-4.

Figure 13-4: The User Information page of the New Mailbox Wizard.
6. Enter the user’s first name, middle initial, and last name.
As you type the name, the New Mailbox Wizard automatically fills in the Name field.
7. (Optional) Change the Name field if you want it to appear different from what was proposed.
You may want to reverse the first and last names so the last name appears first, for example.
8. Enter the user logon name.
This name must be unique within the domain and will be used to form the user’s e-mail address.
9. Enter the password twice.
You’re asked to type the password twice, so type it correctly. If you don’t type it identically in both boxes, you’re asked to correct your mistake.
10. If the password is temporary, select the User Must Change Password at Next Logon check box.
This setting requires the user to change the temporary password the first time he logs on.
11. Click Next.
The Mailbox Settings page is displayed, as shown in Figure 13-5, where you can create an alias for the user’s account name and also set several Exchange options for the user’s mailbox.
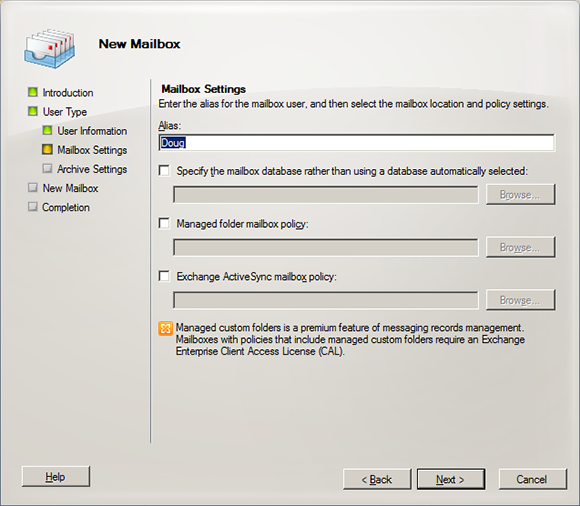
Figure 13-5: The Mailbox Settings page of the New Mailbox Wizard.
12. Enter an alias for the user and then click Next.
The alias can be the same as the name that was used in the Name field on the previous page of the wizard, or you can type a different name if you want.
When you click Next, the page shown in Figure 13-6 is displayed.
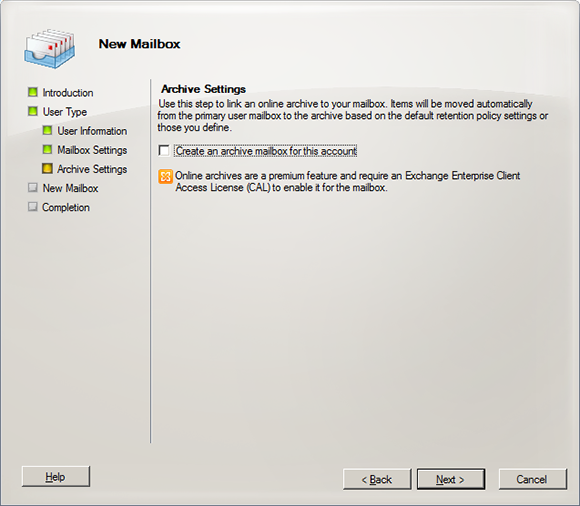
Figure 13-6: The Archive Settings page of the New Mailbox Wizard.
13. If you want to create an archive mailbox for the user, select the Create an Archive Mailbox for This Account check box; otherwise, leave the option deselected.
Archive mailboxes are available only with the Enterprise Edition of Exchange Server 2010, so don’t even think about this option unless you’ve shelled out the money for Enterprise Edition.
14. Click Next.
You’re taken to the final page of the New Mailbox Wizard, as shown in Figure 13-7.
15. Verify that the information is correct and then click New to create the mailbox.
If the account information is not correct, click the Back button and correct the error.
When you click Next, Exchange Management Console displays various and sundry messages and progress bars as it creates the user account and its mailbox. When it’s finished, the Completion page shown in Figure 13-8 is displayed.
16. Pat yourself on the back; then click Finish.
You’re done!
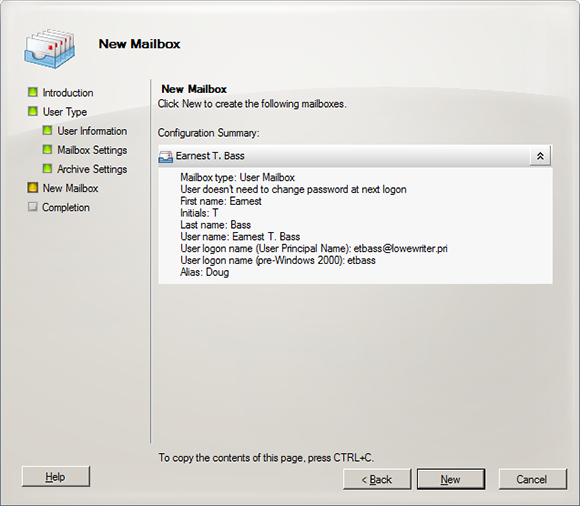
Figure 13-7: Verify the mailbox settings.

Figure 13-8: Congratulations!
Managing Mailboxes
After you set up a mailbox, you can use the Exchange Management Console to manage the basic settings of the mailbox. To do that, right-click the mailbox you want to manage and choose the Properties command from the contextual menu. This action brings up the Properties dialog box, which is the portal that grants access to many of the most frequently used features of Exchange.
The following sections describe several commonly used features that are controlled via this dialog box.
Enabling mailbox features
Exchange Mailbox Features refers to several features of Exchange mailboxes that are controlled via the Mailbox Features tab of the mailbox Properties dialog box. This tab is shown in Figure 13-9.

Figure 13-9: The Mailbox Features tab.
The following paragraphs describe the features that are controlled from this tab:
![]() Outlook Web App: Lets the user access her Exchange mailbox from a web browser rather than from an Outlook client. With this feature enabled, the user can read e-mail from any computer that has an Internet connection. This feature used to be called Outlook Web Access.
Outlook Web App: Lets the user access her Exchange mailbox from a web browser rather than from an Outlook client. With this feature enabled, the user can read e-mail from any computer that has an Internet connection. This feature used to be called Outlook Web Access.
![]() Exchange ActiveSync: Activates the ActiveSync feature, which allows Exchange data to synchronize with mobile devices, such as iPhones or Windows Mobile phones.
Exchange ActiveSync: Activates the ActiveSync feature, which allows Exchange data to synchronize with mobile devices, such as iPhones or Windows Mobile phones.
![]() Unified Messaging: Enables a premium feature (available only with Enterprise Edition) that integrates voice mail and fax messages with Exchange mailboxes.
Unified Messaging: Enables a premium feature (available only with Enterprise Edition) that integrates voice mail and fax messages with Exchange mailboxes.
![]() MAPI: Enables e-mail using the MAPI protocol. This protocol is enabled by default and is the most common way to access e-mail with Microsoft Outlook.
MAPI: Enables e-mail using the MAPI protocol. This protocol is enabled by default and is the most common way to access e-mail with Microsoft Outlook.
![]() POP3: Enables e-mail using the POP3 protocol. POP3 is disabled by default and should be enabled only if the user will need to access e-mail using an e-mail client that requires the POP3 protocol.
POP3: Enables e-mail using the POP3 protocol. POP3 is disabled by default and should be enabled only if the user will need to access e-mail using an e-mail client that requires the POP3 protocol.
![]() IMAP4: Enables e-mail using the IMAP4 protocol. IMAP4 is disabled by default and should be enabled only if required to support an IMAP4 e-mail client.
IMAP4: Enables e-mail using the IMAP4 protocol. IMAP4 is disabled by default and should be enabled only if required to support an IMAP4 e-mail client.
![]() Archive: Enables the Exchange Archive feature, which (as I mention earlier) is available only with the Enterprise edition of Exchange.
Archive: Enables the Exchange Archive feature, which (as I mention earlier) is available only with the Enterprise edition of Exchange.
Creating a forwarder
A forwarder is a feature that automatically forwards any incoming e-mail to another e-mail address. This feature is most often used when an employee is on vacation or leave, and the employee’s manager requests that someone else temporarily handle the absent employee’s e-mail.
To configure a forwarder, follow these steps:
1. In Server Manager, choose Tools⇒Microsoft Exchange Server 2010⇒Exchange Management Console.
This command fires up the Exchange Management Console (refer to Figure 13-1).
2. In the Navigation pane, navigate to Microsoft Exchange⇒Microsoft Exchange On-Premises⇒Recipient Configuration.
3. Right-click the mailbox for the user whose e-mail you want to forward and then choose Properties from the contextual menu.
This summons the mailbox Properties dialog box.
4. Click the Mail Flow Settings tab.
The Mail Flow settings are displayed, as shown in Figure 13-10.
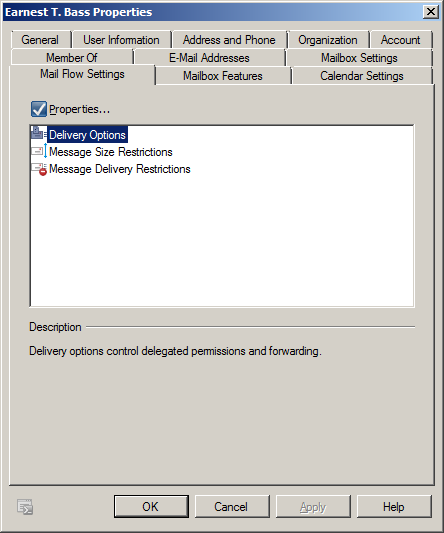
Figure 13-10: The Mail Flow Settings tab.
5. Double-click Delivery Options.
The Delivery Options dialog box appears.
6. Select the Forward To check box.
7. Click the Browse button.
The Select Recipient dialog box appears.
8. Select the recipient you want to forward the e-mail to and then click OK.
The name you selected is displayed in the text box next to the Browse button in the Delivery Options dialog box.
9. (Optional) If you want the e-mail to be delivered to this user’s mailbox in addition to the forwarding address, select the Deliver Message to Both Forwarding Address and Mailbox check box.
If you leave this option deselected, only the forwarding address will receive the e-mail; the mail won’t be delivered to this user’s mailbox.
10. Click OK to close the Delivery Options dialog box.
You return to the mailbox Properties dialog box.
11. Click OK to dismiss the Properties dialog box.
Setting mailbox storage limits
Exchange lets you set a limit on the size of each user’s mailbox. In a very small organization, you can probably get away without imposing strict mailbox size limits. If your organization has 20 or more users, though, you need to limit the size of each user’s mailbox to prevent the Exchange private mail store from getting out of hand.
Exchange provides three kinds of storage limits for user mailboxes:
![]() Issue Warning At: When this limit is exceeded, an e-mail warning is sent to the user to let him know that his mailbox is getting large.
Issue Warning At: When this limit is exceeded, an e-mail warning is sent to the user to let him know that his mailbox is getting large.
![]() Prohibit Send At: When this limit is reached, the user can’t send e-mail, but the mailbox continues to receive e-mail. The user won’t be able to send e-mails again until she deletes enough e-mails to reduce the mailbox size below the limit.
Prohibit Send At: When this limit is reached, the user can’t send e-mail, but the mailbox continues to receive e-mail. The user won’t be able to send e-mails again until she deletes enough e-mails to reduce the mailbox size below the limit.
![]() Prohibit Send and Receive At: When this limit is reached, the mailbox shuts down and can neither send nor receive e-mails.
Prohibit Send and Receive At: When this limit is reached, the mailbox shuts down and can neither send nor receive e-mails.
You can (and should) set a default storage limit that applies to all mailboxes in your organization. You can also override these limits for specific users. The limits you set will depend on many factors, including the number of users in your organization, the type of e-mail they typically use (for example, do they require large attachments?), and the amount of disk space available on your Exchange server.
To configure the default storage limits for all mailboxes, follow these steps:
1. In Server Manager, choose Tools⇒Microsoft Exchange Server 2010⇒Exchange Management Console.
This command fires up the Exchange Management Console (refer to Figure 13-1).
2. In the Navigation pane, navigate to Microsoft Exchange⇒Microsoft Exchange On-Premises⇒Organization Configuration⇒Mailbox.
The organization’s mailbox configuration displays, as shown in Figure 13-11.
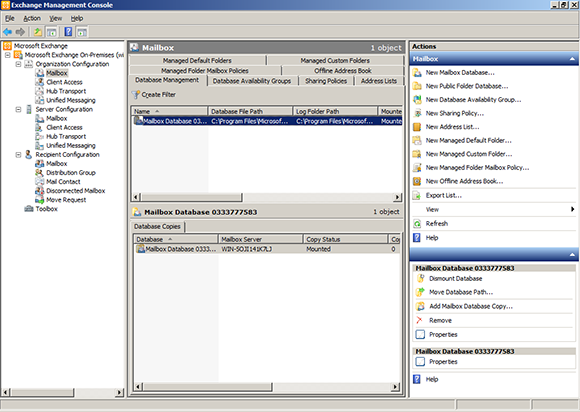
Figure 13-11: The Organization Mailbox page of the Exchange Management Console.
3. In the list of mailbox databases, right-click the mailbox database and then choose Properties from the contextual menu.
Usually, only one mailbox database is listed; the mailbox database is highlighted in Figure 13-11.
When you choose Properties, the Mailbox Database Properties dialog box is displayed.
4. Click the Limits tab.
The Limits tab is displayed, as shown in Figure 13-12.
5. Change the Storage Limits settings to meet your needs.
By default, the storage limits are set quite high: Warnings are issued at about 1.9GB, send permission is revoked at 2GB, and both send and receive permissions are revoked at about 2.4GB. A 2GB allowance for each user’s mailbox is generous, but bear in mind that if you have 100 users, your mailbox database may grow to 200GB. You may want to set lower limits.

Figure 13-12: Set default storage limits.
6. Click OK.
The limits you set take effect immediately.
If you impose restrictive default storage limits for your users, you may want to relax the limits on a case-by-case basis. Some users may require a larger mailbox because of the type of work they do, and you probably don’t want to impose a tight limit on your boss.
Fortunately, overriding the default limits for a specific user is easy. Here are the steps:
1. In Exchange Management Console, navigate to Microsoft Exchange⇒Microsoft Exchange On-Premises⇒Recipient Configuration⇒Mailbox.
2. Right-click the user for whom you want to override the limits and choose Properties.
This summons the Mailbox Properties dialog box.
3. Click the Mailbox Settings tab.
4. Double-click Storage Quotas.
The Storage Quotas dialog box appears, as shown in Figure 13-13.
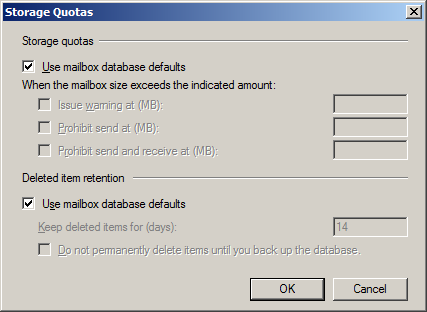
Figure 13-13: Customize storage quotas here.
5. Deselect the Use Mailbox Database Defaults check box in the Storage Quotas section.
This option enables the controls that let you set the Issue Warning, Prohibit Send, and Prohibit Send and Receive limits.
6. Set the appropriate limits for the user.
7. Click OK.
The storage limits are configured.
 You can configure many other features of Exchange via the Exchange Management Console. You should take some time to explore all the nodes in the navigation pane and to examine the Properties dialog boxes for the various types of Exchange objects that appear when you select each node.
Configuring Outlook for Exchange
After you create an Exchange mailbox for a user, you can configure that user’s Outlook client software to connect to the user’s account. Although you can do this configuration directly within Outlook, it’s better to do it outside Outlook, using the Control Main Mail applet. Here are the steps:
1. Open Control Panel and then open the Mail applet.
The dialog box shown in Figure 13-14 appears.
2. Click the Show Profiles button.
The dialog box shown in Figure 13-15 appears, listing the mail profiles that already exist on the computer.

Figure 13-14: The Mail Setup dialog box.

Figure 13-15: Viewing mail profiles.
3. Double-click the user’s profile.
The Mail Setup dialog box shown in Figure 13-16 appears.

Figure 13-16: The Mail Setup dialog box.
4. Click the E-mail Accounts button.
The Account Settings dialog box appears, as shown in Figure 13-17.
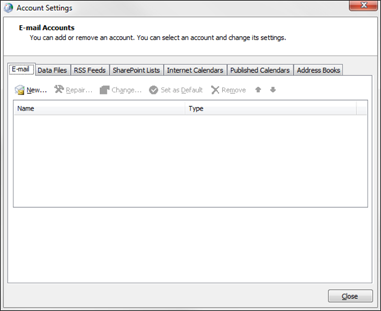
Figure 13-17: The Account Settings dialog box.
5. Click the New icon.
An Add E-mail Account dialog box appears.
 Don’t enter your e-mail address as prompted in this dialog box; instead, proceed to Step 6.
6. Click the Manually Configure Server Settings or Additional Server Types option and then click Next.
A dialog box asks you what type of e-mail account you want to create. The choices are Internet E-mail, Microsoft Exchange, and Other.
7. Select the Microsoft Exchange option and then click Next.
The dialog box shown in Figure 13-18 appears.

Figure 13-18: You must identify the Exchange server and provide a username.
8. Enter the name of the Exchange server and the username in the appropriate text boxes; then click Next.
A dialog box displays the following message:
The E-Mail account you have just added will not start until you choose Exit from the File menu, and then restart Microsoft Outlook.
9. Click OK.
The message dialog box disappears, and the last page of the E-Mail Accounts Wizard appears.
10. Click the Finish button.
The wizard is dismissed.
11. Choose File⇒Exit to close Outlook.
12. Restart Outlook.
The mailbox should be configured.