
Chapter 14
Creating an Intranet
In This Chapter
![]() Getting acquainted with intranets
Getting acquainted with intranets
![]() Finding good uses for intranets
Finding good uses for intranets
![]() Figuring out what you need to set up an intranet
Figuring out what you need to set up an intranet
![]() Setting up an IIS web server
Setting up an IIS web server
![]() Setting up a simple intranet
Setting up a simple intranet
![]() Managing IIS
Managing IIS
No, I’m not mispronouncing Internet, although an intranet is similar to the Internet, but with a twist. Rather than connect your computer to millions of other computers around the world, an intranet connects your computer to other computers in your company or organization. How is an intranet different from your ordinary, run-of-the-mill network? Read on, and I’ll explain.
Defining an Intranet
Everyone knows that the Internet, and especially the World Wide Web, is a phenomenon. Millions of computer users worldwide surf the web, sharing and downloading files.
Companies realized that such a platform would help employees share and access data and documents. But understandably, not many companies wanted their proprietary and private info all over the web. So ingenious network managers at large companies figured out that although “the” web is a great conduit for distributing public information around the world, “a” web — a private internal web — is even better for distributing sensitive information within a company. Thus, the idea of intranets was born. An intranet is simply a network that’s built by using the same tools and protocols that are used by the global Internet but applied instead to an organization’s internal network.
 Think of an intranet as a small, private version of the World Wide Web. Anyone who connects to your local area network (LAN) can access your intranet. The intranet is accessed by using a web browser, such as Internet Explorer or Firefox. However, users don’t need an Internet connection because the information on the intranet is stored on the company’s server computers rather than on a computer that must be accessed from the Internet.
 An intranet is analogous to a closed-circuit television system that can be viewed only by people within the organization that owns the system. In contrast, the Internet is more like cable television in that anyone who’s willing to pay a monthly fee can watch.
Here are two interesting but contradictory points of view about the significance of intranets:
![]() Some computer industry pundits say that intranets are more popular than the Internet. For example, many companies that sell web development tools make more money selling software used for intranets than for the Internet.
Some computer industry pundits say that intranets are more popular than the Internet. For example, many companies that sell web development tools make more money selling software used for intranets than for the Internet.
![]() On the other hand, other industry pundits think that the intranet phenomenon is merely a fad that some other promising new technology, such as pet rocks or hula hoops, will replace in a few years. Only time will tell.
On the other hand, other industry pundits think that the intranet phenomenon is merely a fad that some other promising new technology, such as pet rocks or hula hoops, will replace in a few years. Only time will tell.
Identifying Intranet Uses
Intranets can distribute just about any type of information within a company. Intranets use two basic types of applications:
![]() Publishing application: Information is posted in the form of pages that you can view from any computer with access to the intranet. This type of intranet application is commonly used for company newsletters, policy manuals, and price lists, for example.
Publishing application: Information is posted in the form of pages that you can view from any computer with access to the intranet. This type of intranet application is commonly used for company newsletters, policy manuals, and price lists, for example.
Publishing applications are simple to set up. In fact, you may be able to set up one without a lot of outside help from highly paid computer consultants.
![]() Transaction application: Information is gathered from users of the intranet who file online expense reports, report problems to the help desk, or enroll in employee benefit programs, for example.
Transaction application: Information is gathered from users of the intranet who file online expense reports, report problems to the help desk, or enroll in employee benefit programs, for example.
 Expect to spend big bucks on computer consulting to get an intranet transaction application set up.
Here’s the key difference between these two types of intranet applications:
![]() In a publishing application, information flows in one direction. It flows from the intranet to the user. The user requests some information, and the intranet system delivers it.
In a publishing application, information flows in one direction. It flows from the intranet to the user. The user requests some information, and the intranet system delivers it.
![]() In a transaction application, information flows in both directions. Not only does the user request information from the intranet system, but the intranet system itself also requests information from the user.
In a transaction application, information flows in both directions. Not only does the user request information from the intranet system, but the intranet system itself also requests information from the user.
Setting Up an Intranet
To properly set up an intranet, you need the right tools. Here’s a list of requirements:
![]() A network: An intranet doesn’t require its own cabling; it can operate on your existing network.
A network: An intranet doesn’t require its own cabling; it can operate on your existing network.
![]() A server computer that’s dedicated to the intranet: Make sure that this computer has plenty of RAM (at least 4GB) and gigabytes of disk space (at least 100GB). Of course, the more users your network has and the more information you intend to place on the server, the more RAM and disk storage you need.
A server computer that’s dedicated to the intranet: Make sure that this computer has plenty of RAM (at least 4GB) and gigabytes of disk space (at least 100GB). Of course, the more users your network has and the more information you intend to place on the server, the more RAM and disk storage you need.
![]() Windows Server or a Linux operating system: Web server software requires one or the other.
Windows Server or a Linux operating system: Web server software requires one or the other.
![]() Web server software for the server computer: You need to install a web server, such as IIS (for Windows servers) or Apache (for Linux servers).
Web server software for the server computer: You need to install a web server, such as IIS (for Windows servers) or Apache (for Linux servers).
![]() Programs to help you create web pages: If you’re the type who dreams in binary, you can create web pages by typing HTML codes directly into text files. In that case, the only program you need is Notepad. Alternatively, you can use a program designed specifically for creating web pages, such as Microsoft FrontPage, or perhaps something fancier, such as Adobe Dreamweaver. If you’re going to develop transaction-based applications, you need additional tools.
Programs to help you create web pages: If you’re the type who dreams in binary, you can create web pages by typing HTML codes directly into text files. In that case, the only program you need is Notepad. Alternatively, you can use a program designed specifically for creating web pages, such as Microsoft FrontPage, or perhaps something fancier, such as Adobe Dreamweaver. If you’re going to develop transaction-based applications, you need additional tools.
Setting Up an IIS Web Server
IIS is a free component of Windows Server 2012, but it’s not installed by default. After you complete installing Windows Server, you must add the Web Server role to enable IIS. The following procedure is for Windows Server 2012, but the procedure for Windows 2008 Server (or 2003, for that matter) is similar:
1. Open the Server Manager; then choose Add Roles and Features.
The Add Roles and Features Wizard comes to life.
2. Follow the steps of the Add Roles and Features Wizard up to the Select Server Roles step.
The Select Server Roles page is shown in Figure 14-1.
3. Select the Web Server (IIS) check box and then click Next.
The Add Roles and Features Wizard asks whether you want to install the related IIS Management Console, as shown in Figure 14-2.
4. Click the Add Features button; then click Next.
The Select Features page appears.

Figure 14-1: The Select Server Roles page of the Add Roles and Features Wizard.

Figure 14-2: Installing the IIS Management Console.
5. Click Next.
The Web Server Role (IIS) page appears, as shown in Figure 14-3.
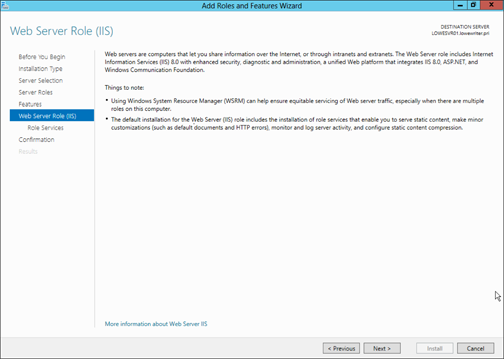
Figure 14-3: The Web Server Role (IIS) page of the Add Roles and Features Wizard.
6. Click Next.
The Select Role Services page appears, as shown in Figure 14-4. This page lists a variety of optional services that can be configured for IIS.
7. Select the services you want to configure for IIS.
If you want, you can study this list and try to anticipate which features you think you’ll need. Or you can just leave the default options selected.
You can always return to the Add Roles and Features Wizard to add features you leave out here.
8. Click Next.
A confirmation page appears.
9. Click Install.
The features you selected are installed. This may take a few minutes, so now would be a good time to take a walk.
When the installation finishes, an Installation Results page is displayed to verify that IIS was properly installed.
10. Click Close.
IIS is now installed and ready to use!
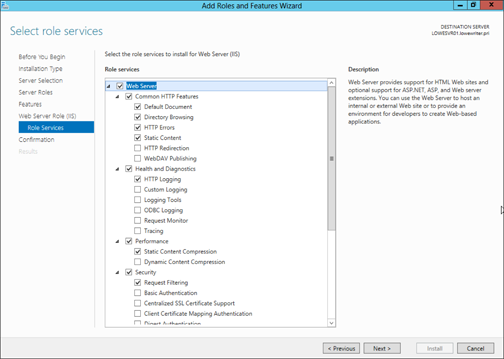
Figure 14-4: The Select Role Services page of the Add Roles and Features Wizard.
Understanding the Default Website
Initially, IIS is configured with a single website: the default website. You can test that IIS is up and running by opening a browser window on the server and typing localhost in the address bar. You can also reach this page by entering your local domain name in the address bar, such as lowewriter.pri. Figure 14-5 shows the standard welcome page that appears when you browse to the default site.
The actual files that make up the default website are stored on the server's C: drive in a folder named inetpubwwwroot. When you browse to the default website without requesting a specific file (simply by typing localhost in the address bar, for example), IIS looks for the following files, in this order:
![]()
default.htm
![]()
default.asp
![]()
index.htm
![]()
index.html
![]()
iisstart.htm
![]()
default.aspx

Figure 14-5: The default website.
Initially, c:inetpubwwwroot contains just two files: iisstart.htm and welcome.png. The iisstart.htm file is the file that's displayed when you browse to the website; it contains the HTML markup necessary to display the image contained in the welcome.png file, which is the image you actually see on the page.
You can preempt the standard page for the default website by providing your own file one of the preceding names. You can follow these steps, for example, to create a simple default.htm file that displays the words Hello World! as the start page for the default website:
1. Open an Explorer window, and browse to c:inetpubwwwroot.
2. Choose File⇒New⇒Text Document, type default.htm for the filename, and press Enter.
3. Right-click the default.htm file you just created and choose Open With⇒Notepad from the contextual menu.
4. Enter the following text in the Notepad window:
<HTML>
<BODY>
<H1>Hello World!</H1>
</BODY>
</HTML>
5. Choose File⇒Save to save the file and then choose File⇒Exit to quit Notepad.
6. Open a browser window.
7. Type localhost in the address bar, and press Enter.
The page shown in Figure 14-6 appears.

Figure 14-6: Hello World!
Creating Websites
IIS has the ability to host multiple websites. This is an extremely useful feature not only for web servers that host public sites, but also for web servers that host internal (intranet) sites. You might create a separate intranet website for Human Resources and assign it the website name hr. Then, assuming that the domain name is lowewriter.pri, users can browse to the website by using the address hr.lowewriter.pri.
Here are the steps:
1. Using Windows Explorer, create a folder in which you will save the files for the new website.
For this example, I created a folder named c:HR-Web-Site.
2. In Server Manager, choose Tools⇒Internet Information Services (IIS) Manager.
The IIS Manager springs to life, as shown in Figure 14-7.

Figure 14-7: The IIS Manager.
3. Right-click Sites and then choose Add Website from the contextual menu.
The Add Website dialog box appears, as shown in Figure 14-8.
4. Enter a name for the website in the Site Name text box.
For this example, I used HR.
5. Click the Browse button (the one with the ellipsis), browse to the folder you created in Step 1, and then click OK.
For this example, I browsed to C:HR-Web-Site.
6. In the Host Name text box, enter the exact DNS name you want to use for the site.
For this example, I entered hr.lowewriter.pri.
7. Click OK.
The newly created website appears below the Sites node in the IIS Manager, as shown in Figure 14-9.

Figure 14-8: The Add Website dialog box.
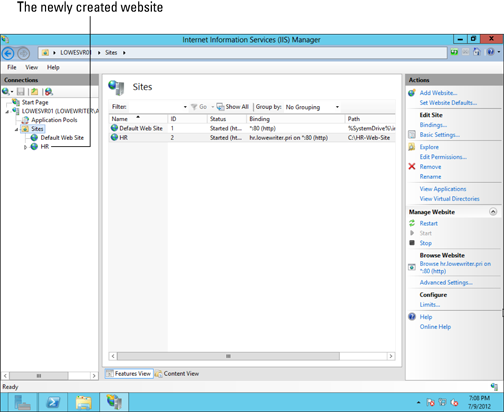
Figure 14-9: The HR website appears in the IIS Manager.
8. Close the IIS Manager.
9. Create a web page to display in the folder you created in Step 1.
For this example, I used Notepad to create a text file named default.htm, with the following text:
<HTML>
<BODY>
<H1>Welcome to the HR Web Site!</H1>
</BODY>
</HTML>
10. In Server Manager, choose Tools⇒DNS.
This brings up the DNS Manager console, as shown in Figure 14-10.

Figure 14-10: The DNS Manager console.
11. In the navigation pane, navigate to the node for your domain.
In this example, I navigated to lowewriter.pri.
12. Choose Action⇒New Alias (CNAME).
The New Resource Record dialog box appears, as shown in Figure 14-11.

Figure 14-11: Creating a CNAME record.
13. Enter the alias name you want to use in the Alias Name text box.
For this example, I entered simply hr.
14. Enter the computer name of your web server in the Fully Qualified Domain Name (FQDN) for Target Host text box.
For this example, I entered lserver01.
15. Click OK.
The DNS alias is created.
16. Close the DNS Manager console.
17. Open a browser window.
18. Browse to the alias address you just created.
For this example, I browsed to hr.lowewriter.pri. Figure 14-12 shows the resulting page.

Figure 14-12: Viewing a website.