Chapter 12
Managing Network Storage
In This Chapter
![]() Understanding network storage
Understanding network storage
![]() Setting permissions
Setting permissions
![]() Sharing folders
Sharing folders
![]() Configuring and managing a file server
Configuring and managing a file server
One key purpose of most computer networks is to provide shared access to disk storage. In this chapter, you find out about several ways that a network can provide shared disk storage. Then you discover how to configure Windows Server 2012 to operate as a file server.
Understanding Network Storage
Many network servers exist solely for the purpose of making disk space available to network users. As networks grow to support more users and as users require more disk space, network administrators are continually finding ways to add more storage to their networks. The following sections describe some key concepts for providing network storage.
File servers
A file server is simply a network server whose primary role is to share its disk drives. Using a file server is the most common way to provide shared network storage.
A file server can be anything from a simple desktop computer that has been pressed into service as a file server to an expensive ($25,000 or more) server with redundant components so that the server can continue to run when a component fails. A file server can even consist of advanced disk subsystems with racks of disk drives that can be replaced without shutting down the server.
One of the most common advanced disk subsystems for file servers is Redundant Array of Inexpensive Disks (RAID). A RAID system, which is a type of disk storage that hardly ever fails, works by lumping together several disk drives and treating them as though they’re a single humongous drive. RAID uses some fancy techniques devised by computer nerds at Berkeley. These techniques ensure that if one of the disk drives in the RAID system fails, no data is lost. The disk drive that failed can be removed and repaired, and the data that was on it can be reconstructed from the other drives.
 Most of this chapter is devoted to showing you how to configure Windows Server 2012 to run as a file server.
Storage appliances
A storage appliance is a device specifically designed for providing shared network storage. Also known as Network Attached Storage (NAS), it’s a self-contained file server that’s preconfigured and ready to run. All you have to do to set it up is take it out of the box, plug it in, and turn it on. Storage appliances are easy to set up and configure, easy to maintain, and less expensive than traditional file servers.
A typical entry-level storage appliance is the Dell PowerVault NX300. This self-contained file server is built into a small rack-mount chassis. It supports up to four hard drives with a total capacity of up to 12 terabytes (TB; that’s 12,000GB). The Dell NX300 runs a special version of Windows Server: Windows Storage Server. This version of Windows, designed specifically for NAS devices, allows you to configure the network storage from any computer on the network by using a web browser.
Note that some storage appliances use customized versions of Linux rather than Windows Storage Server. Also, in some systems, the operating system (OS) resides on a separate hard drive that’s isolated from the shared disks so users are prevented from inadvertently damaging the OS.
Understanding Permissions
Before I get into the details of setting up a file server, you need to have a solid understanding of the concept of permissions. Permissions allow users to access shared resources on a network. Simply sharing a resource, such as a disk folder or a printer, doesn’t guarantee that a given user is able to access that resource. Windows makes this decision based on the permissions that have been assigned to various groups for the resource and group memberships of the user. For example, if the user belongs to a group that has been granted permission to access the resource, the access is allowed. If not, access is denied.
In theory, permissions sound pretty simple. In practice, however, they can get pretty complicated. The following paragraphs explain some of the nuances of how access control and permissions work:
![]() Every object — that is, every file and folder — on an NTFS volume has a set of permissions — the Access Control List (ACL) — associated with it.
Every object — that is, every file and folder — on an NTFS volume has a set of permissions — the Access Control List (ACL) — associated with it.
![]() The ACL identifies which users and groups can access the object and specifies what level of access each user or group has. A folder’s ACL may specify that one group of users can read files in the folder, whereas another group can read and write files in the folder, and a third group is denied access to the folder.
The ACL identifies which users and groups can access the object and specifies what level of access each user or group has. A folder’s ACL may specify that one group of users can read files in the folder, whereas another group can read and write files in the folder, and a third group is denied access to the folder.
![]() Container objects — files and volumes — allow their ACLs to be inherited by the objects that they contain. As a result, if you specify permissions for a folder, those permissions extend to the files and child folders that appear within it.
Container objects — files and volumes — allow their ACLs to be inherited by the objects that they contain. As a result, if you specify permissions for a folder, those permissions extend to the files and child folders that appear within it.
Table 12-1 lists the six permissions that can be applied to files and folders on an NTFS volume.
Table 12-1 File and Folder Permissions
|
Permission |
Description |
|
Full Control |
The user has unrestricted access to the file or folder. |
|
Modify |
The user can change the file or folder’s contents, delete the file or folder, read the file or folder, or change the attributes of the file or folder. For a folder, this permission allows you to create new files or subfolders within the folder. |
|
Read & Execute |
For a file, this permission grants the right to read or execute the file. For a folder, this permission grants the right to list the contents of the folder or to read or execute any of the files in the folder. |
|
List Folder Contents |
This permission applies only to folders; it grants the right to list the contents of the folder. |
|
Read |
This permission grants the right to read the contents of a file or folder. |
|
Write |
This permission grants the right to change the contents of a file or its attributes. For a folder, this permission grants the right to create new files and subfolders within the folder. |
Actually, the six file and folder permissions comprise various combinations of special permissions that grant more detailed access to files or folders. Table 12-2 lists the special permissions that apply to each of the six file and folder permissions.
Assign permissions to groups rather than to individual users. that way, if a particular user needs access to a particular resource, add that user to a group that has permission to use the resource.

Understanding Shares
A share is simply a folder that is made available to other users via the network. Each share has the following elements:
![]() Share name: The name by which the share is known over the network
Share name: The name by which the share is known over the network
![]() Path: The path to the folder on the local computer that's being shared, such as
Path: The path to the folder on the local computer that's being shared, such as C:Accounting
![]() Description: A one-line description of the share
Description: A one-line description of the share
![]() Permissions: A list of users or groups who have been granted access to the share
Permissions: A list of users or groups who have been granted access to the share
When you install Windows and configure various server roles, special shared resources are created to support those roles. You shouldn’t disturb these special shares unless you know what you’re doing. Table 12-3 lists some of the most common special shares.
Table 12-3 Special Shares
|
Share Name |
Description |
|
|
The root directory of a drive. |
|
|
Used for remote administration of a computer. This share points to the OS folder (usually, |
|
|
Used by named pipes, a programming feature that lets processes communicate with one another. |
|
|
Required for domain controllers to function. |
|
|
Another required domain controller share. |
|
|
Used for remote administration of printers. |
|
|
Used by fax clients. |
Notice that some of the special shares end with a dollar sign ($). These shares are hidden shares, not visible to users. You can still access them, however, by typing the complete share name (including the dollar sign) when the share is needed. The special share C$, for example, is created to allow you to connect to the root directory of the C: drive from a network client. You wouldn't want your users to see this share, would you? (Shares such as C$ are also protected by privileges, of course, so if an ordinary user finds out that C$ is the root directory of the server's C: drive, he still can't access it.)
Managing Your File Server
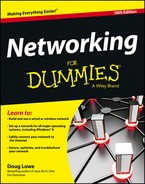
To manage shares on a Windows Server 2012 system, open the Server Manager, and select File and Storage Services in the task pane on the left side of the window. Then click Shares to reveal the management console shown in Figure 12-1.
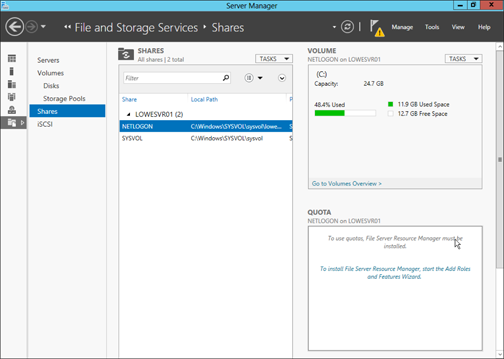
Figure 12-1: Managing shares in Windows Server 2012.
The following sections describe some of the most common procedures that you’ll use when managing your file server.
Using the New Share Wizard
To be useful, a file server should offer one or more shares — folders that have been designated as publicly accessible via the network. To create a new share, use the New Share Wizard:
1. In Server Manager, select File and Storage Services, click Shares and then choose New Share from the Tasks drop-down menu.
The opening screen of the New Share Wizard appears, as shown in Figure 12-2. Here, the wizard asks you what folder you want to share.
2. Select SMB Share – Quick in the list of profiles and then click Next.
The New Share Wizard asks for the location of the share, as shown in Figure 12-3.
Figure 12-2: The New Share Wizard comes to life.

Figure 12-3: The wizard asks where you’d like to locate the share.
3. Select the server where you want the share to reside.
4. Select the location of the share by choosing one of these two options:
• Select by Volume: This option selects the volume on which the shared folder will reside while letting the New Share Wizard create a folder for you. If you select this option, the wizard will create the shared folder on the designated volume. Use this option if the folder doesn't yet exist and you don't mind Windows placing it in the default location, which is inside a folder called Shares on the volume you specify.
• Type a Custom Path: Use this option if the folder exists or if you want to create one in a location other than the Shares folder.
5. Click Next.
The dialog box shown in Figure 12-4 appears.
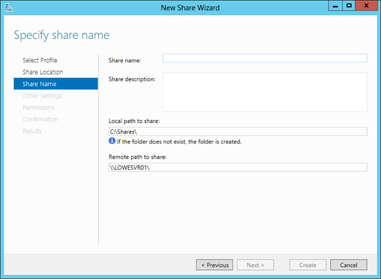
Figure 12-4: The wizard asks for the share name and description.
6. Enter the name that you want to use for the share in the Share Name field.
The default name is the name of the folder being shared. If the folder name is long, you can use a more succinct name here.
7. Enter a description for the share.
8. Click Next.
The dialog box shown in Figure 12-5 appears.
9. Select the share settings you’d like to use:
• Enable Access-Based Enumeration: Hides files that the user does not have permission to access
• Allow Caching of Share: Makes the files available to offline users
• Encrypt Data Access: Encrypts files accessed via the share
10. Click Next.
The wizard displays the default permissions that will be used for the new share, as shown in Figure 12-6.
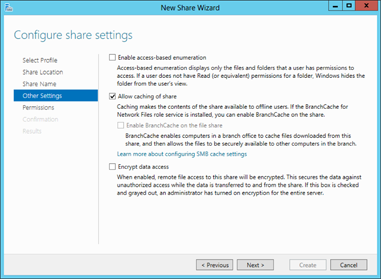
Figure 12-5: Specify the share settings.

Figure 12-6: Setting the share permissions.
11. (Optional) If you want to customize the permissions, click the Customize Permissions button.
Clicking this button summons the Advanced Security Settings for Data dialog box, where you can customize both the NTFS and the share permissions.
12. Click Next.
The confirmation page appears, as shown in Figure 12-7.
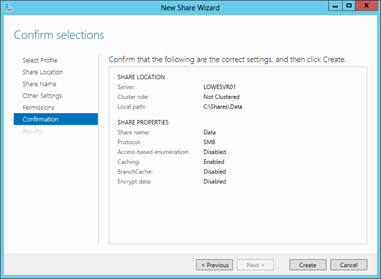
Figure 12-7: Confirming your share settings.
13. Verify that all the settings are correct and then click the Create button.
The share is created, and a results dialog box is displayed, as shown in Figure 12-8.

Figure 12-8: You’re done!
Sharing a folder without the wizard
If you think wizards should be confined to Harry Potter movies, you can set up a share without bothering with the wizard. Just follow these steps:
1. Press the Windows key, click Computer, and navigate to the folder that you want to share.
2. Right-click the folder and choose Properties from the contextual menu.
This action brings up the Properties dialog box for the folder.
3. Click the Sharing tab.
The Sharing tab comes to the front, as shown in Figure 12-9.
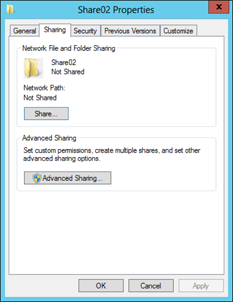
Figure 12-9: Manually share a folder.
4. Click the Advanced Sharing button.
The dialog box shown in Figure 12-10 appears.
5. Select the Share This Folder check box to designate the folder as shared.
The rest of the controls in this dialog box are unavailable until you select this check box.
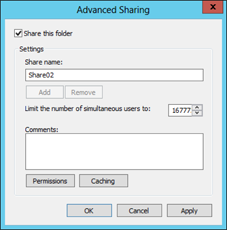
Figure 12-10: Set the share name.
6. Enter the name that you want to use for the share in the Share Name field and then enter a description of the share in the Comments field.
The default name is the name of the folder being shared. If the folder name is long, you can use a more succinct name here.
The description is strictly optional but sometimes helps users determine the intended contents of the folder.
7. Click the Permissions button and then set the permissions you want to apply to the share.
For more information, see the next section.
8. Click OK.
The folder is now shared.
Granting permissions
When you first create a file share, all users are granted read-only access to the share. If you want to allow users to modify files in the share or allow them to create new files, you need to add permissions. Here’s how to do this via the Share and Storage Management console:
1. Open Windows Explorer by pressing the Windows key and clicking Computer; then browse to the folder whose permissions you want to manage.
2. Right-click the folder you want to manage and then choose Properties from the contextual menu.
The Properties dialog box for the folder appears.
3. Click the Sharing tab; then click Advanced Sharing.
The Advanced Sharing dialog box appears.
4. Click Permissions.
The dialog box shown in Figure 12-11 appears. This dialog box lists all the users and groups to whom you’ve granted permission for the folder. Initially, read permissions are granted to a group called Everyone, which means that anyone can view files in the share but no one can create, modify, or delete files in the share.
When you select a user or group from the list, the check boxes at the bottom of the list change to indicate which specific permissions you’ve assigned to each user or group.
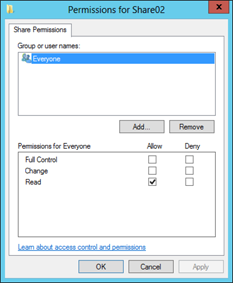
Figure 12-11: Set the share permissions.
5. Click the Add button.
The dialog box shown in Figure 12-12 appears.
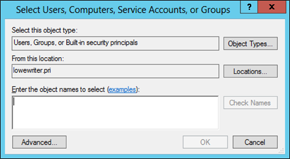
Figure 12-12: Adding permissions.
6. Enter the name of the user or group to whom you want to grant permission and then click OK.
If you’re not sure of the name, click the Advanced button. This action brings up a dialog box from which you can search for existing users.
When you click OK, you return to the Share Permissions tab (refer to Figure 12-11), with the new user or group added.
7. Select the appropriate Allow and Deny check boxes to specify which permissions to allow for the user or group.
8. Repeat Steps 5–7 for any other permissions that you want to add.
9. When you’re done, click OK.
Here are a few other thoughts to ponder concerning adding permissions:
![]() If you want to grant full access to everyone for this folder, don’t bother adding another permission. Instead, select the Everyone group and then select the Allow check box for each permission type.
If you want to grant full access to everyone for this folder, don’t bother adding another permission. Instead, select the Everyone group and then select the Allow check box for each permission type.
![]() You can remove a permission by selecting the permission and then clicking the Remove button.
You can remove a permission by selecting the permission and then clicking the Remove button.
![]() If you’d rather not fuss with the Share and Storage Management console, you can set the permissions from My Computer. Right-click the shared folder, choose Sharing and Security from the contextual menu, and then click Permissions. Then you can follow the preceding procedure, picking up at Step 5.
If you’d rather not fuss with the Share and Storage Management console, you can set the permissions from My Computer. Right-click the shared folder, choose Sharing and Security from the contextual menu, and then click Permissions. Then you can follow the preceding procedure, picking up at Step 5.
![]()
 The permissions assigned in this procedure apply only to the share itself. The underlying folder can also have permissions assigned to it. If that’s the case, whichever of the restrictions is most restrictive always applies. If the share permissions grant a user Full Control permission but the folder permission grants the user only Read permission, for example, the user has only Read permission for the folder.