
Chapter 7
Configuring Windows Clients
In This Chapter
![]() Configuring network connections for Windows clients
Configuring network connections for Windows clients
![]() Setting the computer name, description, and workgroup
Setting the computer name, description, and workgroup
![]() Joining a domain
Joining a domain
![]() Setting logon options
Setting logon options
Before your network setup is complete, you must configure the network’s client computers. In particular, you have to configure each client computer’s network interface card (NIC) so that it works properly, and you have to install the right protocols so that the clients can communicate with other computers on the network.
Fortunately, the task of configuring client computers for the network is child’s play in Windows. For starters, Windows automatically recognizes your network interface card when you start up your computer. All that remains is to make sure that Windows properly installed the network protocols and client software.
With each version of Windows, Microsoft has simplified the process of configuring client network support. In this chapter, I describe the steps for configuring networking for Windows XP, Windows Vista, Windows 7, and Windows 8.
Configuring Network Connections
Windows usually detects the presence of a network adapter automatically; typically, you don’t have to install device drivers manually for the adapter. When Windows detects a network adapter, it automatically creates a network connection and configures it to support basic networking protocols. You may need to change the configuration of a network connection manually, however. The procedures for Windows XP and Vista are described in the following sections.
Configuring Windows XP network connections
The following steps show how to configure your network connection on a Windows XP system:
1. Choose Start⇒Control Panel to open the Control Panel.
2. Double-click the Network Connections icon.
The Network Connections folder appears, as shown in Figure 7-1.
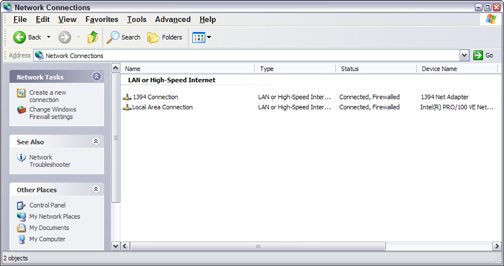
Figure 7-1: The Network Connections folder.
3. Right-click the connection that you want to configure and then choose Properties from the contextual menu that appears.
Either way, the Properties dialog box for the network connection appears, as shown in Figure 7-2.
4. To configure the network adapter settings, click Configure.
This action summons the Properties dialog box for the network adapter, as shown in Figure 7-3. This dialog box has five tabs that let you configure the NIC:
• General: This tab shows basic information about the NIC, such as the device type and status. For example, the device shown in Figure 7-3 is an Intel Pro 100 network interface.
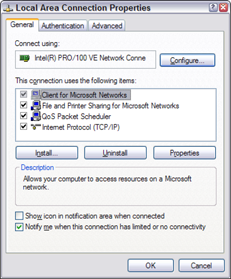
Figure 7-2: The Properties dialog box for a network connection.
• Advanced: From this tab, you can set a variety of device-specific parameters that affect the operation of the NIC. In most cases, you should leave the options on this tab alone.
• Driver: This tab displays information about the device driver that’s bound to the NIC and lets you update the driver to a newer version, roll back the driver to a previously working version, or uninstall the driver.
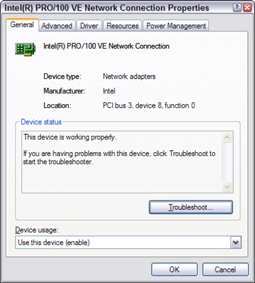
Figure 7-3: The Properties dialog box for a network adapter.
• Resources: From this tab, you can use manual settings to limit the system resources used by the card. In most cases, you can leave the settings on this tab alone.
 In the old days, before Plug and Play cards, you had to configure these settings whenever you installed a card, and it was easy to create resource conflicts. Windows configures these settings automatically so that you should rarely need to fiddle with them.
• Power Management: From this tab, you set power-management options. You can specify that the network card be shut down whenever the computer goes into sleep mode and that the computer wake up periodically to refresh its network state.
 When you click OK to dismiss the network adapter’s Properties dialog box, the network connection’s Properties dialog box closes. Select the Change Settings of This Connection option again to continue the procedure.
5. Click Internet Protocol (TCP/IP) and then click Properties to display the TCP/IP Properties dialog box. Adjust the settings and then click OK.
The TCP/IP Properties dialog box, shown in Figure 7-4, lets you choose among these options:
• Obtain an IP Address Automatically: Choose this option if your network has a DHCP server that assigns IP addresses automatically. Choosing this option dramatically simplifies administering TCP/IP on your network. (See Chapter 5 for more information about DHCP.)
• Use the Following IP Address: If your computer must have a specific IP address, choose this option and then type the computer’s IP address, subnet mask, and default gateway address. (For more information about these settings, see Chapter 5.)
• Obtain DNS Server Address Automatically: The DHCP server can also provide the address of the Domain Name System (DNS) server that the computer should use. Choose this option if your network has a DHCP server. (See Chapter 5.)
• Use the Following DNS Server Addresses: Choose this option if a DNS server isn’t available. Then type the IP addresses of the primary and secondary DNS servers.
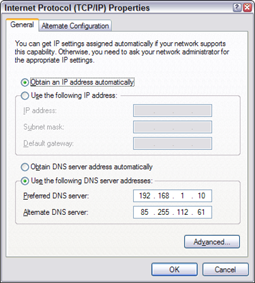
Figure 7-4: Configuring TCP/IP.
Configuring Windows Vista network connections
The procedure for configuring a network connection on Windows Vista is similar to the procedure for Windows XP, except that Microsoft decided to bury the configuration dialog boxes a little deeper in the bowels of Windows.
To find the settings you need, follow these steps:
1. Choose Start⇒Control Panel.
2. Choose View Network Status and Tasks under the Network and Internet heading.
This step opens the Network and Sharing Center, shown in Figure 7-5.
3. Click Manage Network Connections.
The Network Connections folder appears, as shown in Figure 7-6.
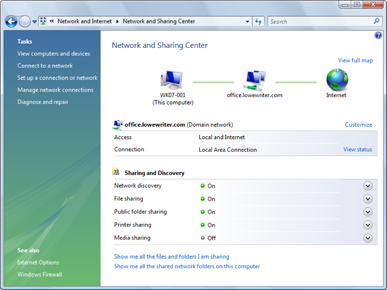
Figure 7-5: The Network and Sharing Center (Windows Vista).
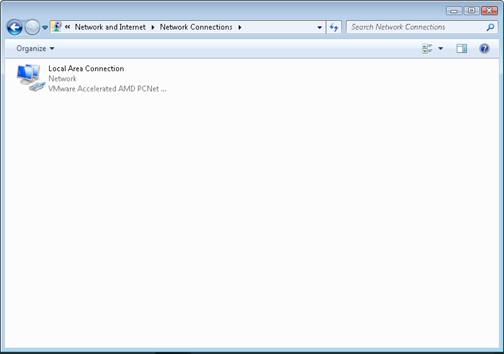
Figure 7-6: The Network Connections folder (Windows Vista).
4. Right-click the connection that you want to configure and then choose Properties from the contextual menu that appears.
The Properties dialog box for the network connection appears, as shown in Figure 7-7. If you compare this dialog box with the dialog box shown earlier, in Figure 7-2, you see that they are similar.
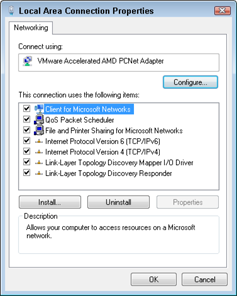
Figure 7-7: The Properties dialog box for a network connection (Windows Vista).
5. Click Configure to configure the network connection.
From this point, the steps for configuring the network connection are the same as they are for Windows XP. As a result, you can continue by beginning with Step 4 in the preceding section, “Configuring Windows XP network connections.”
Configuring Windows 7 and Windows 8 network connections
The procedure for configuring a Windows 7 network connection is similar to the Windows Vista procedure, with just a few minor variations. Here are the steps:
1. Open the Control Panel.
• Windows 7: Choose Start⇒Control Panel.
• Windows 8: Right-click the bottom-left corner of the screen and then choose Control Panel from the contextual menu.
2. Choose Network and Sharing Center.
This step opens the Network and Sharing Center, shown in Figure 7-8.
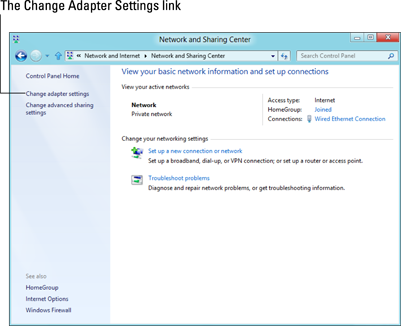
Figure 7-8: The Network and Sharing Center (Windows 8).
3. Click the Change Adapter Settings link on the left.
The Network Connections folder appears, as shown in Figure 7-9.
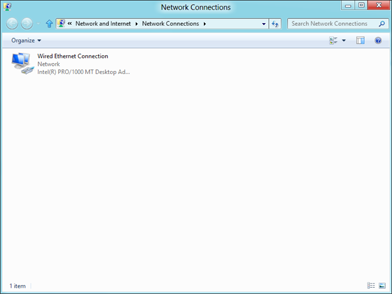
Figure 7-9: The Network Connections folder (Windows 8).
4. Right-click the connection that you want to configure and then choose Properties from the contextual menu that appears.
The Properties dialog box for the network connection appears, as shown in Figure 7-10. If you compare this dialog box with the dialog box shown earlier, in Figure 7-2, you see that they’re very similar.
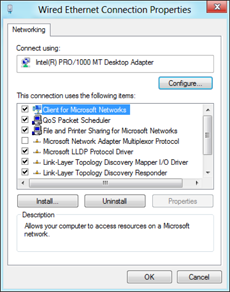
Figure 7-10: The Properties dialog box for a network connection (Windows 8).
5. Click Configure to configure the network connection.
From this point, the steps for configuring the network connection are the same as they are for Windows XP. As a result, you can continue by beginning with Step 4 in the earlier section “Configuring Windows XP network connections.”
Configuring Client Computer Identification
Every client computer must identify itself to participate in the network. The computer identification consists of the computer’s name, an optional description, and the name of either the workgroup or the domain to which the computer belongs.
The computer name must follow certain rules: It may be 1 to 15 characters long and may contain letters, numbers, or hyphens but no spaces or periods. For small networks, it's common to make the computer name the same as the username. For larger networks, you may want to develop a naming scheme that identifies the computer's location. A name such as C-305-1 may be assigned to the first computer in Room 305 of Building C, for example, or MKTG010 may be a computer in the Marketing department.
If the computer will join a domain, you need to have access to an Administrator account on the domain unless the administrator has already created a computer account on the domain. Note that only the following versions of Windows have the capability to join a domain:
![]() Windows 8 Professional and Enterprise
Windows 8 Professional and Enterprise
![]() Windows 7 Professional, Enterprise, and Ultimate
Windows 7 Professional, Enterprise, and Ultimate
![]() Windows Vista Business, Enterprise, and Ultimate
Windows Vista Business, Enterprise, and Ultimate
![]() Windows XP Professional
Windows XP Professional
When you install Windows on the client system, the Setup program asks for the computer name and workstation or domain information. You can change this information later, if you want. The procedure varies depending on the Windows version you’re using.
Configuring Windows XP computer identification
To change the computer identification in Windows XP, follow these steps:
1. Open the Control Panel (Start⇒Control Panel) and then double-click the System icon to open the System Properties dialog box.
2. Click the Computer Name tab.
The computer identification information is displayed.
3. Click the Change button.
This step displays the Computer Name Changes dialog box, as shown in Figure 7-11.
4. Type the new computer name and then specify the workgroup or domain information.
To join a domain, select the Domain radio button and type the domain name in the appropriate text box. To join a workgroup, select the Workgroup radio button and type the workgroup name in the corresponding text box.
5. Click OK.

Figure 7-11: The Computer Name Changes dialog box (Windows XP).
6. If you’re prompted, enter the username and password for an Administrator account.
You’re asked to provide this information only if a computer account hasn’t already been created for the client computer.
7. When a dialog box appears, informing you that you need to restart the computer, click OK; then restart the computer.
You’re done!
Configuring computer identification on Windows Vista, Windows 7, or Windows 8
To change the computer identification in Windows Vista, Windows 7, or Windows 8, follow these steps:
1. Open the Control Panel.
• Windows Vista or Windows 7: Choose Start⇒Control Panel.
• Windows 8: Right-click the bottom-left corner of the screen and then choose Control Panel from the contextual menu.
2. Double-click the System icon.
This step displays the System information window. Figure 7-12 shows the Windows 8 version, but the Windows Vista and Windows 7 versions are similar. Notice the section that lists computer name, domain, and workgroup settings.

Figure 7-12: The System information window (Windows 8).
3. Click the Change Settings link in the bottom-right corner.
If a dialog box appears and asks for your permission to continue, click Continue. The System Properties dialog box appears, as shown in Figure 7-13.
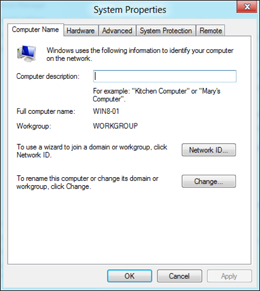
Figure 7-13: The System Properties dialog box (Windows 8).
4. Click the Change button.
This step displays the Computer Name/Domain Changes dialog box, as shown in Figure 7-14.
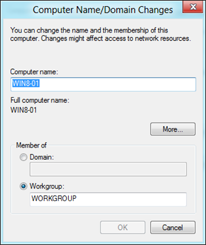
Figure 7-14: The Computer Name/Domain Changes dialog box (Windows 8).
5. Enter the computer name and the workgroup or domain name.
If you want to join a domain, select the Domain radio button and type the domain name. If your network does not use domains, choose the Workgroup option button, and type the workgroup name.
6. Click OK.
7. Enter the username and password for an Administrator account when prompted.
You’re asked to provide this information only if a computer account hasn’t already been created for the client computer.
8. When a dialog box appears, informing you that you need to restart the computer, click OK; then restart the computer.
The computer is added to the domain or workgroup.
Configuring Network Logon
Every user who wants to access a domain-based network must log on to the domain by using a valid user account. The user account is created on the domain controller — not on the client computer.
Network logon isn’t required to access workgroup resources. Instead, workgroup resources can be password-protected to restrict access.
When you start a Windows computer that’s been configured to join a domain, as described in the section “Configuring Client Computer Identification,” earlier in this chapter, the Log on to Windows dialog box is displayed. The user can use this dialog box to log on to a domain by entering a domain username and password and then selecting the domain that she wants to log on to (from the Log on To drop-down list).
You can create local user accounts in Windows that allow users to access resources on the local computer. To log on to the local computer, the user selects This Computer from the Log on To drop-down list and enters the username and password for a local user account. When a user logs on by using a local account, he isn’t connected to a network domain. To log on to a domain, the user must select the domain from the Log on To drop-down list.
If the computer isn’t part of a domain, Windows can display a friendly logon screen that displays an icon for each of the computer’s local users. The user can log on simply by clicking the appropriate icon and entering a password. (This feature isn’t available for computers that have joined a domain.)
Note that if the user logs on by using a local computer account rather than a domain account, she can still access domain resources. A Connect To dialog box appears whenever the user attempts to access a domain resource. Then the user can enter a domain username and password to connect to the domain.