
Chapter 5
Dealing with TCP/IP
In This Chapter
![]() Getting a handle (or two) on the binary system
Getting a handle (or two) on the binary system
![]() Digging into IP addresses
Digging into IP addresses
![]() Finding out how subnetting works
Finding out how subnetting works
![]() Understanding private and public IP addresses
Understanding private and public IP addresses
![]() Looking at network address translation
Looking at network address translation
![]() Finding out how DHCP works
Finding out how DHCP works
![]() Understanding how DNS works
Understanding how DNS works
Transfer Control Protocol/Internet Protocol — TCP/IP — is the basic protocol by which computers on a network talk to each other. Without TCP/IP, networks wouldn’t work. In this chapter, I introduce you to the most important concepts of TCP/IP.
 This chapter is far and away the most technical chapter in this book. It helps you examine the binary system, the details of how IP addresses are constructed, how subnetting works, and how two of the most important TCP/IP services — Dynamic Host Configuration Protocol (DHCP) and Domain Name System (DNS) — work. You don’t need to understand every detail in this chapter to set up a simple TCP/IP network. However, the more you understand the information in this chapter, the more TCP/IP will start to make sense. Be brave.
Understanding Binary
Before you can understand the details of how TCP/IP — in particular, IP — addressing works, you need to understand how the binary numbering system works because binary is the basis of IP addressing. If you already understand binary, please skip right over this section to the next main section, “Introducing IP Addresses.” I don’t want to bore you with stuff that’s too basic.
Counting by ones
The binary counting system uses only two numerals: 0 and 1. In the decimal system to which most people are accustomed, you use ten numerals: 0 through 9. In an ordinary decimal number, such as 3,482, the rightmost digit represents ones; the next digit to the left, tens; the next, hundreds; the next, thousands; and so on. These digits represent powers of ten: first 100 (which is 1); next, 101 (10); then 102 (100); then 103 (1,000); and so on.
In binary, you have only two numerals rather than ten, which is why binary numbers look somewhat monotonous, as in 110011, 101111, and 100001.
The positions in a binary number (called bits rather than digits) represent powers of two rather than powers of ten: 1, 2, 4, 8, 16, 32, and so on. To figure the decimal value of a binary number, you multiply each bit by its corresponding power of two and then add the results. The decimal value of binary 10101, for example, is calculated as follows:
1 × 20 = 1 × 1 = 1
+ 0 × 21 = 0 × 2 = 0
+ 1 × 22 = 1 × 4 = 4
+ 0 × 23 = 0 × 8 = 0
+ 1 × 24 = 1 × 16 = _16
21
Fortunately, a computer is good at converting a number between binary and decimal — so good, in fact, that you’re unlikely ever to need to do any conversions yourself. The point of knowing binary isn’t to be able to look at a number, such as 1110110110110, and say instantly, “Ah! Decimal 7,606!” (If you could do that, you would probably be interviewed on the Today show, and they would even make a movie about you.)
Instead, the point is to have a basic understanding of how computers store information and — most important — to understand how the hexadecimal counting system works (which I describe in the following section).
Here are some of the more interesting characteristics of binary and how the system is similar to and differs from the decimal system:
![]() The number of bits allotted for a binary number determines how large that number can be. If you allot eight bits, the largest value that number can store is 11111111, which happens to be 255 in decimal.
The number of bits allotted for a binary number determines how large that number can be. If you allot eight bits, the largest value that number can store is 11111111, which happens to be 255 in decimal.
![]()
 To quickly determine how many different values you can store in a binary number of a given length, use the number of bits as an exponent of two. An eight-bit binary number, for example, can hold 28 values. Because 28 is 256, an 8-bit number can have any of 256 different values, which is why a byte, which is eight bits, can have 256 different values.
![]() This powers-of-two concept is why computers don’t use nice, even, round numbers in measuring such values as memory or disk space. A value of 1K, for example, isn’t an even 1,000 bytes — it’s 1,024 bytes because 1,024 is 210. Similarly, 1MB isn’t an even 1,000,000 bytes but rather is 1,048,576 bytes, which happens to be 220.
This powers-of-two concept is why computers don’t use nice, even, round numbers in measuring such values as memory or disk space. A value of 1K, for example, isn’t an even 1,000 bytes — it’s 1,024 bytes because 1,024 is 210. Similarly, 1MB isn’t an even 1,000,000 bytes but rather is 1,048,576 bytes, which happens to be 220.
Doing the logic thing
One of the great things about binary is that it's very efficient at handling special operations called logical operations. Four basic logical operations exist, although additional operations are derived from the basic four operations. Three of the operations — AND, OR, and XOR — compare two binary digits (bits). The fourth (NOT) works on just a single bit.
The following list summarizes the basic logical operations:
![]()
AND: An AND operation compares two binary values. If both values are 1, the result of the AND operation is 1. If one value is 0 or both of the values are 0, the result is 0.
![]()
OR: An OR operation compares two binary values. If at least one of the values is 1, the result of the OR operation is 1. If both values are 0, the result is 0.
![]()
XOR: An XOR operation compares two binary values. If exactly one of them is 1, the result is 1. If both values are 0 or if both values are 1, the result is 0.
![]()
NOT: The NOT operation doesn't compare two values. Instead, it simply changes the value of a single binary value. If the original value is 1, NOT returns 0. If the original value is 0, NOT returns 1.
Logical operations are applied to binary numbers that have more than one binary digit by applying the operation one bit at a time. The easiest way to do this manually is to
1. Line one of the two binary numbers on top of the other.
2. Write the result of the operation beneath each binary digit.
The following example shows how you calculate 10010100 AND 11001101:
10010100
AND 11001101
10000100
As you can see, the result is 10000100.
Introducing IP Addresses
An IP address is a number that uniquely identifies every host on an IP network. IP addresses operate at the Network layer of the TCP/IP protocol stack, so they’re independent of lower-level addresses, such as MAC addresses. (MAC stands for Media Access Control.)
IP addresses are 32-bit binary numbers, which means that theoretically, a maximum of something in the neighborhood of 4 billion unique host addresses can exist throughout the Internet. You’d think that’d be enough, but TCP/IP places certain restrictions on how IP addresses are allocated. These restrictions severely limit the total number of usable IP addresses, and about half of the total available IP addresses have already been assigned. However, new techniques for working with IP addresses have helped to alleviate this problem, and a new standard for 128-bit IP addresses (known as IPv6) is on the verge of winning acceptance.
Networks and hosts
The primary purpose of Internet Protocol (IP) is to enable communications between networks. As a result, a 32-bit IP address consists of two parts:
![]() The network ID (or network address): Identifies the network on which a host computer can be found
The network ID (or network address): Identifies the network on which a host computer can be found
![]() The host ID (or host address): Identifies a specific device on the network indicated by the network ID
The host ID (or host address): Identifies a specific device on the network indicated by the network ID
Most of the complexity of working with IP addresses has to do with figuring out which part of the complete 32-bit IP address is the network ID and which part is the host ID. The original IP specification uses the address classes system to determine which part of the IP address is the network ID and which part is the host ID. A newer system — classless IP addresses — is rapidly taking over the address classes system. You come to grips with both systems later in this chapter.
The dotted-decimal dance
IP addresses are usually represented in a format known as dotted-decimal notation. In dotted-decimal notation, each group of eight bits — an octet — is represented by its decimal equivalent. For example, consider the following binary IP address:
11000000101010001000100000011100
The dotted-decimal equivalent to this address is
192.168.136.28
Here, 192 represents the first eight bits (11000000); 168, the second set of eight bits (10101000); 136, the third set of eight bits (10001000); and 28, the last set of eight bits (00011100). This is the format in which you usually see IP addresses represented.
Classifying IP Addresses
When the original designers of the IP protocol created the IP addressing scheme, they could have assigned an arbitrary number of IP address bits for the network ID. The remaining bits would then be used for the host ID. For example, the designers may have decided that half of the address (16 bits) would be used for the network and the remaining 16 bits would be used for the host ID. The result of that scheme would be that the Internet could have a total of 65,536 networks, and each of those networks could have 65,536 hosts.
In the early days of the Internet, this scheme probably seemed like several orders of magnitude more than would ever be needed. However, the IP designers realized from the start that few networks would actually have tens of thousands of hosts. Suppose that a network of 1,000 computers joins the Internet and is assigned one of these hypothetical network IDs. Because that network uses only 1,000 of its 65,536 host addresses, more than 64,000 IP addresses would be wasted.
As a solution to this problem, the idea of IP address classes was introduced. The IP protocol defines five different address classes: A, B, C, D, and E. Each of the first three classes, A–C, uses a different size for the network ID and host ID portion of the address. Class D is for a special type of address called a multicast address. Class E is an experimental address class that isn’t used.
The first four bits of the IP address are used to determine into which class a particular address fits:
![]() If the first bit is 0, the address is a Class A address.
If the first bit is 0, the address is a Class A address.
![]() If the first bit is 1 and the second bit is 0, the address is a Class B address.
If the first bit is 1 and the second bit is 0, the address is a Class B address.
![]() If the first two bits are both 1 and the third bit is 0, the address is a Class C address.
If the first two bits are both 1 and the third bit is 0, the address is a Class C address.
![]() If the first three bits are all 1 and the fourth bit is 0, the address is a Class D address.
If the first three bits are all 1 and the fourth bit is 0, the address is a Class D address.
![]() If the first four bits are all 1, the address is a Class E address.
If the first four bits are all 1, the address is a Class E address.
Because Class D and E addresses are reserved for special purposes, I focus the rest of this discussion on Class A, B, and C addresses. Table 5-1 summarizes the details of each address class.

Class A addresses
Class A addresses are designed for very large networks. In a Class A address, the first octet of the address is the network ID, and the remaining three octets are the host ID. Because only eight bits are allocated to the network ID and the first of these bits is used to indicate that the address is a Class A address, only 126 Class A networks can exist in the entire Internet. However, each Class A network can accommodate more than 16 million hosts.
 Only about 40 Class A addresses are assigned to companies or organizations. The rest are either reserved for use by the Internet Assigned Numbers Authority (IANA) or are assigned to organizations that manage IP assignments for geographic regions, such as Europe, Asia, and Latin America.
Just for fun, Table 5-2 lists some of the better-known Class A networks. You probably recognize many of them. In case you're interested, you can find a complete list of all the Class A address assignments at www.iana.org/assignments/ipv4-address-space.

Class B addresses
In a Class B address, the first two octets of the IP address are used as the network ID, and the second two octets are used as the host ID. Thus, a Class B address comes close to my hypothetical scheme of splitting the address down the middle, using half for the network ID and half for the host ID. It isn't identical to this scheme, however, because the first two bits of the first octet are required to be 10, to indicate that the address is a Class B address. Thus, a total of 16,384 Class B networks can exist. All Class B addresses fall within the range 128.x.y.z to 191.x.y.z. Each Class B address can accommodate more than 65,000 hosts.
The problem with Class B networks is that even though they’re much smaller than Class A networks, they still allocate far too many host IDs. Very few networks have tens of thousands of hosts. Thus, the careless assignment of Class B addresses can lead to a large percentage of the available host addresses being wasted on organizations that don’t need them.
Class C addresses
In a Class C address, the first three octets are used for the network ID, and the fourth octet is used for the host ID. With only eight bits for the host ID, each Class C network can accommodate only 254 hosts. However, with 24 network ID bits, Class C addresses allow for more than 2 million networks.
The problem with Class C networks is that they’re too small. Although few organizations need the tens of thousands of host addresses provided by a Class B address, many organizations need more than a few hundred. The large discrepancy between Class B networks and Class C networks led to the development of subnetting, which I describe in the next section.
Subnetting
Subnetting is a technique that lets network administrators use the 32 bits available in an IP address more efficiently by creating networks that aren’t limited to the scales provided by Class A, B, and C IP addresses. With subnetting, you can create networks with more realistic host limits.
Subnetting provides a more flexible way to designate which portion of an IP address represents the network ID and which portion represents the host ID. With standard IP address classes, only three possible network ID sizes exist: 8 bits for Class A, 16 bits for Class B, and 24 bits for Class C. Subnetting lets you select an arbitrary number of bits to use for the network ID.
Two reasons compel me to use subnetting. The first is to allocate the limited IP address space more efficiently. If the Internet were limited to Class A, B, or C addresses, every network would be allocated 254, 65,000, or 16 million IP addresses for host devices. Although many networks with more than 254 devices exist, few (if any) exist with 65,000, let alone 16 million. Unfortunately, any network with more than 254 devices would need a Class B allocation and probably waste tens of thousands of IP addresses.
The second reason for subnetting is that even if a single organization has thousands of network devices, operating all those devices with the same network ID would slow the network to a crawl. The way TCP/IP works dictates that all the computers with the same network ID must be on the same physical network. The physical network comprises a single broadcast domain, which means that a single network medium must carry all the traffic for the network. For performance reasons, networks are usually segmented into broadcast domains that are smaller than even Class C addresses provide.
Subnets
A subnet is a network that falls within another (Class A, B, or C) network. Subnets are created by using one or more of the Class A, B, or C host bits to extend the network ID. Thus, rather than the standard 8-, 15-, or 24-bit network ID, subnets can have network IDs of any length.
Figure 5-1 shows an example of a network before and after subnetting has been applied. In the unsubnetted network, the network has been assigned the Class B address 144.28.0.0. All the devices on this network must share the same broadcast domain.
In the second network, the first four bits of the host ID are used to divide the network into two small networks, identified as subnets 16 and 32. To the outside world (that is, on the other side of the router), these two networks still appear to be a single network identified as 144.28.0.0. For example, the outside world considers the device at 144.28.16.22 to belong to the 144.28.0.0 network. As a result, a packet sent to this device is delivered to the router at 144.28.0.0. The router then considers the subnet portion of the host ID to decide whether to route the packet to subnet 16 or subnet 32.
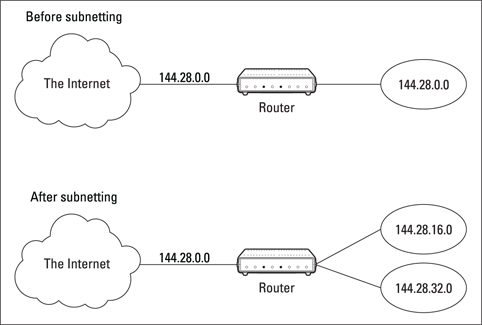
Figure 5-1: A network before and after subnetting.
Subnet masks
For subnetting to work, the router must be told which portion of the host ID to use for the subnet’s network ID. This little sleight of hand is accomplished by using another 32-bit number, known as a subnet mask. Those IP address bits that represent the network ID are represented by a 1 in the mask, and those bits that represent the host ID appear as a 0 in the mask. As a result, a subnet mask always has a consecutive string of ones on the left, followed by a string of zeros.
For example, the subnet mask for the subnet, as shown in Figure 5-1, in which the network ID consists of the 15-bit network ID plus an additional 4-bit subnet ID, would look like this:
11111111 11111111 11110000 00000000
In other words, the first 20 bits are ones; the remaining 12 bits are zeros. Thus, the complete network ID is 20 bits in length, and the actual host ID portion of the subnetted address is 12 bits in length.
To determine the network ID of an IP address, the router must have both the IP address and the subnet mask. The router then performs a bitwise operation called a logical AND on the IP address to extract the network ID. To perform a logical AND, each bit in the IP address is compared to the corresponding bit in the subnet mask. If both bits are 1, the resulting bit in the network ID is set to 1. If either of the bits is 0, the resulting bit is set to 0.
For example, here’s how the network address is extracted from an IP address using the 20-bit subnet mask from the previous example:
144 . 28 . 16 . 17
IP address: 10010000 00011100 00100000 00001001
Subnet mask: 11111111 11111111 11110000 00000000
Network ID: 10010000 00011100 00100000 00000000
144 . 28 . 16 . 0
Thus, the network ID for this subnet is 144.28.16.0.
The subnet mask itself is usually represented in dotted-decimal notation. As a result, the 20-bit subnet mask used in the previous example would be represented as 255.255.240.0:
Subnet mask: 11111111 11111111 11110000 00000000
255 . 255 . 240 . 0
Don't confuse a subnet mask with an IP address. A subnet mask doesn't represent any device or network on the Internet. It's just a way of indicating which portion of an IP address should be used to determine the network ID. (You can spot a subnet mask right away because the first octet is always 255, and 255 isn't a valid first octet for any class of IP address.)
The great subnet roundup
You should know about a few additional restrictions that are placed on subnet masks — in particular:
![]() The minimum number of network ID bits is eight. As a result, the first octet of a subnet mask is always
The minimum number of network ID bits is eight. As a result, the first octet of a subnet mask is always 255.
![]() The maximum number of network ID bits is 30. You have to leave at least two bits for the host ID portion of the address, to allow for at least two hosts. If you used all 32 bits for the network ID, that would leave no bits for the host ID. Obviously, that doesn’t work. Leaving just one bit for the host ID doesn’t work, either. That’s because a host ID of all ones is reserved for a broadcast address — and all zeros refers to the network itself. Thus, if you used 31 bits for the network ID and left only one for the host ID, host ID 1 would be used for the broadcast address and host ID 0 would be the network itself, leaving no room for actual hosts. That’s why the maximum network ID size is 30 bits.
The maximum number of network ID bits is 30. You have to leave at least two bits for the host ID portion of the address, to allow for at least two hosts. If you used all 32 bits for the network ID, that would leave no bits for the host ID. Obviously, that doesn’t work. Leaving just one bit for the host ID doesn’t work, either. That’s because a host ID of all ones is reserved for a broadcast address — and all zeros refers to the network itself. Thus, if you used 31 bits for the network ID and left only one for the host ID, host ID 1 would be used for the broadcast address and host ID 0 would be the network itself, leaving no room for actual hosts. That’s why the maximum network ID size is 30 bits.
![]() Because the network ID is always composed of consecutive bits set to 1, only nine values are possible for each octet of a subnet mask (including counting 0). For your reference, these values are listed in Table 5-3.
Because the network ID is always composed of consecutive bits set to 1, only nine values are possible for each octet of a subnet mask (including counting 0). For your reference, these values are listed in Table 5-3.

Private and public addresses
Any host with a direct connection to the Internet must have a globally unique IP address. However, not all hosts are connected directly to the Internet. Some are on networks that aren’t connected to the Internet. Some hosts are hidden behind firewalls, so their Internet connection is indirect.
Several blocks of IP addresses are set aside just for this purpose — for use on private networks that aren’t connected to the Internet or to use on networks hidden behind a firewall. Three such ranges of addresses exist, as summarized in Table 5-4. Whenever you create a private TCP/IP network, use IP addresses from one of these ranges.
Table 5-4 Private Address Spaces
|
Subnet Mask |
Address Range |
|
|
|
|
|
|
|
|
|
Understanding Network Address Translation
Many firewalls use a technique called network address translation (NAT) to hide the actual IP address of a host from the outside world. When that’s the case, the NAT device must use a globally unique IP to represent the host to the Internet; behind the firewall, however, the host can use any IP address it wants. As packets cross the firewall, the NAT device translates the private IP address to the public IP address, and vice versa.
One of the benefits of NAT is that it helps slow down the rate at which the IP address space is assigned because a NAT device can use a single public IP address for more than one host. It does this by keeping track of outgoing packets so that it can match up incoming packets with the correct host. To understand how this process works, consider this sequence of steps:
1. A host whose private address is 192.168.1.100 sends a request to 74.125.226.1, which happens to be www.google.com. The NAT device changes the source IP address of the packet to 208.23.110.22, the IP address of the firewall. That way, Google will send its reply back to the firewall router. The NAT records that 192.168.1.100 sent a request to 74.125.226.1.
2. Now another host, at address 192.168.1.107, sends a request to 64.4.11.37, which happens to be www.microsoft.com. The NAT device changes the source of this request to 208.23.110.22 so that Microsoft will reply to the firewall router. The NAT records that 192.168.1.107 sent a request to 64.4.11.37.
3. A few seconds later, the firewall receives a reply from 74.125.226.1. The destination address in the reply is 208.23.110.22, the address of the firewall. To determine to whom to forward the reply, the firewall checks its records to see who's waiting for a reply from 74.125.226.1. It discovers that 192.168.1.100 is waiting for that reply, so it changes the destination address to 192.168.1.100 and sends the packet on.
Actually, the process is a little more complicated than that because it’s very likely that two or more users may have pending requests from the same public IP. In that case, the NAT device uses other techniques to figure out to which user each incoming packet should be delivered.
Configuring Your Network for DHCP
Every host on a TCP/IP network must have a unique IP address. Each host must be properly configured so that it knows its IP address. When a new host comes online, it must be assigned an IP address within the correct range of addresses for the subnet — one that’s not already in use. Although you can manually assign IP addresses to each computer on your network, that task quickly becomes overwhelming if the network has more than a few computers.
That’s where Dynamic Host Configuration Protocol (DHCP) comes into play. DHCP automatically configures the IP address for every host on a network, thus ensuring that each host has a valid, unique IP address. DHCP even automatically reconfigures IP addresses as hosts come and go. As you can imagine, DHCP can save a network administrator many hours of tedious configuration work.
In this section, you discover the ins and outs of DHCP: what it is, how it works, and how to set it up.
Understanding DHCP
DHCP allows individual computers on a TCP/IP network to obtain their configuration information — in particular, their IP addresses — from a server. The DHCP server keeps track of which IP addresses have already been assigned so that when a computer requests an IP address, the DHCP servers offer it an IP address that isn’t already in use.
The alternative to DHCP is to assign each computer on your network a static IP address, which can be good or problematic:
![]() Static IP addresses are okay for networks with a handful of computers.
Static IP addresses are okay for networks with a handful of computers.
![]() For networks with more than a few computers, using static IP addresses is a huge mistake. Eventually, some poor, harried administrator (guess who?) will make the mistake of assigning two computers the same IP address. Then you have to manually check each computer’s IP address to find the conflict. DHCP is a must for any but the smallest networks.
For networks with more than a few computers, using static IP addresses is a huge mistake. Eventually, some poor, harried administrator (guess who?) will make the mistake of assigning two computers the same IP address. Then you have to manually check each computer’s IP address to find the conflict. DHCP is a must for any but the smallest networks.
Although the primary job of DHCP is to assign IP addresses, DHCP provides more configuration information than just the IP address to its clients. The additional configuration information is referred to as DHCP options. The following list describes some common DHCP options that can be configured by the server:
![]() Router address, also known as the default gateway address
Router address, also known as the default gateway address
![]() Expiration time for the configuration information
Expiration time for the configuration information
![]() Domain name
Domain name
![]() DNS server address
DNS server address
![]() Windows Internet Name Service (WINS) server address
Windows Internet Name Service (WINS) server address
DHCP servers
A DHCP server can be a server computer located on the TCP/IP network. Fortunately, all modern server operating systems have a built-in DHCP server capability. To set up DHCP on a network server, all you have to do is enable the server’s DHCP function and configure its settings. In the section “Managing a Windows Server 2012 DHCP Server,” later in this chapter, I show you how to configure a DHCP server for Windows 2012.
A server computer running DHCP doesn’t have to be devoted entirely to DHCP unless the network is very large. For most networks, a file server can share duty as a DHCP server, especially if you provide long leases for your IP addresses. (I explain the idea of leases later in this chapter.)
Most multifunction routers also have built-in DHCP servers. So if you don’t want to burden one of your network servers with the DHCP function, you can enable the router’s built-in DHCP server. An advantage of allowing the router to be your network’s DHCP server is that you rarely need to power down a router. By contrast, you occasionally need to restart or power down a file server to perform system maintenance, to apply upgrades, or to do some needed troubleshooting.
Most networks require only one DHCP server. Setting up two or more servers on the same network requires that you carefully coordinate the IP address ranges (known as scopes) for which each server is responsible. If you accidentally set up two DHCP servers for the same scope, you may end up with duplicate address assignments if the servers attempt to assign the same IP address to two different hosts. To prevent this situation from happening, set up just one DHCP server unless your network is so large that one server can’t handle the workload.
Understanding scopes
A scope is simply a range of IP addresses that a DHCP server is configured to distribute. In the simplest case, in which a single DHCP server oversees IP configuration for an entire subnet, the scope corresponds to the subnet. However, if you set up two DHCP servers for a subnet, you can configure each one with a scope that allocates only one part of the complete subnet range. In addition, a single DHCP server can serve more than one scope.
You must create a scope before you can enable a DHCP server. When you create a scope, you can provide it these properties:
![]() A scope name, which helps you identify the scope and its purpose.
A scope name, which helps you identify the scope and its purpose.
![]() A scope description, which lets you provide additional details about the scope and its purpose.
A scope description, which lets you provide additional details about the scope and its purpose.
![]() A starting IP address for the scope.
A starting IP address for the scope.
![]() An ending IP address for the scope.
An ending IP address for the scope.
![]() A subnet mask for the scope. You can specify the subnet mask with dotted decimal notation or with Classless Inter Domain Routing (CIDR) notation.
A subnet mask for the scope. You can specify the subnet mask with dotted decimal notation or with Classless Inter Domain Routing (CIDR) notation.
![]() One or more ranges of excluded addresses. These addresses aren’t assigned to clients. (For more information, see the section “Feeling excluded?,” later in this chapter.)
One or more ranges of excluded addresses. These addresses aren’t assigned to clients. (For more information, see the section “Feeling excluded?,” later in this chapter.)
![]() One or more reserved addresses. These addresses are always assigned to particular host devices. (For more information, see the section “Reservations suggested,” later in this chapter.)
One or more reserved addresses. These addresses are always assigned to particular host devices. (For more information, see the section “Reservations suggested,” later in this chapter.)
![]() The lease duration, which indicates how long the host is allowed to use the IP address. The client attempts to renew the lease when half of the lease duration has elapsed. For example, if you specify a lease duration of eight days, the client attempts to renew the lease after four days have passed. The host then has plenty of time to renew the lease before the address is reassigned to some other host.
The lease duration, which indicates how long the host is allowed to use the IP address. The client attempts to renew the lease when half of the lease duration has elapsed. For example, if you specify a lease duration of eight days, the client attempts to renew the lease after four days have passed. The host then has plenty of time to renew the lease before the address is reassigned to some other host.
![]() The router address for the subnet.
The router address for the subnet.
This value is also known as the default gateway address.
![]() The domain name and the IP address of the network’s DNS servers and WINS servers.
The domain name and the IP address of the network’s DNS servers and WINS servers.
Feeling excluded?
Everyone feels excluded once in a while. With a wife and three daughters, I know how that feels. Sometimes, however, being excluded is a good thing. In the case of DHCP scopes, exclusions can help you prevent IP address conflicts and can enable you to divide the DHCP workload for a single subnet among two or more DHCP servers.
An exclusion is a range of addresses not included in a scope but falling within the range of the scope’s starting and ending addresses. In effect, an exclusion range lets you punch a hole in a scope: The IP addresses that fall within the hole aren’t assigned.
Here are a couple of reasons to exclude IP addresses from a scope:
![]() The computer that runs the DHCP service itself must usually have a static IP address assignment. As a result, the address of the DHCP server should be listed as an exclusion.
The computer that runs the DHCP service itself must usually have a static IP address assignment. As a result, the address of the DHCP server should be listed as an exclusion.
![]() You may want to assign static IP addresses to your other servers. In that case, each server IP address should be listed as an exclusion.
You may want to assign static IP addresses to your other servers. In that case, each server IP address should be listed as an exclusion.
Reservations are often better solutions to this problem, as I describe in the next section.
Reservations suggested
In some cases, you may want to assign a specific IP address to a particular host. One way to do this is to configure the host with a static IP address so that the host doesn’t use DHCP to obtain its IP configuration. However, two major disadvantages to that approach exist:
![]() TCP/IP configuration supplies more than just the IP address. If you use static configuration, you must manually specify the subnet mask, default gateway address, DNS server address, and other configuration information required by the host. If this information changes, you have to change it not only at the DHCP server, but also at each host that you configured statically.
TCP/IP configuration supplies more than just the IP address. If you use static configuration, you must manually specify the subnet mask, default gateway address, DNS server address, and other configuration information required by the host. If this information changes, you have to change it not only at the DHCP server, but also at each host that you configured statically.
![]() You must remember to exclude the static IP address from the DHCP server’s scope. Otherwise, the DHCP server doesn’t know about the static address and may assign it to another host. Then comes the problem: You have two hosts with the same address on your network.
You must remember to exclude the static IP address from the DHCP server’s scope. Otherwise, the DHCP server doesn’t know about the static address and may assign it to another host. Then comes the problem: You have two hosts with the same address on your network.
A better way to assign a fixed IP address to a particular host is to create a DHCP reservation. A reservation simply indicates that whenever a particular host requests an IP address from the DHCP server, the server should provide it the address that you specify in the reservation. The host doesn’t receive the IP address until the host requests it from the DHCP server, but whenever the host does request IP configuration, it always receives the same address.
To create a reservation, you associate the IP address that you want assigned to the host with the host’s MAC address. Accordingly, you need to get the MAC address from the host before you create the reservation:
![]() Usually, you can get the MAC address by running the command
Usually, you can get the MAC address by running the command ipconfig /all from a command prompt.
![]() If TCP/IP has not yet been configured on the computer, you can get the MAC address by choosing the System Information command:
If TCP/IP has not yet been configured on the computer, you can get the MAC address by choosing the System Information command:
Choose Start⇒All Programs⇒Accessories⇒System Tools⇒System Information.
If you set up more than one DHCP server, be sure to specify the same reservations on each server. If you forget to repeat a reservation on one of the servers, that server may assign the address to another host.
How long to lease?
One of the most important decisions that you make when you configure a DHCP server is the length of time to specify for the lease duration. The default value is eight days, which is appropriate in many cases. However, you may encounter situations in which a longer or shorter interval may be appropriate:
![]() The more stable your network, the longer the lease duration can safely exist. If you only periodically add new computers to your network (or replace existing computers), you can safely increase the lease duration past eight days.
The more stable your network, the longer the lease duration can safely exist. If you only periodically add new computers to your network (or replace existing computers), you can safely increase the lease duration past eight days.
![]() The more volatile the network, the shorter the lease duration should be. For example, you may have a wireless network in a university library, used by students who bring their laptop computers into the library to work for a few hours at a time. For this network, a duration as short as one hour may be appropriate.
The more volatile the network, the shorter the lease duration should be. For example, you may have a wireless network in a university library, used by students who bring their laptop computers into the library to work for a few hours at a time. For this network, a duration as short as one hour may be appropriate.
Don’t configure your network to allow leases of infinite duration. Although some administrators feel that this duration cuts down the workload for the DHCP server on stable networks, no network is permanently stable. Whenever you find a DHCP server that’s configured with infinite leases, look at the active leases. I guarantee that you’ll find IP leases assigned to computers that no longer exist.
Managing a Windows Server 2012 DHCP Server
The exact steps to follow when you configure and manage a DHCP server depend on the network operating system or router you’re using. The following paragraphs describe how to work with a DHCP server in Windows Server 2012. The procedures for other operating systems are similar.
If you haven’t already installed the DHCP server on the server, install it using the Server Manager (click Server Manager on the taskbar). Once the DHCP server role is installed, you can manage it by opening the DHCP management console, as shown in Figure 5-2. To open this console, open System Manager and choose Tools⇒DHCP.
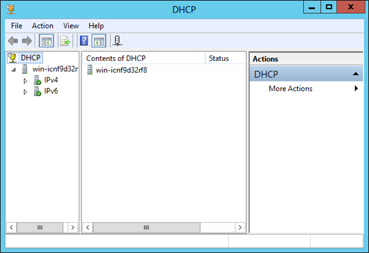
Figure 5-2: The DHCP management console.
To get started with a DHCP server, you must create at least one scope. You can create a scope by using the New Scope Wizard, which you start by selecting the server you want to create the scope on and then clicking New Scope. The wizard asks for the essential information required to define the scope, including the scope’s name, its starting and ending IP addresses, and the subnet mask. You can also specify any IP addresses you want to exclude from the scope, the lease duration (the default is eight days), the IP address of your gateway router, the domain name for your network, and the IP addresses for the DNS servers you want the client computers to use. Figure 5-3 shows the New Scope Wizard in action.
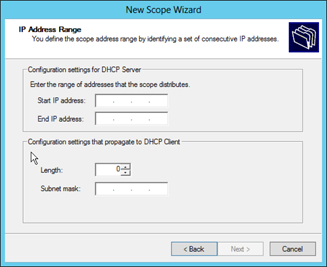
Figure 5-3: The New Scope Wizard.
Configuring a Windows DHCP Client
Configuring a Windows client for DHCP is easy. The DHCP client is included automatically when you install the TCP/IP protocol, so all you have to do is configure TCP/IP to use DHCP. To do this, open the Network Properties dialog box by choosing Network or Network Connections in the Control Panel (depending on which version of Windows the client is running). Then select the TCP/IP protocol and click the Properties button. This action opens the TCP/IP Properties dialog box, as shown in Figure 5-4. To configure the computer to use DHCP, select the Obtain an IP Address Automatically and Obtain DNS Server Address Automatically options. Click OK, and you’re done.

Figure 5-4: Configuring a Windows client to use DHCP.
Using DNS
DNS (Domain Name System) is the TCP/IP facility that lets you use names rather than numbers to refer to host computers. Without DNS, you'd buy books from 72.21.194.212 rather than from www.amazon.com, you'd sell your used furniture at 66.135.200.161 rather than on www.ebay.com, and you'd search the web at 74.125.224.147 rather than at www.google.com.
Understanding how DNS works and how to set up a DNS server is crucial to setting up and administering a TCP/IP network. The rest of this chapter introduces you to the basics of DNS, including how the DNS naming system works and how to set up a DNS server.
Domains and domain names
To provide a unique DNS name for every host computer on the Internet, DNS uses a time-tested technique: divide and conquer. DNS uses a hierarchical naming system that’s similar to the way folders are organized hierarchically on a Windows computer. Instead of folders, however, DNS organizes its names into domains. Each domain includes all the names that appear directly beneath it in the DNS hierarchy.
For example, Figure 5-5 shows a small portion of the DNS domain tree. At the top of the tree is the root domain, which is the anchor point for all domains. Directly beneath the root domain are four top-level domains, named edu, com, org, and gov.
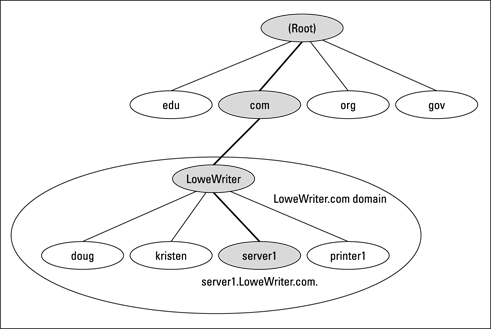
Figure 5-5: DNS names.
In reality, many more top-level domains than this exist in the Internet’s root domain. In fact, at the time I wrote this, there were more than 87 million of them.
Beneath the com domain in Figure 5-5 is another domain named LoweWriter, which happens to be my own personal domain. (Pretty clever, eh?) To completely identify this domain, you have to combine it with the name of its parent domain (in this case, com) to create the complete domain name: LoweWriter.com. Notice that the parts of the domain name are separated from each other by periods, which are pronounced "dot." As a result, when you read this domain name, you should pronounce it "LoweWriter dot com."
Beneath the LoweWriter node are four host nodes, named doug, kristen, server1, and printer1. These nodes correspond to three computers and a printer on my home network. You can combine the host name with the domain name to get the complete DNS name for each of my network's hosts. For example, the complete DNS name for my server is server1.LoweWriter.com. Likewise, my printer is printer1.LoweWriter.com.
Here are a few additional details that you need to remember about DNS names:
![]() DNS names aren't case-sensitive. As a result,
DNS names aren't case-sensitive. As a result, LoweWriter and Lowewriter are treated as the same name, as are LOWEWRITER, LOWEwriter, and LoWeWrItEr. When you use a domain name, you can use capitalization to make the name easier to read, but DNS ignores the difference between capital and lowercase letters.
![]() The name of each DNS node can be up to 63 characters long (not including the dot) and can include letters, numbers, and hyphens. No other special characters are allowed.
The name of each DNS node can be up to 63 characters long (not including the dot) and can include letters, numbers, and hyphens. No other special characters are allowed.
![]() A subdomain is a domain that's beneath an existing domain. For example, the
A subdomain is a domain that's beneath an existing domain. For example, the com domain is a subdomain of the root domain. Likewise, LoweWriter is a subdomain of the com domain.
![]() DNS is a hierarchical naming system that's similar to the hierarchical folder system used by Windows. However, one crucial difference exists between DNS and the Windows naming convention. When you construct a complete DNS name, you start at the bottom of the tree and work your way up to the root. Thus,
DNS is a hierarchical naming system that's similar to the hierarchical folder system used by Windows. However, one crucial difference exists between DNS and the Windows naming convention. When you construct a complete DNS name, you start at the bottom of the tree and work your way up to the root. Thus, doug is the lowest node in the name doug.LoweWriter.com. By contrast, Windows paths are the opposite: They start at the root and work their way down. For example, in the path WindowsSystem32dns, dns is the lowest node.
![]() The DNS tree can be up to 127 levels deep. However, in practice, the DNS tree is pretty shallow. Most DNS names have just three levels (not counting the root), and although you sometimes see names with four or five levels, you rarely see more levels than that.
The DNS tree can be up to 127 levels deep. However, in practice, the DNS tree is pretty shallow. Most DNS names have just three levels (not counting the root), and although you sometimes see names with four or five levels, you rarely see more levels than that.
![]() Although the DNS tree is shallow, it's very broad. In other words, each of the top-level domains has a huge number of second-level domains immediately beneath it. For example, at the time I wrote this book, the
Although the DNS tree is shallow, it's very broad. In other words, each of the top-level domains has a huge number of second-level domains immediately beneath it. For example, at the time I wrote this book, the com domain had more than two million second-level domains beneath it.
Fully qualified domain names
If a domain name ends with a trailing dot, that trailing dot represents the root domain, and the domain name is said to be a fully qualified domain name (FQDN). A fully qualified domain name — also called an absolute name — is unambiguous because it identifies itself all the way back to the root domain. In contrast, if a domain name doesn’t end with a trailing dot, the name may be interpreted in the context of some other domain. Thus, DNS names that don’t end with a trailing dot are relative names.
This concept is similar to the way relative and absolute paths work in Windows. For example, if a path begins with a backslash, such as WindowsSystem32dns, the path is absolute. However, a path that doesn't begin with a backslash, such as System32dns, uses the current folder as its starting point. If the current folder happens to be Windows, WindowsSystem32dns and System32dns refer to the same location.
In many cases, relative and fully qualified domain names are interchangeable because the software that interprets them always interprets relative names in the context of the root domain. That's why, for example, you can type www.wiley.com — without the trailing dot — rather than www.wiley.com. to go to the Wiley home page in a web browser. Some applications, such as DNS servers, may interpret relative names in the context of a domain other than the root.
Working with the Windows DNS Server
The procedure for installing and managing a DNS server depends on the network operating system you’re using. This section is specific to working with a DNS server in Windows 2008. Working with a DNS server in a Linux or Unix environment is similar but without the help of a graphical user interface.
You can install the DNS server on Windows Server 2012 from the Server Manager (choose Server Manager on the taskbar). After you install the DNS server, you can manage it from the DNS management console. Here, you can perform common administrative tasks, such as adding additional zones, changing zone settings, or adding new records an existing zone. The DNS management console hides the details of the resource records from you, thus allowing you to work with a friendly graphical user interface instead.
To add a new host (which is defined by a DNS record called an A record) to a zone, right-click the zone in the DNS management console and choose the Add New Host command. This action opens the New Host dialog box, as shown in Figure 5-6.

Figure 5-6: The New Host dialog box.
Here, you specify the following information:
![]() Name: The host name for the new host.
Name: The host name for the new host.
![]() IP Address: The host’s IP address.
IP Address: The host’s IP address.
![]() Create Associated Pointer (PTR) Record: Automatically creates a PTR record in the reverse lookup zone file. Select this option if you want to allow reverse lookups for the host. (A reverse lookup determines the domain name for a given IP address. It’s called that because the normal type of DNS lookup determines the IP address for a given domain name.)
Create Associated Pointer (PTR) Record: Automatically creates a PTR record in the reverse lookup zone file. Select this option if you want to allow reverse lookups for the host. (A reverse lookup determines the domain name for a given IP address. It’s called that because the normal type of DNS lookup determines the IP address for a given domain name.)
![]() Allow Any Authenticated User to Update: Select this option if you want to allow other users to update this record or other records with the same host name. You should usually leave this option deselected.
Allow Any Authenticated User to Update: Select this option if you want to allow other users to update this record or other records with the same host name. You should usually leave this option deselected.
![]() Time to Live: The TTL value for this record, which indicates how long (in seconds) the data should be cached.
Time to Live: The TTL value for this record, which indicates how long (in seconds) the data should be cached.
You can add other records, such as MX records, in the same way.
Configuring a Windows DNS Client
Client computers don’t need much configuration to work properly with DNS. The client must have the address of at least one DNS server. Usually, this address is supplied by DHCP, so if the client is configured to obtain its IP address from a DHCP server, it also obtains the DNS server address from DHCP.
To configure a client computer to obtain the DNS server location from DHCP, open the Network Properties dialog box by choosing Network or Network Connections in the Control Panel (depending on which version of Windows the client is running). Then select the TCP/IP protocol and click the Properties button. This action summons the TCP/IP Properties dialog box, which is shown back in Figure 5-4. To configure the computer to use DHCP, select the Obtain an IP Address Automatically and the Obtain DNS Server Address Automatically options. Click OK, and you’re done.