
Chapter 19
Solving Network Problems
In This Chapter
![]() Checking the obvious things
Checking the obvious things
![]() Fixing computers that have expired
Fixing computers that have expired
![]() Pinpointing the cause of trouble
Pinpointing the cause of trouble
![]() Restarting client and server computers
Restarting client and server computers
![]() Reviewing network event logs
Reviewing network event logs
![]() Keeping a record of network woes
Keeping a record of network woes
Face it: Networks are prone to breaking.
They have too many parts. Cables. Connectors. Cards. Switches. Routers. All these parts must be held together in a delicate balance, and the network equilibrium is all too easy to disturb. Even the best-designed computer networks sometimes act as if they’re held together with baling wire, chewing gum, and duct tape.
To make matters worse, networks breed suspicion. After your computer is attached to a network, users begin to blame the network every time something goes wrong, regardless of whether the problem has anything to do with the network. You can’t get columns to line up in a Word document? Must be the network. Your spreadsheet doesn’t add up? The @@#$% network’s acting up again. The stock market’s down? Arghhh!!!!!!
The worst thing about network failures is that sometimes they can shut down an entire company. It’s not so bad if just one user can’t access a particular shared folder on a file server. If a critical server goes down, however, your network users may be locked out of their files, applications, e-mail, and everything else they need to conduct business as usual. When that happens, they’ll be beating down your doors and won’t stop until you get the network back up and running.
In this chapter, I review some of the most likely causes of network trouble and suggest some basic troubleshooting techniques that you can employ when your network goes on the fritz.
When Bad Things Happen to Good Computers
Here are some basic troubleshooting steps explaining what you should examine at the first sign of network trouble. In many (if not most) of the cases, one of the following steps can get your network back up and running:
1. Make sure that your computer and everything attached to it is plugged in.
 Computer geeks love it when a user calls for help, and they get to tell the user that the computer isn’t plugged in or that its power strip is turned off. They write it down in their geek logs so that they can tell their geek friends about it later. They may even want to take your picture so that they can show it to their geek friends. (Most “accidents” involving computer geeks are a direct result of this kind of behavior. So try to be tactful when you ask a user whether he or she is sure the computer is actually turned on.)
2. Make sure that your computer is properly connected to the network.
3. Note any error messages that appear on-screen.
4. Try restarting the computer.
 An amazing number of computer problems are cleared up by a simple restart of the computer. Of course, in many cases, the problem recurs, so you’ll have to eventually isolate the cause and fix the problem. Some problems are only intermittent, and a simple reboot is all that’s needed.
5. Try the built-in Windows network troubleshooter.
For more information, see the section, “Using the Windows Networking Troubleshooter,” later in this chapter.
6. Check the free disk space on your computer and on the server.
When a computer runs out of disk space or comes close to it, strange things can happen. Sometimes you get a clear error message indicating such a situation, but not always. Sometimes the computer just grinds to a halt; operations that used to take a few seconds now take a few minutes.
7. Do a little experimenting to find out whether the problem is indeed a network problem or just a problem with the computer itself.
See the section, “Time to Experiment,” later in this chapter, for some simple things that you can do to isolate a network problem.
8. Try restarting the network server.
See the section, “Restarting a Network Server,” later in this chapter.
Fixing Dead Computers
If a computer seems totally dead, here are some things to check:
![]() Make sure that the computer is plugged in.
Make sure that the computer is plugged in.
![]() If the computer is plugged into a surge protector or a power strip, make sure that the surge protector or power strip is plugged in and turned on. If the surge protector or power strip has a light, it should be glowing. Also, the surge protector may have a reset button that needs to be pressed.
If the computer is plugged into a surge protector or a power strip, make sure that the surge protector or power strip is plugged in and turned on. If the surge protector or power strip has a light, it should be glowing. Also, the surge protector may have a reset button that needs to be pressed.
![]() Make sure that the computer’s On/Off switch is turned on. This advice sounds too basic to even include here, but many computers have two power switches: an on/off switch on the back of the computer and a push-button on the front that actually starts the computer. If you push the front button and nothing happens, check the switch on the back to make sure it’s in the ON position.
Make sure that the computer’s On/Off switch is turned on. This advice sounds too basic to even include here, but many computers have two power switches: an on/off switch on the back of the computer and a push-button on the front that actually starts the computer. If you push the front button and nothing happens, check the switch on the back to make sure it’s in the ON position.
 To complicate matters, newer computers have a Sleep feature, in which they appear to be turned off but really they’re just sleeping. All you have to do to wake such a computer is jiggle the mouse a little. (I used to have an uncle like that.) It’s easy to assume that the computer is turned off, press the power button, wonder why nothing happened, and then press the power button and hold it down, hoping it will take. If you hold down the power button long enough, the computer will actually turn itself off. Then, when you turn the computer back on, you get a message saying the computer wasn’t shut down properly. Arghhh! The moral of the story is to jiggle the mouse if the computer seems to have nodded off.
![]() If you think the computer isn’t plugged in but it looks like it is, listen for the fan. If the fan is running, the computer is getting power, and the problem is more serious than an unplugged power cord. (If the fan isn’t running but the computer is plugged in and the power is on, the fan may be out to lunch.)
If you think the computer isn’t plugged in but it looks like it is, listen for the fan. If the fan is running, the computer is getting power, and the problem is more serious than an unplugged power cord. (If the fan isn’t running but the computer is plugged in and the power is on, the fan may be out to lunch.)
![]() If the computer is plugged in and turned on but still not running, plug a lamp into the outlet to make sure that power is getting to the outlet. You may need to reset a tripped circuit breaker or replace a bad surge protector. Or you may need to call the power company. (If you live in California, don’t bother calling the power company. It probably won’t do any good.)
If the computer is plugged in and turned on but still not running, plug a lamp into the outlet to make sure that power is getting to the outlet. You may need to reset a tripped circuit breaker or replace a bad surge protector. Or you may need to call the power company. (If you live in California, don’t bother calling the power company. It probably won’t do any good.)
![]() Check the surge protector. Surge protectors have a limited life span. After a few years of use, many surge protectors continue to provide electrical power for your computer, but the components that protect your computer from power surges no longer work. If you’re using a surge protector that is more than two or three years old, replace the old surge protector with a new one.
Check the surge protector. Surge protectors have a limited life span. After a few years of use, many surge protectors continue to provide electrical power for your computer, but the components that protect your computer from power surges no longer work. If you’re using a surge protector that is more than two or three years old, replace the old surge protector with a new one.
![]() Make sure that the monitor is plugged in and turned on. The monitor has a separate power cord and switch. (The monitor actually has two cables that must be plugged in. One runs from the back of the monitor to the back of the computer; the other is a power cord that comes from the back of the monitor and must be plugged into an electrical outlet.)
Make sure that the monitor is plugged in and turned on. The monitor has a separate power cord and switch. (The monitor actually has two cables that must be plugged in. One runs from the back of the monitor to the back of the computer; the other is a power cord that comes from the back of the monitor and must be plugged into an electrical outlet.)
![]() Make sure that all cables are plugged in securely. Your keyboard, monitor, mouse, and printer are all connected to the back of your computer by cables.
Make sure that all cables are plugged in securely. Your keyboard, monitor, mouse, and printer are all connected to the back of your computer by cables.
Make sure that the other ends of the monitor and printer cables are plugged in properly, too.
![]() If the computer is running but the display is dark, try adjusting the monitor’s contrast and brightness. Some monitors have knobs that you can use to adjust the contrast and brightness of the monitor’s display. They may have been turned down all the way.
If the computer is running but the display is dark, try adjusting the monitor’s contrast and brightness. Some monitors have knobs that you can use to adjust the contrast and brightness of the monitor’s display. They may have been turned down all the way.
Ways to Check a Network Connection
The cables that connect client computers to the rest of the network are finicky beasts. They can break at a moment’s notice, and by “break,” I don’t necessarily mean “to physically break in two.” Although some broken cables look like someone got to the cable with pruning shears, most cable problems aren’t visible to the naked eye.
![]() Twisted-pair cable: If your network uses twisted-pair cable, you can quickly tell whether the cable connection to the network is good by looking at the back of your computer. Look for a small light located near where the cable plugs in; if this light is glowing steadily, the cable is good. If the light is dark or it’s flashing intermittently, you have a cable problem (or a problem with the network card or the hub or switch that the other end of the cable is plugged in to).
Twisted-pair cable: If your network uses twisted-pair cable, you can quickly tell whether the cable connection to the network is good by looking at the back of your computer. Look for a small light located near where the cable plugs in; if this light is glowing steadily, the cable is good. If the light is dark or it’s flashing intermittently, you have a cable problem (or a problem with the network card or the hub or switch that the other end of the cable is plugged in to).
If the light isn’t glowing steadily, try removing the cable from your computer and reinserting it. This action may cure the weak connection.
![]() Patch cable: Hopefully, your network is wired so that each computer is connected to the network with a short (six feet or so) patch cable. One end of the patch cable plugs into the computer, and the other end plugs into a cable connector mounted on the wall. Try quickly disconnecting and reconnecting the patch cable. If that doesn’t do the trick, try to find a spare patch cable that you can use.
Patch cable: Hopefully, your network is wired so that each computer is connected to the network with a short (six feet or so) patch cable. One end of the patch cable plugs into the computer, and the other end plugs into a cable connector mounted on the wall. Try quickly disconnecting and reconnecting the patch cable. If that doesn’t do the trick, try to find a spare patch cable that you can use.
![]() Switches: Switches are prone to having cable problems, too — especially switches that are wired in a “professional manner,” involving a rat’s nest of patch cables. Be careful whenever you enter the lair of the rat’s nest. If you need to replace a patch cable, be very careful when you disconnect the suspected bad cable and reconnect the good cable in its place.
Switches: Switches are prone to having cable problems, too — especially switches that are wired in a “professional manner,” involving a rat’s nest of patch cables. Be careful whenever you enter the lair of the rat’s nest. If you need to replace a patch cable, be very careful when you disconnect the suspected bad cable and reconnect the good cable in its place.
A Bunch of Error Messages Just Flew By!
Error messages that display when your computer boots can provide invaluable clues to determine the source of the problem.
If you see error messages when you start up the computer, keep the following points in mind:
![]() Don’t panic if you see a lot of error messages. Sometimes, a simple problem that’s easy to correct can cause a plethora of error messages when you start your computer. The messages may look as if your computer is falling to pieces, but the fix may be very simple.
Don’t panic if you see a lot of error messages. Sometimes, a simple problem that’s easy to correct can cause a plethora of error messages when you start your computer. The messages may look as if your computer is falling to pieces, but the fix may be very simple.
![]() If the messages fly by so fast that you can’t see them, press your computer’s Pause key. Your computer comes to a screeching halt, giving you a chance to catch up on your error-message reading. After you’ve read enough, press the Pause key again to get things moving. (On keyboards that don’t have a Pause key, pressing Ctrl+Num Lock or Ctrl+S does the same thing.)
If the messages fly by so fast that you can’t see them, press your computer’s Pause key. Your computer comes to a screeching halt, giving you a chance to catch up on your error-message reading. After you’ve read enough, press the Pause key again to get things moving. (On keyboards that don’t have a Pause key, pressing Ctrl+Num Lock or Ctrl+S does the same thing.)
![]() If you miss the error messages the first time, restart the computer and watch them again.
If you miss the error messages the first time, restart the computer and watch them again.
![]() Better yet, press F8 when you see the
Better yet, press F8 when you see the Starting Windows message. This displays a menu that allows you to select from several startup options.
Double-Checking Your Network Settings
I swear that there are little green men who sneak into offices at night, turn on computers, and mess up TCP/IP configuration settings just for kicks. These little green men are affectionately known as networchons.
Remarkably, network configuration settings sometimes get inadvertently changed so that a computer, which enjoyed the network for months or even years, one day finds itself unable to access the network. So one of the first things you do, after making sure that the computers are actually on and that the cables aren’t broken, is a basic review of the computer’s network settings. Check the following:
![]() At a command prompt, run
At a command prompt, run ipconfig to make sure that TCP/IP is up and running on the computer and that the IP addresses, subnet masks, and default gateway settings look right.
![]() Call up the network connection’s Properties dialog box and make sure that the necessary protocols are installed correctly.
Call up the network connection’s Properties dialog box and make sure that the necessary protocols are installed correctly.
![]() Open the System Properties dialog box (double-click System in Control Panel) and check the Computer Name tab.
Open the System Properties dialog box (double-click System in Control Panel) and check the Computer Name tab.
Make sure that the computer name is unique and also that the domain or workgroup name is spelled properly.
![]() Double-check the user account to make sure that the user really has permission to access the resources he needs.
Double-check the user account to make sure that the user really has permission to access the resources he needs.
Using the Windows Networking Troubleshooter
Windows comes with a built-in troubleshooter that can often help you to pin down the cause of a network problem. Figure 19-1 shows the Windows 8 version. Answer the questions asked by the troubleshooter and click Next to move from screen to screen. The Networking Troubleshooter can’t solve all networking problems, but it does point out the causes of the most common problems.

Figure 19-1: The Windows 8 Networking Troubleshooter.
The procedure for starting Networking Troubleshooter depends on which version of Windows you’re using:
![]() Windows 8 and Windows 7: Open Control Panel, click View Network Status and Tasks, and then click Troubleshoot Problems. Then select the troubleshooter that seems most directly related to the problem you’re experiencing. You’ll find troubleshooters for wireless network problems, home networks, and local area network (LAN) and Internet connections.
Windows 8 and Windows 7: Open Control Panel, click View Network Status and Tasks, and then click Troubleshoot Problems. Then select the troubleshooter that seems most directly related to the problem you’re experiencing. You’ll find troubleshooters for wireless network problems, home networks, and local area network (LAN) and Internet connections.
![]() Windows Vista: Choose Start⇒Help and Support, click Troubleshooting, and then click the link for the network troubleshooter that seems most directly related to the problem you’re experiencing. You’ll find troubleshooters for wireless network problems, home networks, and LAN and Internet connections.
Windows Vista: Choose Start⇒Help and Support, click Troubleshooting, and then click the link for the network troubleshooter that seems most directly related to the problem you’re experiencing. You’ll find troubleshooters for wireless network problems, home networks, and LAN and Internet connections.
![]() Windows XP: Choose Start⇒Help and Support⇒Networking and the Web⇒Fixing Network or Web Problems. Then click Home and Small Office Networking Troubleshooter.
Windows XP: Choose Start⇒Help and Support⇒Networking and the Web⇒Fixing Network or Web Problems. Then click Home and Small Office Networking Troubleshooter.
Time to Experiment
If you can’t find some obvious explanation for your troubles — say, the computer is unplugged — you need to do some experimenting to narrow down the possibilities. Design your experiments to answer one basic question: Is it a network problem or a local computer problem?
Here are some ways you can narrow down the cause of the problem:
![]() Try performing the same operation on someone else’s computer. If no one on the network can access a network drive or printer, something is probably wrong with the network. On the other hand, if the error occurs on only one computer, the problem is likely with that computer. The wayward computer may not be reliably communicating with the network or configured properly for the network, or the problem may have nothing to do with the network at all.
Try performing the same operation on someone else’s computer. If no one on the network can access a network drive or printer, something is probably wrong with the network. On the other hand, if the error occurs on only one computer, the problem is likely with that computer. The wayward computer may not be reliably communicating with the network or configured properly for the network, or the problem may have nothing to do with the network at all.
![]() If you can perform the operation on another computer without problems, try logging on to the network with another computer using your own username. Then see whether you can perform the operation without error. If you can, the problem is probably on your computer. If you can’t, the problem may be with the way your user account is configured.
If you can perform the operation on another computer without problems, try logging on to the network with another computer using your own username. Then see whether you can perform the operation without error. If you can, the problem is probably on your computer. If you can’t, the problem may be with the way your user account is configured.
![]() If you can’t log on at another computer, try waiting for a bit. Your account may be temporarily locked out. This can happen for a variety of reasons — the most common of which is trying to log on with the wrong password several times in a row. If you’re still locked out an hour later, call the network administrator and offer a doughnut.
If you can’t log on at another computer, try waiting for a bit. Your account may be temporarily locked out. This can happen for a variety of reasons — the most common of which is trying to log on with the wrong password several times in a row. If you’re still locked out an hour later, call the network administrator and offer a doughnut.
Who’s on First?
When troubleshooting a networking problem, find out who is actually logged on to a network server. For example, if a user can’t access a file on the server, you can check whether the user is logged on. If so, you know that the user’s account is valid. Even so, the user may not have permission to access the particular file or folder that he’s attempting to access. On the other hand, if the user isn’t logged on, the problem may lie with the account itself or how the user is attempting to connect to the server.
I also recommend finding out who’s logged on in case you need to restart the server. For more information about restarting a server, see the section, “Restarting a Network Server,” later in this chapter.
To find out who is currently logged on to a Windows server, right-click the Computer icon on the desktop and choose Manage from the menu that appears. This brings up the Computer Management window. Open System Tools in the tree list and then open Shared Folders and select Sessions. A list of users who are logged on appears.
You can immediately disconnect all users by right-clicking Sessions in the Computer Management window and choosing All Tasks⇒Disconnect All. Be warned, however, that this can cause users to lose data.
Restarting a Client Computer
Sometimes, trouble gets a computer so tied up in knots that the only thing you can do is reboot. In some cases, the computer just starts acting weird. Strange characters appear on the screen, or Windows goes haywire and doesn’t let you exit a program. Sometimes, the computer gets so confused that it can’t even move. It just sits there, like a deer staring at oncoming headlights. It won’t move, no matter how hard you press Esc or Enter. You can move the mouse all over your desktop, or you can even throw it across the room, but the mouse pointer on the screen stays perfectly still.
When a computer starts acting strange, you need to reboot. If you must reboot, you should do so as cleanly as possible. I know this procedure may seem elementary, but the technique for safely restarting a client computer is worth repeating, even if it is basic:
1. Save your work if you can.
Use the File⇒Save command to save any documents or files that you were editing when things started to go haywire. If you can’t use the menus, try clicking the Save button on the toolbar. If that doesn’t work, try pressing Ctrl+S (the standard keyboard shortcut for the Save command).
2. Close any running programs if you can.
Use the File⇒Exit command or click the Close button in the upper-right corner of the program window. Or press Alt+F4.
If a program refuses to close, you can usually shut it down by using Windows Task Manager. Right-click the Windows task bar and choose Start Task Manager. Then select the program you want to close and click the End Task button.
3. Restart the computer.
• Windows XP: Choose Start⇒Turn Off Computer to summon the Shut Down Windows dialog box. Select the Restart option and then click OK.
• Windows 7 and Vista: Click the Start button, click the right arrow that appears at the bottom-right corner of the Start menu, and then click Restart.
• Windows 8: Oddly enough, shutting down Windows 8 is a bit challenging. You can stare at the Windows 8 desktop all day and not find an intuitive way to shut down your computer. The secret lies in the Charms Bar, which you can find by hovering the mouse over the lower-right corner of the screen. Next, click the Settings icon, and then click the Shut Down icon.
If restarting your computer doesn’t seem to fix the problem, you may need to turn off your computer and then turn it on again. To do so, follow the previous procedure but choose Shut Down instead of Restart.
Here are a few things to try if you have trouble restarting your computer:
1. If your computer refuses to respond to the Start⇒Shut Down command, try pressing Ctrl+Alt+Delete.
This is called the “three-finger salute.” It’s appropriate to say, “Queueue” while you do it.
When you press Ctrl+Alt+Delete, Windows displays a dialog box that enables you to close any running programs or shut down your computer entirely.
2. If pressing Ctrl+Alt+Delete doesn’t do anything, you’ve reached the last resort. The only thing left to do is turn off the computer by pressing the power On/Off button and holding it down for a few seconds.
 Turning off your computer by pressing the power button is a drastic action that you should take only after your computer becomes completely unresponsive. Any work you haven’t yet saved to disk is lost. (Sniff.) (If your computer doesn’t have a Reset button, turn off the computer, wait a few moments, and then turn the computer back on again.)
If at all possible, save your work before restarting your computer. Any work you haven’t saved is lost. Unfortunately, if your computer is totally tied up in knots, you probably can’t save your work. In that case, you have no choice but to push your computer off the digital cliff.
Booting in Safe Mode
Windows provides a special start-up mode called Safe Mode that’s designed to help fix misbehaving computers. When you start your computer in Safe Mode, Windows loads only the most essential parts of itself into memory — the bare minimum required for Windows to work. Safe Mode is especially useful when your computer has developed a problem that prevents you from using the computer at all.
To boot your computer in Safe Mode, first restart the computer. Then, as soon as the computer begins to restart, start pressing the F8 key — just tap away at it until a menu titled Advanced Boot Options appears. One of the options on this menu is Safe Mode; use the up- or down-arrow keys to select that option, and then press Enter to boot in Safe Mode.
Using System Restore
System Restore is a Windows feature that periodically saves important Windows configuration information and allows you to later return your system to a previously saved configuration. This can often fix problems by reverting your computer to a time when it was working.
By default, Windows saves restore points whenever you install new software on your computer or apply a system update. Restore points are also saved automatically every seven days.
Although System Restore is turned on by default, you should verify that System Restore is active and running to make sure that System Restore points are being created. To do that, right-click Computer from the Start menu, choose Properties, and then click the System Protection tab. The dialog box shown in Figure 19-2 is displayed. Verify that the Protection status for your computer’s C: drive is On. If it isn’t, select the C: drive and click the Configure button to configure System Restore for the drive.
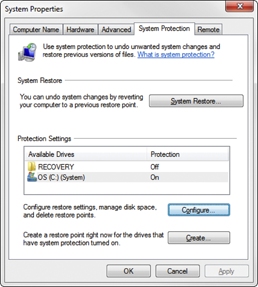
Figure 19-2: The System Protection tab of the System Properties dialog box.
If your computer develops a problem, you can restore it to a previously saved restore point by clicking the System Protection tab. This brings up the System Restore Wizard, as shown in Figure 19-3. This wizard allows you to select the restore point you want to use.
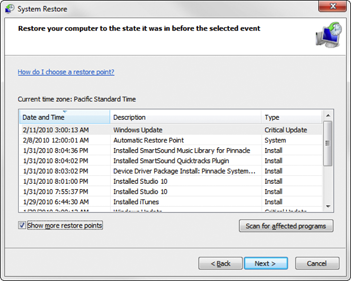
Figure 19-3: Use System Restore to restore your system to an earlier configuration.
Here are a few additional thoughts to remember about System Restore:
![]() System Restore does not delete data files from your system. Thus, files in your Documents folder won’t be lost.
System Restore does not delete data files from your system. Thus, files in your Documents folder won’t be lost.
![]() System Restore does remove any applications or system updates you’ve installed since the restore point was made. Thus, you need to reinstall those applications or system updates — unless, of course, you determine that an application or system update was the cause of your problem in the first place.
System Restore does remove any applications or system updates you’ve installed since the restore point was made. Thus, you need to reinstall those applications or system updates — unless, of course, you determine that an application or system update was the cause of your problem in the first place.
![]() System Restore automatically restarts your computer. The restart may be slow because some of the changes made by System Restore happen after the restart.
System Restore automatically restarts your computer. The restart may be slow because some of the changes made by System Restore happen after the restart.
![]() Do not turn off or cut power to your computer during System Restore. Doing so may leave your computer in an unrecoverable state.
Do not turn off or cut power to your computer during System Restore. Doing so may leave your computer in an unrecoverable state.
Restarting Network Services
Once in a while, the operating system (OS) service that supports the task that’s causing you trouble inexplicably stops or gets stuck. If users can’t access a server, it may be because one of the key network services has stopped or is stuck.
You can review the status of services by using the Services tool, as shown in Figure 19-4. To display it, right-click Computer from the Start menu and choose Manage; then, expand the Services and Applications node and click Services. Review this list to make sure that all key services are running. If an important service is paused or stopped, restart it.
Which services qualify as “important” depends on what roles you define for the server. Table 19-1 lists a few important services that are common to most Windows network operating systems (NOSes). However, many servers require additional services besides these. In fact, a typical server will have many dozens of services running simultaneously.

Figure 19-4: Looking at services (Windows 8).
Table 19-1 Key Windows Services
|
Service |
Description |
|
Computer Browser |
Maintains a list of computers on the network that can be accessed. If this service is disabled, the computer won’t be able to use browsing services, such as My Network Places. |
|
DHCP Client |
Enables the computer to obtain its IP address from a Dynamic Host Configuration Protocol (DHCP) server. If this service is disabled, the computer’s IP address won’t be configured properly. |
|
DNS Client |
Enables the computer to access a Domain Name Server (DNS) server to resolve DNS names. If this service is disabled, the computer won’t be able to handle DNS names, including Internet addresses and Active Directory (AD) names. |
|
Server |
Provides basic file- and printer-sharing services for the server. If this service is stopped, clients won’t be able to connect to the server to access files or printers. |
|
Workstation |
Enables the computer to establish client connections with other servers. If this service is disabled, the computer won’t be able to connect to other servers. |
Key services usually stop for a reason, so simply restarting a stopped service probably won’t solve your network’s problem — at least, not for long. You should review the System log to look for any error messages that may explain why the service stopped in the first place.
Restarting a Network Server
Sometimes, the only way to flush out a network problem is to restart the network server that’s experiencing trouble.
Restarting a network server is something you should do only as a last resort. Windows Server is designed to run for months or even years at a time without rebooting. Restarting a server invariably results in a temporary shutdown of the network. If you must restart a server, try to do it during off hours if possible.
Before you restart a server, check whether a specific service that’s required has been paused or stopped. You may be able to just restart the individual service rather than the entire server. For more information, see the section, “Restarting Network Services,” earlier in this chapter.
Here’s the basic procedure for restarting a network server:
1. Make sure that everyone is logged off the server.
The easiest way to do that is to restart the server after normal business hours, when everyone has gone home for the day. Then, you can just shut down the server and let the shutdown process forcibly log off any remaining users.
To find out who’s logged on, refer to the earlier section, “Who’s on First?”
2. After you’re sure the users have logged off, shut down the network server.
You want to do this step behaving like a good citizen if possible — decently, and in order. Use the Start⇒Shut Down command to shut down the server. This summons a dialog box that requires you to indicate the reason for the shutdown. The information you supply here is entered into the server’s System log, which you can review by using Event Viewer. See the next section for more on Event Viewer.
3. Reboot the server computer or turn it off and then on again.
Watch the server start up to make sure that no error messages appear.
4. Tell everyone to log back on and make sure that everyone can now access the network.
Heed the following when you consider restarting the network server:
![]() Restarting the network server is more drastic than restarting a client computer. Make sure that everyone saves his or her work and logs off the network before you do it! You can cause major problems if you blindly turn off the server computer while users are logged on.
Restarting the network server is more drastic than restarting a client computer. Make sure that everyone saves his or her work and logs off the network before you do it! You can cause major problems if you blindly turn off the server computer while users are logged on.
![]() Obviously, restarting a network server is a major inconvenience to every network user. Better offer treats.
Obviously, restarting a network server is a major inconvenience to every network user. Better offer treats.
Looking at Event Logs
One of the most useful troubleshooting techniques for diagnosing network problems is to review the network operating system’s built-in event logs. These logs contain information about interesting and potentially troublesome events that occur during the daily operation of your network. Ordinarily, these logs run in the background, quietly gathering information about network events. When something goes wrong, you can check the logs to see whether the problem generated a noteworthy event. In many cases, the event logs contain an entry that pinpoints the exact cause of the problem and suggests a solution.
To display the event logs in a Windows server, use Event Viewer, which is available from the Administrative Tools menu. For example, Figure 19-5 shows an Event Viewer from a Windows Server 2012 system. The tree listing on the left side of Event Viewer lists five categories of events that are tracked: Application, Security, Setup, System, and Forwarded Events. Select one of these options to see the log that you want to view. For details about a particular event, double-click the event to display a dialog box with detailed information about the event.
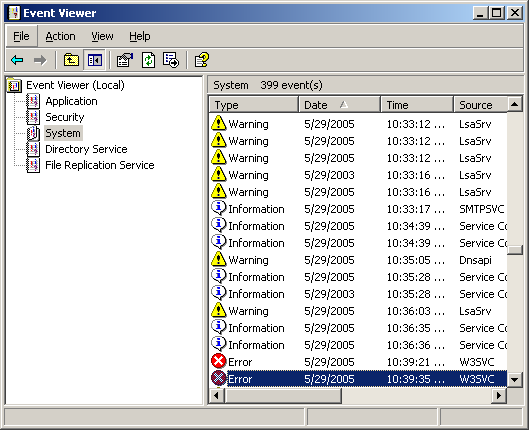
Figure 19-5: View event logs here.
Documenting Your Trials and Tribulations
For a large network, you probably want to invest in problem-management software that tracks each problem through the entire process of troubleshooting, from initial report to final resolution. For small- and medium-sized networks, it’s probably sufficient to put together a three-ring binder with pre-printed forms. Or record your log in a Word document or an Excel spreadsheet.
Regardless of how you track your network problems, the tracking log should include the following information:
![]() The real name and the network username of the person reporting the problem
The real name and the network username of the person reporting the problem
![]() The date the problem was first reported
The date the problem was first reported
![]() An indication of the severity of the problem
An indication of the severity of the problem
Is it merely an inconvenience, or is a user unable to complete his or her work because of the problem? Does a workaround exist?
![]() The name of the person assigned to resolve the problem
The name of the person assigned to resolve the problem
![]() A description of the problem
A description of the problem
![]() A list of the software involved, including versions
A list of the software involved, including versions
![]() A description of the steps taken to solve the problem
A description of the steps taken to solve the problem
![]() A description of any intermediate steps that were taken to try to solve the problem, along with an indication of whether those steps were “undone” when they didn’t help solve the problem
A description of any intermediate steps that were taken to try to solve the problem, along with an indication of whether those steps were “undone” when they didn’t help solve the problem
![]() The date the problem was finally resolved
The date the problem was finally resolved