Chapter 3
More Ways to Use Your Network
In This Chapter
![]() Transforming your computer into a network server
Transforming your computer into a network server
![]() Sharing folders with network users
Sharing folders with network users
![]() Working in the Public folder
Working in the Public folder
![]() Sharing your printer
Sharing your printer
![]() Using Office on a network
Using Office on a network
![]() Working with files offline
Working with files offline
Chapter 2 introduces you to the basics of using a network: logging on, accessing data on shared network folders, printing, and logging off. In this chapter, I go beyond these basics. You find out how to turn your computer into a server that shares its own files and printers, how to use one of the most popular network computer applications — e-mail — and how to work with Office on a network.
Sharing Your Stuff
As you probably know, networks consist of two types of computers: client computers and server computers. In the economy of computer networks, client computers are the consumers — the ones that use network resources, such as shared printers and disk drives. Servers are the providers — the ones that offer their own printers and hard drives to the network so that the client computers can use them.
This chapter shows you how to turn your humble Windows client computer into a server computer so that other computers on your network can use your printer and any folders that you decide you want to share. In effect, your computer functions as both a client and a server at the same time. A couple of examples show how:
![]() It’s a client when you send a print job to a network printer or when you access a file stored on another server’s hard drive.
It’s a client when you send a print job to a network printer or when you access a file stored on another server’s hard drive.
![]() It’s a server when someone else sends a print job to your printer or accesses a file stored on your computer’s hard drive.
It’s a server when someone else sends a print job to your printer or accesses a file stored on your computer’s hard drive.
Enabling File and Printer Sharing (Windows XP)
Before you can share your files or your printer with other network users, you must set up a Windows File and Printer Sharing feature. Without this feature installed, your computer can be a network client but not a server. This section shows you how to enable this feature for Windows XP. For Windows Vista, see the next section, “Enabling File and Printer Sharing (Windows Vista).”
If you’re lucky, the File and Printer Sharing feature is already set up on your computer. To find out, double-click the My Computer icon on your desktop. Select the icon for your C: drive and then click File on the menu bar to reveal the File menu. If the menu includes a Sharing command, File and Printer Sharing is already set up, so you can skip the rest of this section. If you can’t find a Sharing command on the File menu, you have to install File and Printer Sharing before you can share a file or printer with other network users.
To enable File and Printer Sharing on a Windows XP system, follow these steps:
1. From the Start menu, choose Settings⇒Control Panel.
The Control Panel comes to life.
2. Double-click the Network Connections icon.
The Network Connections window appears.
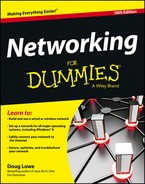
3. Right-click Local Area Connection and choose Properties.
The Local Area Connection properties dialog box appears, as shown in Figure 3-1.
4. Make sure the File and Print Sharing for Microsoft Networks option is checked.
5. Click OK.
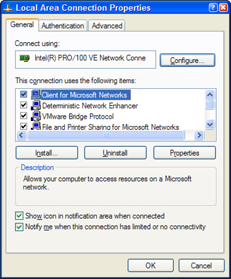
Figure 3-1: The Local Area Connection Properties dialog box.
 While you’re working in the Network dialog box, don’t mess around with any of the other network settings. You can safely change the File and Print Sharing options, but leave the rest of the settings in the Network dialog box alone.
Enabling File and Printer Sharing (Windows Vista)
To enable file and printer sharing in Windows Vista, follow these steps:
1. Choose Start⇒Network.
This step opens the Network folder.
2. Click the Network and Sharing Center button on the toolbar.
This step opens the Network and Sharing Center, as shown in Figure 3-2.
3. Click the down arrow to the right of File Sharing in the Sharing and Discovery section.
This step reveals the controls that enable you to activate file sharing, as shown in Figure 3-3.
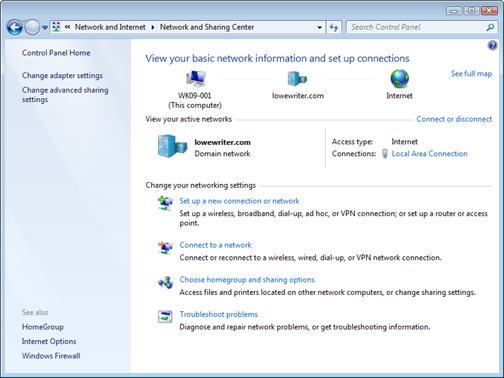
Figure 3-2: The Network and Sharing Center.
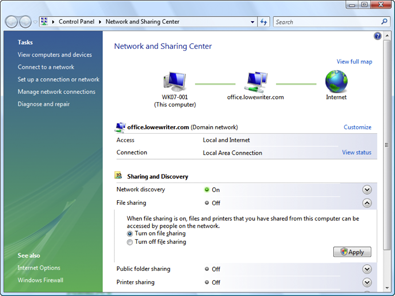
Figure 3-3: Activating the file sharing feature.
4. Select the Turn on File Sharing option and then click Apply.
This file sharing feature is activated.
5. Select the Printer Sharing option.
This step reveals the controls that enable you to activate printer sharing.
6. Select the Turn on Printer Sharing option and then click Apply.
This file sharing feature is activated.
7. Close the Network and Sharing Center folder.
You’re done; you can now share your files and printers.
Enabling File and Printer Sharing (Windows 7 and 8)
Here are the steps to enable file and printer sharing in Windows 7:
1. Click the Start button, type Control Panel, and press Enter.
This step opens the Control Panel.
2. Double-click the Network and Sharing Center icon and then click Change Advanced Sharing Settings.
This step opens the Advanced Sharing Settings page, which lists network settings for each network you’re connected to.
• For a home computer running Windows 7: Two networks are listed: Home or Work, and Public.
• In Windows 8: The Home or Work network is called Private.
• For a computer connected to a domain network: A third network named Domain is listed.
3. Click the down arrow next to the network you want to enable file and printer sharing for.
• For a home computer: Click the down arrow next to Home or Work (Windows 7) or Private (Windows 8).
• For a computer connected to a domain network: Click the down arrow next to Domain.
Figure 3-4 shows the settings for a Domain network. The settings for a Home or Work network are the same.
Do not enable file or printer sharing for the Public network. Enabling file or printer sharing on a public network exposes your computer’s data to other users on the same public network.

Figure 3-4: Enabling file and printer sharing in Windows 8.
4. Select the Turn on File and Printer Sharing option.
5. Click the Save Changes button.
This action saves your changes and closes the Advanced Sharing Settings page.
Sharing a Folder
To enable other network users to access files that reside on your hard drive, you must designate a folder on the drive as a shared folder. Note that you can also share an entire drive, if you so desire. If you share an entire drive, other network users can access all the files and folders on the drive. If you share a folder, network users can access only those files that reside in the folder you share. (If the folder you share contains other folders, network users can access files in those folders, too.)
Don’t share an entire hard drive unless you want to grant everyone on the network the freedom to sneak a peek at every file on your hard drive. Instead, you should share just the folder or folders containing the specific documents that you want others to be able to access. For example, if you store all your Word documents in the My Documents folder, you can share your My Documents folder so that other network users can access your Word documents.
Sharing a folder in Windows XP
To share a folder on a Windows XP computer, follow these steps:
1. Double-click the My Computer icon on your desktop.
The My Computer window comes to center stage.
2. Select the folder that you want to share.
Click the icon for the drive that contains the folder you want to share, and then find the folder itself and click it.
3. Choose File⇒Sharing and Security.
The Properties dialog box for the folder that you want to share appears. Notice that the sharing options are grayed out.
4. Select the Share This Folder on the Network option.
After you select this option, the rest of the sharing options come alive, as shown in Figure 3-5.
 If you prefer, you can skip Steps 2–4. Instead, just right-click the folder you want to share and then choose Sharing and Security from the menu that appears.
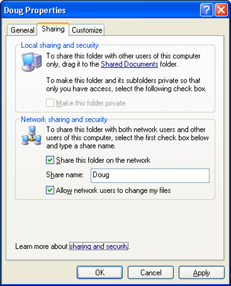
Figure 3-5: The Sharing options come to life when you select the Share This Folder on the Network check box (in Windows XP).
5. (Optional) Change the share name if you don’t like the name that Windows proposes.
The share name is the name that other network users use to access the shared folder. You can give it any name you want, but the name can be no more than 12 characters long. Uppercase and lowercase letters are treated the same in a share name, so the name My Documents is the same as MY DOCUMENTS.
Windows proposes a share name for you, based on the actual folder name. If the folder name has 12 or fewer characters, the proposed share name is the same as the folder name. If the folder name is longer than 12 characters, however, Windows abbreviates it. For example, the name Multimedia Files becomes MULTIMEDIA F.
If the name that Windows chooses doesn't make sense or seems cryptic, you can change the share name to something better. For example, I would probably use MEDIA FILES rather than MULTIMEDIA F.
6. (Optional) If you want to allow other network users to change the files in this folder, select the Allow Network Users to Change My Files check box.
If you leave this option deselected, other network users can open your files, but they can’t save any changes they make.
7. Click OK.
The Properties dialog box vanishes, and a hand is added to the icon for the folder to show that the folder is shared.
If you change your mind and decide that you want to stop sharing a folder, double-click the My Computer icon, select the folder or drive that you want to stop sharing, and choose File⇒Sharing to summon the Properties dialog box. Deselect the Share This Folder on the Network check box and then click OK.
Sharing a folder in Windows Vista, 7, or 8
To share a folder in Windows Vista, Windows 7, or Windows 8, follow these steps:
1. Open File Explorer.
• Windows Vista or 7: Choose Start⇒Computer.
• Windows 8: Open the desktop and click the File Explorer icon on the taskbar; then click Computer in the Location list on the left side of the screen.
2. Navigate to the folder you want to share.
3. Right-click the folder you want to share and choose Properties.
The Properties dialog box appears.
4. Click the Sharing tab and then click the Share button.
The File Sharing dialog box appears, as shown in Figure 3-6.
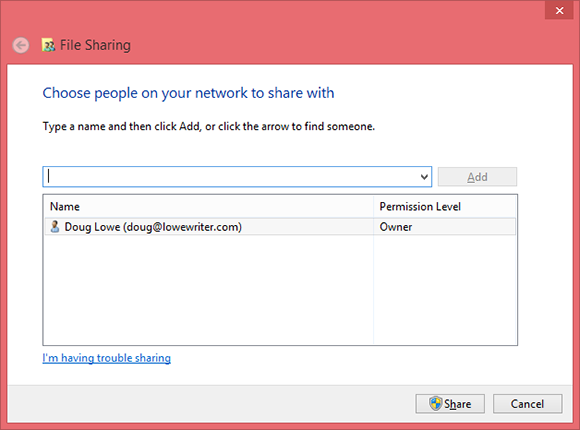
Figure 3-6: The File Sharing dialog box (Windows 8).
5. Click the arrow in the drop-down list, choose Everyone, and then click Add.
This action designates that anyone on your network can access the shared folder.
If you prefer, you can limit access to just certain users. To do so, select each person you want to grant access to and then click Add.
6. Select the level of access you want to grant each user.
You can use the drop-down list in the Permission Level column to choose from three levels of access:
• Reader: A reader can open files but can’t modify or create new files or folders.
• Contributor: A contributor can add files to the share but can change or delete only her own files.
• Owner: An owner has full access to the shared folder. He or she can create, change, or delete any file in the folder.
7. Click Share.
A confirmation dialog box appears to confirm that the folder has been shared.
Using the Public Folder in Windows Vista or Windows 7 or 8
Windows Vista, Windows 7, and Windows 8 include an alternative method of sharing files on the network: the Public folder. The Public folder is simply a folder that’s designated for public access. Files you save in this folder can be accessed by other users on the network and by any user who logs on to your computer.
Before you can use the Public folder, you must enable it. In Windows 7 or 8, just follow the steps listed in the section “Enabling File and Printer Sharing (Windows 7 and 8)” earlier in this chapter, but choose the Turn on Sharing option in the Public Sharing Settings section. For Windows Vista, follow the steps in the earlier section “Enabling File and Printer Sharing (Windows Vista),” but choose the Public Sharing option instead of the File Sharing and Printer Sharing options.
After you enable Public folder sharing, you can access the Public folder on your own computer in Windows Vista by choosing Start⇒Computer and then clicking the Public icon in the pane on the left side of the window. To open the Public folder in Windows 7, choose Start⇒Computer, expand the Libraries item in the left pane, and then expand the Documents, Music, Pictures, or Videos items. In Windows 8, open the desktop, click the File Explorer icon on the taskbar, expand the Libraries item in the left pane, and then expand the Documents, Music, Pictures or Videos items.
Figure 3-7 shows an example of a Public folder in Windows 8.
As you can see, the Public folder includes several predefined subfolders designed for sharing documents, downloaded files, music, pictures, and videos. You can use these subfolders if you want, or you can create your own subfolders to help organize the data in your Public folder.
To access the Public folder of another computer, use the techniques that I describe in Chapter 2 to either browse to the Public folder or map it to a network drive.

Figure 3-7: A Public folder in Windows 8.
Sharing a Printer
Sharing a printer is much more traumatic than sharing a hard drive. When you share a hard drive, other network users access your files from time to time. When they do, you hear your drive click a few times, and your computer may hesitate for a half-second or so. The interruptions caused by other users accessing your drive are sometimes noticeable but rarely annoying.
When you share a printer, you get to see Murphy’s Law in action: Your co-worker down the hall is liable to send a 140-page report to your printer just moments before you try to print a 1-page memo that has to be on the boss’s desk in two minutes. The printer may run out of paper — or worse, jam — during someone else’s print job — and you’re expected to attend to the problem.
Although these interruptions can be annoying, sharing your printer makes a lot of sense in some situations. If you have the only decent printer in your office or workgroup, everyone will bug you to let them use it anyway. You may as well share the printer on the network. At least this way, they won’t line up at your door to ask you to print their documents for them.
Sharing a printer in Windows XP
The following procedure shows you how to share a printer in Windows XP:
1. From the Start menu, choose Printers and Faxes.
The Printers and Faxes folder appears, as shown in Figure 3-8. In this example, the Printers folder lists a single printer, named HP PSC 750.
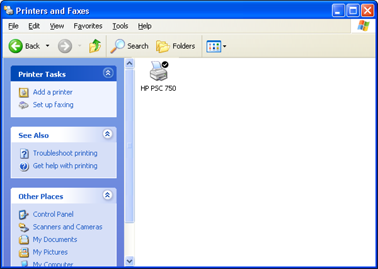
Figure 3-8: The Printers and Faxes folder.
2. Select the printer that you want to share.
Click the icon for the printer to select the printer.
3. Choose File⇒Sharing.
You’re right: This command doesn’t make sense. You’re sharing a printer, not a file, but the Sharing command is on the File menu. Go figure.
When you choose File⇒Sharing, the Properties dialog box for the printer appears.
4. Select the Share This Printer option.
5. (Optional) Change the share name if you don’t like the name suggested by Windows.
Other computers use the share name to identify the shared printer, so choose a meaningful or descriptive name.
6. Click OK.
You return to the Printers folder, where a hand is added to the printer icon to show that the printer is now a shared network printer.
To take your shared printer off the network so that other network users can’t access it, follow Steps 1–3 in the preceding set of steps to open the Printer Properties dialog box. Select the Do Not Share This Printer option and then click OK. The hand disappears from the printer icon to indicate that the printer is no longer shared.
Sharing a printer in Windows Vista, Windows 7, or Windows 8
To share a printer in Windows Vista, Windows 7, or Windows 8, follow these steps:
1. Open the Control Panel.
• Windows 7 or earlier: Choose Start⇒Control Panel.
• Windows 8: Press the Windows key, type Control, and then click the Control Panel icon.
2. Click Devices and Printers.
3. Right-click the printer that you want to share and choose Printer Properties.
The Properties dialog box for the printer appears.
4. Click the Sharing tab.
The Sharing tab appears, as shown in Figure 3-9. Notice that the options for sharing the printer are disabled.

Figure 3-9: Sharing a printer in Windows 8.
5. Select the Share This Printer option.
6. (Optional) Change the share name if you don’t like the name suggested by Windows.
Because other computers will use the share name to identify the shared printer, pick a descriptive name.
7. Click OK.
You return to the Printers folder. The icon for the printer is modified to indicate that it has been shared.
To take your shared printer off the network so that other network users can’t access it, follow Steps 1–4 in the preceding set of steps. Deselect the Share This Printer check box and then click OK.
Using Microsoft Office on a Network
Microsoft Office is far and away the most popular suite of application programs used on personal computers, and it includes the most common types of application programs used in an office: a word processing program (Word), a spreadsheet program (Excel), a presentation program (PowerPoint), and an excellent e-mail program (Outlook). Depending on the version of Office you purchase, you may also get a database program (Access), a desktop publishing program (Publisher), a set of Ginsu knives (KnifePoint), and a slicer and dicer (ActiveSalsa).
This section describes the networking features of Microsoft Office System 2010, the latest and greatest version of Office. Most of these features also work with previous versions of Office.
To get the most from using Office on a network, you should purchase the Microsoft Office Resource Kit. The Office Resource Kit, also known as ORK, contains information about installing and using Office on a network and comes with a CD that has valuable tools. If you don't want to purchase the ORK, you can view it online and download the ORK tools from the Microsoft TechNet website (http://technet.microsoft.com/en-US/). Nanoo-nanoo, Earthling.
Installing Office on a network — some options
You need to make some basic decisions when you prepare to install Microsoft Office on a network. In particular, here are some possible approaches to installing Microsoft Office on your network clients:
![]() You can simply ignore the fact that you have a network and purchase a separate copy of Office for each user on the network. Then you can install Office from the CD on each computer. This option works well if
You can simply ignore the fact that you have a network and purchase a separate copy of Office for each user on the network. Then you can install Office from the CD on each computer. This option works well if
• Your network is small.
• Each computer has ample disk space to hold the necessary Office files.
• Each computer has its own CD-ROM drive. (If the computer doesn’t have a CD-ROM drive, you can share a CD-ROM drive on another computer and install the software from the shared drive.)
![]() On a larger network, you can use the Office Setup program in Administrative Setup mode. This option lets you create a special type of setup on a network server disk from which you can install Office on network computers. Administrative Setup enables you to control the custom features selected for each network computer and reduce the amount of user interaction required to install Office on each computer.
On a larger network, you can use the Office Setup program in Administrative Setup mode. This option lets you create a special type of setup on a network server disk from which you can install Office on network computers. Administrative Setup enables you to control the custom features selected for each network computer and reduce the amount of user interaction required to install Office on each computer.
If you choose to use Administrative Setup, you can use the Network Installation Wizard, which comes with the Office Resource Kit. The Network Installation Wizard lets you customize settings for installing Office on client computers. For example, you can choose which Office components to install, provide default answers to yes/no questions that Setup asks the user while installing Office, and select the amount of interaction you want the Setup program to have with the user while installing Office.
No matter which option you choose for installing Office on your network, you must purchase either a copy of Office or a license to install Office for every computer that uses Office. Purchasing a single copy of Office and installing it on more than one computer is illegal.
Accessing network files
Opening a file that resides on a network drive is almost as easy as opening a file on a local drive. All Office programs use File⇒Open to summon the Open dialog box, as shown in its Excel incarnation in Figure 3-10. (The Open dialog box is nearly identical in other Office programs.)
To access a file that resides on a network volume that’s mapped to a drive letter, all you have to do is use the drop-down list at the top of the dialog box to select the network drive.
You can map a network drive directly from the Open dialog box by navigating to the folder you want to map, right-clicking the folder, and choosing Map Network Drive.

Figure 3-10: The Open dialog box in Excel 2010.
If you try to open a file that another network user has opened already, Office tells you that the file is already in use and offers to let you open a read-only version of the file. You can read and edit the read-only version, but Office doesn’t let you overwrite the existing version of the file. Instead, you have to use the Save As command to save your changes to a new file.
Using workgroup templates
Although an occasional sacrifice to the Office gods may make your computing life a bit easier, a template isn’t a place of worship. Rather, a template is a special type of document file that holds formatting information, boilerplate text, and other customized settings that you can use as the basis for new documents.
Three Office programs — Word, Excel, and PowerPoint — enable you to specify a template whenever you create a new document. When you create a new document in Word, Excel, or PowerPoint by choosing File⇒New, you see a dialog box that lets you choose a template for the new document.
Office comes with a set of templates for the most common types of documents. These templates are grouped under the various tabs that appear across the top of the New dialog box.
In addition to the templates that come with Office, you can create your own templates in Word, Excel, and PowerPoint. Creating your own templates is especially useful if you want to establish a consistent look for documents prepared by your network users. For example, you can create a Letter template that includes your company’s letterhead or a Proposal template that includes a company logo.
Office enables you to store templates in two locations. Where you put them depends on what you want to do with them:
![]() The User Templates folder on each user’s local disk drive: If a particular user needs a specialized template, put it here.
The User Templates folder on each user’s local disk drive: If a particular user needs a specialized template, put it here.
![]() The Workgroup Templates folder on a shared network drive: If you have templates that you want to make available to all network users on the network server, put them here. This arrangement still allows each user to create templates that aren’t available to other network users.
The Workgroup Templates folder on a shared network drive: If you have templates that you want to make available to all network users on the network server, put them here. This arrangement still allows each user to create templates that aren’t available to other network users.
When you use both a User Templates folder and a Workgroup Templates folder, Office combines the templates from both folders and lists them in alphabetical order in the New dialog box. For example, the User Templates folder may contain templates named Blank Document and Web Page, and the Workgroup Templates folder may contain a template named Company Letterhead. In this case, three templates appear in the New dialog box, in this order: Blank Document, Company Letterhead, and Web Page.
To set the location of the User Templates and Workgroup Templates folders, follow these steps in Microsoft Word:
1. Click the Office button and then click Word Options.
The Word Options dialog box opens.
2. Click the Advanced tab.
The Advanced options appear.
3. Scroll down to the General section and then click the File Locations button.
The File Locations dialog box appears, as shown in Figure 3-11.
4. Double-click the Workgroup Templates item.
This step opens a dialog box that lets you browse to the location of your template files.
5. Browse to the template files and then click OK.
You return to the File Locations dialog box.
6. Click OK to dismiss the File Locations dialog box.
You return to the Word Options dialog box.
7. Click OK again.
The Word Options dialog box is dismissed.
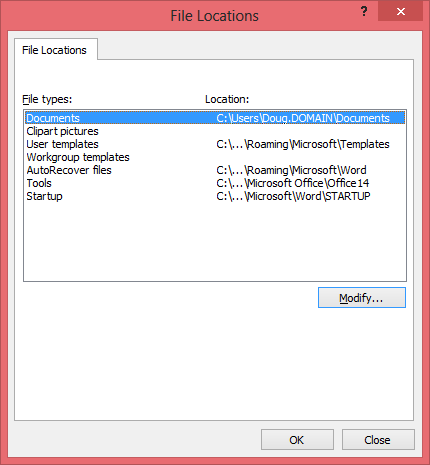
Figure 3-11: Setting the file locations in Word 2010.
Although the User Templates and Workgroup Templates settings affect Word, Excel, and PowerPoint, you can change these settings only from Word. The Options dialog boxes in Excel and PowerPoint don’t show the User Templates or Workgroup Templates options.
When you install Office, the standard templates that come with Office are copied into a folder on the computer’s local disk drive, and the User Templates option is set to this folder. The Workgroup Templates option is left blank. You can set the Workgroup Templates folder to a shared network folder by clicking Network Templates, clicking the Modify button, and specifying a shared network folder that contains your workgroup templates.
Networking an Access database
If you want to share a Microsoft Access database among several network users, be aware of a few special considerations. Here are the most important ones:
![]() When you share a database, more than one user may try to access the same record at the same time. This situation can lead to problems if two or more users try to update the record. To handle this potential traffic snarl, Access locks the record so that only one user at a time can update it. Access uses one of three methods to lock records:
When you share a database, more than one user may try to access the same record at the same time. This situation can lead to problems if two or more users try to update the record. To handle this potential traffic snarl, Access locks the record so that only one user at a time can update it. Access uses one of three methods to lock records:
• Edited Record: This method locks a record whenever a user begins to edit a record. For example, if a user retrieves a record in a form that allows the record to be updated, Access locks the record while the user edits it so that other users can’t edit the record until the first record is finished.
• No Locks: This method doesn’t really mean that the record isn’t locked. Instead, No Locks means that the record isn’t locked until a user writes a change to the database. This method can be confusing to users because it enables one user to overwrite changes made by another user.
• All Records: All Records locks an entire table whenever a user edits any record in the table.
![]() Access lets you split a database so that the forms, queries, and reports are stored on each user’s local disk drive, but the data itself is stored on a network drive. This feature can make the database run more efficiently on a network, but it’s a little more difficult to set up. (To split a database, choose Tools⇒Database Utilities⇒Database Splitter.)
Access lets you split a database so that the forms, queries, and reports are stored on each user’s local disk drive, but the data itself is stored on a network drive. This feature can make the database run more efficiently on a network, but it’s a little more difficult to set up. (To split a database, choose Tools⇒Database Utilities⇒Database Splitter.)
![]() Access includes built-in security features that you should use if you share an Access database from a Windows client computer. If you store the database on a domain server, you can use the server’s security features to protect the database.
Access includes built-in security features that you should use if you share an Access database from a Windows client computer. If you store the database on a domain server, you can use the server’s security features to protect the database.
![]() Access automatically refreshes forms and datasheets every 60 seconds. That way, if one user opens a form or datasheet and another user changes the data a few seconds later, the first user sees the changes within one minute. If 60 seconds is too long (or too short) an interval, you can change the refresh rate by using the Advanced tab in the Options dialog box.
Access automatically refreshes forms and datasheets every 60 seconds. That way, if one user opens a form or datasheet and another user changes the data a few seconds later, the first user sees the changes within one minute. If 60 seconds is too long (or too short) an interval, you can change the refresh rate by using the Advanced tab in the Options dialog box.
Working with Offline Files
Desktop computers are by nature stationary beasts. As a result, they’re almost always connected to their networks. Notebook computers, however, are more transitory. If you have a notebook computer, you’re likely to tote it around from place to place. If you have a network at work, you probably connect to the network when you’re at work. But then you take the notebook computer home for the weekend, and you aren’t connected to your network.
Of course, your boss wants you to spend your weekends working, so you need a way to access your important network files while you’re away from the office and disconnected from the network. That’s where the offline files feature comes in. It lets you access your network files even while you’re disconnected from the network.
It sounds like magic, but it isn’t really. Imagine how you’d work away from the network without this feature. You simply copy the files you need to work on to your notebook computer’s local hard disk. Then, when you take the computer home, you work on the local copies. When you get back to the office, you connect to the network and copy the modified files back to the network server.
That’s essentially how the offline files feature works, except that Windows does all the copying automatically. Windows also uses smoke and mirrors to make it look like the copies are actually on the network even though you’re not connected to the network. For example, if you map a drive (drive M:, for example) and make it available offline, you can still access the offline copies of the file on the M: drive. That’s because Windows knows that when you aren’t connected to the network, it should redirect drive M: to its local copy of the drive M: files.
The main complication of working with offline files, of course, is what happens when two or more users want to access the same offline files. Windows can attempt to straighten that mess out for you, but it doesn’t do a great job of it. Your best bet is to not use the offline files feature with network resources that other users may want available offline, too. In other words, it’s okay to make your home drive available offline because that drive is accessible only to you. I don’t recommend making shared network resources available offline, though, unless they’re read-only resources that don’t contain files you intend to modify.
Using the offline files feature is easy:
![]() Windows Vista, Windows 7, or Windows 8: Open the Computer folder, right-click the mapped network drive you want to make available offline, and choose Always Available Offline.
Windows Vista, Windows 7, or Windows 8: Open the Computer folder, right-click the mapped network drive you want to make available offline, and choose Always Available Offline.
![]() Windows XP: Open My Computer, right-click the mapped drive, and choose Make Available Offline.
Windows XP: Open My Computer, right-click the mapped drive, and choose Make Available Offline.
If you don’t want to designate an entire mapped drive for offline access, you can designate individual folders within a mapped drive by using the same technique: Right-click the folder and then choose Always Available Offline (Make Available Offline in Windows XP).
When you first designate a drive or folder as available offline, Windows copies all the files on the drive or folder to local storage. Depending on how many files are involved, this process can take a while, so plan accordingly.
After you designate a drive as available offline, Windows takes care of the rest. Each time you log on to or out of the network, Windows synchronizes your offline files. Windows compares the time stamp on each file on both the server and the local copy and then copies any files that have changed.
Here are a few other thoughts to consider about offline files:
![]() If you want, you can force Windows to synchronize your offline files by right-clicking the drive or folder and choosing Sync.
If you want, you can force Windows to synchronize your offline files by right-clicking the drive or folder and choosing Sync.
![]() Make sure that no files in the folder are currently open at the time you set the Make Available Offline option. If any files are open, you’ll receive an error message. You have to close the open files before you can designate the folder for offline access.
Make sure that no files in the folder are currently open at the time you set the Make Available Offline option. If any files are open, you’ll receive an error message. You have to close the open files before you can designate the folder for offline access.
![]() The Properties dialog box for mapped drives includes an Offline Files tab, as shown in Figure 3-12.
The Properties dialog box for mapped drives includes an Offline Files tab, as shown in Figure 3-12.
![]() Employers love the offline files feature because it encourages their employees to work at home during evenings and weekends. In fact, every time you use the offline files feature to work at home, your boss sends Bill Gates a nickel. That’s how he got so rich.
Employers love the offline files feature because it encourages their employees to work at home during evenings and weekends. In fact, every time you use the offline files feature to work at home, your boss sends Bill Gates a nickel. That’s how he got so rich.
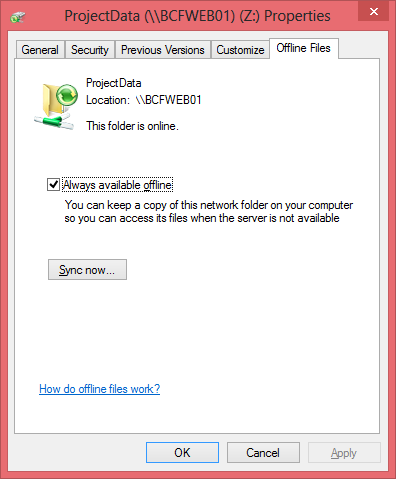
Figure 3-12: Offline file properties.