
Interpreting Visual Indicators
Given a network scenario, interpret visual indicators (e.g., link lights, collision lights) to determine the nature of the problem.
One of the first and easiest methods to spot signs of trouble on a network or with a network component is to look at the LEDs that appear on most network components. Many of the devices used in modern networks—such as hubs, routers, switches, and even NICs—have LEDs that let you know what, if anything, is going wrong. The following sections examine some of the common networking devices and what you can learn from their LEDs.
NOTE
Software Versus Hardware Loopback Chapter 13, “Troubleshooting Connectivity ,” discusses the use of the local loopback address (127.0.0.1) as a means of testing the Transmission Control Protocol/Internet Protocol (TCP/IP) connectivity of a system. Although this test is an effective way of ensuring that the TCP/IP protocol suite is operating correctly, it does not ensure that the network is functional at a physical level because the software loopback functionality is built in to the protocol suite. In other words, a software loopback never makes it as far as the physical NIC or connection. A hardware loopback takes the test one step further by providing a mechanism to test the physical connectivity. The software loopback test is still a useful tool, however, because without a functioning network card, operating systems generally won't allow the protocol suite to be tested.
LEDs on Networking Devices
If you have seen a hub or a switch, you have no doubt noticed the LEDs on the front of the device. Each individual RJ-45 connector has one or two dedicated LEDs. These LEDs are designed to provide the network administrator with a quick idea of the status of a connection or to a potential problem. Table 14.1 provides some examples of link-light indicators functioning on a hub.
EXAM TIP
Visual Indicators When CompTIA says visual indicators, it is basically referring to indicator lights/LEDs.
Note that the LEDs' sequencing and meanings vary among the different hub manufacturers and therefore may be different from those listed in Table 14.1.
In addition to link-light indicators, some hubs and switches have port-speed LEDs that, when lit, indicate the speed at which the connected device is functioning. Some also have LEDs that indicate whether the link is operating in full-duplex mode. These LEDs are often labeled FDX, FX, FD, or Full. Figure 14.6 shows an example of LEDs on an Ethernet switch.
Figure 14.6. LEDs on a hub.

EXAM TIP
Do You Have a Faulty Patch Cable? If a connection LED on a hub is not lit, all the physical connections are correct, and the connected system is powered on, you might have a faulty patch cable. You should know this for the exam.
By understanding the function of the lights on networking devices, you can tell at a glance the status of a device and the systems connected to it. You should take the time to familiarize yourself with the specific indicator lights on the network devices you work with and their various states.
LEDs on NICs and Other Devices
In addition to hubs and switches, most other networking devices have LEDs that provide a variety of information. Most NIC have at least one LED that indicates whether there is a link between the system and the network into which it is plugged. The link light operates at a physical level; in other words, it should be lit when the PC is on, regardless of whether the networking software is loaded, the network configuration is correct, or the user is logged on to the network. In addition to the link LED, many NICs have additional lights to indicate the speed at which the network connection is established and/or when there is network activity on the link. Figure 14.7 shows a NIC that has a link light (right), an activity LED (middle), and an LED that indicates whether the link is at 100Mbps (left).
Figure 14.7. A NIC with indicator LEDs.

LEDs are also included on cable modems and DSL modems, which are increasingly common as people want faster methods to connect to the Internet.
NOTE
Reading the Lights The trick to using indictor lights on networking equipment is knowing how they function in normal operation. Then, when a deviation occurs, you can recognize that something is wrong.
The number of LEDs on a device and their functionality depends on the device. For example, the cable modem we use has four LEDs: one that indicates that the modem is online, a Send indicator, a Receive indicator, and one labeled Message.
Using LEDs in Troubleshooting
The usefulness of LEDs in troubleshooting scenarios cannot be overstated. LEDs provide an instant, visual indicator about the state of a network link. In some cases, as with collision lights, they can even alert you to problems on the network. Understanding how to interpret information provided by LEDs is important for the real world and for the Network+ exam.
To demonstrate how LEDs can be used for troubleshooting, consider the sample network layout in Figure 14.8.
Figure 14.8. A sample network.
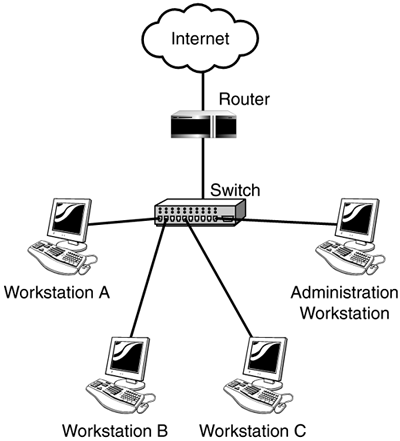
Imagine a scenario in which a user who is working at Workstation A calls and tells you she is unable to access the Internet. The Internet connection could be down, but by connecting to the Internet yourself, you determine that it is working correctly; therefore, it is safe to assume that the problem is on the user's end rather than with the Internet connectivity. Next, you decide to visit the user's workstation to see if you can ping the Internet router. Before you begin the ping test, you look at the back of the system and see that the link LED on the NIC is not lit. You can be fairly sure at this point that the ping test will not work because without the link light, there is no connectivity between the NIC and the switch.
Now you have narrowed the problem to one of a few things. Either the NIC or the cable is faulty, the switch to which the user is connected is not functioning, or the port on the switch to which the user is connected is faulty.
EXAM TIP
Identify the Link Lights Expect to be asked to identify the purposes of link lights on the Network+ exam. You might be presented with diagrams and asked how you would use LEDs in the troubleshooting process.
The easiest way to test whether the cable is the problem is to borrow a known working cable from Workstation B or C and plug it into Workstation A. When you try this, if the link light does not come on, you can deduce that the NIC is faulty. If the light does come on, you can deduce that either the port on the switch or a cable is faulty. The next step is to swap the cable out or try the original cable in another port switch.
Whatever the actual problem, link lights play an important role in the troubleshooting process. They give you an easy method of seeing what steps do and don't work.