11. Proofing and Printing Documents
Introduction
After finalizing your document, there are some necessary steps you should do prior to printing. You can check for inconsistent formatting in your document. If you have established a certain style, checking your formatting can ensure that your document is formatted correctly.
You can also look up and use synonyms and antonyms to make your document more interesting. Under the Review tab, you can use a Thesaurus, translate a word or document into another language, or even use multiple languages with the Word program. Of course, no document should be printed without first going through the spell checker to check your spelling and grammar usage. You can add personalized names, terms, company information to your spell checker, so that when you are using the spell checker, it won’t make unnecessary stops on words that are spelled and used correctly.
If your document is larger, page numbers might be necessary to help your reader follow along. You can insert page numbers for single or double sided printing, and you can even add chapter numbers. When getting ready to print, you might want to preview your document to make sure that your margins are appropriate for your text and printing. If, after previewing your document, you find that some text should be on a different page, you can insert page breaks to end the page early, so that common text stays together on a page. You can also insert a whole new page in your document.
When it’s finally time to print, you can print all or part of a document, change your page orientation to print landscape or portrait, print double-sided or specialized documents, and even print document properties.
Checking for Inconsistent Formatting
By default, Word does not automatically check for inconsistent formatting as you create documents. To instruct Word to mark the document for inconsistent formatting, and also to check documents that you have already prepared for inconsistent formatting, you need to change editing options in the Word Options dialog box. Word will automatically detect any inconsistent format elements and mark them with a blue wavy underline. When you turn on the Keep track of formatting option you can also use the Select Text with Similar formatting command on the shortcut menu that appears if you right-click selected text.
Change Editing Options
![]() Click the File tab, and then click Options.
Click the File tab, and then click Options.
![]() In the left pane, click Advanced.
In the left pane, click Advanced.
![]() Select the Keep track of formatting check box.
Select the Keep track of formatting check box.
![]() Select the Mark formatting inconsistencies check box.
Select the Mark formatting inconsistencies check box.
![]() Click OK.
Click OK.
The formatting inconsistencies are indicated by a blue wavy underline.

Change Inconsistent Formatting
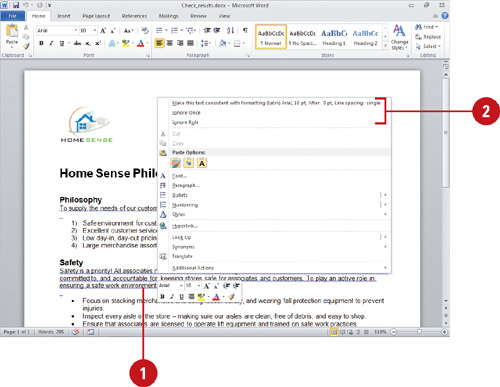
![]() In the document, right-click any wavy, blue line to open a list of Formatting commands.
In the document, right-click any wavy, blue line to open a list of Formatting commands.
![]() Click the appropriate choice based on the error in the text to make the necessary correction.
Click the appropriate choice based on the error in the text to make the necessary correction.
![]() Make this text consistent with formatting…
Make this text consistent with formatting…
![]() Ignore Once.
Ignore Once.
![]() Ignore Rule.
Ignore Rule.
Did You Know?
You can find similar inconsistent formatting quickly. You can also click the Select button on the Home tab, and then click Select Text With Similar Formatting to facilitate global changes of mistakes that have been repeated throughout the document.
Checking Spelling and Grammar
A document’s textual inaccuracies can distract the reader, so it’s important that your text be error-free. Word provides a spelling checker—common for all Office 2010 programs—so that you can check the spelling in an entire document for words not listed in the dictionary (such as misspellings, names, technical terms, or acronyms) or duplicate words (such as the the). You can correct these errors as they arise or after you finish the entire document. You can use the Spelling button on the Review tab to check the entire document using the Spelling dialog box, or you can avoid spelling errors on a document by enabling the AutoCorrect feature to automatically correct words as you type.
Check Spelling All at Once
![]() Click the Review tab.
Click the Review tab.
![]() Click the Spelling & Grammar button.
Click the Spelling & Grammar button.
![]() If the Spelling dialog box opens, choose an option:
If the Spelling dialog box opens, choose an option:
![]() Click Ignore Once to skip the word, or click Ignore All to skip every instance of the word.
Click Ignore Once to skip the word, or click Ignore All to skip every instance of the word.
![]() Click Add to Dictionary to add a word to your dictionary, so it doesn’t show up as a misspelled word in the future.
Click Add to Dictionary to add a word to your dictionary, so it doesn’t show up as a misspelled word in the future.
![]() Click a suggestion, and then click Change or Change All.
Click a suggestion, and then click Change or Change All.
![]() Select the correct word, and then click AutoCorrect to add it to the AutoCorrect list.
Select the correct word, and then click AutoCorrect to add it to the AutoCorrect list.
![]() If no suggestion is appropriate, click in the document and edit the text yourself. Click Resume to continue.
If no suggestion is appropriate, click in the document and edit the text yourself. Click Resume to continue.
![]() Word will prompt you when the spelling check is complete, or you can click Close to end the spelling check.
Word will prompt you when the spelling check is complete, or you can click Close to end the spelling check.


Correct Spelling and Grammar as you Type
![]() Right-click a word with a red or green wavy underline.
Right-click a word with a red or green wavy underline.
![]() Click a substitution, or click Ignore (or Grammar) to skip any other instances of the word.
Click a substitution, or click Ignore (or Grammar) to skip any other instances of the word.
Did You Know?
You can add a familiar word to your dictionary. Right-click the wavy line under the word in question, and then click Add To Dictionary.
You can hyphenate words. Click the Page Layout tab, click the Hyphenation button, and then click Automatic.

For Your Information
Finding out Document Readability
Word can help you determine the readability of your documents. When you set the readability option and check spelling and grammar, Word displays information and statistics about the reading level of the document, including the Flesch Reading Ease score and the Flesch-Kincaid Grade Level score. The readability scores are based on the average number of syllables per word and words per sentence. To display readability statistics, click the File tab, click Options, click Proofing in the left pane, select the Check Grammar With Spelling check box, select the Show Readability Statistics check box, and then click OK.
Using Custom Dictionaries
Before you can use a custom dictionary, you need to enable it first. You can enable and manage custom dictionaries by using the Custom Dictionaries dialog box. In the dialog box, you can change the language associated with a custom dictionary, create a new custom dictionary, or add or remove an existing custom dictionary. If you need to manage dictionary content, you can also change the default custom dictionary to which the spelling checker adds words, as well as add, delete, or edit words. All the modifications you make to your custom dictionaries are shared with all your Microsoft Office programs, so you only need to make changes once. If you mistakenly type an obscene or embarrassing word, such as ass instead of ask, the spelling checker will not catch it because both words are spelled correctly. You can avoid this problem by using an exclusion dictionary. When you use a language for the first time, Office automatically creates an exclusion dictionary. This dictionary forces the spelling checker to flag words you don’t want to use.
Use a Custom Dictionary
![]() Click the File tab, and then click Options.
Click the File tab, and then click Options.
![]() In the left pane, click Proofing.
In the left pane, click Proofing.
![]() Click Custom Dictionaries.
Click Custom Dictionaries.
![]() Select the check box next to CUSTOM.DIC (Default).
Select the check box next to CUSTOM.DIC (Default).
![]() Click the Dictionary language list arrow, and then select a language for a dictionary.
Click the Dictionary language list arrow, and then select a language for a dictionary.
![]() Click the options you want:
Click the options you want:
![]() Click Edit Word List to add, delete, or edit words.
Click Edit Word List to add, delete, or edit words.
![]() Click Change Default to select a new default dictionary.
Click Change Default to select a new default dictionary.
![]() Click New to create a new dictionary.
Click New to create a new dictionary.
![]() Click Add to insert an existing dictionary.
Click Add to insert an existing dictionary.
![]() Click Remove to delete a dictionary.
Click Remove to delete a dictionary.
![]() Click OK to close the Custom Dictionaries dialog box.
Click OK to close the Custom Dictionaries dialog box.
![]() Click OK.
Click OK.

Find and Modify the Exclusion Dictionary
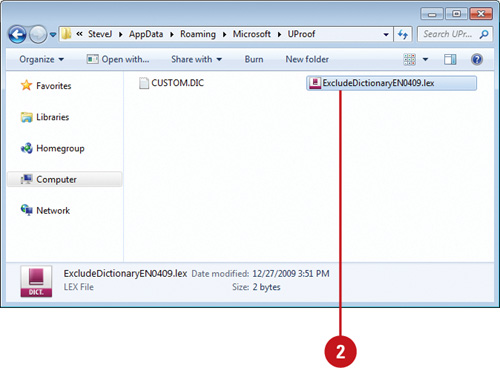
![]() In Windows Explorer, go to the folder location where the custom dictionaries are stored.
In Windows Explorer, go to the folder location where the custom dictionaries are stored.
![]() Windows 7 or Vista. C:Usersuser nameAppDataRoamingMicrosoftUProof
Windows 7 or Vista. C:Usersuser nameAppDataRoamingMicrosoftUProof
![]() Windows XP. C:Documents and Settingsuser nameApplication DataMicrosoftUProof
Windows XP. C:Documents and Settingsuser nameApplication DataMicrosoftUProof
TROUBLE? If you can’t find the folder, change folder settings to show hidden files and folders.
![]() Locate the exclusion dictionary for the language you want to change.
Locate the exclusion dictionary for the language you want to change.
![]() The file name you want is ExcludeDictionary Language CodeLanguage LCID.lex.
The file name you want is ExcludeDictionary Language CodeLanguage LCID.lex.
For example, ExcludeDictionary EN0409.lex, where EN is for English.
Check Word Help for an updated list of LCID (Local Identification Number) numbers for each language.
![]() Open the file using Microsoft Notepad or WordPad.
Open the file using Microsoft Notepad or WordPad.
![]() Add each word you want the spelling check to flag as misspelled. Type the words in all lowercase and then press Enter after each word.
Add each word you want the spelling check to flag as misspelled. Type the words in all lowercase and then press Enter after each word.
![]() Save and close the file.
Save and close the file.
Changing Proofing Options
You can customize the way Microsoft Office spell checks a document by selecting proofing settings in Options. Some spelling options apply to specific Office programs, such as Check spelling as you type, while other options apply to all Microsoft Office programs, such as Ignore Internet and file addresses, and Flag repeated words. If you have ever mistakenly used their instead of there, you can use contextual spelling to fix it. While you work in a document, you can set options to have the spelling checker search for mistakes in the background.
Change Office Spelling Options
![]() Click the File tab, and then click Options.
Click the File tab, and then click Options.
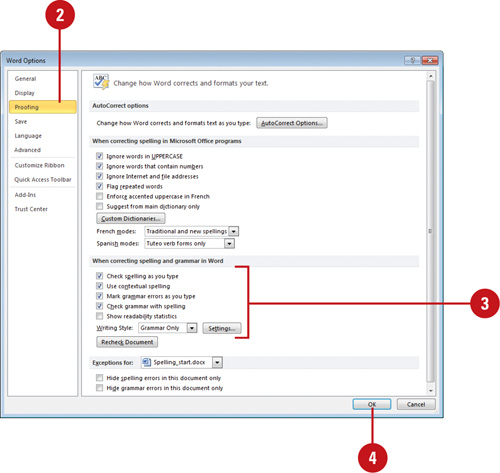
![]() In the left pane, click Proofing.
In the left pane, click Proofing.
![]() Select or clear the spelling options you want.
Select or clear the spelling options you want.
![]() Ignore words in UPPERCASE.
Ignore words in UPPERCASE.
![]() Ignore words that contain numbers.
Ignore words that contain numbers.
![]() Ignore Internet and file addresses.
Ignore Internet and file addresses.
![]() Flag repeated words.
Flag repeated words.
![]() Enforce accented uppercase in French.
Enforce accented uppercase in French.
![]() Suggest from main dictionary only. Select to exclude your custom dictionary.
Suggest from main dictionary only. Select to exclude your custom dictionary.
![]() French modes. Select an option for working with French.
French modes. Select an option for working with French.
![]() Spanish modes. Select an option for working with Spanish (New!).
Spanish modes. Select an option for working with Spanish (New!).
![]() Click OK.
Click OK.
Did You Know?
You can hide spelling or grammar errors for a specific document. Click the File tab, click Options, click Proofing, click the Exceptions For list arrow, select the file you want, select the check boxes to hide spelling or grammar error for this document only, and then click OK.

![]() Click the File tab, and then click Options.
Click the File tab, and then click Options.
![]() In the left pane, click Proofing.
In the left pane, click Proofing.
![]() Select or clear the Word spelling options you want.
Select or clear the Word spelling options you want.
![]() Check spelling as you type.
Check spelling as you type.
![]() Use contextual spelling.
Use contextual spelling.
![]() Mark grammar errors as you type.
Mark grammar errors as you type.
![]() Check grammar with spelling.
Check grammar with spelling.
![]() Show readability statistics.
Show readability statistics.
![]() Writing Style. Select to check grammar only or grammar and style.
Writing Style. Select to check grammar only or grammar and style.
![]() Click OK.
Click OK.
Change Grammar Settings
![]() Click the File tab, and then click Options.
Click the File tab, and then click Options.
![]() In the left pane, click Proofing.
In the left pane, click Proofing.
![]() Click Settings.
Click Settings.
![]() Under Require, click the list arrow, and then select the option you want: always, never, or don’t check.
Under Require, click the list arrow, and then select the option you want: always, never, or don’t check.
![]() Under Grammar, select the check boxes with the grammar and style options you want and clear the ones you don’t want.
Under Grammar, select the check boxes with the grammar and style options you want and clear the ones you don’t want.
![]() Click OK.
Click OK.
![]() Click OK.
Click OK.

Setting Languages for Proofing
When you’re working with more than one language at a time in a document, you can enable a language option to make it easier to switch between languages when typing and editing text. When you select the Detect language automatically option, Word automatically detects the language you are typing and uses the appropriate proofing tool for the language. Along with this option, you can also select the Automatically switch keyboard to match language of surround text option in the Advanced pane of the Word Options dialog box to work more efficiently with multiple languages.
Set a Language for Proofing
![]() Click the Review tab.
Click the Review tab.
![]() Click the Language button, and then click Set Proofing Language.
Click the Language button, and then click Set Proofing Language.
![]() Review the list of languages above the double line in the Mark selected text as list. Office only detects languages above the double line.
Review the list of languages above the double line in the Mark selected text as list. Office only detects languages above the double line.
![]() Quickly add a language.
Quickly add a language.
Double-click a language in the Mark selected text as list.
![]() Add/remove a language. On the Review tab, click the Language button, and then click Language Preferences.
Add/remove a language. On the Review tab, click the Language button, and then click Language Preferences.
![]() Select or clear the following check boxes:
Select or clear the following check boxes:
![]() Do not check spelling or grammar. Select to not check spelling or grammar for the languages.
Do not check spelling or grammar. Select to not check spelling or grammar for the languages.
![]() Detect language automatically.
Detect language automatically.
Select to automatically detect the language you are typing and enables the proofing tools for the language.
![]() To set a language as the default, select the language, and then click Set As Default.
To set a language as the default, select the language, and then click Set As Default.
![]() Click OK.
Click OK.

Set an Option to Automatically Switch Keyboard Language
![]() Click the File tab, and then click Options.
Click the File tab, and then click Options.
![]() In the left pane, click Advanced.
In the left pane, click Advanced.
![]() Select the Automatically switch keyboard to match language of surrounding text check box.
Select the Automatically switch keyboard to match language of surrounding text check box.
![]() If the option is not available, you need to enable a keyboard layout for a language in the Language pane of the Word Options dialog box.
If the option is not available, you need to enable a keyboard layout for a language in the Language pane of the Word Options dialog box.
![]() Click OK.
Click OK.
See Also
See “Using Multiple Languages” on page 280 for information on enabling a keyboard layout to use with Microsoft Office programs.


Translating Text to Another Language
If you need to quickly translate a word into another language, you can enable the Mini Translator (New!) that translates words when you point to them. The Mini Translator also includes a toolbar, which provides options to copy the translation to the Clipboard or play the word audibly. Before you get started, you need to choose the translation language you want to use. If you don’t get the results you want, you can also use the Research task pane to translate text. With the Research task pane, you can translate single words or short phrases into different languages by using bilingual dictionaries and incorporate it into your work. If you need to translate an entire document for basic subject matter understanding, Web-based machine translation services are available using the Translate Document command. A machine translation is helpful for general meaning, but may not preserve the full meaning of the content.
Translate Text Using the Mini Translator
![]() Click the Review tab.
Click the Review tab.
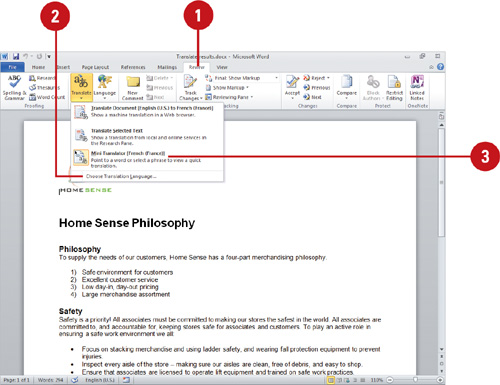
![]() Click the Translate button, click Choose Translation Language, specify a language for the Mini Translator, and then click OK.
Click the Translate button, click Choose Translation Language, specify a language for the Mini Translator, and then click OK.
![]() Click the Translate button, and then click the Mini Translator language you set for translation to highlight the icon next to the command.
Click the Translate button, and then click the Mini Translator language you set for translation to highlight the icon next to the command.
![]() Point to the word you want to display the Mini Translator with the translated word. You can also use the toolbar to perform the following options:
Point to the word you want to display the Mini Translator with the translated word. You can also use the toolbar to perform the following options:
![]() Expand. Opens the Research pane with more options.
Expand. Opens the Research pane with more options.
![]() Copy. Copies the translation to the Clipboard.
Copy. Copies the translation to the Clipboard.
![]() Play and Stop. Plays or stops the word audibly.
Play and Stop. Plays or stops the word audibly.
![]() Help. Opens Help.
Help. Opens Help.
![]() To turn off the Mini Translator, click the Translate button, and then click the Mini Translator language to clear the highlighted icon next to the command.
To turn off the Mini Translator, click the Translate button, and then click the Mini Translator language to clear the highlighted icon next to the command.

Translate Text Using the Research Pane
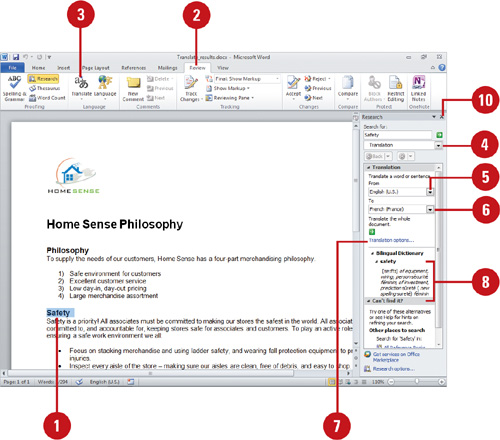
![]() Select the text you want to translate.
Select the text you want to translate.
![]() Click the Review tab.
Click the Review tab.
![]() Click the Translate button, and then click Translate Selected Text.
Click the Translate button, and then click Translate Selected Text.
If this is the first you have used translation services, click OK to install the bilingual dictionaries and enable the service.
![]() If necessary, click the list arrow, and then click Translation.
If necessary, click the list arrow, and then click Translation.
![]() Click the From list arrow, and then select the language of the selected text.
Click the From list arrow, and then select the language of the selected text.
![]() Click the To list arrow, and then select the language you want to translate into.
Click the To list arrow, and then select the language you want to translate into.
![]() To customize which resources are used for translation, click Translation options, select the look-up options you want, and then click OK.
To customize which resources are used for translation, click Translation options, select the look-up options you want, and then click OK.
![]() Right-click the translated text in the Research task pane that you want to copy, and then click Copy.
Right-click the translated text in the Research task pane that you want to copy, and then click Copy.
![]() Paste the information into your document.
Paste the information into your document.
![]() When you’re done, click the Close button on the task pane.
When you’re done, click the Close button on the task pane.
See Also
See “Using Multiple Languages” on page 280 for information on adding languages to use with Microsoft Office programs.
Using Multiple Languages
International Microsoft Office users can change the language that appears on their screens by changing the default language settings. Users around the world can enter, display, and edit text in all supported languages—including European languages, Japanese, Chinese, Korean, Hebrew, and Arabic—to name a few. You’ll probably be able to use Office programs in your native language. If the text in your document is written in more than one language, you can automatically detect languages or designate the language of selected text so the spelling checker uses the right dictionary. You can set preferences (New!) for editing, display, ScreenTip, and Help languages. If you don’t have the keyboard layout or related software installed, you can click links to add or enable them (New!).
Add a Language to Office Programs
![]() Click the File tab, click Options, and then click Language.
Click the File tab, click Options, and then click Language.
![]() You can also click Start on the taskbar, point to All Programs, click Microsoft Office, click Microsoft Office Tools, and then click Microsoft Office 2010 Language Preferences.
You can also click Start on the taskbar, point to All Programs, click Microsoft Office, click Microsoft Office Tools, and then click Microsoft Office 2010 Language Preferences.
![]() Click the Language list arrow, and then select the language you want to enable.
Click the Language list arrow, and then select the language you want to enable.
![]() Click Add.
Click Add.
![]() To enable the correct keyboard layout for the installed language, click the Not enabled link to open the Text Services and Input Language dialog box, where you can select a keyboard layout, and then click OK.
To enable the correct keyboard layout for the installed language, click the Not enabled link to open the Text Services and Input Language dialog box, where you can select a keyboard layout, and then click OK.
![]() Set the language priority order for the buttons, tabs, and Help for the Display and Help languages.
Set the language priority order for the buttons, tabs, and Help for the Display and Help languages.
![]() Set your ScreenTip language to Match Display Language or a specific language.
Set your ScreenTip language to Match Display Language or a specific language.
![]() Click OK, and then click Yes (if necessary) to quit and restart Office.
Click OK, and then click Yes (if necessary) to quit and restart Office.

Finding the Right Words
Repeating the same word in a document can reduce a message’s effectiveness. Instead, replace some words with synonyms or find antonyms. If you need help finding exactly the right words, use the shortcut menu to look up synonyms quickly or search a Thesaurus for more options. This feature can save you time and improve the quality and readability of your document. You can also install a Thesaurus for another language. Foreign language thesauruses can be accessed under Research Options on the Research task pane.
Use the Thesaurus
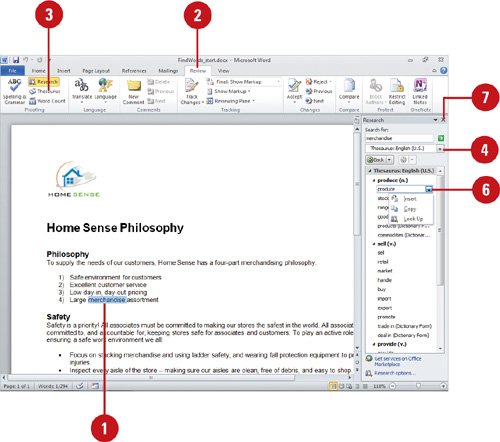
![]() Select the text you want to translate.
Select the text you want to translate.
![]() Click the Review tab.
Click the Review tab.
![]() Click the Thesaurus button.
Click the Thesaurus button.
![]() Click the list arrow, and then select a Thesaurus, if necessary.
Click the list arrow, and then select a Thesaurus, if necessary.
![]() Point to the word in the Research task pane.
Point to the word in the Research task pane.
![]() Click the list arrow, and then click one of the following:
Click the list arrow, and then click one of the following:
![]() Insert to replace the word you looked up with the new word.
Insert to replace the word you looked up with the new word.
![]() Copy to copy the new word and then paste it within the document.
Copy to copy the new word and then paste it within the document.
![]() Look Up to look up the word for other options.
Look Up to look up the word for other options.
![]() When you’re done, click the Close button on the task pane.
When you’re done, click the Close button on the task pane.
Setting Up Page Margins
Margins are the blank space between the edge of a page and the text. The default setting for Word documents is 1.25 inches on the left and right, and 1 inch on the top and bottom. You can use the mouse pointer to adjust margins visually for the entire document, or you can use the Page Setup dialog box to set precise measurements for an entire document or a specific section. When you shift between portrait and landscape page orientation, the margin settings automatically change. If you need additional margin space for binding pages into a book or binder, you can adjust the left or right gutter settings. Gutters allow for additional margin space so that all of the document text remains visible after binding. Unless this is your purpose, leave the default settings in place.
Adjust Margins Visually
![]() Click the Print Layout tab.
Click the Print Layout tab.
![]() If necessary, click the View Ruler button to display it.
If necessary, click the View Ruler button to display it.
![]() Select the text where you want to change the margins.
Select the text where you want to change the margins.
![]() Position the pointer over a margin boundary on the horizontal or vertical ruler.
Position the pointer over a margin boundary on the horizontal or vertical ruler.
![]() Press and hold Alt, and then click a margin boundary to display the measurements of the text and margin areas as you adjust the margins.
Press and hold Alt, and then click a margin boundary to display the measurements of the text and margin areas as you adjust the margins.
![]() Drag the left, right, top, or bottom margin boundary to a new position.
Drag the left, right, top, or bottom margin boundary to a new position.
Did You Know?
You can preset gutter measurements.
To set the gutters for normal binding, display the Margins tab in the Page Setup dialog box, click the Multiple Pages list arrow, and then click Book Fold.

Select Standard Margins Quickly
![]() Click the Print Layout tab.
Click the Print Layout tab.
![]() Click the Margins button, and then click the margin setting you want:
Click the Margins button, and then click the margin setting you want:
![]() Last Custom Setting.
Last Custom Setting.
![]() Normal.
Normal.
![]() Narrow.
Narrow.
![]() Moderate.
Moderate.
![]() Wide.
Wide.
![]() Mirrored.
Mirrored.
![]() Office 2003 Default.
Office 2003 Default.

Create Custom Margins Using Page Setup
![]() Click the Print Layout tab.
Click the Print Layout tab.
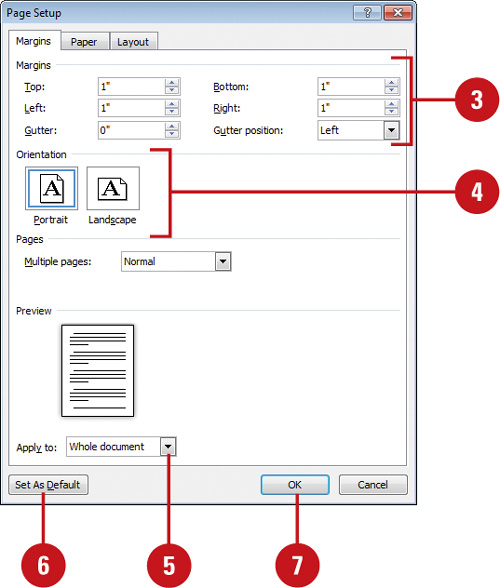
![]() Click the Margins button, and then click Custom Margins.
Click the Margins button, and then click Custom Margins.
The Page Setup dialog box opens, displaying the Margins tab.
![]() Type new margin measurements (in inches) in the Top, Bottom, Left, or Right boxes, and Gutter boxes.
Type new margin measurements (in inches) in the Top, Bottom, Left, or Right boxes, and Gutter boxes.
![]() Click the page orientation you want.
Click the page orientation you want.
![]() Click the Apply to list arrow, and then click Selected Text, This Point Forward, or Whole Document.
Click the Apply to list arrow, and then click Selected Text, This Point Forward, or Whole Document.
![]() To make the new margin settings the default for all new Word documents, click Set As Default, and then click Yes.
To make the new margin settings the default for all new Word documents, click Set As Default, and then click Yes.
![]() Click OK.
Click OK.
Adjusting Paper Settings
Every document you produce and print might need a different page setup. You can achieve the look you want by printing on a standard paper size (such as letter, legal, or envelope), international standard paper sizes, or any custom size that your printer accepts. The default setting is 8.5 x 11 inches, the most common letter and copy size. You can also print several pages on one sheet. If you want to create a custom paper size, you can input custom settings for special print jobs on odd-sized paper.
Set the Paper Size
![]() Click the Page Layout tab.
Click the Page Layout tab.
![]() Click the Page Setup Dialog Box Launcher.
Click the Page Setup Dialog Box Launcher.
![]() Click the Paper tab.
Click the Paper tab.
![]() Click the Paper size list arrow, and then select the paper size you want, or specify a custom size.
Click the Paper size list arrow, and then select the paper size you want, or specify a custom size.
![]() Select the paper source for the first page and other pages.
Select the paper source for the first page and other pages.
![]() Click the Apply to list arrow, and then click This section, This point forward, or Whole document.
Click the Apply to list arrow, and then click This section, This point forward, or Whole document.
![]() Verify your selections in the Preview box.
Verify your selections in the Preview box.
![]() To make your changes the default settings for all new documents, click Set As Default, and then click Yes.
To make your changes the default settings for all new documents, click Set As Default, and then click Yes.
![]() Click OK.
Click OK.
Did You Know?
You can improve printing speed. If printing is slow, you can turn off background printing to speed up the process. In the Page Setup dialog box on the Paper tab, click Print Options, click Advanced in the left pane, clear the Print In Background check box, and then click OK.

Controlling the Way Pages Break
When you’re creating a document, sometimes a line of text, known as a widow or orphan, in a paragraph doesn’t fit on a page and looks out of place on the next page. A widow is the last line of a paragraph printed by itself at the top of a page. An orphan is the first line of a paragraph printed by it self at the bottom of a page. You can use the Widow/Orphan Control option to automatically correct the problem. If a widow or orphan occurs, Word adjusts the paragraph to make sure at least two lines appear together on the next page. When two paragraphs need to remain grouped to maintain their impact, regardless of where the normal page break would have occurred, you can keep paragraphs together on a page or in a column. If you need to start a paragraph at the top of a page, you can automatically generate a page break before a paragraph.
Control Pagination
![]() Select the paragraph in which you want to control.
Select the paragraph in which you want to control.
![]() Click the Page Layout tab.
Click the Page Layout tab.
![]() Click the Paragraph Dialog Box Launcher.
Click the Paragraph Dialog Box Launcher.
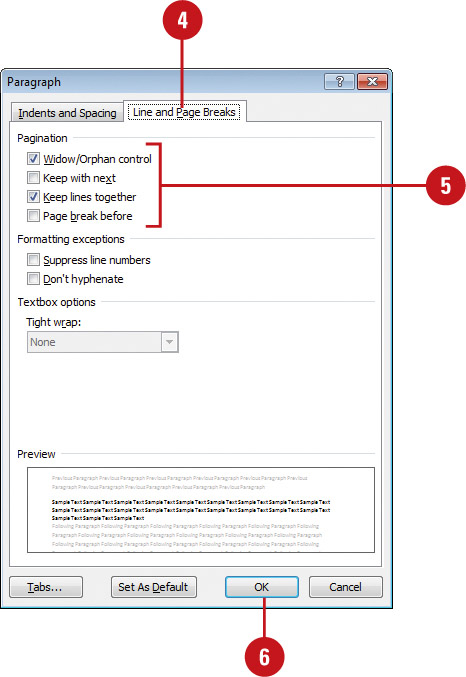
![]() Click the Line and Page Breaks tab.
Click the Line and Page Breaks tab.
![]() Choose an option:
Choose an option:
![]() Select the Widow/Orphan control check box to avoid paragraphs ending with a single word on a line or a single line at the top of a page.
Select the Widow/Orphan control check box to avoid paragraphs ending with a single word on a line or a single line at the top of a page.
![]() Select the Keep with next check box to group paragraphs together.
Select the Keep with next check box to group paragraphs together.
![]() Select the Keep lines together check box to keep paragraph lines together.
Select the Keep lines together check box to keep paragraph lines together.
![]() Select the Page break before check box to precede a paragraph with a page break.
Select the Page break before check box to precede a paragraph with a page break.
![]() Click OK.
Click OK.
Inserting New Pages and Sections
When you fill a page, Word inserts a page break and starts a new page. As you add or delete text, this soft page break moves. A soft page break appears as a dotted gray line in Normal view. To start a new page before the current one is filled, insert a hard page break that doesn’t shift as you edit text. A hard page break appears as a dotted gray line with the text Page Break centered in Normal view. A section is a mini-document within a document that stores margin settings, page orientation, page numbering, and so on. In Page Layout view, you can show or hide the white space on the top and bottom of each page and the gray space between pages.
Insert and Delete a Hard Page Break
![]() Click where you want to insert a hard page break.
Click where you want to insert a hard page break.
![]() Use one of the following:
Use one of the following:
![]() Page Break. Click the Insert tab, and then click the Page Break button.
Page Break. Click the Insert tab, and then click the Page Break button.
![]() Blank Page. Click the Insert tab, and then click the Blank Page button.
Blank Page. Click the Insert tab, and then click the Blank Page button.
![]() Page or Section Break. Click the Page Layout button, click Page Break, and then click the page break option you want.
Page or Section Break. Click the Page Layout button, click Page Break, and then click the page break option you want.
TIMESAVER Press Ctrl+Enter to insert a page break.
![]() To delete a page break, click the page break in Print Layout view, and then press the Delete key. To move a page break, drag it to a new location.
To delete a page break, click the page break in Print Layout view, and then press the Delete key. To move a page break, drag it to a new location.
Did You Know?
You can opt to start a new line, but not a new paragraph. Insert a text wrapping break to force text to the next line in the same paragraph—the perfect tool to make a phrase fall on one line. Press Shift+Enter where you want to insert a text wrapping break.

Insert and Delete a Section Break
![]() Click where you want to insert a section break.
Click where you want to insert a section break.
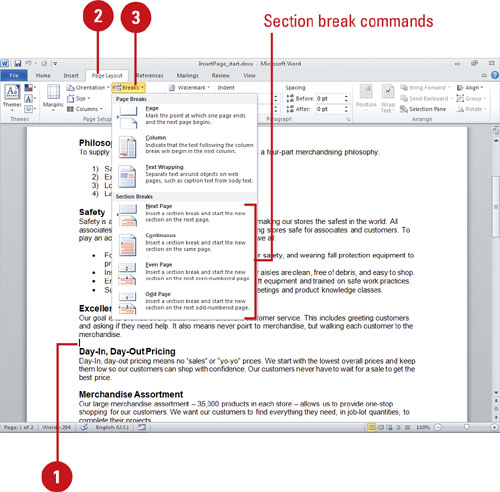
![]() Click the Page Layout tab.
Click the Page Layout tab.
![]() Click Page Break button, and then select the type of section break you want.
Click Page Break button, and then select the type of section break you want.
![]() Next Page. Starts the section on a new page.
Next Page. Starts the section on a new page.
![]() Continuous. Starts the section wherever the point is located.
Continuous. Starts the section wherever the point is located.
![]() Even Page. Starts the section on the next even-numbered page.
Even Page. Starts the section on the next even-numbered page.
![]() Odd Page. Starts the section on the next odd-numbered page.
Odd Page. Starts the section on the next odd-numbered page.
![]() To delete a section break, click the section break in Print Layout view, and then press Delete.
To delete a section break, click the section break in Print Layout view, and then press Delete.
Show or Hide White Space Between Pages
![]() Click the Print Layout View button.
Click the Print Layout View button.
![]() Scroll to the bottom of a page, and then point to the gap between two pages. (The Hide White Space cursor or Show White Space cursor appears.)
Scroll to the bottom of a page, and then point to the gap between two pages. (The Hide White Space cursor or Show White Space cursor appears.)
![]() Click the gap between the pages to show or hide the white space.
Click the gap between the pages to show or hide the white space.

Previewing a Document
Before printing, you should verify that the page looks the way you want. You save time, money, and paper by avoiding duplicate printing. Print Preview shows you the exact placement of your data on each printed page. You can view all or part of your document as it will appear when you print it. Print Preview shows you the pages based on the properties of the selected printer. For example, if the selected printer is setup to print color, Print Preview displays in color. The Print screen (New!) on the File tab makes it easy to zoom in and out to view a document more comfortably, switch between pages, preview page breaks, set print options, and print all from the same place.
Preview a Document
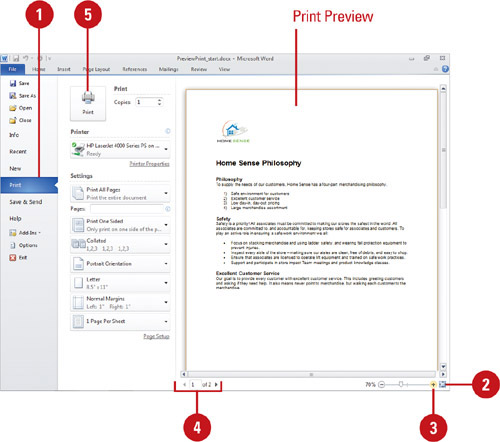
![]() Click the File tab, and then click Print.
Click the File tab, and then click Print.
![]() Click the Zoom to Page button to toggle the zoom in and out to the page.
Click the Zoom to Page button to toggle the zoom in and out to the page.
![]() To adjust the zoom, drag the Zoom slider or click the Zoom In or Zoom Out buttons.
To adjust the zoom, drag the Zoom slider or click the Zoom In or Zoom Out buttons.
![]() To switch pages, click the Next Page or Previous Page button, or enter a specific page in the Current Page box.
To switch pages, click the Next Page or Previous Page button, or enter a specific page in the Current Page box.
![]() If you want to print, click the Print button.
If you want to print, click the Print button.
Printing a Document
When you’re ready to print your document, you can choose several printing options on the Print screen (New!) on the File tab, such as choosing a new printer, selecting the number of pages in the document you want printed and the number of copies, specifying the page size, margins, and orientation, and selecting any scaling or pages to fit on a printed page. You can also use the Page Setup dialog box to control the appearance of pages, such as margins, orientation, paper size and source and the layout of sections, headers and footers, and page alignment. You can quickly print a copy of your document without using the Print screen by clicking the Quick Print button on the Quick Access Toolbar.
Print All or Part of a Document
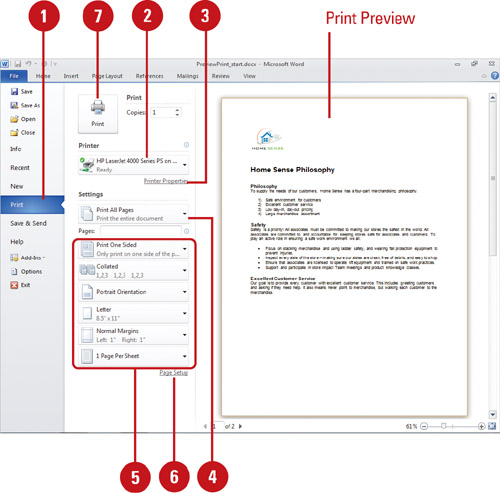
![]() Click the File tab, and then click Print.
Click the File tab, and then click Print.
TIMESAVER To print without the Print screen, press Ctrl+P, or click the Quick Print button on the Quick Access Toolbar.
![]() Click the Printer list arrow, and then click the printer you want to use.
Click the Printer list arrow, and then click the printer you want to use.
![]() To change printer properties, click the Printer Properties link, select the options you want, and then click OK.
To change printer properties, click the Printer Properties link, select the options you want, and then click OK.
![]() Select whether you want to print the entire document or only the pages you specify.
Select whether you want to print the entire document or only the pages you specify.
![]() Select the other print options you want to use, such as sides to print, collated, orientation, size, margins, or pages per sheet.
Select the other print options you want to use, such as sides to print, collated, orientation, size, margins, or pages per sheet.
![]() To change page options, click the Page Setup link, select the options you want, and then click OK.
To change page options, click the Page Setup link, select the options you want, and then click OK.
![]() Click Print.
Click Print.
Printing Specialized Documents
Two-sided printing is appropriate for bound reports, pamphlets, brochures and many other types of Word documents. Not all printers support automatic two-sided printing. If your printer does not support two-sided printing, you can use the Manually Print on Both Sides option on the Print screen to help you complete the process. In addition to printing two-side documents, you can also print multiple pages on a page, which is useful for creating handouts for a presentation.
Print a Two-Sided Document
![]() Click the File tab, and then click Print.
Click the File tab, and then click Print.
![]() If necessary, click the Printer list arrow, and then click the printer you want to use.
If necessary, click the Printer list arrow, and then click the printer you want to use.
![]() Select an option for printing on both sides:
Select an option for printing on both sides:
![]() Print on Both Sides (Long edge). Prints on both sides where pages flip on the long edge.
Print on Both Sides (Long edge). Prints on both sides where pages flip on the long edge.
![]() Print on Both Sides (Short edge). Prints on both sides where pages flip on the short edge.
Print on Both Sides (Short edge). Prints on both sides where pages flip on the short edge.
![]() Manually Print on Both Sides. The first side of each alternate page will be printed. Then you will be prompted to reinsert the pages into the printer so that the second side can be printed.
Manually Print on Both Sides. The first side of each alternate page will be printed. Then you will be prompted to reinsert the pages into the printer so that the second side can be printed.
![]() Select the other print options you want to use.
Select the other print options you want to use.
![]() Click Print.
Click Print.

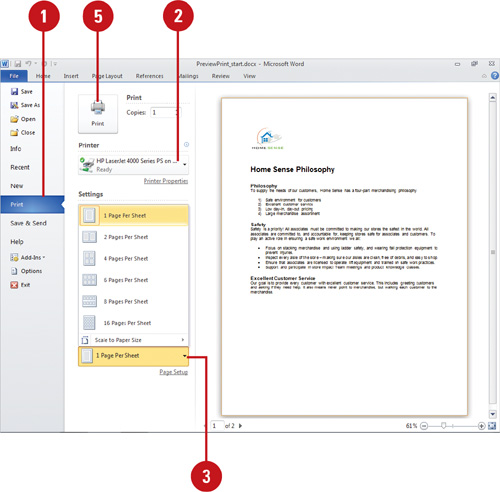
Print Multiple Pages Per Sheet
![]() Click the File tab, and then click Print.
Click the File tab, and then click Print.
![]() If necessary, click the Printer list arrow, and then click the printer you want to use.
If necessary, click the Printer list arrow, and then click the printer you want to use.
![]() Select an option for printing multiple pages per sheet:
Select an option for printing multiple pages per sheet:
![]() 1 Page Per Sheet.
1 Page Per Sheet.
![]() 2 Page Per Sheet.
2 Page Per Sheet.
![]() 4 Page Per Sheet.
4 Page Per Sheet.
![]() 6 Page Per Sheet.
6 Page Per Sheet.
![]() 8 Page Per Sheet.
8 Page Per Sheet.
![]() 16 Page Per Sheet.
16 Page Per Sheet.
![]() Scale to Paper Size. Select a paper size for the scaling of the document pages per sheet.
Scale to Paper Size. Select a paper size for the scaling of the document pages per sheet.
![]() Select the other print options you want to use.
Select the other print options you want to use.
![]() Click Print.
Click Print.
Printing Document Properties
In addition to printing the actual document, you can also print other aspects of a document, such as document properties, document markup, styles, AutoText entries, or shortcut key assignments. If you’re working with others who have made a lot of changes to your document, you can use the Print screen on the File tab to select options to print a table of document properties or a list of markup, styles, or AutoText entries. If you want a list of keyboard shortcuts available in Word, you can select the Key assignments options to print out a list.
Print Document Properties
![]() Click the File tab, and then click Print.
Click the File tab, and then click Print.
![]() If necessary, click the Printer list arrow, and then click the printer you want to use.
If necessary, click the Printer list arrow, and then click the printer you want to use.
![]() Select what you want to print under Document Properties:
Select what you want to print under Document Properties:
![]() Document properties. Prints a table of properties and values.
Document properties. Prints a table of properties and values.
![]() List of markup. Prints a list of markup only from the document.
List of markup. Prints a list of markup only from the document.
![]() Styles. Prints a list of styles used in the document.
Styles. Prints a list of styles used in the document.
![]() AutoText Entries. Prints a list of AutoText available.
AutoText Entries. Prints a list of AutoText available.
![]() Key assignment. Prints a list of customized shortcut keys.
Key assignment. Prints a list of customized shortcut keys.
![]() Print Markup. Prints the document with the markup.
Print Markup. Prints the document with the markup.
![]() Select the other print options you want to use.
Select the other print options you want to use.
![]() Click Print.
Click Print.
