16. Customizing Word
What You’ll Do
Change Default Text and Page Settings
Change Advanced Document Properties
Access Commands Not in the Ribbon
Introduction
Once you’ve become familiar with Microsoft Word and all its features, you might want to customize the way you work with Word. You can change your view settings so that your Word window looks the way you want it to. Word comes with set defaults—such as showing the vertical ruler, or how many files you’ve recently opened—which you can change to suit your needs.
Some of the other Word customization features allow you to set a default font and related attributes to use when you are typing text in text boxes. Other defaults might be the color or line style of a shape object that you create. You can change the location of the Ribbon and the configuration of the Quick Access Toolbar to include commands not available on the Ribbon.
When you need to manage all the pictures on your computer, Microsoft Office Picture gives you a flexible way to organize, edit, and share your pictures. With Picture Manager, you can view all the pictures on your computer no matter where you store them. If you need to edit a picture, you can use Picture Manager to remove red eye and to change brightness, contrast, and color. You can also crop, rotate and flip, resize, and compress a picture.
Setting General Options
You can customize the performance of many Word features including its editing, saving, spelling, viewing, printing and security procedures. Each person uses Word in a different way. Word Options allows you to change general options to personalize what appears in the Word window. When you change these options, Word uses them for all subsequent Word sessions until you change them again.
Change General Options
![]() Click the File tab, and then click Options.
Click the File tab, and then click Options.
![]() In the left pane, click General.
In the left pane, click General.
![]() Select the Top options for working with Word you want:
Select the Top options for working with Word you want:
![]() Show Mini Toolbar on Selection. Select to show a miniature semi-transparent toolbar that helps you work with selected text.
Show Mini Toolbar on Selection. Select to show a miniature semi-transparent toolbar that helps you work with selected text.
![]() Enable Live Preview. Select to show preview changes in a document.
Enable Live Preview. Select to show preview changes in a document.
![]() Color Scheme. Click the list arrow to select a Windows related color scheme.
Color Scheme. Click the list arrow to select a Windows related color scheme.
![]() ScreenTip style. Click the list arrow to select a screentip option: Show enhanced ScreenTips, Don’t show enhanced ScreenTips, or Don’t show ScreenTips.
ScreenTip style. Click the list arrow to select a screentip option: Show enhanced ScreenTips, Don’t show enhanced ScreenTips, or Don’t show ScreenTips.
![]() Type your name and initials as you want them to appear in Properties, and review comments.
Type your name and initials as you want them to appear in Properties, and review comments.
![]() Select the Open e-mail attachments in Full Screen Reading view check box to use Full Screen Reading view or clear to use Print Layout view.
Select the Open e-mail attachments in Full Screen Reading view check box to use Full Screen Reading view or clear to use Print Layout view.
![]() Click OK.
Click OK.

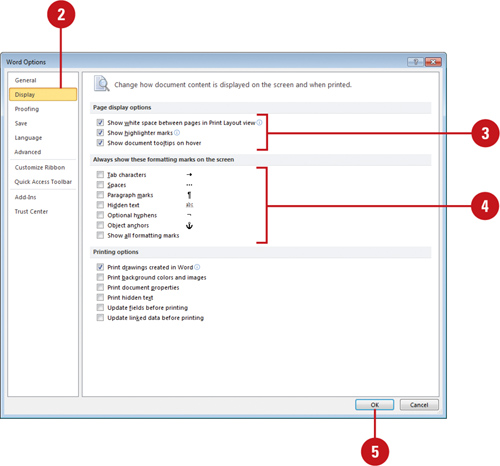
Setting Page Display Options
Sometimes it’s hard to determine whether a blank is a tab or space. You can set options on the Display pane in Word Options to show or hide formatting marks. Formatting marks help you see characters that are not visible, such as tabs, spaces, paragraph marks, and hidden text. You can also set page display that show white space between pages in Print Layout view, show highlighted text on the screen and in print, or show tooltip information when you point to a hyperlink or reviewer’s comment.
Change Page Display Options
![]() Click the File tab, and then click Options.
Click the File tab, and then click Options.
![]() In the left pane, click Display.
In the left pane, click Display.
![]() Select or clear any of the check boxes to change the display options you want.
Select or clear any of the check boxes to change the display options you want.
![]() Show white space between pages in Print Layout view. Select to display top and bottom margins. (Default on).
Show white space between pages in Print Layout view. Select to display top and bottom margins. (Default on).
![]() Show highlighter marks. Select to display highlighted text on the screen and in print. (Default on).
Show highlighter marks. Select to display highlighted text on the screen and in print. (Default on).
![]() Show document tooltips on hover. Select to display information when you point to a hyperlink or reviewer’s comment. (Default on).
Show document tooltips on hover. Select to display information when you point to a hyperlink or reviewer’s comment. (Default on).
![]() Select or clear any of the check boxes to display or hide the formatting marks you want.
Select or clear any of the check boxes to display or hide the formatting marks you want.
![]() Tab characters, Spaces Paragraph marks, Hidden text, Optional hyphens, or Object anchors. (Default off).
Tab characters, Spaces Paragraph marks, Hidden text, Optional hyphens, or Object anchors. (Default off).
![]() Show all formatting marks. (Default off).
Show all formatting marks. (Default off).
![]() Click OK
Click OK
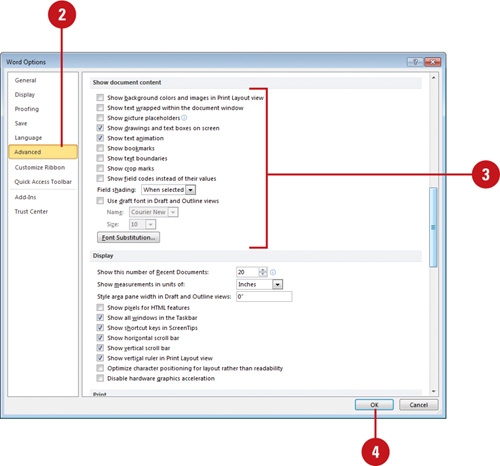
Setting Display Options
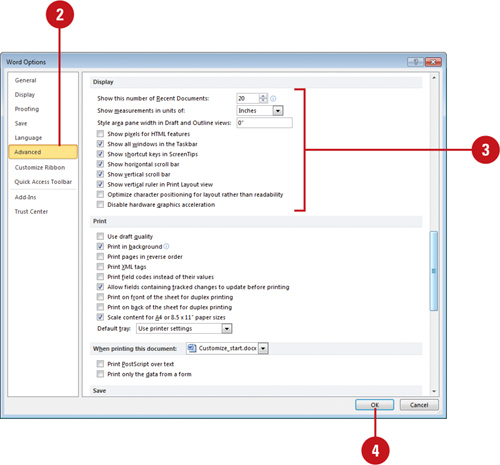
Word uses unique characters and formatting to display specialized document elements, such as bookmarks, crop marks, text boundaries and wrapping, and background colors and images. You can set options on the Advanced pane in Word Options to show or hide these elements when you work on a document. In addition, you can also show or hide Word window elements, such as scroll bars, shortcut keys, and the vertical ruler. If you want to change the number of recent documents shown on the File tab or the units of measurement used in a document, you can set the options on the Advanced pane.
Change Display View Options
![]() Click the File tab, and then click Options.
Click the File tab, and then click Options.
![]() In the left pane, click Advanced.
In the left pane, click Advanced.
![]() Select or clear any of the check boxes to change the display view options you want.
Select or clear any of the check boxes to change the display view options you want.
![]() Show background colors and images in Print Layout view. (Default off).
Show background colors and images in Print Layout view. (Default off).
![]() Show text wrapped within the document window. (Default off).
Show text wrapped within the document window. (Default off).
![]() Show picture placeholders. Shows empty boxes; speeds up the display. (Default off).
Show picture placeholders. Shows empty boxes; speeds up the display. (Default off).
![]() Show drawings and text boxes on screen. (Default on).
Show drawings and text boxes on screen. (Default on).
![]() Show text animation. (Default on).
Show text animation. (Default on).
![]() Show bookmarks. (Default on).
Show bookmarks. (Default on).
![]() Show text boundaries. Shows dotted lines. (Default on).
Show text boundaries. Shows dotted lines. (Default on).
![]() Show crop marks. Shows corner of margins. (Default off).
Show crop marks. Shows corner of margins. (Default off).
![]() Show field codes instead of their values. (Default off).
Show field codes instead of their values. (Default off).
![]() Use draft font in Draft and Outline views. (Default off).
Use draft font in Draft and Outline views. (Default off).
![]() Click OK.
Click OK.
![]() Click the File tab, and then click Options.
Click the File tab, and then click Options.
![]() In the left pane, click Advanced.
In the left pane, click Advanced.
![]() Select or clear any of the check boxes to change the display options you want.
Select or clear any of the check boxes to change the display options you want.
![]() Show this number of Recent Documents. Set to 0 to turn off the recent documents display.
Show this number of Recent Documents. Set to 0 to turn off the recent documents display.
![]() Show measurements in units of. Set ruler units. (Default is Inches).
Show measurements in units of. Set ruler units. (Default is Inches).
![]() Style area pane width in Draft and Outline views. Set the pane width. (Default is 0”).
Style area pane width in Draft and Outline views. Set the pane width. (Default is 0”).
![]() Show pixels for HTML features. Uses pixels as the unit of measurement for HTML features. (Default on).
Show pixels for HTML features. Uses pixels as the unit of measurement for HTML features. (Default on).
![]() Show all windows in the Taskbar. Select to show each document window on the taskbar. (Default on).
Show all windows in the Taskbar. Select to show each document window on the taskbar. (Default on).
![]() Show shortcut keys in ScreenTips. (Default on).
Show shortcut keys in ScreenTips. (Default on).
![]() Show horizontal scroll bar. (Default on).
Show horizontal scroll bar. (Default on).
![]() Show vertical scroll bar. (Default on).
Show vertical scroll bar. (Default on).
![]() Show vertical ruler in Print Layout view. (Default on).
Show vertical ruler in Print Layout view. (Default on).
![]() Optimize character positioning for layout rather than readability. Select to optimize for printing. (Default off)
Optimize character positioning for layout rather than readability. Select to optimize for printing. (Default off)
![]() Disable hardware graphics acceleration (New!). Select to disable hardware graphics acceleration. (Default off)
Disable hardware graphics acceleration (New!). Select to disable hardware graphics acceleration. (Default off)
![]() Click OK.
Click OK.
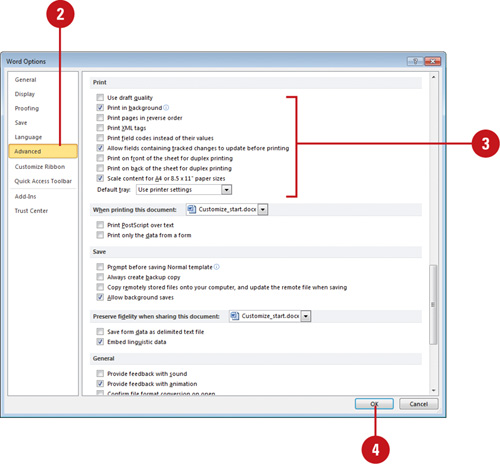
Setting Print Options
If your document contains a lot of graphics, colors, and drawings, it could slow down the printing process. While you’re working on the document, you can turn off options to speed up the printing process. When you’re ready to print the final version, you can turn the options back on. If you have marked text in the document as hidden, you can turn on the Print hidden text option to print it. You can also set options to print on both sides of a page (known as duplex printing) and select the default paper tray you like to use.
Change Print Display Options
![]() Click the File tab, and then click Options.
Click the File tab, and then click Options.
![]() In the left pane, click Display.
In the left pane, click Display.
![]() Select or clear any of the check boxes to change the print display options you want.
Select or clear any of the check boxes to change the print display options you want.
![]() Print drawings created in Word. Clear to speed up the process. (Default on).
Print drawings created in Word. Clear to speed up the process. (Default on).
![]() Print background colors and images. Clear to speed up the process. (Default off).
Print background colors and images. Clear to speed up the process. (Default off).
![]() Print document properties. Select to print document summary information. (Default off).
Print document properties. Select to print document summary information. (Default off).
![]() Print hidden text. Select to print text marked as hidden without the dotted lines. (Default off).
Print hidden text. Select to print text marked as hidden without the dotted lines. (Default off).
![]() Update fields before printing. (Default off).
Update fields before printing. (Default off).
![]() Update linked data before printing. (Default on).
Update linked data before printing. (Default on).
![]() Click OK.
Click OK.

![]() Click the File tab, and then click Options.
Click the File tab, and then click Options.
![]() In the left pane, click Advanced.
In the left pane, click Advanced.
![]() Select or clear any of the check boxes to change the print options you want.
Select or clear any of the check boxes to change the print options you want.
![]() Use draft quality. Select for documents with minimal formatting. (Default on).
Use draft quality. Select for documents with minimal formatting. (Default on).
![]() Print in background. Set to print while you continue to work. (Default on).
Print in background. Set to print while you continue to work. (Default on).
![]() Print pages in reverse order. (Default off).
Print pages in reverse order. (Default off).
![]() Print XML tags. Select when a Schema is attached to the document. (Default off).
Print XML tags. Select when a Schema is attached to the document. (Default off).
![]() Print field codes instead of their values. (Default off).
Print field codes instead of their values. (Default off).
![]() Print on front of the sheet for duplex printing. Prints in reverse order, so you can flip and print on the back. (Default off).
Print on front of the sheet for duplex printing. Prints in reverse order, so you can flip and print on the back. (Default off).
![]() Print on back of the sheet for duplex printing. Prints in ascending order so you can print on the front in reverse order. (Default off).
Print on back of the sheet for duplex printing. Prints in ascending order so you can print on the front in reverse order. (Default off).
![]() Scale content for A4 or 8.5 x 11” paper sizes. (Default on).
Scale content for A4 or 8.5 x 11” paper sizes. (Default on).
![]() Default tray. Select the printer tray you want. (Default is Use printer settings).
Default tray. Select the printer tray you want. (Default is Use printer settings).
![]() Click OK.
Click OK.
Setting Editing Options
If you spend a lot of time modifying documents, you can set editing options in Word to customize the way you work. You can set options to automatically select entire words, use smart paragraph selection (includes the paragraph mark), allow text to be dragged and dropped, and identify formatting inconsistencies, keep track of formatting, and show AutoComplete suggestions (New!). You can also set cutting, copying, and pasting options to specify formatting preferences when you paste text and graphics.
Change Editing Options
![]() Click the File tab, and then click Options.
Click the File tab, and then click Options.
![]() In the left pane, click Advanced.
In the left pane, click Advanced.
![]() Select or clear any of the check boxes to change the options you want, some options include:
Select or clear any of the check boxes to change the options you want, some options include:
![]() Typing replaces selected text. (Default on).
Typing replaces selected text. (Default on).
![]() When selecting, automatically select entire word. (Default on).
When selecting, automatically select entire word. (Default on).
![]() Allow text to be dragged and dropped. (Default on).
Allow text to be dragged and dropped. (Default on).
![]() Use CTRL+ Click to follow hyperlink. (Default on).
Use CTRL+ Click to follow hyperlink. (Default on).
![]() Automatically create drawing canvas when inserting AutoShapes. (Default off).
Automatically create drawing canvas when inserting AutoShapes. (Default off).
![]() Use smart paragraph selection.(Default on).
Use smart paragraph selection.(Default on).
![]() Use smart cursoring. (Default on).
Use smart cursoring. (Default on).
![]() Use the Insert key to control overtype mode. (Default off).
Use the Insert key to control overtype mode. (Default off).
![]() Prompt to update style. (Default off).
Prompt to update style. (Default off).
![]() Use Normal style for bulleted or numbered lists. (Default off).
Use Normal style for bulleted or numbered lists. (Default off).
![]() Enable click and type. Select a default paragraph style. (Default on and Normal).
Enable click and type. Select a default paragraph style. (Default on and Normal).
![]() Show AutoComplete suggestions (New !). (Default on).
Show AutoComplete suggestions (New !). (Default on).
![]() Click OK.
Click OK.

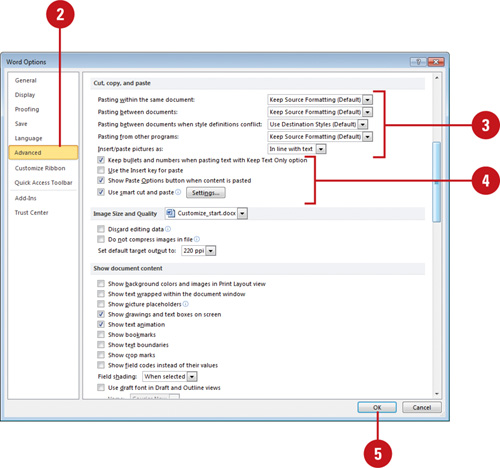
Change Cut, Copy, and Paste Options
![]() Click the File tab, and then click Options.
Click the File tab, and then click Options.
![]() In the left pane, click Advanced.
In the left pane, click Advanced.
![]() Click the list arrow next to any of the following, and then select the option you want:
Click the list arrow next to any of the following, and then select the option you want:
![]() Pasting within the same document. (Default: Keep Source Formatting).
Pasting within the same document. (Default: Keep Source Formatting).
![]() Pasting between documents. (Default: Keep Source Formatting).
Pasting between documents. (Default: Keep Source Formatting).
![]() Pasting between documents when style definitions conflict. (Default: Use Destination Styles).
Pasting between documents when style definitions conflict. (Default: Use Destination Styles).
![]() Pasting from other programs. (Default: Keep Source Formatting).
Pasting from other programs. (Default: Keep Source Formatting).
![]() Insert/paste pictures as. (Default: In line with text).
Insert/paste pictures as. (Default: In line with text).
![]() Select or clear any of the check boxes to change the options you want, some options include:
Select or clear any of the check boxes to change the options you want, some options include:
![]() Keep bullets and numbers when pasting text with Keep Text Only option. (Default on).
Keep bullets and numbers when pasting text with Keep Text Only option. (Default on).
![]() Use the Insert Key for paste. (Default off).
Use the Insert Key for paste. (Default off).
![]() Show Paste Options button when content is pasted. (Default on).
Show Paste Options button when content is pasted. (Default on).
![]() Use smart cut and paste. (Default on).
Use smart cut and paste. (Default on).
![]() Click OK.
Click OK.
Changing Default Text and Page Settings
When you type text in a document, Word applies a set of default text font and paragraph attributes. Some examples of Word’s font default settings include font style, size, and formatting options, such as bold, italic, and underline. You can also include text effects (New!), such as text fill, outline, style, shadow, reflection, glow and soft edges, and 3-D. Some paragraph examples include alignment, indents, and spacing. You might find that having your own personalized font style and color, indent, and spacing settings would really make your documents more custom. In the same way, you can also set default page options—such as margins, paper sizes, and layout—for a new document. To find out the current default settings for your document, you can open a new document, and then type some text.
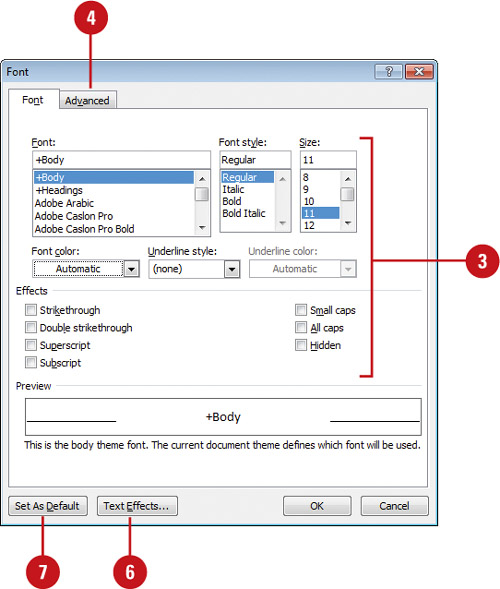
Change Default Text and Character Spacing
![]() Click the Home tab.
Click the Home tab.
![]() Click the Font Dialog Box Launcher.
Click the Font Dialog Box Launcher.
![]() Change the font options to what you want to be the default.
Change the font options to what you want to be the default.
![]() Click the Advanced tab.
Click the Advanced tab.
![]() Change the character spacing options and OpenType Features to what you want to be the default.
Change the character spacing options and OpenType Features to what you want to be the default.
![]() To specify text effects (New!), click Text Effects, set the options you want, and then click Close.
To specify text effects (New!), click Text Effects, set the options you want, and then click Close.
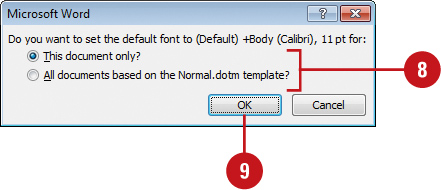
![]() Click Set As Default.
Click Set As Default.
![]() Click the This document only? or All documents based on the Normal.dotm template? option.
Click the This document only? or All documents based on the Normal.dotm template? option.
![]() Click OK.
Click OK.
![]() Click the Home tab.
Click the Home tab.
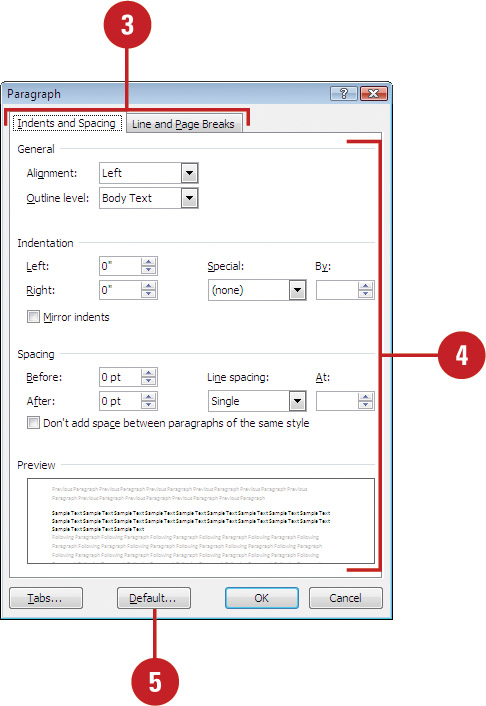
![]() Click the Paragraph Dialog Box Launcher.
Click the Paragraph Dialog Box Launcher.
![]() Click the Indents and Spacing or Line and Page Breaks tab.
Click the Indents and Spacing or Line and Page Breaks tab.
![]() Change the paragraph options to what you want to be the default.
Change the paragraph options to what you want to be the default.
![]() Click Default.
Click Default.
![]() Click the This document only? or All documents based on the Normal.dotm template? option, and then click OK.
Click the This document only? or All documents based on the Normal.dotm template? option, and then click OK.
Change Default Page Setup
![]() Click the Page Layout tab.
Click the Page Layout tab.
![]() Click the Page Setup Dialog Box Launcher.
Click the Page Setup Dialog Box Launcher.
![]() Click the Margins, Paper, or Layout tab.
Click the Margins, Paper, or Layout tab.
![]() Change the margin, paper, and layout options to what you want to be the default.
Change the margin, paper, and layout options to what you want to be the default.
![]() Click Default, and then click Yes.
Click Default, and then click Yes.

Setting Advanced Save Options
In addition to the standard save options on the Save pane in Word Options, you can also set more advanced save options that allow you to automatically create a backup copy of a document, save form data, and update remotely stored files. If you are using nonstandard fonts to create a document, you can embed the fonts you use so they “travel” (are saved) with your document, Then, if the computer you use to show or print the document does not have all your document fonts installed, the embedded fonts appear in the document and your document quality will not suffer. When you embed fonts, the size of your document increases.
Change Advanced Save Options
![]() Click the File tab, and then click Options.
Click the File tab, and then click Options.
![]() In the left pane, click Advanced.
In the left pane, click Advanced.
![]() Select the save options you want:
Select the save options you want:
![]() Prompt before saving Normal template. (Default off).
Prompt before saving Normal template. (Default off).
![]() Always create backup copy. (Default off).
Always create backup copy. (Default off).
![]() Copy remotely stored files onto your computer, and update the remote file when saving. (Default off).
Copy remotely stored files onto your computer, and update the remote file when saving. (Default off).
![]() Allow background saves. (Default on).
Allow background saves. (Default on).
![]() Click the Preserve fidelity when sharing this document list arrow, and then select the document you want to specify options.
Click the Preserve fidelity when sharing this document list arrow, and then select the document you want to specify options.
![]() Select the save options you want:
Select the save options you want:
![]() Save form data as delimited text file. (Default off).
Save form data as delimited text file. (Default off).
![]() Click OK.
Click OK.

![]() Click the File tab, and then click Options.
Click the File tab, and then click Options.
![]() In the left pane, click Save.
In the left pane, click Save.
![]() Click the Preserve fidelity when sharing this document list arrow, and then select the document you want to specify options.
Click the Preserve fidelity when sharing this document list arrow, and then select the document you want to specify options.
![]() Select the document embedding options you want:
Select the document embedding options you want:
![]() Embed fonts in the file. Select to save fonts in a document file. (Default off).
Embed fonts in the file. Select to save fonts in a document file. (Default off).
![]() Embed only the characters used in the document. Select to save only the fonts you actually use in a document. (Default off).
Embed only the characters used in the document. Select to save only the fonts you actually use in a document. (Default off).
![]() Do not embed common system fonts. Select to reduce file size when you use Windows and Office fonts. (Default off).
Do not embed common system fonts. Select to reduce file size when you use Windows and Office fonts. (Default off).
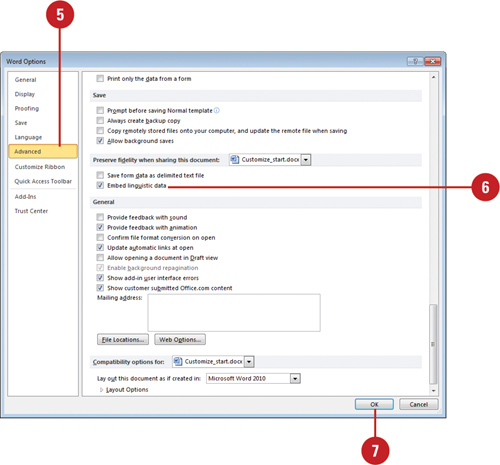
![]() In the left pane, click Advanced.
In the left pane, click Advanced.
![]() Select the document embedding options you want:
Select the document embedding options you want:
![]() Embed linguistic data. Select to save speech and handwritten text. (Default on).
Embed linguistic data. Select to save speech and handwritten text. (Default on).
![]() Click OK.
Click OK.

Setting Advanced General Options
In addition to display options, the Advanced pane in Word Options also includes options to provide general user feedback. You can set the feedback options to play sound, show simple animation, show add-in user interface error, or display alerts to update links. You can also set options for default file locations, Web pages, and shared workspaces using the File Locations, Web Options, and Service buttons.
Change Advanced General Options
![]() Click the File tab, and then click Options.
Click the File tab, and then click Options.
![]() In the left pane, click Advanced.
In the left pane, click Advanced.
![]() Select the general options you want:
Select the general options you want:
![]() Provide feedback with sound. (Default off).
Provide feedback with sound. (Default off).
![]() Provide feedback with animation. (Default on).
Provide feedback with animation. (Default on).
![]() Confirm file format conversion on open. Select to choose a file converter. (Default off).
Confirm file format conversion on open. Select to choose a file converter. (Default off).
![]() Update automatic links at open. (Default on).
Update automatic links at open. (Default on).
![]() Allow opening a document in Draft view. (Default off).
Allow opening a document in Draft view. (Default off).
![]() Enable background repagination. Select to repaginate documents as needed. (Default on).
Enable background repagination. Select to repaginate documents as needed. (Default on).
![]() Show add-in user interface errors. Select to display alerts for custom interface problems. (Default off).
Show add-in user interface errors. Select to display alerts for custom interface problems. (Default off).
![]() Show customer submitted Office.com content. (New !) Select to show customer content from Office.com. (Default on).
Show customer submitted Office.com content. (New !) Select to show customer content from Office.com. (Default on).
![]() Mailing address. Enter to use as the default return address for envelopes and letters.
Mailing address. Enter to use as the default return address for envelopes and letters.
![]() Click OK.
Click OK.

For Your Information
Changing Default File Locations
If you always save documents in a specific folder, you can change the default location where documents are saved. You can change the default file location for documents, clip art pictures, user templates, workgroup templates, AutoRecover files, tools, and startup. Unless you fully understand the internal connects between Word and the clip art, tools, and startup folders, you should not change those default file locations. After you make a change, Word uses the new setting for all subsequent Word sessions until you change the setting again. In the Advanced pane of the Word Options dialog box, click File Locations, select the file type you want to change, click Modify, open the new default folder location, click OK, and then click OK.
Setting Compatibility Options
If you have an older Word or WordPerfect document that doesn’t display very well in Word 2010, you can set compatibility options to simulate the layout of an older format to improve the display. Word 2010 provides compatibility for all previous versions of Word going back to Word for Windows 1.0 and WordPerfect 5.x. Compatibility options are available on the Advanced pane in Word Options. After you select the layout version you want to use, you click the arrow to display the long list of compatibility options.
Change Compatibility Options
![]() Click the File tab, and then click Options.
Click the File tab, and then click Options.
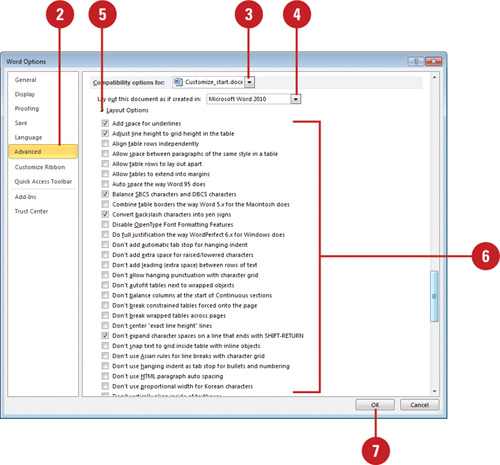
![]() In the left pane, click Advanced, and then scroll to the bottom of the dialog box.
In the left pane, click Advanced, and then scroll to the bottom of the dialog box.
![]() Click the Compatibility options for list arrow, and then select the document in which you want to set options.
Click the Compatibility options for list arrow, and then select the document in which you want to set options.
![]() Click the Layout this document as if created in list arrow, and then select the version of Word you want.
Click the Layout this document as if created in list arrow, and then select the version of Word you want.
![]() Click the arrow next to Layout Options.
Click the arrow next to Layout Options.
![]() Select or clear the layout check box options in the list.
Select or clear the layout check box options in the list.
![]() Click OK.
Click OK.
Changing Advanced Document Properties
You can use document properties—also known as metadata—to help you manage and track files. Search tools can use the metadata to find a document based-on your search criteria, such as title, subject, author, category, keywords, or comments. You can create advanced custom properties to associate more specific criteria for search tools to use. If you associate a document property to an item in the document, the document property updates when you change the item.
Customize Advanced Properties
![]() Click the File tab, and then click Info.
Click the File tab, and then click Info.
![]() Click the Properties button, and then click Advanced Properties.
Click the Properties button, and then click Advanced Properties.
![]() Click the tabs to view and add information:
Click the tabs to view and add information:
![]() General. To find out file location or size.
General. To find out file location or size.
![]() Summary. To add title and author information for the document.
Summary. To add title and author information for the document.
![]() Statistics. To display the number of slides, paragraphs, words and other details about the document.
Statistics. To display the number of slides, paragraphs, words and other details about the document.
![]() Contents. To display document contents.
Contents. To display document contents.
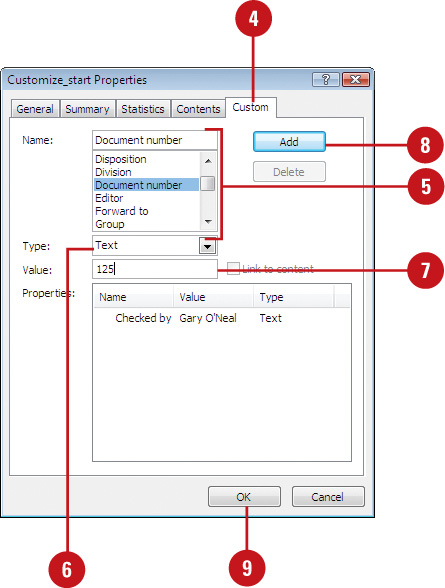
![]() Click the Custom tab.
Click the Custom tab.
![]() Type the name for the custom property or select a name from the list.
Type the name for the custom property or select a name from the list.
![]() Select the data type for the property you want to add.
Select the data type for the property you want to add.
![]() Type a value for the property.
Type a value for the property.
![]() Click Add.
Click Add.
![]() Click OK.
Click OK.

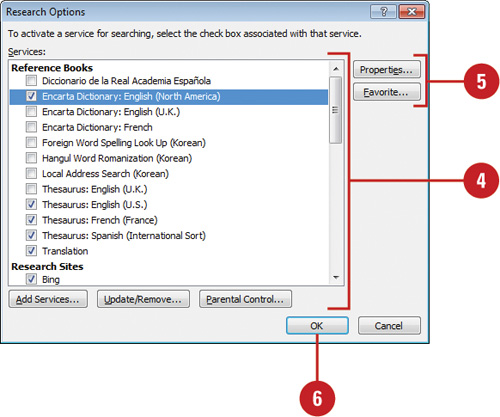
Changing Research Options
When you want to research a topic and use the material in a document, you can use the Research button on the Review tab to find the information you want directly from Word. Once you find it, you can copy and paste it into your document. If you have a hard time finding research information on a specific topic, you can use the Research Options command to enable and update additional reference books and research Web sites from which to search.
Change Research Options
![]() Click the Review tab.
Click the Review tab.
![]() Click the Research button.
Click the Research button.
![]() In the task pane, click Research options.
In the task pane, click Research options.
![]() Do one or more of the following:
Do one or more of the following:
![]() Services. To activate or remove research services.
Services. To activate or remove research services.
![]() Add Services. To add research services.
Add Services. To add research services.
![]() Update/Remove. To update or remove a service provider.
Update/Remove. To update or remove a service provider.
![]() Parental Control. To turn on parental controls.
Parental Control. To turn on parental controls.
![]() Do one or more of the following:
Do one or more of the following:
![]() Properties. To display properties for the selected service.
Properties. To display properties for the selected service.
![]() Favorite. To make the selected service your favorite (New !).
Favorite. To make the selected service your favorite (New !).
![]() Click OK.
Click OK.
![]() When you’re done, click the Close button on the task pane.
When you’re done, click the Close button on the task pane.
Accessing Commands Not in the Ribbon
If you don’t see a command in the Ribbon that was available in an earlier version of Word, you might think Microsoft removed it from the product. To see if a command is available, check out the Customize section in Word Options. The Quick Access Toolbar gives access to commands not in the Ribbon, which you can add to the toolbar. For example, you can add the following commands: Create Microsoft Outlook Task, Replace Fonts, AutoFormat, Set AutoShape Defaults, Send to Microsoft PowerPoint, and Web Page Preview.
Add Commands Not in the Ribbon to the Quick Access Toolbar
![]() Click the Customize Quick Access Toolbar list arrow, and then click More Commands.
Click the Customize Quick Access Toolbar list arrow, and then click More Commands.
![]() You can also click the File tab, click Options, and then click Quick Access Toolbar.
You can also click the File tab, click Options, and then click Quick Access Toolbar.
![]() Click the Choose command from list arrow, and then click Commands Not in the Ribbon.
Click the Choose command from list arrow, and then click Commands Not in the Ribbon.
![]() Click the Customize Quick Access Toolbar list arrow, and then click For all documents (Default).
Click the Customize Quick Access Toolbar list arrow, and then click For all documents (Default).
![]() Click the command you want to add (left column).
Click the command you want to add (left column).
TIMESAVER Click <Separator>, and then click Add to insert a separator line between buttons.
![]() Click Add.
Click Add.
![]() Click the Move Up and Move Down arrow buttons to arrange the commands in the order you want them to appear.
Click the Move Up and Move Down arrow buttons to arrange the commands in the order you want them to appear.
![]() To reset the Quick Access Toolbar to its original state, click Reset.
To reset the Quick Access Toolbar to its original state, click Reset.
![]() Click OK.
Click OK.

Customizing the Way You Create Objects
When you draw an object, Word applies a set of default object attributes. Examples of object default settings include fill color, shadow, and line style. To find out the current default settings for your document, you can draw an object, or create a text object and check the object’s attributes. If you change a default setting, Word will use the new setting for all subsequent Word sessions until you change the setting again.
Customize the Way You Create Shape Objects
![]() Create a shape.
Create a shape.
![]() Change the shape attributes, including fill color or effect, text color, outline color and style; and font type, style, and size.
Change the shape attributes, including fill color or effect, text color, outline color and style; and font type, style, and size.
![]() Right-click the shape, and then click Set as Default Shape.
Right-click the shape, and then click Set as Default Shape.

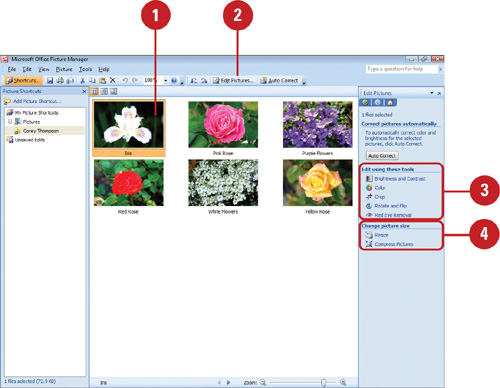
Managing Pictures
With Microsoft Office Picture Manager, you can manage, edit, and share your pictures. You can view all the pictures on your computer and specify which file type you want to open with Picture Manager. If you need to edit a picture, you can use Picture Manager to change brightness, contrast, and color, and to remove red eye. You can also crop, rotate and flip, resize, and compress a picture.
Open Picture Manager and Locate Pictures
![]() Click the Start button, point to All Programs, click Microsoft Office, click Microsoft Office Tools, and then click Microsoft Office Picture Manager.
Click the Start button, point to All Programs, click Microsoft Office, click Microsoft Office Tools, and then click Microsoft Office Picture Manager.
The first time you start the program, it asks you to select the file types you want to open with Picture Manager. Select the check boxes with the formats you want, and then click OK.
![]() If necessary, click Add Picture Shortcut.
If necessary, click Add Picture Shortcut.
![]() Click Locate Pictures.
Click Locate Pictures.
![]() Click the Look in list arrow, and then click a drive location.
Click the Look in list arrow, and then click a drive location.
![]() Click OK.
Click OK.
![]() Use the View buttons to view your pictures.
Use the View buttons to view your pictures.
![]() When you’re done, click the Close button.
When you’re done, click the Close button.


Did You Know?
You can export a folder of files with a new format or size. In Picture Manager, click the File menu, click Export, specify the folder with the pictures you want to change, select an export file format or select a size, and then click OK.
![]() In Picture Manager, select the picture you want to edit.
In Picture Manager, select the picture you want to edit.
![]() Click the Edit Pictures button on the Standard toolbar.
Click the Edit Pictures button on the Standard toolbar.
![]() Use the editing tools on the Edit Pictures task pane to modify the picture.
Use the editing tools on the Edit Pictures task pane to modify the picture.
![]() Brightness and Contrast
Brightness and Contrast
![]() Color
Color
![]() Crop
Crop
![]() Rotate and Flip
Rotate and Flip
![]() Red Eye Removal
Red Eye Removal
![]() Use the sizing tools on the Edit Pictures task pane to change the picture size.
Use the sizing tools on the Edit Pictures task pane to change the picture size.
![]() Resize
Resize
![]() Compress Pictures
Compress Pictures
![]() Click the Save button on the Standard toolbar.
Click the Save button on the Standard toolbar.
![]() When you’re done, click the Close button.
When you’re done, click the Close button.

Did You Know?
You can discard changes to a picture.
If you don’t like the changes you make to a picture, click the Edit menu, and then click Discard Changes to restore the picture.