7. Creating Desktop Publishing Documents
What You’ll Do
Add Desktop Publishing Effects
Apply Picture, Texture, and Gradient Fills
Introduction
When you want to add objects to a document, you can use Microsoft Word as a drawing package. Word provides a wide range of predesigned shapes, line options or freeform tools that allow you to draw, size, and format your own shapes and forms.
You can add several types of drawing objects to your documents—shapes, text boxes, lines, and freeforms. Shapes are preset objects, such as stars, circles, or ovals. Text boxes are objects with text, a shape without a border. Lines are simply the straight or curved lines (arcs) that can connect two points or are used as arrows. Freeforms are irregular curves or polygons that you can create as a freehand drawing.
Once you create a drawing object, you can move, resize, nudge, copy or delete it on your documents. You can also change its style by adding color, creating a fill pattern, rotating it, and applying a shadow or 3-D effect. Take a simple shape and by the time you are done adding various effects, it could become an attractive piece of graphic art for your document. If you’d like to use it later, you can save it to the Clip Organizer.
Object placement on your documents is a key factor to successfully communicating your message. To save time and effort, multiple objects should be grouped if they are to be considered one larger object. Grouping helps you make changes later on, or copy your objects to another document. Word has the ability to line up your objects with precision—rulers and grids are part of the alignment process to help you. By grouping and aligning, you are assured that your drawing objects will be accurately placed.
Adding Desktop Publishing Effects
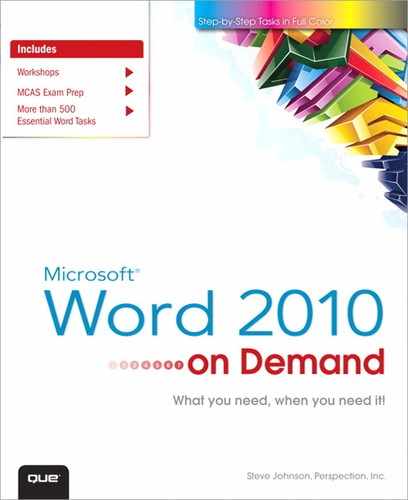
A few simple elements—drop caps, borders, and shading—make your newsletters and brochures look like a professional produced them. A drop cap is the enlarged first letter of a paragraph that provides instant style to a document. Instead of using a desktop publishing program to create a drop cap effect, you can quickly achieve the same thing in Word. You can change the drop cap position, font, and height, and then enter the distance between the drop cap and paragraph.

Add a Drop Cap
![]() Click the Print Layout View button.
Click the Print Layout View button.
![]() Click the Insert tab.
Click the Insert tab.
![]() Click the paragraph where you want the drop cap.
Click the paragraph where you want the drop cap.
![]() Click the Drop Cap button, and then select the drop cap style you want.
Click the Drop Cap button, and then select the drop cap style you want.
![]() Click the Print Layout View button.
Click the Print Layout View button.
![]() Click the Insert tab.
Click the Insert tab.
![]() Click the paragraph with the drop cap.
Click the paragraph with the drop cap.
![]() Click the Drop Cap button, and then click Drop Cap Options.
Click the Drop Cap button, and then click Drop Cap Options.
![]() Click a drop cap position.
Click a drop cap position.
![]() Change the drop cap font and height, and then enter the distance between the drop cap and text.
Change the drop cap font and height, and then enter the distance between the drop cap and text.
![]() Click OK.
Click OK.

Adding a Watermark
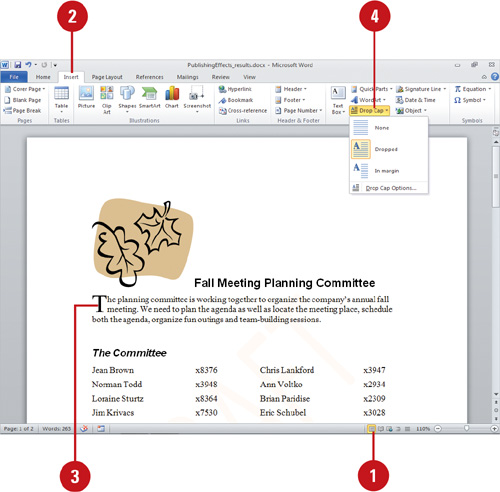
A watermark is a background effect—some text or a graphic, that prints in a light shade behind your text on your document. You can use a washed out version of your company logo, or you can add text such as SAMPLE, DRAFT, PROPOSAL, or CONFIDENTIAL. If you can’t find the watermark you need, check out Office.com (New!). If you decide to change your watermark, it’s as easy as typing in some new text.
Add or Remove a Watermark
![]() Click the Print Layout View button.
Click the Print Layout View button.
![]() Click the Page Layout tab.
Click the Page Layout tab.
![]() Click the Watermark button.
Click the Watermark button.
![]() Do one of the following:
Do one of the following:
![]() Add. Click the border you want to add.
Add. Click the border you want to add.
![]() Add from Office.com. Click More Watermarks from Office.com (New!).
Add from Office.com. Click More Watermarks from Office.com (New!).
![]() Remove. Click Remove Page
Remove. Click Remove Page
Did You Know?
You can save a selection to the Watermark gallery. Select the image you want to add to the Watermark gallery, click the Page Layout tab, click the Watermark button, and then click Save Selection To Watermark Gallery. In the Create New Building Block dialog box, enter a name, select a category, enter a description, specify a Save in document, specify an option where you insert the content, and then click OK.
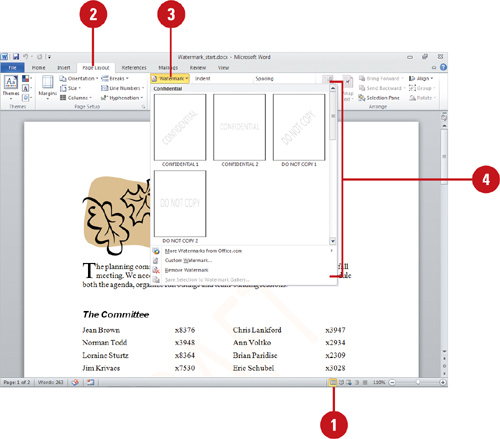
Customize or Remove a Watermark
![]() Click the Print Layout View button.
Click the Print Layout View button.
![]() Click the Page Layout tab.
Click the Page Layout tab.
![]() Click the Watermark button, and then click Custom Watermark.
Click the Watermark button, and then click Custom Watermark.
![]() To remove a watermark, click the No watermark option.
To remove a watermark, click the No watermark option.
![]() To insert a picture as a watermark, click the Picture watermark option, click Select Picture, select a picture, and then click OK.
To insert a picture as a watermark, click the Picture watermark option, click Select Picture, select a picture, and then click OK.
![]() To customize watermark text, click the Text watermark option, and then select the settings you want.
To customize watermark text, click the Text watermark option, and then select the settings you want.
![]() Click OK.
Click OK.

Adding Page Backgrounds
Borders are lines or graphics that appear around a page, paragraph, selected text, or table cells. With borders, you can change the line style, width, and colors, and you can add shadows and 3D effects. In addition to a page border, you can also change the page color. If you apply a theme color as the page color, it changes if you change the document theme. Shading is a color that fills the background of selected text, paragraphs, or table cells. For more attractive pages, add clips or columns.
Add Borders and Shading
![]() Select the text you want to have a border.
Select the text you want to have a border.
![]() Click the Page Layout tab.
Click the Page Layout tab.
![]() Click the Page Borders button.
Click the Page Borders button.
![]() Click the Borders tab.
Click the Borders tab.
![]() Do one of the following:
Do one of the following:
![]() Click a box setting to modify all border edges.
Click a box setting to modify all border edges.
![]() Click the edge in the diagram to modify individual border edges.
Click the edge in the diagram to modify individual border edges.
![]() Click a border style, color, and width.
Click a border style, color, and width.
![]() Click the Shading tab.
Click the Shading tab.
![]() Click the Fill list arrow, and then click a fill color.
Click the Fill list arrow, and then click a fill color.
![]() Click OK.
Click OK.


![]() Click the page you want to have a border.
Click the page you want to have a border.
![]() Click the Page Layout tab.
Click the Page Layout tab.
![]() Click the Page Borders button.
Click the Page Borders button.
![]() Click the Page Border tab.
Click the Page Border tab.
![]() Click a box setting.
Click a box setting.
![]() Click a line style, or click the Art list arrow, and then select a line or art style.
Click a line style, or click the Art list arrow, and then select a line or art style.
![]() Click a Width list arrow, and then select a width.
Click a Width list arrow, and then select a width.
![]() Click the Apply to list arrow, and then select the pages you want to have borders.
Click the Apply to list arrow, and then select the pages you want to have borders.
![]() Click OK.
Click OK.

Add Page Color
![]() Click the page you want to have a border.
Click the page you want to have a border.
![]() Click the Page Layout tab.
Click the Page Layout tab.
![]() Click the Page Color button.
Click the Page Color button.
![]() Do one of the following:
Do one of the following:
![]() Add. Click the color you want to add.
Add. Click the color you want to add.
![]() Remove. Click No Color.
Remove. Click No Color.

Arranging Text in Columns
Newspaper-style columns can give newsletters and brochures a more polished look. You can format an entire document, selected text, or individual sections into columns. You can create one, two, or three columns of equal size. You can also create two columns and have one column wider than the other. Word fills one column with text before the other, unless you insert a column break. Column breaks are used in two-column layouts to move the text after the insertion point to the top of the following column. You can also display a vertical line between the columns. To view the columns side by side, switch to print layout view.
![]() Click the Page Layout tab.
Click the Page Layout tab.
![]() Select the text you want to arrange in columns.
Select the text you want to arrange in columns.
![]() Click the Columns button.
Click the Columns button.
![]() Select the number of columns you want.
Select the number of columns you want.

Did You Know?
You can remove columns quickly.
Select the columns, click the Columns button on the Page Layout tab, and then click the first column.
You can align text in a column. Click the Align Left, Center, Align Right, or Justify button on the Home tab to align paragraphs in columns.
![]() Click the Page Layout tab, and then click in the columns you want to modify.
Click the Page Layout tab, and then click in the columns you want to modify.
![]() Click the Columns button, and then click More Columns.
Click the Columns button, and then click More Columns.
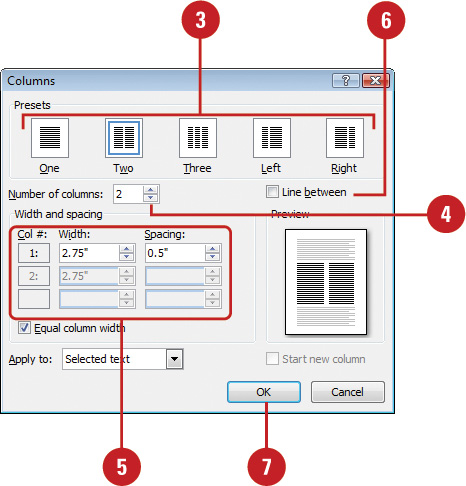
![]() Click a column preset format.
Click a column preset format.
![]() If necessary, enter the number of columns you want.
If necessary, enter the number of columns you want.
![]() Enter the width and spacing you want for each column.
Enter the width and spacing you want for each column.
![]() To place a vertical line between columns, select the Line between check box.
To place a vertical line between columns, select the Line between check box.
![]() Click OK.
Click OK.
Insert a Column Break
![]() Click where you want to insert a column break.
Click where you want to insert a column break.
![]() Click the Page Layout tab.
Click the Page Layout tab.
![]() Click the Break button, and then click Column.
Click the Break button, and then click Column.
![]() To delete a column break, click the column break dotted line in Draft view or select lines above and below the break, and then press the Delete key.
To delete a column break, click the column break dotted line in Draft view or select lines above and below the break, and then press the Delete key.

Wrapping Text Around an Object
When integrating pictures, charts, tables, or other graphics with your text, you need to wrap the text around the object regardless of where it is placed on the page. Rather than having to constantly reset margins and make other tedious adjustments, Word simplifies this task with the text wrapping feature. Unless your object or table is large enough to span the entire page, your layout will look more professional if you wrap your text around it instead of leaving excessive white space.
Change the Text Position Around an Object or Picture
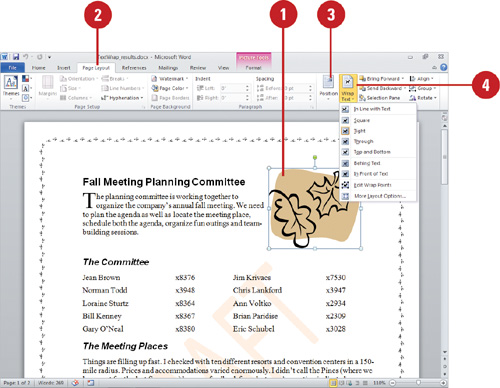
![]() Select the picture or object.
Select the picture or object.
![]() Click the Page Layout tab.
Click the Page Layout tab.
![]() Click the Position button, and then click the text wrapping option you want.
Click the Position button, and then click the text wrapping option you want.
![]() To customize text position, click the Position button, click More Layout Options, specify the options you want, and then click OK.
To customize text position, click the Position button, click More Layout Options, specify the options you want, and then click OK.

Wrap Text Around an Object or Picture
![]() Select the picture or object.
Select the picture or object.
![]() Click the Page Layout tab.
Click the Page Layout tab.
![]() To change text position, click the Position button, select a position or click More Layout Options, specify the options you want, and then click OK.
To change text position, click the Position button, select a position or click More Layout Options, specify the options you want, and then click OK.
![]() Click the Wrap Text button, and then click the text wrapping option you want.
Click the Wrap Text button, and then click the text wrapping option you want.
Wrap Text Tightly Around an Object or Picture
![]() Select the picture or object.
Select the picture or object.
![]() Click the Page Layout tab.
Click the Page Layout tab.
![]() To change text position, click the Position button, select a position or click More Layout Options, specify the options you want, and then click OK.
To change text position, click the Position button, select a position or click More Layout Options, specify the options you want, and then click OK.
![]() Click the Wrap Text button, and then click Tight.
Click the Wrap Text button, and then click Tight.
![]() Click the Wrap Text button, and then click Edit Wrap Points.
Click the Wrap Text button, and then click Edit Wrap Points.
![]() Drag edit points around the object or picture to tighten text around it.
Drag edit points around the object or picture to tighten text around it.
![]() Click a blank area of the document to deselect the object or picture.
Click a blank area of the document to deselect the object or picture.

Working with Text Boxes
In addition to normal text on a page, you can also create independent text boxes to hold other types of information—such as titles, heading, pull quotes, and side bars—similar to those found on a desktop publishing page. You can insert a text box with predefined information or you can create a blank text box. If you can’t find the predefined text box you need, check out Office.com (New!). You can even link two or more text boxes together to have text flow to different parts of a document. If you no longer need the text boxes to link, you can quickly break the link.
Insert a Text Box Pull Quote or Side Bar
![]() Click where you want to insert a text box.
Click where you want to insert a text box.
![]() Click the Insert tab.
Click the Insert tab.
![]() Click the Text Box button.
Click the Text Box button.
![]() Click the predefined text box you want to insert.
Click the predefined text box you want to insert.
![]() Add from Office.com. Click More Text Boxes from Office.com (New!).
Add from Office.com. Click More Text Boxes from Office.com (New!).

Create a Text Box from Existing Text
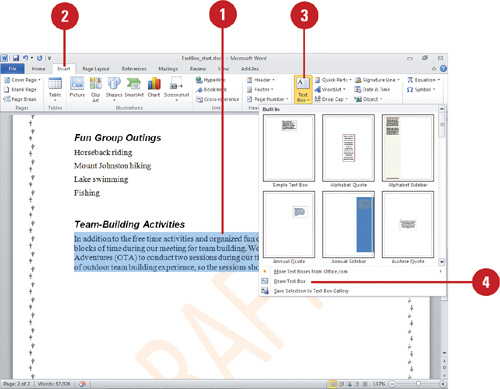
![]() Select the text you want to place in a text box.
Select the text you want to place in a text box.
![]() Click the Insert tab.
Click the Insert tab.
![]() Click the Text Box button.
Click the Text Box button.
![]() Click Draw Text Box.
Click Draw Text Box.
Did You Know?
You can change text direction in a text box. Select the text box you want to modify, click the Text Direction button on the Format tab under Drawing Tools.
![]() Click the Insert tab.
Click the Insert tab.
![]() Click the Text Box button.
Click the Text Box button.
![]() Point to where you want to place the text box, and then drag to create a text box the size you want.
Point to where you want to place the text box, and then drag to create a text box the size you want.
![]() If necessary, click the text box to select it.
If necessary, click the text box to select it.
![]() Type the text you want.
Type the text you want.
![]() To resize the text box, drag a size handle.
To resize the text box, drag a size handle.

Link Text Boxes
![]() Select the source text box.
Select the source text box.
![]() Click the Format tab under Drawing Tools.
Click the Format tab under Drawing Tools.
![]() Click the Create Link button.
Click the Create Link button.
![]() Point to the destination text box (the pointer changes to a pitcher), and then click to link the text boxes.
Point to the destination text box (the pointer changes to a pitcher), and then click to link the text boxes.

Did You Know?
You can break a link. Select the text box with the link you want to break, click the Break Link button on the Format tab under Drawing Tools, and then click the destination text box to break the link.
Drawing and Resizing Shapes
Word supplies ready-made shapes, ranging from hearts to lightning bolts to stars. The ready-made shapes are available directly on the Shapes gallery on the Insert and Format tabs. Once you have placed a shape on a document, you can resize it using the sizing handles. Many shapes have an adjustment handle, a small yellow or pink diamond located near a resize handle that you can drag to alter the shape. For precision when resizing, use the Size Dialog Box Launcher to specify the new size of the shape.
Draw a Shape
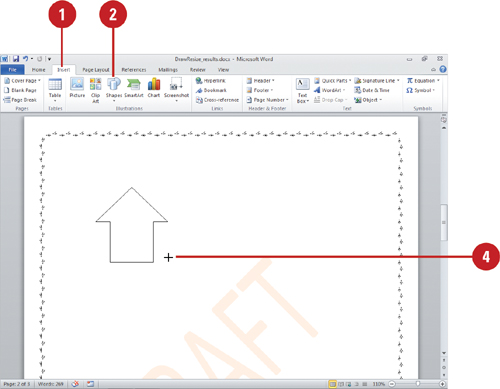
![]() Click the Insert tab.
Click the Insert tab.
![]() Click the Shapes button.
Click the Shapes button.
![]() Click the shape you want to draw.
Click the shape you want to draw.
![]() Drag the pointer on the document where you want to place the shape until the drawing object is the shape and size that you want.
Drag the pointer on the document where you want to place the shape until the drawing object is the shape and size that you want.
The shape you draw uses the line and fill color defined by the document’s theme.
TIMESAVER To draw a proportional shape, hold down Shift as you drag the pointer.

Did You Know?
You can quickly delete a shape. Click the shape to select it, and then press Delete.
You can draw a perfect circle or square. To draw a perfect circle or square, click the Oval or Rectangle button on the Shapes gallery, and then press and hold Shift as you drag.
![]() Select the shape you want to resize.
Select the shape you want to resize.
![]() Drag one of the sizing handles.
Drag one of the sizing handles.
![]() To resize the object in the vertical or horizontal direction, drag a sizing handle on the side of the selection box.
To resize the object in the vertical or horizontal direction, drag a sizing handle on the side of the selection box.
![]() To resize the object in both the vertical and horizontal directions, drag a sizing handle on the corner of the selection box.
To resize the object in both the vertical and horizontal directions, drag a sizing handle on the corner of the selection box.
![]() To resize the object with precise measurements, click the Format tab under Drawing Tools, and then specify exact height and width settings in the Size group.
To resize the object with precise measurements, click the Format tab under Drawing Tools, and then specify exact height and width settings in the Size group.

Adjust a Shape
![]() Select the shape you want to adjust.
Select the shape you want to adjust.
![]() Click one of the adjustment handles (small yellow diamonds), and then drag the handle to alter the form of the shape.
Click one of the adjustment handles (small yellow diamonds), and then drag the handle to alter the form of the shape.

Did You Know?
You can replace a shape. Replace one shape with another, while retaining the size, color, and orientation of the shape. Click the shape you want to replace, click the Format tab, click the Edit Shape button, point to Change Shape, and then click the new shape you want.
Adding Text to a Shape
You can add text to a shape in the same way you add text to a text box. Simply, select the shape object, and then start typing. Shapes range from rectangles and circles to arrows and stars. When you place text in a shape, the text becomes part of the object. If you rotate or flip the shape, the text rotates or flips too. You can use tools, such as an alignment button or Font Style, on the Mini-toolbar and Home tab to format the text in a shape like the text in a text box.
Add Text to a Shape
![]() Select the shape in which you want to add text.
Select the shape in which you want to add text.
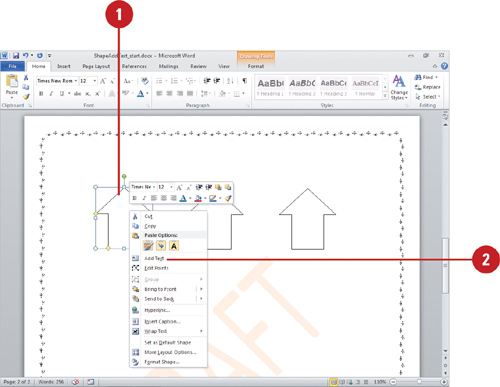
![]() Right-click the shape, and then click Add Text.
Right-click the shape, and then click Add Text.
![]() Type the text you want.
Type the text you want.
![]() To edit the text in a shape, click the text to place the insertion point, and then edit the text.
To edit the text in a shape, click the text to place the insertion point, and then edit the text.

Did You Know?
You can copy and move shapes. To copy a shape, select the shape, click the Copy button on the Home tab, and then click the Paste button. To move a shape, position the cursor (which changes to a 4-headed arrow), and then drag it to a new location.
You can align text in a shape. Select the shapes with the text you want to change, click the Format tab under Drawing Tools, click the Align Text button, and then select an alignment option: Top, Middle, or Bottom.
Creating and Editing Freeforms
When you need to create a customized shape, use the freeform tools. Choose a freeform tool from the Lines category in the list of shapes. Freeforms are like the drawings you make with a pen and paper, except that you use a mouse for your pen and a document for your paper. A freeform shape can either be an open curve or a closed curve. You can edit a freeform by using the Edit Points command to alter the vertices that create the shape.
Draw a Freeform Polygon
![]() Click the Insert tab.
Click the Insert tab.
![]() Click the Shapes button and then click the Freeform shape in the Shapes gallery under Lines.
Click the Shapes button and then click the Freeform shape in the Shapes gallery under Lines.
![]() Click the document where you want to place the first vertex of the polygon.
Click the document where you want to place the first vertex of the polygon.
![]() Move the pointer, and then click to place the second point of the polygon. A line joins the two points.
Move the pointer, and then click to place the second point of the polygon. A line joins the two points.
![]() To draw a line with curves, drag a line instead of clicking in steps 3 and 4.
To draw a line with curves, drag a line instead of clicking in steps 3 and 4.
![]() Continue moving the mouse pointer and clicking to create additional sides of your polygon.
Continue moving the mouse pointer and clicking to create additional sides of your polygon.
![]() Finish the polygon. For a closed polygon, click near the starting point. For an open polygon, double-click the last point in the polygon.
Finish the polygon. For a closed polygon, click near the starting point. For an open polygon, double-click the last point in the polygon.

Did You Know?
You can convert a shape to a freeform.
Select the shape, click the Edit Shape button, and then click Convert To Freeform.
You can switch between a closed curve and an open curve. Right-click the freeform drawing, and then click Close Path or Open Path.
For Your Information
Modifying a Freeform
Each vertex indicated by a black dot (a corner in an irregular polygon and a bend in a curve) has two attributes: its position, and the angle at which the curve enters and leaves it. You can move the position of each vertex and control the corner or bend angles. You can also add or delete vertices as you like. When you delete a vertex, Word recalculates the freeform and smooths it among the remaining points. Similarly, if you add a new vertex, Word adds a corner or bend in your freeform. To edit a freeform, click the freeform object, click the Format tab under Drawing Tools, click the Edit Shape button, click Edit Points, modify any of the points (move or delete), and then click outside to set the new shape.
Adding a Quick Style to a Shape
Instead of changing individual attributes of a shape—such as shape fill, shape outline, and shape effects—you can quickly add them all at once with the Shape Quick Style gallery. The Shape Quick Style gallery provides a variety of different formatting combinations. To quickly see if you like a Shape Quick Style, point to a thumbnail in the gallery to display a live preview of it in the selected shape. If you like it, you can apply it.
Add a Quick Style to a Shape
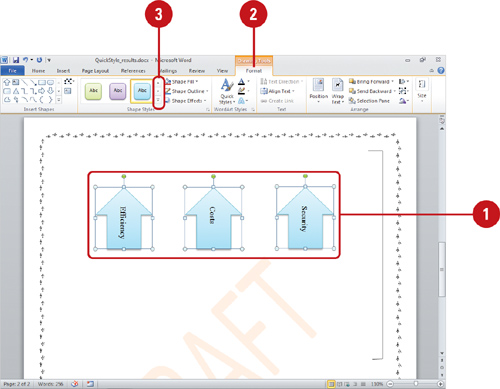
![]() Select the shapes you want to modify.
Select the shapes you want to modify.
![]() Click the Format tab under Drawing Tools.
Click the Format tab under Drawing Tools.
![]() Click the scroll up or down arrow, or click the More list arrow in the Shapes Styles group to see additional styles.
Click the scroll up or down arrow, or click the More list arrow in the Shapes Styles group to see additional styles.
The current style appears highlighted in the gallery.
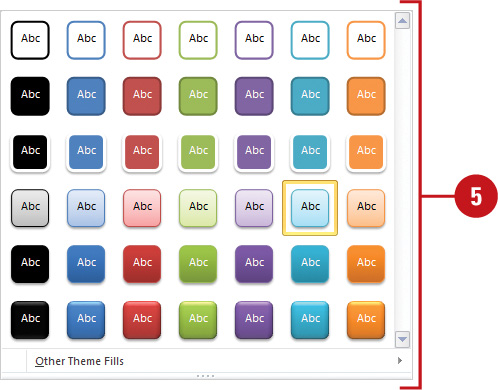
![]() Point to a style.
Point to a style.
A live preview of the style appears in the current shape.
![]() Click the style you want from the gallery to apply it to the selected shape.
Click the style you want from the gallery to apply it to the selected shape.
Did You Know?
You can add a Quick Style to a text box. A shape is a text box without a fill and outline (border), so you can apply a Quick Style to a text box using the same steps.
Adding Formatting to Shape Text
You can format text in a shape the same way you format text on a document page. You can change several font attributes—such as bold, italic, underline, font color and gradient (New!), outline (New!), shadow (New!), reflection (New!), glow (New!), 3-D (New!), or high-light—to enhance data to catch the reader’s attention. The main formats you apply to text are available on the Home tab in the Font group or in the Font dialog box. Some of the additional formats available include strikethrough, subscript, superscript, small caps, all caps, underline style, and hidden.
Add a Style to Shape Text
![]() Select the shapes with the text you want to modify.
Select the shapes with the text you want to modify.
![]() Click the Home tab.
Click the Home tab.
![]() To change fonts, click the Font list arrow or click the Font Size list arrow.
To change fonts, click the Font list arrow or click the Font Size list arrow.
![]() Point to a font style or size.
Point to a font style or size.
A live preview of the style or size appears in the current shape.
![]() Click the style or size you want to apply it to the selected shape.
Click the style or size you want to apply it to the selected shape.
![]() To apply other formatting, click one or more of the formatting buttons on the Ribbon: Bold, Italic, Underline, Strikethrough, Subscript, Superscript, Text Effects, Text Highlight Color, or Font Color.
To apply other formatting, click one or more of the formatting buttons on the Ribbon: Bold, Italic, Underline, Strikethrough, Subscript, Superscript, Text Effects, Text Highlight Color, or Font Color.
![]() Underline Styles. Click the Underline button arrow, and then select a style.
Underline Styles. Click the Underline button arrow, and then select a style.
![]() Gradient Text. Click the Font Color button, point to Gradient, and then select a style (New!). To create a custom gradient, click More Gradients.
Gradient Text. Click the Font Color button, point to Gradient, and then select a style (New!). To create a custom gradient, click More Gradients.
![]() To use the Font dialog box to change font attributes, click the Font Dialog Box Launcher, specify the changes you want, and then click OK.
To use the Font dialog box to change font attributes, click the Font Dialog Box Launcher, specify the changes you want, and then click OK.


Applying Color Fills
When you create a closed drawing object such as a square, it applies the Shape Fill color to the inside of the shape, and the Shape Outline color to the edge of the shape. A line drawing object uses the Shape Outline color. You can set the Shape Fill to be a solid, gradient, texture or picture, and the Shape Outline can be a solid or gradient. If you want to make multiple changes to a shape at the same time, the Format Shape dialog box allows you to do everything in one place. If the solid color appears too dark, you can make the color fill more transparent. If you no longer want to apply a shape fill to an object, you can remove it.
Apply a Color Fill to a Shape
![]() Select the shape you want to modify.
Select the shape you want to modify.
![]() Click the Format tab under Drawing Tools.
Click the Format tab under Drawing Tools.
![]() Click the Shape Fill button.
Click the Shape Fill button.
![]() Select the fill color option you want.
Select the fill color option you want.
![]() To remove a color fill, click the Shape Fill button, and then click No Fill.
To remove a color fill, click the Shape Fill button, and then click No Fill.

Did You Know?
You can set the color and line style for an object as the default. Right-click the object, and then click Set as Default Shape. Any new objects you create will use the same styles.
You can use the document background as the fill for a shape. Right-click the object, click Format Shape, click Fill in the left pane, click the Background option, and then click Close.
You can undo changes made in the Format Shape dialog box. Since changes made in the Shape Format dialog box are instantly applied, it’s not possible to Cancel the dialog box. To remove changes, click the Undo button on the Quick Access Toolbar.
For Your Information
Formatting a SmartArt Shape
In the same way you can apply shape fills, outlines, and effects to a shape, you can also apply them to shapes in a SmartArt graphic. You can modify all or part of the SmartArt graphic by using the Shape Fill, Shape Outline, and Shape Effects buttons. Shape Fill can be set to be a solid, gradient, texture or picture, or set the Shape Outline to be a solid or gradient. In addition, you can change the look of a SmartArt graphic by applying effects, such as glow and soft edges. If a shape in a SmartArt graphic contains text, you can use WordArt style galleries to modify shape text.
Apply a Shape Color Fill with a Transparency
![]() Select the shape you want to modify.
Select the shape you want to modify.
![]() Click the Format tab under Drawing Tools.
Click the Format tab under Drawing Tools.
![]() Click the Shape Styles Dialog Box Launcher.
Click the Shape Styles Dialog Box Launcher.
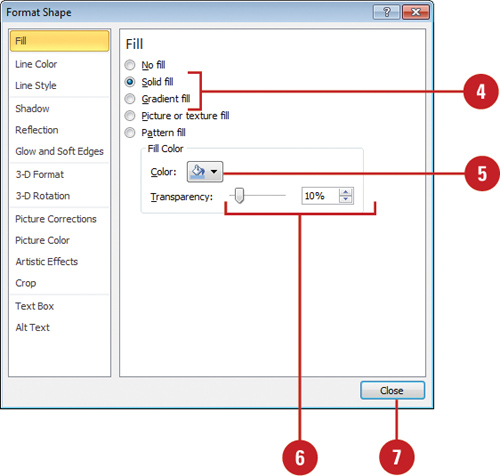
![]() Click the Solid fill or Gradient fill option.
Click the Solid fill or Gradient fill option.
![]() Click the Color list arrow, and then select the fill color you want.
Click the Color list arrow, and then select the fill color you want.
![]() Drag the Transparency slider or enter a number from 0 (fully opaque) to 100 (fully transparent).
Drag the Transparency slider or enter a number from 0 (fully opaque) to 100 (fully transparent).
All your changes are instantly applied to the shape.
![]() Click Close.
Click Close.
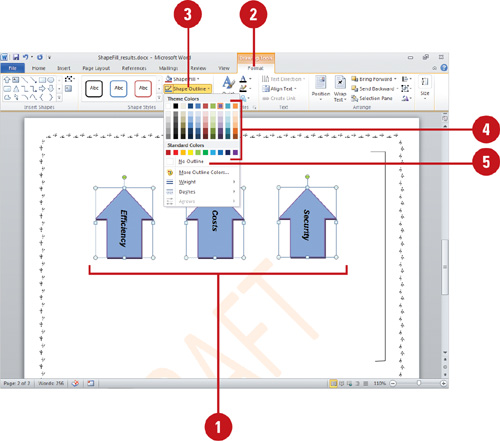
Apply a Color Outline to a Shape
![]() Select the shape you want to modify.
Select the shape you want to modify.
![]() Click the Format tab under Drawing Tools.
Click the Format tab under Drawing Tools.
![]() Click the Shape Outline button.
Click the Shape Outline button.
![]() Select the outline color you want.
Select the outline color you want.
![]() To remove an outline color, click the Shape Outline button, and then click No Outline.
To remove an outline color, click the Shape Outline button, and then click No Outline.
Applying Picture or Texture Fills
Applying a shape fill to a drawing object can add emphasis or create a point of interest in your document. You can insert a picture or clip art or texture into a shape. You can insert a picture from a file or clip art from the Clip Art task pane, or paste one in from the Clipboard. Stretch a picture or texture to fit across the selected shape or repeatedly tile it horizontally and vertically to fill the shape. When you stretch an image, you can also set offsets, which determine how much to scale an image to fit a shape relative to the edges. A positive offset number moves the image edge toward the center of the shape, while a negative offset number moves the image edge away from the shape. If the image appears too dark, you can make the picture more transparent.
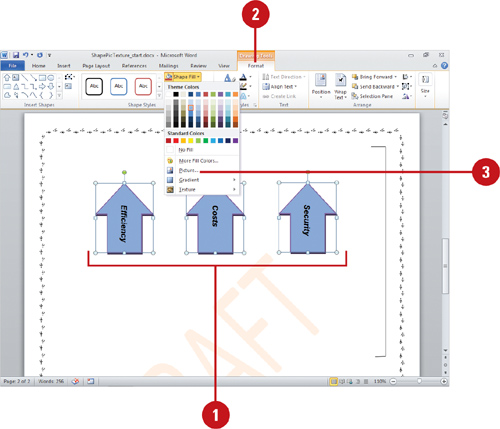
Apply a Picture or Texture Fill to a Shape
![]() Select the shape you want to modify.
Select the shape you want to modify.
![]() Click the Format tab under Drawing Tools.
Click the Format tab under Drawing Tools.
![]() Click the Shape Fill button.
Click the Shape Fill button.
![]() Click Picture, locate and select a picture file you want, and then click Insert.
Click Picture, locate and select a picture file you want, and then click Insert.
![]() Point to Texture, and then select a texture.
Point to Texture, and then select a texture.

Did You Know?
You can apply a custom picture fill.
Right-click the object you want to modify, click Format Shape, click Fill, click the Picture or Texture Fill option, click File, Clipboard, or Clip Art to select a picture, select the tile, stretch, and transparency options you want, and then click Close.
You can apply a custom texture fill.
Right-click the object you want to modify, click Format Shape, click Fill, click the Picture or Texture Fill option, click the Texture button, select a texture, select the offset, scale, alignment, mirror and transparency options you want, and then click Close.
Applying Gradient Fills
Gradients are made up of two or more colors that gradually fade into each other. They can be used to give depth to a shape or create realistic shadows. Apply a gradient fill to a shape by using a gallery or presets for quick results, or by using the Format dialog box for custom results. A gradient is made up of several gradient stops, which are used to create non-linear gradients. Gradient stops consist of a position, a color, brightness (New!), and a transparency percentage.
Apply a Gradient Fill to a Shape
![]() Select the shape you want to modify.
Select the shape you want to modify.
![]() Click the Format tab under Drawing Tools.
Click the Format tab under Drawing Tools.
![]() Click the Shape Fill button.
Click the Shape Fill button.
![]() Point to Gradient, and then select a gradient from the gallery.
Point to Gradient, and then select a gradient from the gallery.
Four gradient modes are available: linear (parallel bands), radial (radiate from center), rectangle (radiate from corners), and path (radiate along path).

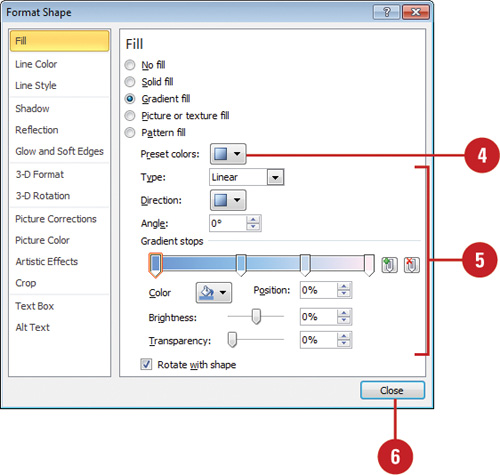
Apply a Custom Gradient Fill
![]() Select the shape you want to modify.
Select the shape you want to modify.
![]() Click the Format tab under Drawing Tools.
Click the Format tab under Drawing Tools.
![]() Click the Shape Fill button, point to Gradient, and then click More Gradients.
Click the Shape Fill button, point to Gradient, and then click More Gradients.
![]() Click the Preset colors list arrow, and then select a gradient preset.
Click the Preset colors list arrow, and then select a gradient preset.
![]() Select a type, direction, or angle. Select a gradient stop, and then change color, position, brightness (New!), or transparency.
Select a type, direction, or angle. Select a gradient stop, and then change color, position, brightness (New!), or transparency.
![]() Click Close.
Click Close.
Applying Shape Effects
You can change the look of a shape by applying shape effects, like shadows, reflections (New!), glows (New!), bevels (New!), and 3-D rotations. You can apply effects to a shape by using the Shape Effects gallery for quick results. From the Shape Effects gallery you can apply a built-in combination of 3-D effects or individual 3-D effects to a shape. To quickly see if you like the effect, point to a thumbnail in the Shape Effects gallery to display a live preview of it. If you like it, you can apply it. If you no longer want to apply the effect, you can remove it. Simply, select the shape, and then select the No effect type option on the Shape Effects gallery.
Add or Remove Preset Effects to a Shape
![]() Select the shape you want to modify.
Select the shape you want to modify.
![]() Click the Format tab under Drawing Tools.
Click the Format tab under Drawing Tools.
![]() Click the Shape Effects button, point to Shadow, Reflection, Glow, or Soft Edges, and then select an effect.
Click the Shape Effects button, point to Shadow, Reflection, Glow, or Soft Edges, and then select an effect.
![]() Preset. Select a preset.
Preset. Select a preset.
![]() Remove. Select the No effect type option, such as No Shadow, No Reflection, No Glow, or No Soft Edges.
Remove. Select the No effect type option, such as No Shadow, No Reflection, No Glow, or No Soft Edges.
![]() Options. Click the Options command for the effect type, such as Shadow Options, Reflection Options, Glow Options, or Soft Edges Options.
Options. Click the Options command for the effect type, such as Shadow Options, Reflection Options, Glow Options, or Soft Edges Options.


Add a Preset 3-D Effect to a Shape
![]() Select the shape you want to modify.
Select the shape you want to modify.
![]() Click the Format tab under Drawing Tools.
Click the Format tab under Drawing Tools.
![]() To add or remove a 3D effect, click the Shape Effects, point to Preset, Bevel, or 3-D Rotation, and then select a 3D effect.
To add or remove a 3D effect, click the Shape Effects, point to Preset, Bevel, or 3-D Rotation, and then select a 3D effect.
![]() Preset. Select a preset.
Preset. Select a preset.
![]() Remove. Select the No Presets option.
Remove. Select the No Presets option.
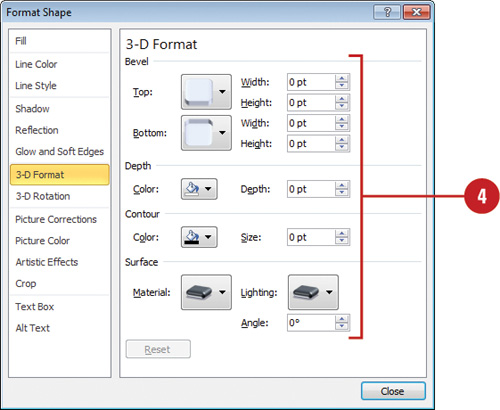
![]() To change individual 3-D bevel effects, click the Shape Effects, point to Preset or Bevel, click 3-D Options, select any of the following 3D effect options, and then click Close.
To change individual 3-D bevel effects, click the Shape Effects, point to Preset or Bevel, click 3-D Options, select any of the following 3D effect options, and then click Close.
![]() Bevel. Change the bevel top and bottom effects and the width and height for the shape in points.
Bevel. Change the bevel top and bottom effects and the width and height for the shape in points.
![]() Depth. Change the depth color and perspective for the shape in points.
Depth. Change the depth color and perspective for the shape in points.
![]() Contour. Change the contour color and size for the shape in points.
Contour. Change the contour color and size for the shape in points.
![]() Surface Material. Change the surface material of the shape.
Surface Material. Change the surface material of the shape.
![]() Surface Lighting. Change the angle of the lighting source.
Surface Lighting. Change the angle of the lighting source.
![]() To change individual 3-D rotation effects, click the Shape Effects, point to 3D Rotation, click 3-D Rotation Options, select the 3D effect options you want, and then click Close.
To change individual 3-D rotation effects, click the Shape Effects, point to 3D Rotation, click 3-D Rotation Options, select the 3D effect options you want, and then click Close.

Aligning and Distributing Objects
In addition to using grids and guides to align objects to a specific point, you can align a group of objects to each other. The Align commands make it easy to align two or more objects relative to each other vertically to the left, center, or right, or horizontally from the top, middle, or bottom. To evenly align several objects to each other across the document, either horizontally or vertically, select them and then choose a distribution option. Before you select an align command, specify how you want Word to align the objects. You can align the objects in relation to the document or to the selected objects.
Distribute Objects
![]() Select the objects you want to distribute.
Select the objects you want to distribute.
![]() Click the Format tab under Drawing Tools.
Click the Format tab under Drawing Tools.
![]() Click the Align button.
Click the Align button.
![]() On the Align menu, click the alignment method you want:
On the Align menu, click the alignment method you want:
![]() Click Align to Page if you want the objects to align relative to the document page.
Click Align to Page if you want the objects to align relative to the document page.
![]() Click Align to Margin if you want the objects to align relative to the document margin.
Click Align to Margin if you want the objects to align relative to the document margin.
![]() On the Align submenu, click the distribution command you want:
On the Align submenu, click the distribution command you want:
![]() Click Distribute Horizontally to evenly distribute the objects horizontally.
Click Distribute Horizontally to evenly distribute the objects horizontally.
![]() Click Distribute Vertically to evenly distribute the objects vertically.
Click Distribute Vertically to evenly distribute the objects vertically.

Align Objects with Other Objects
![]() Select the objects you want to align.
Select the objects you want to align.
![]() Click the Format tab under Drawing Tools.
Click the Format tab under Drawing Tools.
![]() Click the Align button.
Click the Align button.
![]() On the Align menu, click the alignment method you want:
On the Align menu, click the alignment method you want:
![]() Click Align to Page if you want the objects to align relative to the document page.
Click Align to Page if you want the objects to align relative to the document page.
![]() Click Align to Margin if you want the objects to align relative to the document margin.
Click Align to Margin if you want the objects to align relative to the document margin.
![]() On the Align menu, click the alignment command you want:
On the Align menu, click the alignment command you want:
![]() Click Align Left to line up the objects with the left edge of the selection or document.
Click Align Left to line up the objects with the left edge of the selection or document.
![]() Click Align Center to line up the objects with the center of the selection or document.
Click Align Center to line up the objects with the center of the selection or document.
![]() Click Align Right to line up the objects with the right edge of the selection or document.
Click Align Right to line up the objects with the right edge of the selection or document.
![]() Click Align Top to line up the objects with the top edge of the selection or document.
Click Align Top to line up the objects with the top edge of the selection or document.
![]() Click Align Middle to line up the objects vertically with the middle of the selection or document.
Click Align Middle to line up the objects vertically with the middle of the selection or document.
![]() Click Align Bottom to line up the objects with the bottom of the selection or document.
Click Align Bottom to line up the objects with the bottom of the selection or document.


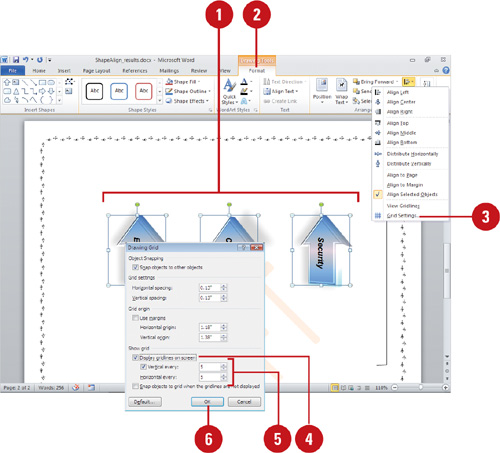
Aligning Objects to Grids
Word uses a grid to align an individual object or a group of objects to a vertical or horizontal line. Turning on the visible grid option makes it easier to create, modify, and align a shape. Within the Drawing Grid dialog box, you can select from a variety of options, such as snapping objects to the grid or to other objects and displaying drawing guides on-screen.
Turn On or Turn Off the Visible Grid
![]() Select the objects you want to arrange.
Select the objects you want to arrange.
![]() Click the Format tab under Drawing Tools.
Click the Format tab under Drawing Tools.
![]() Click the Align button, and then click Grid Settings.
Click the Align button, and then click Grid Settings.
![]() Select or clear the Display gridlines on screen check box.
Select or clear the Display gridlines on screen check box.
![]() Select or clear the Vertical every check box, and then enter a value for the vertical and horizontal gridlines, if you turn it on.
Select or clear the Vertical every check box, and then enter a value for the vertical and horizontal gridlines, if you turn it on.
![]() Click OK.
Click OK.
Set Objects to Snap into Place
![]() Select the objects you want to arrange.
Select the objects you want to arrange.
![]() Click the Format tab under Drawing Tools.
Click the Format tab under Drawing Tools.
![]() Click the Align button, and then click Grid Settings.
Click the Align button, and then click Grid Settings.
![]() Select the Snap objects to other objects check box.
Select the Snap objects to other objects check box.
![]() Select the Snap objects to grid when the gridlines are not displayed check box.
Select the Snap objects to grid when the gridlines are not displayed check box.
![]() Click OK.
Click OK.

![]() Select the objects you want to arrange.
Select the objects you want to arrange.
![]() Click the Format tab under Drawing Tools.
Click the Format tab under Drawing Tools.
![]() Click the Align button, and then click View Gridlines.
Click the Align button, and then click View Gridlines.

Align an Object to a Grid
![]() If you want, display gridlines on the screen (horizontal and vertical).
If you want, display gridlines on the screen (horizontal and vertical).
![]() Drag the object’s center or edge near the guide. Word aligns the center or edge to the guide.
Drag the object’s center or edge near the guide. Word aligns the center or edge to the guide.

Did You Know?
You can use the keyboard to override grid settings. To temporarily override settings for the grids and guides, press and hold the Alt key as you drag an object.
Changing Stacking Order
Multiple objects on a document appear in a stacking order, like layers of transparencies. Stacking is the placement of objects one on top of another. In other words, the first object that you draw is on the bottom and the last object that you draw is on top. You can change the order of this stack of objects by using the Bring to Front, Send to Back, Bring Forward, and Send Backward commands on the Format tab under Drawing Tools.
Arrange a Stack of Objects
![]() Select the objects you want to arrange.
Select the objects you want to arrange.
![]() Click the Format tab under Drawing Tools.
Click the Format tab under Drawing Tools.
![]() Click the stacking option you want.
Click the stacking option you want.
![]() Click the Bring to Front button arrow, and then click Bring to Front, Bring Forward, or Bring in Front of Text to move a drawing to the top of the stack or up one location in the stack.
Click the Bring to Front button arrow, and then click Bring to Front, Bring Forward, or Bring in Front of Text to move a drawing to the top of the stack or up one location in the stack.
![]() Click the Send to Back button arrow, and then click Send to Back, Send Backward, or Send Behind Text to move a drawing to the bottom of the stack or back one location in the stack.
Click the Send to Back button arrow, and then click Send to Back, Send Backward, or Send Behind Text to move a drawing to the bottom of the stack or back one location in the stack.


Did You Know?
You can view a hidden object in a stack. Press the Tab key or Shift+Tab to cycle forward or backward through the objects until you select the object you want.
You can connect two shapes. Click the Insert tab, click the Shapes button or list arrow, click a connector (located in the Lines category), position the pointer over an object handle (turns red), drag the connector to the object handle (turns red) on another object. An attached connector point appears as red circles, while an unattached connector point appears as light blue.
Rotating and Flipping Objects
After you create an object, you can change its orientation on the document by rotating or flipping it. Rotating turns an object 90 degrees to the right or left; flipping turns an object 180 degrees horizontally or vertically. For a more freeform rotation, which you cannot achieve in 90 or 180 degree increments, drag the green rotate lever at the top of an object. You can also rotate and flip any type of picture–including bitmaps–in a document. This is useful when you want to change the orientation of an image, such as changing the direction of an arrow.
Rotate an Object to any Angle
![]() Select the object you want to rotate.
Select the object you want to rotate.
![]() Position the pointer (which changes to the Free Rotate pointer) over the green rotate lever at the top of the object, and then drag to rotate the object.
Position the pointer (which changes to the Free Rotate pointer) over the green rotate lever at the top of the object, and then drag to rotate the object.
![]() Click outside the object to set the rotation.
Click outside the object to set the rotation.

Rotate or Flip an Object Using Preset Increments
![]() Select the object you want to rotate or flip.
Select the object you want to rotate or flip.
![]() Click the Format tab under Drawing Tools.
Click the Format tab under Drawing Tools.
![]() Click the Rotate button, and then click the option you want.
Click the Rotate button, and then click the option you want.
![]() Rotate. Click Rotate Right 90° or
Rotate. Click Rotate Right 90° or
![]() Rotate Left 90°.
Rotate Left 90°.
![]() Flip. Click Flip Vertical or Flip Horizontal.
Flip. Click Flip Vertical or Flip Horizontal.

Grouping and Ungrouping Objects
Objects can be grouped, ungrouped, and regrouped to make editing and moving them easier. Rather than moving several objects one at a time, you can group the objects and move them all together. Grouped objects appear as one object, but each object in the group maintains its individual attributes. You can change an individual object within a group without ungrouping. This is useful when you need to make only a small change to a group, such as changing the color of a single shape in the group. You can also format specific shapes, drawings, or pictures within a group without ungrouping. Simply select the object within the group, change the object or edit text within the object, and then deselect the object. However, if you need to move an object in a group, you need to first ungroup the objects, move it, and then group the objects together again.
Group Objects Together
![]() Select the shapes you want to group together.
Select the shapes you want to group together.
![]() Click the Format tab under Drawing Tools.
Click the Format tab under Drawing Tools.
![]() Click the Group button, and then click Group.
Click the Group button, and then click Group.

Did You Know?
You can use the Tab key to select objects in order. Move between the drawing objects on your document (even those hidden behind other objects) by pressing the Tab key.
You can use the shortcut menu to select Group related commands. Right-click the objects you want to group, point to Group, and then make your selections.
You can no longer ungroup tables. Due to the increased table size and theme functionality, tables can no longer be ungrouped.
![]() Select the grouped object you want to ungroup.
Select the grouped object you want to ungroup.
![]() Click the Format tab under Drawing Tools.
Click the Format tab under Drawing Tools.
![]() Click the Group button, and then click Ungroup.
Click the Group button, and then click Ungroup.
Did You Know?
You can troubleshoot the arrangement of objects. If you have trouble selecting an object because another object is in the way, you can use the Selection pane to help you select it.
