8. Working with Long Documents
What You’ll Do
Create a Multiple-Author Document
Create Documents Using Automatic Formatting
Insert Page Numbers and the Date and Time
Find Topics in a Long Document
Introduction
When working with long documents, the ability to split up the tasks can be crucial to meeting a deadline. Microsoft Word can do just that. By creating a master document in an Outline format, you can simply select the sections of the master that will be sectioned off as a subdocument. Word creates a number of subdocuments off the master, based on how you decide to group them. Once the subdocuments are created, they become separate files that others can open, develop, save and re-insert into the master.
Using master documents and subdocuments by many individuals could be a formatting nightmare. Word has an automatic formatting tool to help you create an overall format for your long document. In order to help your readers process your document, headers and footers, along with a cross reference, are a great way to keep them focused on the material at hand.
Once your long document is created and will be bound in some fashion, it’s important to make sure that you have enough white space around the margins so that text won’t get cut off during the binding process. And, as you navigate through the document, be sure to check for any special items that might require your attention. You can use the Go To function or Navigation pane to quickly move from object to object, section to section, or page to page, to name a few. The Select Browse Object button is also a way to navigate through your long document. Browse by comments, graphics, tables or footnotes. The availability for Word to seek out these objects and for you to review them is crucial to your long document being a success.
Other documents items, such as a Table of Contents and an Index can all be done very easily in Word. When you need to know that final word count, you can find it quickly through the References tab.
Creating an Outline
Outlines are useful for organizing information, such as topics in an essay. An outline typically consists of main headings and subheadings. You can create an outline from scratch in Outline view or change a bulleted or numbered list into an outline using the bullets and numbering commands on the Home tab. In Outline view, you can use buttons in the Outlining Tools group or drag the mouse pointer to move headings and subheadings to different locations or levels.
Create an Outline in Outline View
![]() In a new document, click the Outline View button.
In a new document, click the Outline View button.
![]() Type a heading, and then press Enter.
Type a heading, and then press Enter.
![]() Type another heading or press Tab to add a subheading under the heading.
Type another heading or press Tab to add a subheading under the heading.
![]() To change a heading or subheading to a different level and apply the corresponding heading style, place the insertion point in the heading, and then click the Promote or Demote button until the heading is at the level you want, or click the Promote to Heading or Promote to Body button.
To change a heading or subheading to a different level and apply the corresponding heading style, place the insertion point in the heading, and then click the Promote or Demote button until the heading is at the level you want, or click the Promote to Heading or Promote to Body button.
![]() To move a heading or subheading to a different location, place the insertion point in the heading, and then click the Move Up or Move Down button until the heading is moved where you want it to go.
To move a heading or subheading to a different location, place the insertion point in the heading, and then click the Move Up or Move Down button until the heading is moved where you want it to go.
![]() When you’re done, click the Close Outline View button.
When you’re done, click the Close Outline View button.

Change the Outline Display in Outline View
![]() Open the document with the outline, and then click the Outline View button.
Open the document with the outline, and then click the Outline View button.
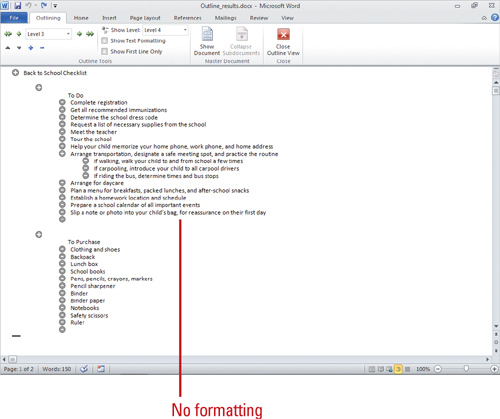
![]() Use the Outlining Tools to change the display in Outline view.
Use the Outlining Tools to change the display in Outline view.
![]() Show Level. Click the list arrow, and then select the level you want to display.
Show Level. Click the list arrow, and then select the level you want to display.
![]() Show Text Formatting. Select or clear to show or hide text formatting.
Show Text Formatting. Select or clear to show or hide text formatting.
![]() Show First Line Only. Select to show the first line only.
Show First Line Only. Select to show the first line only.
![]() When you’re done, click the Close Outline View button.
When you’re done, click the Close Outline View button.

Creating a Multiple-Author Document
When several people are going to collaborate on a document by dividing the workload by section or heading, you can create a master document so that everyone can work concurrent with one another instead of passing one file around. The process of creating a master document begins with an outline. When the outline is complete, individual headings or sections can have subdocuments assigned to them. These sub-documents can be distributed to the collaborators and completed separately. When ready, they can then be combined back into the master document so that all the information is contained in a single file. After you have created a master document, those sections that you have designated as subdocuments can be created and saved as separate files. These files can then be reinserted into the master document as they are completed.
Create a Master Document
![]() In a new document, click the Outline View button.
In a new document, click the Outline View button.
![]() Enter headings to outline the presentation of topics in the master document, pressing Enter after each entry.
Enter headings to outline the presentation of topics in the master document, pressing Enter after each entry.
![]() Select a heading, and then click one of the buttons in Outline view to assign a heading style (Heading 1 through Heading 9).
Select a heading, and then click one of the buttons in Outline view to assign a heading style (Heading 1 through Heading 9).
![]() Click the Promote or Demote button to increase or decrease the heading level of the headlines and body text.
Click the Promote or Demote button to increase or decrease the heading level of the headlines and body text.
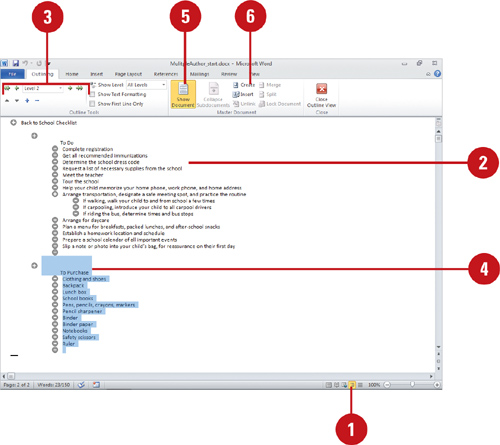
![]() Select the heading that you want to make into a subdocument.
Select the heading that you want to make into a subdocument.
![]() Click the Show Document button.
Click the Show Document button.
![]() Click the Create Subdocument button.
Click the Create Subdocument button.
![]() Click the File tab, and then click Save As.
Click the File tab, and then click Save As.
![]() Select the location, type a name, and then click Save.
Select the location, type a name, and then click Save.
![]() When you’re done, click the Close Outline View button.
When you’re done, click the Close Outline View button.

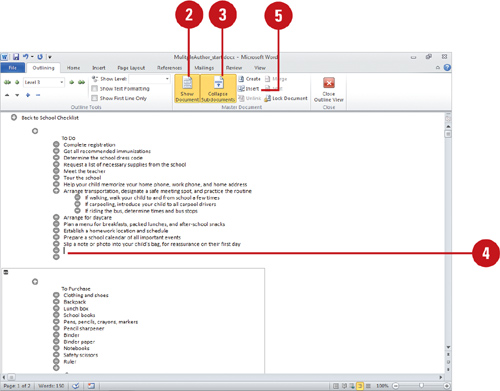
![]() Open the Master document in which you want to add a subdocument.
Open the Master document in which you want to add a subdocument.
![]() Click the Show Document button.
Click the Show Document button.
![]() If the subdocuments are collapsed, click the Expand Subdocument button.
If the subdocuments are collapsed, click the Expand Subdocument button.
![]() Position the insertion point where you want the subdocument inserted.
Position the insertion point where you want the subdocument inserted.
![]() Click the Insert Subdocument button.
Click the Insert Subdocument button.
![]() Locate and select the subdocument file you want to insert, and then click Open.
Locate and select the subdocument file you want to insert, and then click Open.
![]() To open the subdocument, double-click the subdocument or Ctrl+click the subdocument link. Close the subdocument to return to the master document.
To open the subdocument, double-click the subdocument or Ctrl+click the subdocument link. Close the subdocument to return to the master document.
![]() When you’re done, click the Close Outline View button, and then click Yes to save, if necessary.
When you’re done, click the Close Outline View button, and then click Yes to save, if necessary.

Did You Know?
You can collapse, or hide, all of your subdocuments. To hide (collapse) the subdocuments in a master document, click the Collapse Subdocuments button in Outline view. All subdocuments are collapsed. To show (expand) the subdocuments, click the Expand Subdocuments button.
You can lock and unlock a master document. Click the Show Documents button in Outline view, select text in the master document, and then click Lock Document. To unlock, click Expand Subdocuments button to remove the lock on the files.
Creating Documents Using Automatic Formatting
Word can automatically perform some formatting functions for you as you type a document. For example, you can change straight quotation marks to smart (curly) quotes, hyphens to en-dashes or em-dashes, an asterisk before and after text to bold text, or an underscore before and after text to italic text. You can also type a number and text or a bullet and text to start a numbered or bulleted list. If you had AutoFormat disabled when you created the document, you still have the option of using the feature to find and correct errors in formatting.
Set Up Automatic Formatting As You Type
![]() Click the File tab, and then click Options.
Click the File tab, and then click Options.
![]() In the left pane, click Proofing, and then click AutoCorrect Options.
In the left pane, click Proofing, and then click AutoCorrect Options.
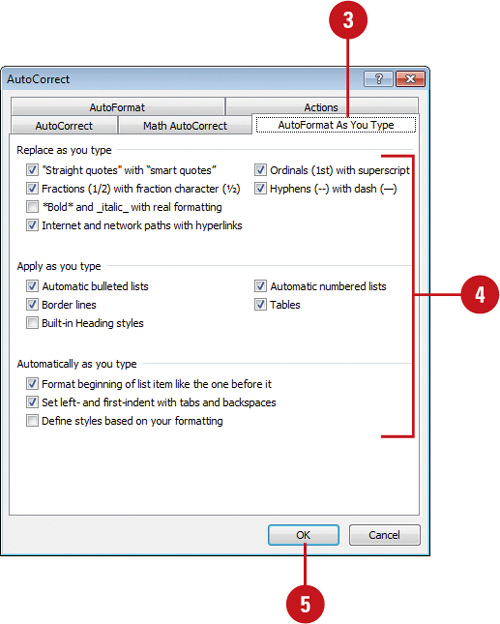
![]() Click the AutoFormat As You Type tab.
Click the AutoFormat As You Type tab.
![]() Select or clear the AutoFormat check boxes you want to use.
Select or clear the AutoFormat check boxes you want to use.
![]() Click OK.
Click OK.
Your choices take effect, but they only apply to text you will be entering subsequently. In this case, AutoFormat does not correct errors retroactively.
Change Document Formatting with AutoFormat
![]() Click the AutoFormat button on the Quick Access Toolbar.
Click the AutoFormat button on the Quick Access Toolbar.
![]() The AutoFormat button is not on the Quick Access Toolbar by default. Use the Customize pane in Word Options to add the button.
The AutoFormat button is not on the Quick Access Toolbar by default. Use the Customize pane in Word Options to add the button.
![]() Click Options.
Click Options.
![]() Click the AutoFormat tab to select the formatting options you want.
Click the AutoFormat tab to select the formatting options you want.
![]() Click the other tabs to make any additional changes to your document.
Click the other tabs to make any additional changes to your document.
![]() Click OK.
Click OK.
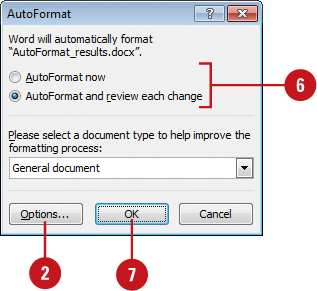
![]() Click the AutoFormat now option to have Word automatically format the document, or click the AutoFormat and review each change option to review, and then accept or reject each change.
Click the AutoFormat now option to have Word automatically format the document, or click the AutoFormat and review each change option to review, and then accept or reject each change.
![]() Click OK.
Click OK.
![]() If you chose the AutoFormat and review each change option, then continue.
If you chose the AutoFormat and review each change option, then continue.
![]() Click Review Changes to look at changes individually.
Click Review Changes to look at changes individually.
![]() Click Style Gallery if you want to preview your document, and then click OK.
Click Style Gallery if you want to preview your document, and then click OK.
![]() se the Accept and Reject buttons to accept or reject the review changes.
se the Accept and Reject buttons to accept or reject the review changes.
![]() Click Close or Cancel.
Click Close or Cancel.


Creating Headers and Footers
Most books, including this one, use headers and footers to help you keep track of where you are. A header is text printed in the top margin of every page within a document. Footer text is printed in the bottom margin. Commonly used headers and footers contain your name, the document title, the filename, the print date, and page numbers. If you divide your document into sections, you can create different headers and footers for each section.
Create and Edit Headers and Footers
![]() Click the Insert tab.
Click the Insert tab.
![]() Click the Header or Footer button.
Click the Header or Footer button.
![]() Click a built-in header or footer, or click Edit Header or Edit Footer to modify an existing one.
Click a built-in header or footer, or click Edit Header or Edit Footer to modify an existing one.
TIMESAVER Double-click a header or footer to edit it.
The Design tab under Header & Footer Tools displays on the Ribbon.
![]() If necessary, click the Go to Header or Go to Footer button to display the header or footer text area.
If necessary, click the Go to Header or Go to Footer button to display the header or footer text area.
![]() Click the header or footer box, and then type the text you want. Edit and format header or footer text as usual.
Click the header or footer box, and then type the text you want. Edit and format header or footer text as usual.
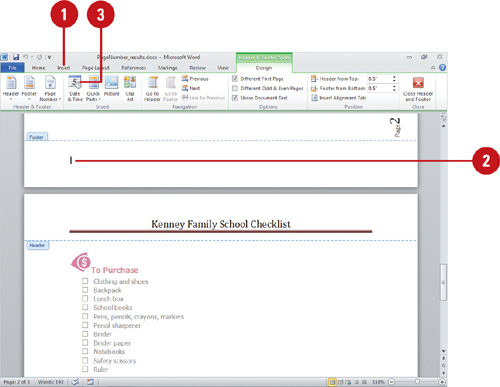
![]() To insert common items in a header or footer, click a button (Date & Time, Quick Parts, Picture, or Clip Art) in the Insert group.
To insert common items in a header or footer, click a button (Date & Time, Quick Parts, Picture, or Clip Art) in the Insert group.
![]() When you’re done, click the Close Header and Footer button.
When you’re done, click the Close Header and Footer button.


Did You Know?
You can quickly remove a header or footer. Click the Insert tab, click the Header or Footer button, and then click Remove Header or Remove Footer.
Create Different Headers and Footers for Different Pages
![]() Click the Insert tab.
Click the Insert tab.
![]() Click the Header or Footer button.
Click the Header or Footer button.
![]() Click a built-in header or footer, or click Edit Header or Edit Footer to modify an existing one.
Click a built-in header or footer, or click Edit Header or Edit Footer to modify an existing one.
The Design tab under Header & Footer Tools displays on the Ribbon.
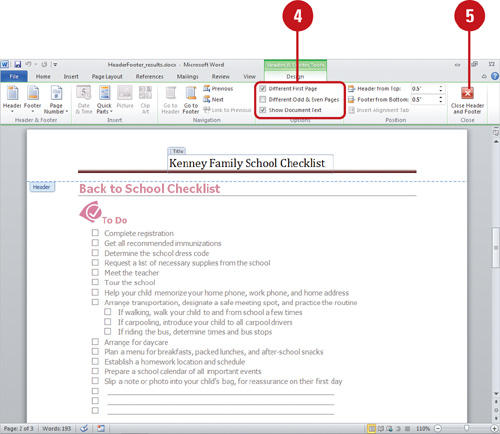
![]() To create different headers or footers for odd and even pages, click to select the Different Odd & Even Pages check box.
To create different headers or footers for odd and even pages, click to select the Different Odd & Even Pages check box.
To create a unique header or footer for the document’s first page, click to select the Different First Page check box.
To show document text, select the Show Document Text check box.
![]() When you’re done, click the Close Header and Footer button.
When you’re done, click the Close Header and Footer button.

Did You Know?
You can change header and footer position. Double-click the header or footer you want to change, and then adjust the Header from Top or Footers from Bottom settings on the Ribbon.
There are default tab stops used to align header and footer text. Typically, headers and footers have two default tab stops. The first, in the middle, centers text. The second, on the far right, aligns text on the right margin. To left align text, don’t press Tab. You can add and move the tab stops as needed. In addition, you can use the alignment buttons on the Home tab.
Inserting Page Numbers and the Date and Time
Page numbers help you keep your document in order or find a topic from the table of contents. Number the entire document consecutively or each section independently; pick a numbering scheme, such as roman numerals or letters. When you insert page numbers, you can select the position and alignment of the numbers on the page. The date and time field ensures you know which printout is the latest. Word uses your computer’s internal calendar and clock as its source. You can insert the date and time for any installed language. Add page numbers and the date in a footer to conveniently keep track of your work.
Insert and Format Page Numbers
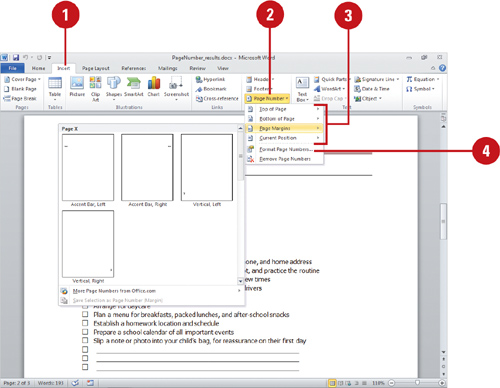
![]() Click the Insert tab.
Click the Insert tab.
![]() Click the Page Number button.
Click the Page Number button.
![]() Point to the position you want (Top of Page, Bottom of Page, Page Margins, or Current Position), and then select a position.
Point to the position you want (Top of Page, Bottom of Page, Page Margins, or Current Position), and then select a position.
![]() Click the Page Number button, and then click Format Page Numbers.
Click the Page Number button, and then click Format Page Numbers.
![]() Click the Number format list arrow, and then select a numbering scheme.
Click the Number format list arrow, and then select a numbering scheme.
![]() Select the starting number.
Select the starting number.
![]() Click OK.
Click OK.

Did You Know?
You can quickly remove page numbers. Click the Insert tab, click the Page Number button, and then click Remove Page Numbers.
![]() To insert the date or time on a single page, display the page, and then click the Insert tab.
To insert the date or time on a single page, display the page, and then click the Insert tab.
![]() To place the date or time on every page, display or insert a header or footer.
To place the date or time on every page, display or insert a header or footer.
The Design tab under Header & Footer Tools displays on the Ribbon.
![]() Click to place the insertion point where you want to insert the date or time.
Click to place the insertion point where you want to insert the date or time.
![]() Click the Date & Time button.
Click the Date & Time button.
![]() If necessary, click the Language list arrow, and then select a language.
If necessary, click the Language list arrow, and then select a language.
![]() To have the date or time automatically update, select the Update automatically check box.
To have the date or time automatically update, select the Update automatically check box.
![]() Click the date and time format you want.
Click the date and time format you want.
![]() To set the current date and time (based on your computer clock) as the default, click Set as Default, and then click Yes.
To set the current date and time (based on your computer clock) as the default, click Set as Default, and then click Yes.
![]() Click OK.
Click OK.

Inserting Cross References
Cross references direct the reader to related information located elsewhere in the document. Cross references can refer to figures or illustrations, sidebars, section headings, even individually marked paragraphs. Without distracting the reader of the document, cross references can be an easy tool to help navigate through a larger document. You can cross-reference only items in the same document. To cross-reference an item in another document, you need to first combine the documents into a master document.
Create a Cross Reference
![]() Select the text that starts the cross reference in the document.
Select the text that starts the cross reference in the document.
![]() Click the References tab.
Click the References tab.
![]() Click the Cross-Reference button.
Click the Cross-Reference button.
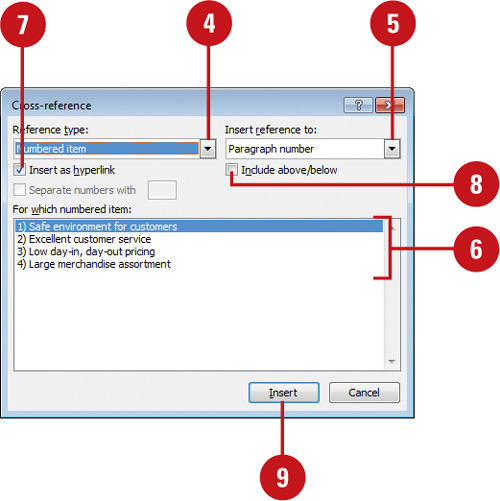
![]() Click the Reference type list arrow, and then select the type of item to which you will refer (heading, footnote, bookmark, etc.).
Click the Reference type list arrow, and then select the type of item to which you will refer (heading, footnote, bookmark, etc.).
![]() Click the Insert reference to list arrow, and then select the type of data (page, paragraph number, etc.) that you will be referencing.
Click the Insert reference to list arrow, and then select the type of data (page, paragraph number, etc.) that you will be referencing.
![]() Click the specific item, by number, to which you want to refer.
Click the specific item, by number, to which you want to refer.
![]() To let users move to the referenced item, select the Insert as hyperlink check box.
To let users move to the referenced item, select the Insert as hyperlink check box.
![]() To include data regarding the relative position of the referenced item, select the Include above/below check box.
To include data regarding the relative position of the referenced item, select the Include above/below check box.
![]() Click Insert.
Click Insert.
![]() Repeat the steps for each additional cross reference that you want to insert into the document, and then click either Close or Cancel.
Repeat the steps for each additional cross reference that you want to insert into the document, and then click either Close or Cancel.

Preparing for a Bound Document
If your finished document will be bound in some fashion, especially if you will use a form of binding such as is found in books, you must allow additional margin space for the binding process; otherwise some of your text can be in the binding fold and therefore unreadable. If you open a book, the crease between the two facing pages is referred to as the gutter. You must take care to ensure that nothing except white space is in the gutter.
Change the Gutter Margin Setting
![]() Click the Page Layout tab.
Click the Page Layout tab.
![]() Click the Page Setup Dialog Box Launcher.
Click the Page Setup Dialog Box Launcher.
![]() If necessary, click the Margins tab.
If necessary, click the Margins tab.
![]() Enter a value for the gutter margin.
Enter a value for the gutter margin.
![]() Click the Gutter Position list arrow, and then click Left or Top depending on the orientation of your intended binding (Left would be for a normal book, Top would be for a book that flips open from top to bottom).
Click the Gutter Position list arrow, and then click Left or Top depending on the orientation of your intended binding (Left would be for a normal book, Top would be for a book that flips open from top to bottom).
![]() Click OK.
Click OK.

Did You Know?
You can set aside a gutter for printing.
The size of the gutter you should use varies greatly depending on the binding process that will be used. Check with your printer before finalizing this setting to ensure that you allow the correct amount of space.
You can use a gutter even if you are printing on both sides. Remember that, if you are using double-sided printing, the gutter will be to the left on odd-numbered pages and to the right on even-numbered pages.
Finding Topics in a Long Document
Instead of searching through pages of text in your document for that certain paragraph, bookmark, tables, footnote or endnote, caption, or other object, you can navigate a lengthy document using the Find and Replace dialog box or the Navigation pane (New!). Providing that you have set up your long document with headings, bookmarks, captions, object numbers and the like, you will be able to use those as “clues” in which to locate the specific items you are looking for.
Move to Pages or Document Items Using Go To
![]() Click the Home tab.
Click the Home tab.
![]() Click the Find button arrow, and then click Go To.
Click the Find button arrow, and then click Go To.
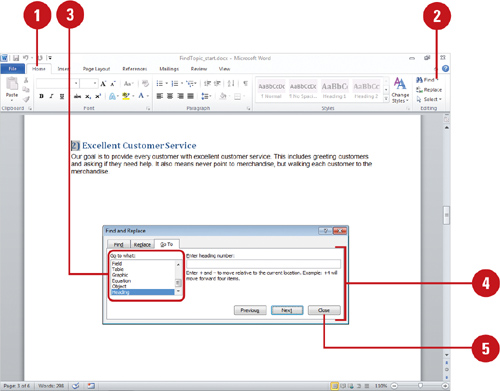
![]() Click the type of item to which you want to move to (page, table, etc.).
Click the type of item to which you want to move to (page, table, etc.).
![]() Use one of the following methods:
Use one of the following methods:
![]() Specific item. Type the name or number of the item in the Enter box, and then click Go To.
Specific item. Type the name or number of the item in the Enter box, and then click Go To.
![]() Next or previous item of the same type. Empty the Enter box, and then click Next or Previous.
Next or previous item of the same type. Empty the Enter box, and then click Next or Previous.
![]() Click Close.
Click Close.
Move to Pages or Document Items Using Navigation Pane
![]() Click the Home tab.
Click the Home tab.
![]() Click the Find button.
Click the Find button.
![]() Click the Browse Headings or Browse Pages tab.
Click the Browse Headings or Browse Pages tab.
![]() Click a heading name or thumbnail of a page to display it.
Click a heading name or thumbnail of a page to display it.
![]() To close the Navigation pane, click the Close button on the pane.
To close the Navigation pane, click the Close button on the pane.

Navigating a Long Document
Word also includes a very unobtrusive, but powerful tool on the vertical scroll bar, the Select Browse Object button. Now that you might be working with a large document and need to navigate through pages of text, multiple graphics and tables, numerous footnotes, reviewer comments and the like, the Select Browse Object button becomes a useful tool. You can navigate through pages easily, instead of relying on all the various commands that are available to locate similar elements of your long document.
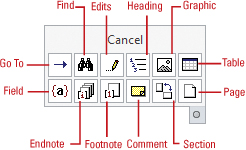
Select a Browse Object
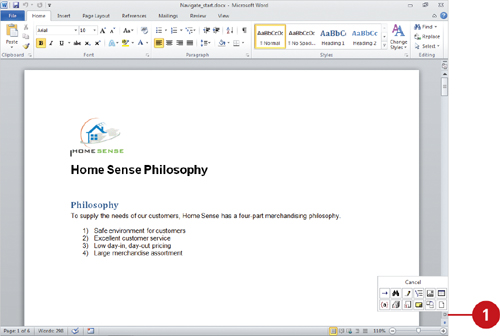
![]() Click the Select Browse Object button on the vertical scroll bar.
Click the Select Browse Object button on the vertical scroll bar.
![]() Click the icon that represents the browse command you want to activate:
Click the icon that represents the browse command you want to activate:
![]() By Field. Click to browse by field.
By Field. Click to browse by field.
![]() By Endnote. Click to browse by endnote.
By Endnote. Click to browse by endnote.
![]() By Footnote. Click to browse by footnote.
By Footnote. Click to browse by footnote.
![]() By Comment. Click to browse by comment.
By Comment. Click to browse by comment.
![]() By Section. Click to browse by section.
By Section. Click to browse by section.
![]() By Page. Click to browse by page.
By Page. Click to browse by page.
![]() Go To. Click to go to a specific item.
Go To. Click to go to a specific item.
![]() Find. Click to find an item.
Find. Click to find an item.
![]() By Edits. Click to browse by edits.
By Edits. Click to browse by edits.
![]() By Heading. Click to browse by heading.
By Heading. Click to browse by heading.
![]() By Graphic. Click to browse by graphic.
By Graphic. Click to browse by graphic.
![]() By Table. Click to browse by table.
By Table. Click to browse by table.
Inserting a Table of Contents
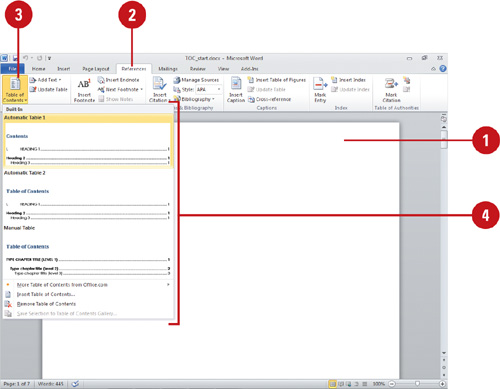
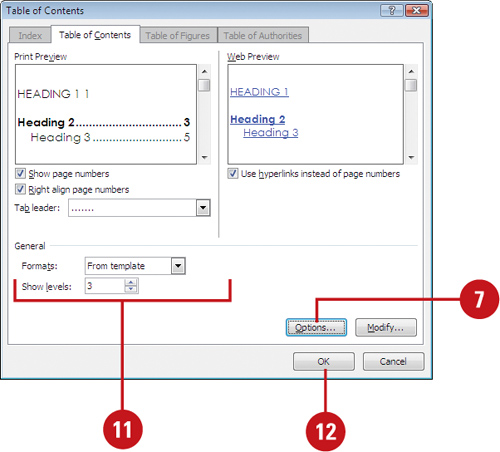
A table of contents provides an outline of main topics and page locations. Word builds a table of contents based on the styles in a document that you choose. By default, Heading 1 is the first-level entry, Heading 2 the second level, and so on. In a printed table of contents, a leader, a line whose style you select, connects an entry to its page number. In Web documents, entries become hyperlinks. Hide nonprinting characters before creating a table of contents so text doesn’t shift to other pages as you print.
Insert a Table of Contents
![]() Position the insertion point where you want the table of contents.
Position the insertion point where you want the table of contents.
![]() Click the References tab.
Click the References tab.
![]() Click the Table of Contents button.
Click the Table of Contents button.
![]() Do one of the following:
Do one of the following:
![]() Add. Click a Table of Contents style from the gallery.
Add. Click a Table of Contents style from the gallery.
![]() Remove. Click Remove Table of Contents.
Remove. Click Remove Table of Contents.
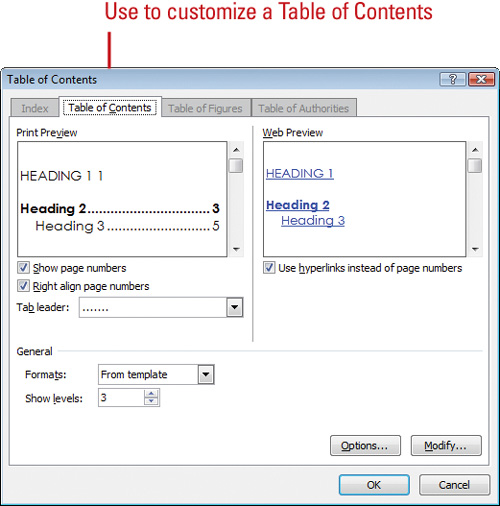
![]() Customize. Click Insert Table of Contents, click the Table of Contents tab, select the format, levels, and options you want, and then click OK.
Customize. Click Insert Table of Contents, click the Table of Contents tab, select the format, levels, and options you want, and then click OK.
Did You Know?
You can update the table of contents.
As you continue to add information to a document, you can quickly update the table of contents. Click the References tab, click Update Table, and then click Update Page Numbers or Update Entire Table. You can also click Update Table on the tab when you select the table of contents.
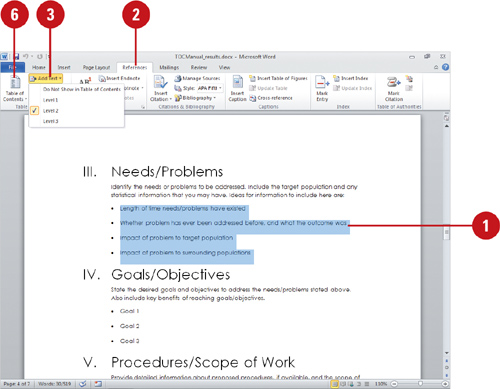
You can add a specific paragraph to the table of contents. Select the paragraph you want to add, click the References tab, and then click the Add Text button.
Create a Table of Contents Manually
![]() Select the text you want to include in your table of contents.
Select the text you want to include in your table of contents.
![]() Click the References tab.
Click the References tab.
![]() Mark entries using heading styles or individual text.
Mark entries using heading styles or individual text.
![]() Heading styles. Click the heading style you want in the Styles group on the Home tab.
Heading styles. Click the heading style you want in the Styles group on the Home tab.
![]() Individual text. Click the Add Text button, and then click the table of contents level you want: Level 1, Level 2, or Level 3.
Individual text. Click the Add Text button, and then click the table of contents level you want: Level 1, Level 2, or Level 3.
![]() To mark additional entries, select the text, use the options in Step 3.
To mark additional entries, select the text, use the options in Step 3.
![]() Click the place where you want to insert the table of contents.
Click the place where you want to insert the table of contents.
![]() Click the Table of Contents button, and then click Insert Table of Contents.
Click the Table of Contents button, and then click Insert Table of Contents.
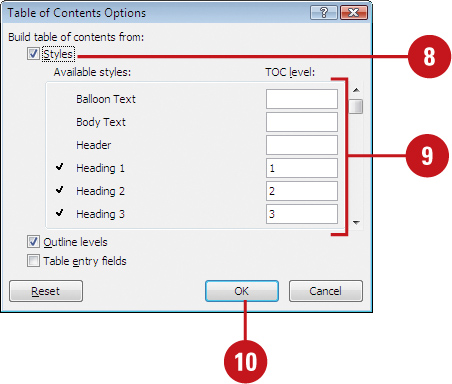
![]() Click Options.
Click Options.
![]() Select the Styles check box.
Select the Styles check box.
![]() Specify the TOC levels you want to use.
Specify the TOC levels you want to use.
![]() Click OK.
Click OK.
![]() Select the formatting options you want.
Select the formatting options you want.
![]() Click OK.
Click OK.
Did You Know?
You can delete a table of contents.
Click the References tab, click Table of Contents, and then click Remove Table of Contents.
Creating an Index
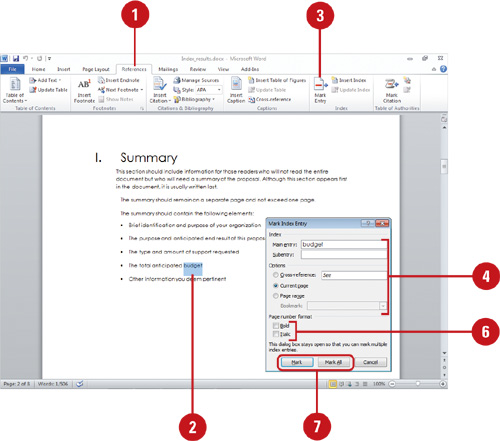
An index appears at the end of a document and alphabetically lists the main topics, names, and items used in a long document. Each index listing is called an entry. You can create an index entry for a word, phrase, or symbol for a topic. In an index, a cross-reference indicates another index entry that is related to the current entry. There are several ways to create an index. Begin by marking index entries. Some index entries will refer to blocks of text that span multiple pages within a document.
Create an Index
![]() Click the References tab.
Click the References tab.
![]() To use existing text as an index entry, select the text. To enter your text as an index entry, click at the point where you want the index entry inserted.
To use existing text as an index entry, select the text. To enter your text as an index entry, click at the point where you want the index entry inserted.
![]() Click the Mark Entry button or press Alt+Shift+X.
Click the Mark Entry button or press Alt+Shift+X.
![]() Type or edit the entry. The entry can be customized by creating a sub-entry or a cross-reference to another entry.
Type or edit the entry. The entry can be customized by creating a sub-entry or a cross-reference to another entry.
![]() To format the text for the index, right-click it in the Main Entry or Sub-entry box, click Font, select your formatting options, and then click OK.
To format the text for the index, right-click it in the Main Entry or Sub-entry box, click Font, select your formatting options, and then click OK.
![]() To select a format for the page numbers that will appear in the index, select the Bold or Italic check boxes.
To select a format for the page numbers that will appear in the index, select the Bold or Italic check boxes.
![]() To mark the index entry, click Mark or Mark All for all similar text.
To mark the index entry, click Mark or Mark All for all similar text.
Repeat steps 2-7 for additional index entries, and then click Close.
![]() Go to the page where you want to display your Index.
Go to the page where you want to display your Index.
![]() Click the Insert Index button.
Click the Insert Index button.
![]() Click the Index tab, and then select any options you want.
Click the Index tab, and then select any options you want.
![]() Click OK.
Click OK.

Create Multiple Page Index Entries
![]() Click the Insert tab.
Click the Insert tab.
![]() Select the text in which you want the index entry to refer.
Select the text in which you want the index entry to refer.
![]() Click the Bookmark button.
Click the Bookmark button.
![]() Enter a name, and then click Add.
Enter a name, and then click Add.
![]() Click after the end of the text in the document that you just marked with a bookmark.
Click after the end of the text in the document that you just marked with a bookmark.
![]() Click the References tab.
Click the References tab.
![]() Click the Mark Entry button or press Alt+Shift+X.
Click the Mark Entry button or press Alt+Shift+X.
![]() Enter the index entry for the marked text.
Enter the index entry for the marked text.
![]() To format the text for the index, right-click the Main Entry or Sub-entry box, click Font, select your formatting options, and then click OK.
To format the text for the index, right-click the Main Entry or Sub-entry box, click Font, select your formatting options, and then click OK.
![]() To select a format for the page numbers that will appear in the index, select the Bold or Italic check boxes.
To select a format for the page numbers that will appear in the index, select the Bold or Italic check boxes.
![]() Click the Page Range option.
Click the Page Range option.
![]() Select the bookmark name you entered in Step 4.
Select the bookmark name you entered in Step 4.
![]() Click Mark.
Click Mark.
![]() Repeat steps 2-13 for additional index entries, and then click Close or Cancel.
Repeat steps 2-13 for additional index entries, and then click Close or Cancel.


Determining Word Count Statistics
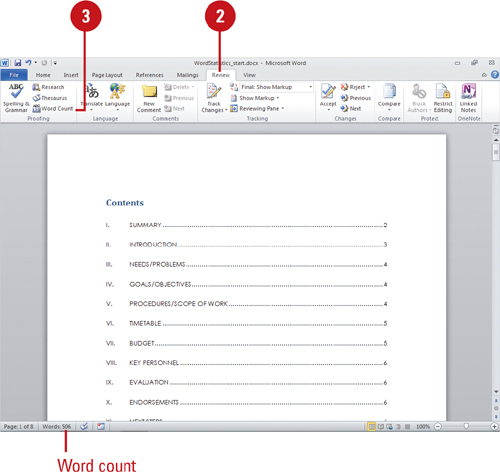
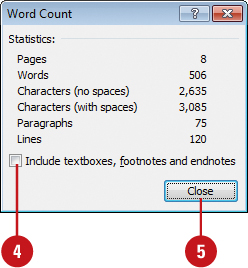
Producing lengthy documents for business, school or as contract work can often be regulated by the word count. Legal briefs may charge by the line or word, or school papers might need to be a certain length in word count. Either way, if you need to determine your word count, there is an easier way than counting each word manually. You can quickly determine the number of words in your document by viewing the Status bar. It appears in the lower-left corner next to the number of pages in your document. You can also use the Word Count button on the Review tab to find out word count statistics, including number of pages, characters, paragraphs, and lines. You have the choice whether to include or exclude text boxes, footnotes, and endnotes in the word count statistics.
Find Out Document Word Count Statistics
![]() If you want to find out statistics for only part of a document, select the text you want to count.
If you want to find out statistics for only part of a document, select the text you want to count.
![]() Click the Review tab.
Click the Review tab.
![]() Click the Word Count button.
Click the Word Count button.
![]() Select or clear the Include textboxes, footnotes and endnotes check box.
Select or clear the Include textboxes, footnotes and endnotes check box.
![]() Click Close.
Click Close.
Did You Know?
You can count words in a text box.
Select the text in the text box. The Status bar displays the number of words. To count the words in multiple text boxes, press and hold Ctrl while you select the text in each text box.
Adding a Cover Page
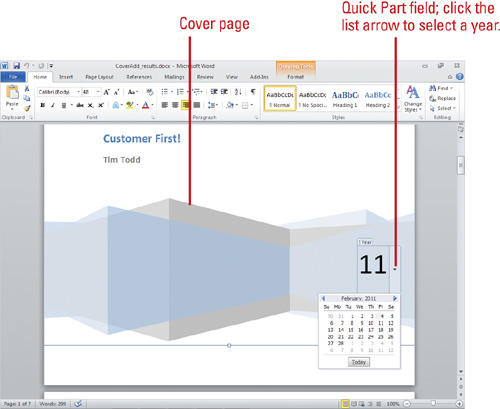
A cover page provides an introduction to a report, or an important memo you want to circulate to others. Word makes it easy to add a cover page to any document. You can quickly select one from a gallery of styles that fit your document. If you can’t find the cover page you need, check out Office.com (New!). Each cover page includes text boxes sample text, which you can change, and defined fields, such as a title and author’s name, that automatically get filled in with information from document properties.
Insert a Cover Page
![]() Click the Insert tab.
Click the Insert tab.
![]() Click the Cover Page button to display a gallery of cover pages.
Click the Cover Page button to display a gallery of cover pages.
![]() Click the cover page you want.
Click the cover page you want.
![]() Add from Office.com. Click More Cover Pages from Office.com (New!).
Add from Office.com. Click More Cover Pages from Office.com (New!).
Word inserts a cover at the beginning of your document.
![]() To remove a cover page, click the Cover Page button, and then click Remove Current Cover Page.
To remove a cover page, click the Cover Page button, and then click Remove Current Cover Page.

Did You Know?
You can add a custom cover page to the Cover Page gallery. Create the cover page you want to add, select it, click the Insert tab, click the Cover Page button, click Save Selection To Cover Page Gallery, enter a name, select the Cover Pages gallery if necessary, select a category, enter a description, leave remaining options, and then click OK.