
9. Working with Technical Documents
What You’ll Do
Introduction
Microsoft Word has many additional features that help you develop a more technical document. Research papers, business proposals and the like, all require more than just a document with some graphics or special text formatting.
You can find research material and incorporate it into your work quickly and easily. You can access informational services and insert the material right into your document without leaving Word. Material such as dictionaries, thesauruses, research sites, language translations, stock quotes, and company information are all at your finger tips.
With all of this research, it might be necessary to create footnotes or endnotes to reference your sources. You can format the notes to be similar in text to your document, or have an entirely different look. When working with a lot of text, you can create a bookmark to help you jump to various topics in your document.
Creating captions for your graphics is easy with Word. Once you’ve created captions, you can create a Table of Figures—similar to a Table of Contents, but this item keeps track of your graphics. You can format text in your document to have number lines. This is helpful if you need to locate a specific section of text—such as a legal briefing—in a long document. You can also create an outline in Word to help organize your document.
Some more technical features such as summing up the values in your tables and calculating values, are done with the help of Word’s Formula feature. You can also document an equation for that scientific or mathematical paper.
Inserting Building Blocks Using Quick Parts
A Quick Part is a defined field or set of fields that contains information you can use throughout a document. Word calls these building blocks. Instead of typing the company name, address and phone number every time you need it in a document, you can insert a text box field with the information. Word provides a variety of defined Quick Parts—including Author, Company, Company Address, Company E-mail, Manager and Status—you can quickly insert in a document. The Quick Part fields insert information you provide in Document Properties or a placeholder, which you can fill in the first time. If a predefined field doesn’t meet your needs, you can create your own or get more on Office.com. If you need to modify a Quick Part, you can use the building block organizer, which stores your custom Quick Parts and those provided by Word. Word uses Quick Parts as part of the program to build page covers, headers and footers, pull quotes, and side bar to name a few.
Insert a Quick Part Building Block
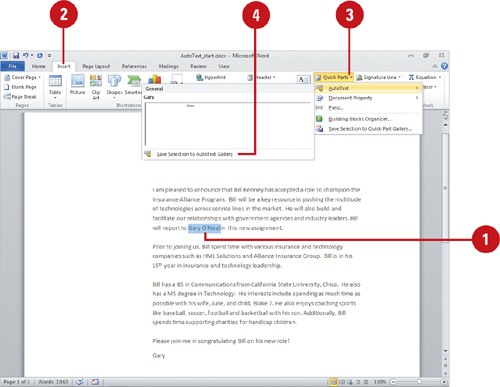
![]() Click where you want to insert a text box.
Click where you want to insert a text box.
![]() Click the Insert tab.
Click the Insert tab.
![]() Click the Quick Parts button.
Click the Quick Parts button.
![]() Point to Document Property, and then click the predefined Quick Part you want to insert.
Point to Document Property, and then click the predefined Quick Part you want to insert.
![]() Modify the predefined Quick Part; click the list arrow (if available) to define it.
Modify the predefined Quick Part; click the list arrow (if available) to define it.


Did You Know?
You can create your own Quick Part. Select the text box you want to use, click the Insert tab, click the Quick Parts button, and then click Save Selection To Quick Parts Gallery.
![]() Click the Insert tab.
Click the Insert tab.
![]() Click the Quick Parts button, and then click Field.
Click the Quick Parts button, and then click Field.
![]() Click the Categories list arrow, and then click a category to narrow down the field names.
Click the Categories list arrow, and then click a category to narrow down the field names.
![]() Click the field name you want to use.
Click the field name you want to use.
![]() Specify field property information.
Specify field property information.
![]() Click the format you want to apply.
Click the format you want to apply.
![]() Click OK.
Click OK.
Work with Building Blocks
![]() Click the Insert tab.
Click the Insert tab.
![]() Click the Quick Parts button, and then click Building Blocks Organizer.
Click the Quick Parts button, and then click Building Blocks Organizer.
![]() Select the Quick Part building block you want to modify.
Select the Quick Part building block you want to modify.
![]() Click Edit Properties.
Click Edit Properties.
![]() Specify the properties you want to change, including Name, Gallery, Category, Description, Save in, and Options.
Specify the properties you want to change, including Name, Gallery, Category, Description, Save in, and Options.
![]() Click OK.
Click OK.
![]() To insert or delete a building block, select it, and then click Insert or Delete.
To insert or delete a building block, select it, and then click Insert or Delete.
![]() Click Close.
Click Close.


Inserting and Creating AutoText
AutoText stores text and graphics you want to reuse, such as a company logo, boilerplate text, or formatted table. For example, you can use AutoText to quickly insert the text To Whom It May Concern or a graphic of your signature. You can use the AutoText entries that come with Word, or create your own. AutoText is part of Word’s building block approach to creating customized documents. Word calls these building blocks. To insert AutoText, you use the Quick Parts button (New!) and then AutoText menu.
Insert AutoText from the AutoText Gallery
![]() Click where you want to insert AutoText.
Click where you want to insert AutoText.
![]() Click the Insert tab.
Click the Insert tab.
![]() Click the Quick Parts button, and then point to AutoText.
Click the Quick Parts button, and then point to AutoText.
![]() Click the AutoText entry you want from the AutoText gallery.
Click the AutoText entry you want from the AutoText gallery.

![]() Select the text or graphic in which you want to create an AutoText entry.
Select the text or graphic in which you want to create an AutoText entry.
![]() Click the Insert tab.
Click the Insert tab.
![]() Click the Quick Parts button, and then point to AutoText.
Click the Quick Parts button, and then point to AutoText.
![]() Click Save Selection to AutoText Gallery.
Click Save Selection to AutoText Gallery.
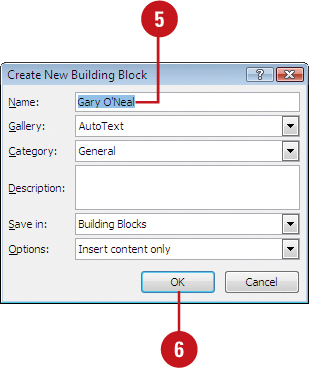
The Create New Building Block dialog box opens.
![]() Type an AutoText name, or use the suggested one.
Type an AutoText name, or use the suggested one.
![]() Click OK.
Click OK.

Did You Know?
You can delete an AutoText entry. Click the Insert tab, click the Quick Parts button, point to AutoText, right-click the entry you want to delete, click Organize And Delete, click Delete, click Yes, and then click Close.
Inserting Research Material
With the Research task pane, you can access data sources and insert research material right into your text without leaving Word. The Research task pane can help you access electronic dictionaries, thesauruses, research sites, and proprietary company information. You can select one reference source or search in all reference books. This research pane allows you to find information and quickly and easily incorporate it into your work. If you have a hard time finding research information on a specific topic, you can use the Research Options command to enable and update additional reference books and research Web sites from which to search.
Research a Topic
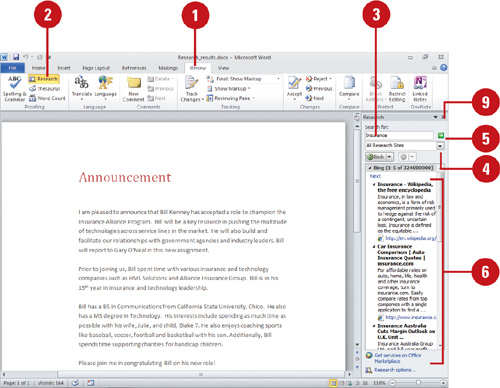
![]() Click the Review tab.
Click the Review tab.
![]() Click the Research button.
Click the Research button.
![]() Type the topic you would like to research.
Type the topic you would like to research.
![]() Click the list arrow, and then select a reference source, or click All Reference Books.
Click the list arrow, and then select a reference source, or click All Reference Books.
![]() Click the Start Searching button (green arrow).
Click the Start Searching button (green arrow).
![]() Select the information in the task pane that you want to copy.
Select the information in the task pane that you want to copy.
To search for more information, click one of the words in the list or click a link to an online site.
![]() Select the information you want, and then copy it.
Select the information you want, and then copy it.
In the Research task pane, you can point to the item you want, click the list arrow, or right-click selected text, and then click Copy.
![]() Paste the information into your document.
Paste the information into your document.
![]() When you’re done, click the Close button on the task pane.
When you’re done, click the Close button on the task pane.
![]() Click the Review tab.
Click the Review tab.
![]() Click the Research button.
Click the Research button.
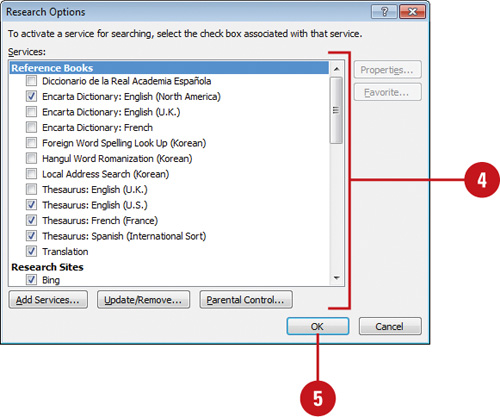
![]() In the task pane, click Research Options.
In the task pane, click Research Options.
![]() You can also click Research Options in the Privacy Option pane of the Trust Center.
You can also click Research Options in the Privacy Option pane of the Trust Center.
![]() Do one or more of the following:
Do one or more of the following:
![]() Services. To activate or remove research services.
Services. To activate or remove research services.
![]() Add Services. To add research services.
Add Services. To add research services.
![]() Update/Remove. To update or remove a service provider.
Update/Remove. To update or remove a service provider.
![]() Parental Control. To turn on parental controls.
Parental Control. To turn on parental controls.
![]() Click OK.
Click OK.
![]() When you’re done, click the Close button on the task pane.
When you’re done, click the Close button on the task pane.
Creating Footnotes or Endnotes
Footnotes are used to provide additional information that is inappropriate for the body of the text, and to document your references for information or quotes presented in the body of the document. Footnotes are appropriate for academic, scientific, and occasionally business purposes. Footnotes appear at the bottom of the page on which the information is cited, and Word automatically inserts a reference mark at the insertion point to associate the information presented with the note at the bottom of the page. Creating and manipulating endnotes is identical to performing the same functions for footnotes. Endnotes differ from footnotes in that they appear at the end of the document or section (in the case of longer documents), not the bottom of the page on which the reference mark appears.
Create a Footnote or Endnote
![]() Position the insertion point where you want to insert a footnote.
Position the insertion point where you want to insert a footnote.
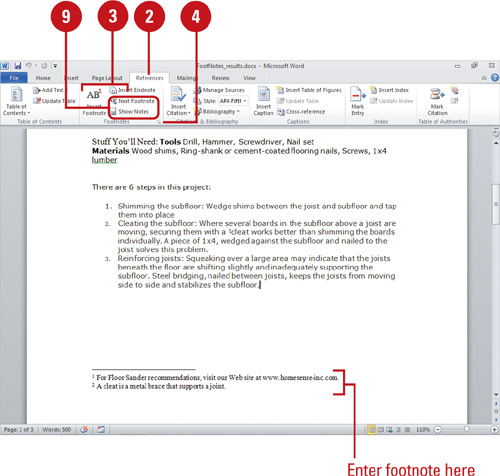
![]() Click the References tab.
Click the References tab.
![]() To quickly create a footnote or endnote, click the Insert Footnote or Insert Endnote button, and then enter footnote or endnote text.
To quickly create a footnote or endnote, click the Insert Footnote or Insert Endnote button, and then enter footnote or endnote text.
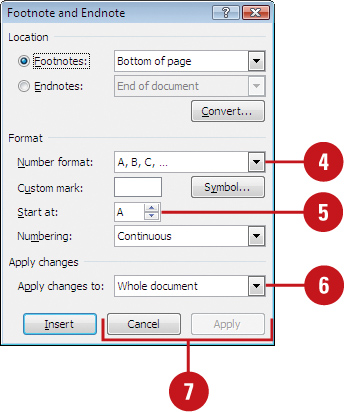
![]() To create a customized footnote or endnote, click the Footnote & Endnote Dialog Box Launcher.
To create a customized footnote or endnote, click the Footnote & Endnote Dialog Box Launcher.
![]() Click the Footnotes or Endnotes option, click the list arrow next to the option, and then select the location where you want to place the footnote or endnote.
Click the Footnotes or Endnotes option, click the list arrow next to the option, and then select the location where you want to place the footnote or endnote.
![]() Verify that the Number Format option of 1,2,3… is selected.
Verify that the Number Format option of 1,2,3… is selected.
![]() Click Insert to insert a reference mark in the text. Word moves the insertion point to the bottom of the page corresponding to the number of the reference mark.
Click Insert to insert a reference mark in the text. Word moves the insertion point to the bottom of the page corresponding to the number of the reference mark.
![]() Type the text of your footnote or endnote.
Type the text of your footnote or endnote.
![]() Click the Show Notes button and the Next Footnote button to show/hide notes and locate them.
Click the Show Notes button and the Next Footnote button to show/hide notes and locate them.
![]() Click in the document to continue with your work.
Click in the document to continue with your work.

Modifying Footnotes or Endnotes
Editing the actual text of a footnote or endnote is just like editing any text, except that you must first access the note. Use the Show Notes button to display all the notes, click to position your insertion point at the bottom of the page or in the Notes pane, and then edit. As you change other text in a document, Word repositions your notes. When your edits affect sentences with notes, or when you move, copy, or delete notes in your document, Word renumbers the other notes for you. When you move, copy, or delete a note, you work with the note reference mark in the document, not the text in the Notes pane. You can move, copy, or delete a note in the same way you would text in a document.
Edit a Footnote or Endnote
![]() To quickly view a footnote or endnote, point to the reference mark to display a ScreenTip with the contents of the note.
To quickly view a footnote or endnote, point to the reference mark to display a ScreenTip with the contents of the note.
![]() To go to a note, double-click the reference mark in the document.
To go to a note, double-click the reference mark in the document.
![]() In Draft view, the Notes pane opens.
In Draft view, the Notes pane opens.
![]() Click to place the insertion point in the Notes pane or at the bottom of the page where you want to edit the note text, and then edit the note text as if you were editing text in the document.
Click to place the insertion point in the Notes pane or at the bottom of the page where you want to edit the note text, and then edit the note text as if you were editing text in the document.
![]() If necessary, click the Close button on the Notes pane.
If necessary, click the Close button on the Notes pane.
![]() To move or copy a note, select the reference mark, click the Cut or Copy button on the Home tab, click to place the insertion point, and then click the Paste button.
To move or copy a note, select the reference mark, click the Cut or Copy button on the Home tab, click to place the insertion point, and then click the Paste button.


Did You Know?
You can delete a footnote or endnote. Select the reference mark for the footnote or endnote you want to delete, and then press Delete.
Formatting Footnotes or Endnotes
Footnote or endnote reference marks appear as 1,2,3… by default. Word provides you with various options in order to customize the reference marks the way you wish. If you’d like to change your footnotes or endnotes to be a, b, c or Roman numerals i, ii, iii, you can do that through the Insert menu. You can format the location of the footnote or endnote to be at the bottom of the text, or at the bottom of the page. You can also have Word renumber your footnotes or endnotes after each section of your document, and change the font and other formatting for a reference mark. You format a footnote or endnote reference mark in the same way you format any other text in a document.
Change a Footnote or Endnote Format
![]() Click to place the insertion point in the section in which you want to change the footnote or endnote format.
Click to place the insertion point in the section in which you want to change the footnote or endnote format.
![]() Click the References tab.
Click the References tab.
![]() Click the Footnote & Endnote Dialog Box Launcher.
Click the Footnote & Endnote Dialog Box Launcher.
![]() Click the Number Format list arrow, and then click the format you want.
Click the Number Format list arrow, and then click the format you want.
![]() To change the starting point, click the Start at Up or Down arrows.
To change the starting point, click the Start at Up or Down arrows.
![]() If necessary, click the Apply changes to list arrow, and then click Whole Document.
If necessary, click the Apply changes to list arrow, and then click Whole Document.
![]() Click Apply, and then click Cancel.
Click Apply, and then click Cancel.

Format Footnotes or Endnotes in a Document
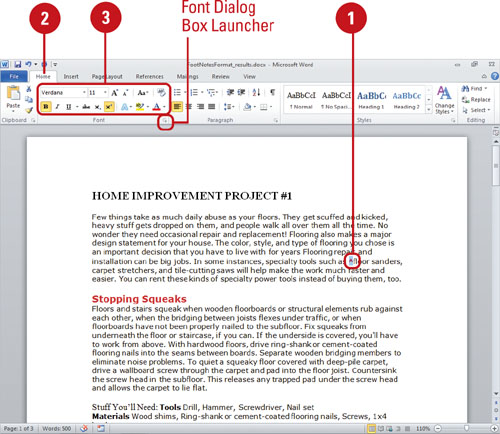
![]() In the body text, select the footnote or endnote reference mark.
In the body text, select the footnote or endnote reference mark.
![]() Click the Home tab.
Click the Home tab.
![]() Use the formatting buttons on the Home tab or click the Font Dialog Box Launcher to format the reference marks the way you want.
Use the formatting buttons on the Home tab or click the Font Dialog Box Launcher to format the reference marks the way you want.

Did You Know?
You can create a footnote or endnote continuation notice when a note is too long. Click the Draft View button on the Status bar, click the References tab, and then click the Show Notes button. If necessary, click the View Footnote Area or View Endnote Area option, and then click OK. In the Notes pane, click the list arrow, click Footnote Continuation Notice or Endnote Continuation Notice, and then type the text you want to use for the notice.
You can convert one or more notes to footnotes or endnotes. Click the Draft View button on the Status bar, and then click the Show Notes button. If necessary, click View Footnote Area or View Endnote Area option, and then click OK. Select the number of the note or notes you want to convert, right-click it, and then click Convert To Footnote or Convert To Endnote. To convert all notes to footnotes or endnotes, click the Footnote & Endnote Dialog Box Launcher, click Convert, click the option you want, click OK, and then click Close.
Creating a Bibliography
A bibliography is a list of sources that you cited during the research of a project. A bibliography typically appears at the end of a document and provides information about the source of your research. When you create a bibliography, you can choose a standard style, which is widely accepted by universities and businesses. So, all you need to do is create a citation and enter the source information. If you’re not sure what source you want to use, you can insert a placeholder and fill in the source information later. After you finish adding sources to a document, you can use the Manage Source dialog box to choose which ones you want to use before you create the bibliography.
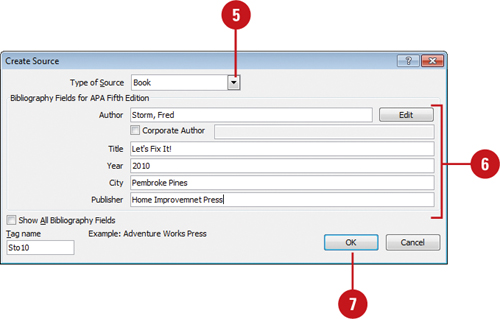
Add a Citation and Source to a Document
![]() Click the References tab.
Click the References tab.
![]() Click the Style list arrow, and then click the style you want.
Click the Style list arrow, and then click the style you want.
If you’re not sure, ask your professor or a business associate, or search the Internet.
![]() Click to place the insertion point where you want to place the citation.
Click to place the insertion point where you want to place the citation.
![]() Click the Insert Citation button, and then click Add New Source.
Click the Insert Citation button, and then click Add New Source.
![]() To add new placeholder to fill in the source information later, click Add new placeholder, type a placeholder name, and then click OK.
To add new placeholder to fill in the source information later, click Add new placeholder, type a placeholder name, and then click OK.
![]() Click the Type of Source list arrow, and then select a source type.
Click the Type of Source list arrow, and then select a source type.
![]() Enter the bibliography information for the source.
Enter the bibliography information for the source.
![]() Click OK.
Click OK.

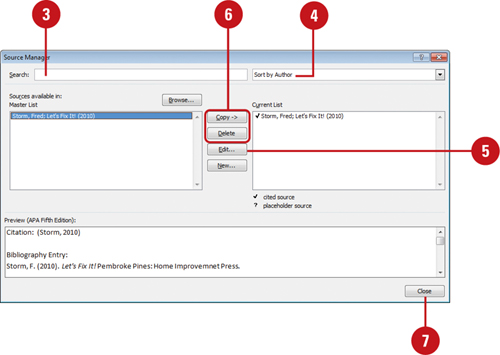
Manage Sources and Placeholders
![]() Click the References tab.
Click the References tab.
![]() Click the Manage Sources button.
Click the Manage Sources button.
All the sources from previous documents appear in the Master List, and currently cited sources in the Current List.
![]() To search for sources, click in the Search box, type search criteria, and then press Enter.
To search for sources, click in the Search box, type search criteria, and then press Enter.
![]() To sort source information, click the Sort list arrow, and then select a sort type.
To sort source information, click the Sort list arrow, and then select a sort type.
![]() To edit a placeholder, click the placeholder you want to edit in the Current List, and then click Edit.
To edit a placeholder, click the placeholder you want to edit in the Current List, and then click Edit.
![]() Use the Copy and Delete buttons to move sources around or delete them.
Use the Copy and Delete buttons to move sources around or delete them.
![]() Click Close.
Click Close.
Create a Bibliography
![]() Click to place the insertion point where you want to insert a bibliography.
Click to place the insertion point where you want to insert a bibliography.
![]() Click the References tab.
Click the References tab.
![]() Click the Bibliography button.
Click the Bibliography button.
![]() Click the bibliography format style you want to insert.
Click the bibliography format style you want to insert.
![]() To update a bibliography, select the bibliography, click the tab button, and then click Update Bibliography.
To update a bibliography, select the bibliography, click the tab button, and then click Update Bibliography.

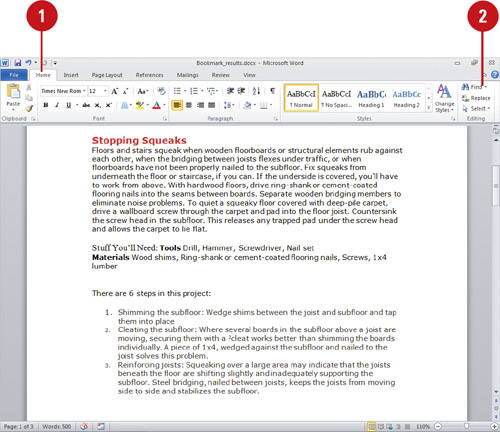
Creating a Bookmark
Instead of scrolling through a long document to find a specific word, phrase, or section, you can use bookmarks. Bookmarks are used to mark text so that you, or your reader, can quickly return to it. Using bookmarks as a destination make it easy to navigate through a long document. You can also navigate through documents with bookmarks by selecting a bookmark as a destination in the Go To dialog box.
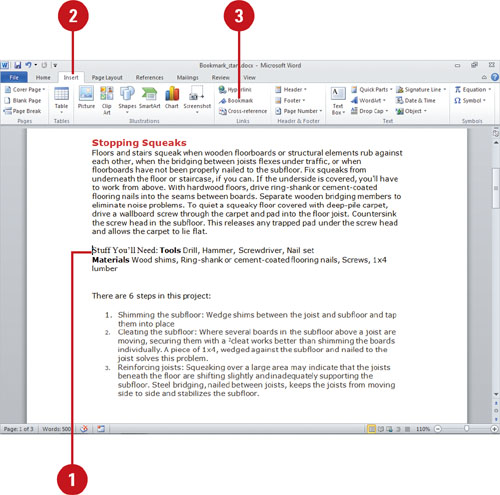
Create a Bookmark
![]() Click in your document where you want to insert a Bookmark.
Click in your document where you want to insert a Bookmark.
![]() Click the Insert tab.
Click the Insert tab.
![]() Click the Bookmark button.
Click the Bookmark button.
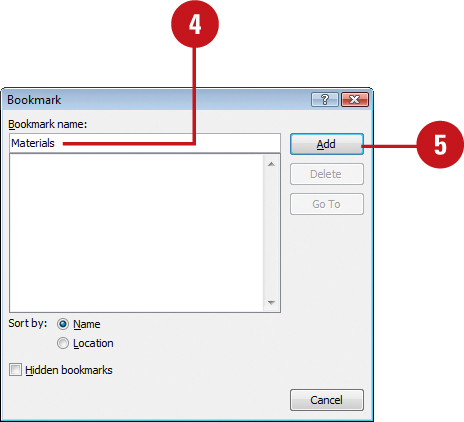
![]() Type a one word descriptive name for your Bookmark.
Type a one word descriptive name for your Bookmark.
![]() Click Add.
Click Add.
![]() Click the Home tab.
Click the Home tab.
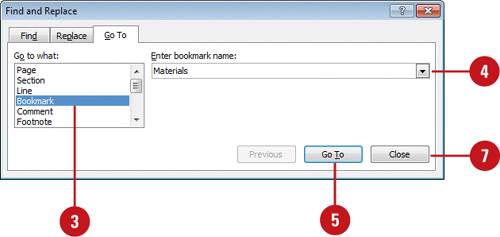
![]() Click the Find button arrow, and then click Go To.
Click the Find button arrow, and then click Go To.
![]() On the Go To tab, click Bookmark.
On the Go To tab, click Bookmark.
![]() Click the Enter bookmark name list arrow, and then select the bookmark you want to move to.
Click the Enter bookmark name list arrow, and then select the bookmark you want to move to.
![]() Click Go To.
Click Go To.
![]() If you want, choose another bookmark.
If you want, choose another bookmark.
![]() Click Close.
Click Close.
Did You Know?
You can go to different locations in Word. Click the Home tab, click the Find button arrow, click Go To, select the Go To What option you want, specify a location, and then click Next or Previous. When you’re done, click Close.
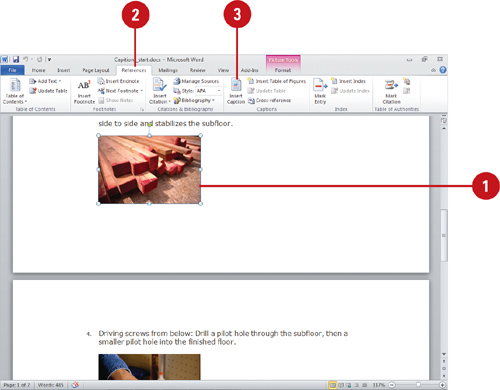
Creating Captions
Captions are helpful not only to associate images with the text that refers to them, but also to provide the reader with amplifying information about the figure, table, chart, or other illustration displayed. You can use preset captions provided, such as Figure, or you can create your own custom caption for your document.
Insert a Caption
![]() Select the image that you want to caption.
Select the image that you want to caption.
![]() Click the References tab.
Click the References tab.
![]() Click the Insert Caption button.
Click the Insert Caption button.
![]() If you want to use a Label other than the default setting of Figure, which is appropriate for most art, click the Label list arrow, and then click Equation or Table.
If you want to use a Label other than the default setting of Figure, which is appropriate for most art, click the Label list arrow, and then click Equation or Table.
![]() If you want to use a numbering sequence other than the default setting of 1,2,3…, click Numbering, make your selections, and then click OK.
If you want to use a numbering sequence other than the default setting of 1,2,3…, click Numbering, make your selections, and then click OK.
![]() Click OK.
Click OK.

Did You Know?
You can have Word automatically add a caption field. Whenever you insert a particular type of file, such as a bitmapped image, click AutoCaption. In the Add Caption When Inserting list, click the check boxes to select the instances where you want the feature to apply, select the Label, Positioning and Numbering options you want, and then click OK.
You can add custom labels for captions. Click New Label, type the name of the New Label, and then click OK.
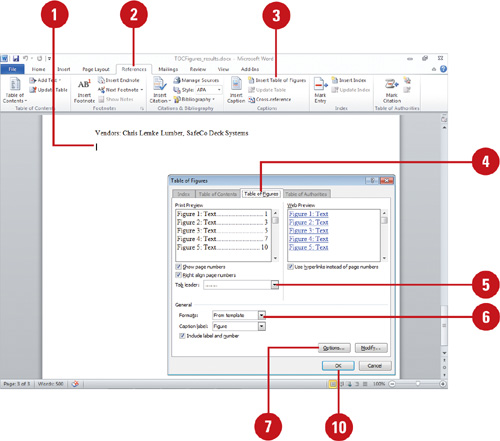
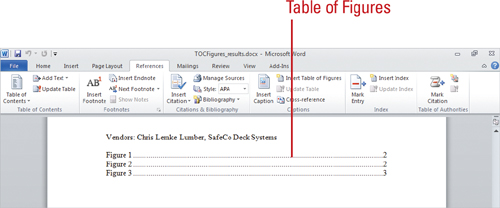
Creating a Table of Figures
If you are creating a document in which there are many illustrations (art, photographs, charts, diagrams etc.), it is often helpful to the reader of your document to provide a Table of Figures. A Table of Figures is like a Table of Contents except that it deals only with the graphic content of a document, not the written content. To create the Table of Figures, Word looks for text with the Style code that you specify (Figure, Table, etc). You can also add a tab leader to make the table easier to read.
Create a Table of Figures
![]() Position the insertion point where you want the Table of Figures to appear.
Position the insertion point where you want the Table of Figures to appear.
![]() Click the References tab.
Click the References tab.
![]() Click Insert Table of Figures button.
Click Insert Table of Figures button.
![]() Click the Table of Figures tab.
Click the Table of Figures tab.
![]() Click the Tab leader list arrow, and then select the tab leader you want to use.
Click the Tab leader list arrow, and then select the tab leader you want to use.
![]() Click the Formats list arrow, and then select the format you want to use for the Table of Figures.
Click the Formats list arrow, and then select the format you want to use for the Table of Figures.
![]() If you want to create a Table of Figures from something other than the default Figure style, or the Table style, click Options.
If you want to create a Table of Figures from something other than the default Figure style, or the Table style, click Options.
![]() Click the Style list arrow, select the text formatting that you want Word to search for when building the Table of Figures, and then click Close. All figure callouts of the selected style are tagged for inclusion in the Table of Figures.
Click the Style list arrow, select the text formatting that you want Word to search for when building the Table of Figures, and then click Close. All figure callouts of the selected style are tagged for inclusion in the Table of Figures.
![]() Click OK.
Click OK.
![]() Click OK.
Click OK.

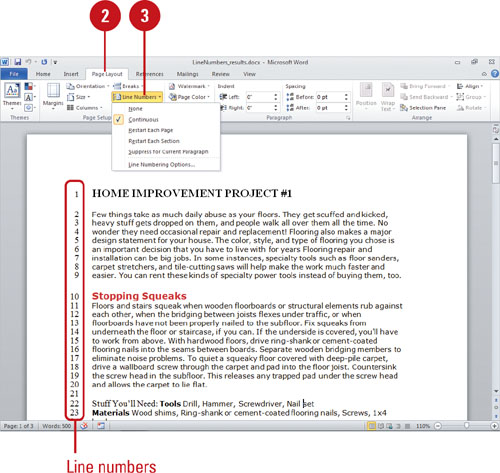
Numbering Lines
Many legal documents use the formatting convention of numbering every line of text to make it easier for multiple parties to refer to very specific text in a longer document in the context of their discussions. Other types of documents that sometimes use this convention are movie and television scripts. You can have Word automatically number each line of text within a document.
Number Each Line in a Document Quickly
![]() If you want to show or hide line numbers to only selected text, select the text you want.
If you want to show or hide line numbers to only selected text, select the text you want.
![]() Click the Page Layout tab.
Click the Page Layout tab.
![]() Click the Line Numbers button, and then click the option you want:
Click the Line Numbers button, and then click the option you want:
![]() None. Remove line numbers from the document.
None. Remove line numbers from the document.
![]() Continuous. Add line numbers to the document starting from line 1.
Continuous. Add line numbers to the document starting from line 1.
![]() Restart Each Page. Restart line numbers on each page.
Restart Each Page. Restart line numbers on each page.
![]() Restart Each Section. Restart line numbers at each section.
Restart Each Section. Restart line numbers at each section.
![]() Suppress for Current Paragraph. Remove line numbers from the selected text.
Suppress for Current Paragraph. Remove line numbers from the selected text.
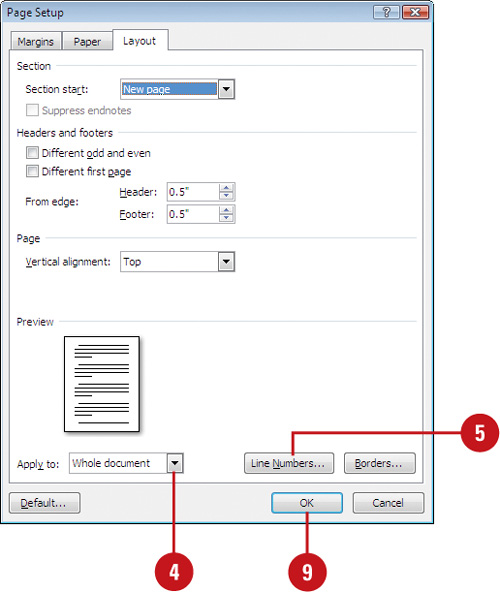
Customize Line Numbering Options
![]() If you want to display line numbers to only selected text, select the text you want.
If you want to display line numbers to only selected text, select the text you want.
![]() Click the Page Layout tab.
Click the Page Layout tab.
![]() Click the Line Numbers button, and then click Line Numbering Options.
Click the Line Numbers button, and then click Line Numbering Options.
![]() If you’re adding line numbers to part of a document, click the Apply to list arrow, and then click Selected text.
If you’re adding line numbers to part of a document, click the Apply to list arrow, and then click Selected text.
![]() Click Line Numbers.
Click Line Numbers.
![]() Click the Add line numbering check box.
Click the Add line numbering check box.
![]() Select the options you want: Start at, From text, Count by, and Numbering.
Select the options you want: Start at, From text, Count by, and Numbering.
![]() Click OK.
Click OK.
![]() Click OK.
Click OK.
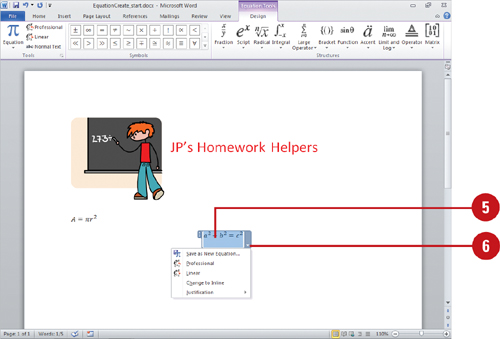
Creating an Equation
If you are creating a scientific or academic paper that involves complex equations, you may need to display them in the text without actually using them in conjunction with a table. The standard keyboard does not have all of the mathematical symbols you might need to create the equation, so you can use the Equations gallery to quickly insert a common equation or the Design tab under Equation Tools to create a custom equation. The Equations gallery is part of Word’s building block approach to creating customized documents.
Insert a Common Equation from the Equations Gallery
![]() Click where you want to insert an equation.
Click where you want to insert an equation.
![]() Click the Insert tab.
Click the Insert tab.
![]() Click the Equation button arrow.
Click the Equation button arrow.
![]() Click a common equation from the Equations gallery.
Click a common equation from the Equations gallery.
The equation appears in the document as a building block.
![]() Click to place the insertion point in the equation and then edit it like you would text.
Click to place the insertion point in the equation and then edit it like you would text.
![]() To change the equation display, click the Equations Options list arrow, and then click the option you want.
To change the equation display, click the Equations Options list arrow, and then click the option you want.
![]() Save as New Equation. Saves the equation as a new building block in the Equations gallery.
Save as New Equation. Saves the equation as a new building block in the Equations gallery.
![]() Professional. Displays equation in 2D form.
Professional. Displays equation in 2D form.
![]() Linear. Displays equation in 1D form.
Linear. Displays equation in 1D form.
![]() Change to Inline or Display. Changes the equation position to inline with text or display in the middle of the line.
Change to Inline or Display. Changes the equation position to inline with text or display in the middle of the line.
![]() Justification. Changes alignment: Left, Right, Centered, or Centered as a Group.
Justification. Changes alignment: Left, Right, Centered, or Centered as a Group.

![]() Click where you want to insert an equation.
Click where you want to insert an equation.
![]() Click the Insert tab.
Click the Insert tab.
![]() Click the Equation button arrow, and then click Insert New Equation.
Click the Equation button arrow, and then click Insert New Equation.
A blank equation building block appears.
![]() Click the Design tab under Equation Tools.
Click the Design tab under Equation Tools.
![]() Type any part of the equation, or click any of the buttons in the Structures group you want, and then select the equation segment you want.
Type any part of the equation, or click any of the buttons in the Structures group you want, and then select the equation segment you want.
![]() Select the placeholder you want to insert more of the equation.
Select the placeholder you want to insert more of the equation.
![]() Click the scroll up or down arrow, or click the More list arrow in the Symbols group, and then select the symbol you want to insert.
Click the scroll up or down arrow, or click the More list arrow in the Symbols group, and then select the symbol you want to insert.
![]() Continue to insert structures and symbols to complete your equation.
Continue to insert structures and symbols to complete your equation.


Did You Know?
You can display an equation as regular text. Select an equation, click the Design tab under Equation Tools, click the Linear button, and then click the Normal Text button.
You can change default equation options. Select an equation, click the Design tab under Equation Tools, click the Tools Dialog Box Launcher, specify the options you want, and then click OK.
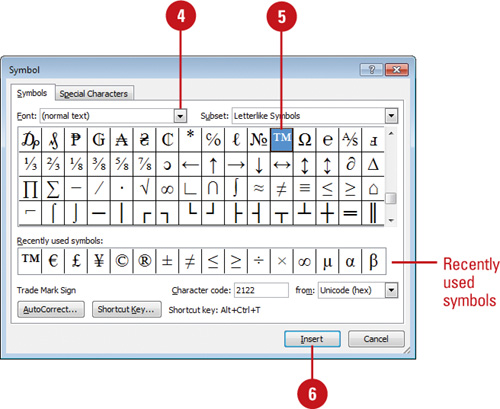
Inserting Symbols
Word comes with a host of symbols for every need. Insert just the right one to keep from compromising a document’s professional appearance with a missing accent or mathematical symbol (å). In the Symbol dialog box, you use the Recently used symbols list to quickly insert a symbol that you want to insert again. If you don’t see the symbol you want, use the Font list to look at the available symbols for other fonts installed on your computer.
Insert Recently Used Symbols and Special Characters Quickly
![]() Click the document where you want to insert a symbol or character.
Click the document where you want to insert a symbol or character.
![]() Click the Insert tab.
Click the Insert tab.
![]() Click the Symbol button.
Click the Symbol button.
![]() Click one of the recently used symbols or special characters from the list to insert it into the document.
Click one of the recently used symbols or special characters from the list to insert it into the document.

Did You Know?
You can insert a symbol using a character code. When the From box displays ASCII (decimal), you can use the number shown in the Character Code box to insert a character or symbol. Place your insertion point where you want the character on the slide, make sure Num Lock is on, hold down the Alt key, and then use the numeric keypad to type 0 (zero) followed by the character code. Then release the Alt key. The code applies to the current code page only, so some characters may not be available this way.
Insert Symbols and Special Characters
![]() Click the document where you want to insert a symbol or character.
Click the document where you want to insert a symbol or character.
![]() Click the Insert tab.
Click the Insert tab.
![]() Click the Symbol button, and then click More Symbols.
Click the Symbol button, and then click More Symbols.
![]() To see other symbols, click the Font list arrow, and then click a new font.
To see other symbols, click the Font list arrow, and then click a new font.
![]() Click a symbol or character.
Click a symbol or character.
You can use the Recently used symbols list to use a symbol you’ve already used.
![]() Click Insert. 6 5
Click Insert. 6 5
Did You Know?
You can assign a shortcut key to insert a symbol within the document. Click the Insert menu, click Symbol, click a symbol, click Shortcut Key, enter the shortcut key information requested, and then click Close.