10. Creating Mail Merge Documents
What You’ll Do
Introduction
Whether you are looking to personalize your annual Christmas letter to friends and family, or prepare a direct-mail marketing piece to 10,000 customers of your business, Word’s Mail Merge Wizard is up to the task. To perform a mail merge, you need a form letter that contains the text you want to send out, plus merge fields for the information that you want to use to personalize each letter, such as the recipient’s address, first name in the greeting line, and so forth. These fields can be added manually, or as part of the Mail Merge Wizard process.
You must have a data document that contains all of this information in either comma or tab delimited format. Most databases, such as Access or Outlook (contacts), can automatically export into this format. Alternately, you can manually create a data document if you do not have an existing database of contact information that you can use for the merge. Equipped with these two sources, the Mail Merge Wizard can quickly and easily create thousands of personalized letters, address labels, and envelopes, in a fraction of the time it would otherwise take you to do these tasks.
If you prefer a more manual approach to creating a mail merge document, you can perform the process using commands on the Mailings tab. The mail merge process follows the same general steps. First, set up the main document. Second, connect the document to a data source. Third, refine the list of recipients or items. Fourth, add mail merge fields, and fifth, preview and complete the merge. If you need to stop working during the mail merge process, you can save the document and resume it again later. Word saves all information regarding the mail merge and returns you to the place in the task pane where you left off.
Starting the Mail Merge
Did you ever send the same letter to several people and spend a lot of time changing personal information, such as names and addresses? If so, form letters will save you time. Mail merge is the process of combining names and addresses stored in a data file with a main document (usually a form letter) to produce customized documents. There are four main steps to merging. First, select the document you want to use. Second, create a data file with the variable information. Third, create the main document with the boilerplate (unchanging information) and merge fields. Finally, merge the main document with the data source to create a new document with all the merged information. When you start the mail merge, you need to open the letter that you want to mail merge or type one. Don’t worry about addressing the letter or adding a greeting line, you can accomplish that with the Mail Merge Wizard.
Start the Mail Merge Wizard
![]() Click the Mailings tab.
Click the Mailings tab.
![]() Click the Start Mail Merge button, and then click Step by Step Mail Merge Wizard.
Click the Start Mail Merge button, and then click Step by Step Mail Merge Wizard.
The Mail Merge task pane opens, displaying Step 1 of 6.
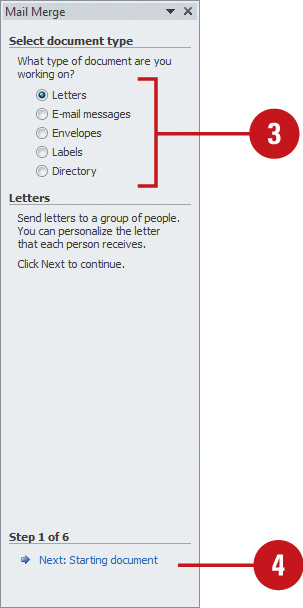
![]() Select the type of document you are working on (in this case the Letters option).
Select the type of document you are working on (in this case the Letters option).
![]() Click Next: Starting document on the task pane to display Step 2 of 6.
Click Next: Starting document on the task pane to display Step 2 of 6.
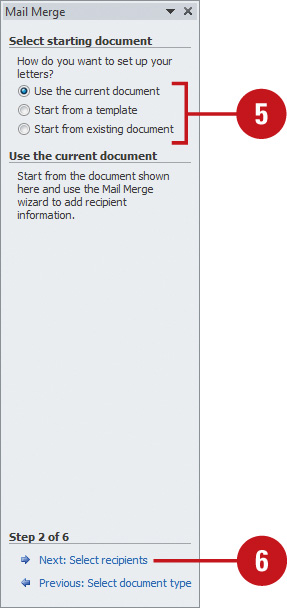
![]() Click a starting document option (such as Use the current document).
Click a starting document option (such as Use the current document).
![]() Click Next: Select recipients on the task pane to display Step 3 of 6.
Click Next: Select recipients on the task pane to display Step 3 of 6.
Did You Know?
You can set up the main document manually. Create a new or existing document, click the Mailings tab, click the Start Mail Merge button, select a document type (Letters, E-Mail Messages, etc.), and then select any options, if prompted.
Importing Data from a Database
Now it is time to specify the recipients for your mail merge. To do so, you must identify a data document as the source of the recipient information you will use to personalize the mailing. If you have an existing database of information to work with, this is the easiest method. The mail merge works with most standard database and spreadsheet programs including Microsoft Access, Microsoft FoxPro, and Microsoft Excel. Before you can import data into the Mail Merge Wizard from an external database, you must first export it from the database you are using. Follow the instructions for that database to export a file in either comma or tab delimited format, and remember which format you chose. Export the file to the My Data Sources folder.
Import Data from an Existing Database
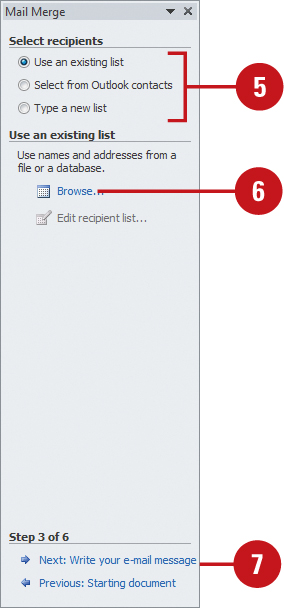
![]() On Step 3 of 6 in the Mail Merge task pane, click the Use an existing list option.
On Step 3 of 6 in the Mail Merge task pane, click the Use an existing list option.
![]() Click Browse on the task pane.
Click Browse on the task pane.
![]() Locate and select the database file from which you want to import the recipient data.
Locate and select the database file from which you want to import the recipient data.
![]() Click Open.
Click Open.
![]() If necessary, select a data source, such as a table in an Excel worksheet or Access database, and then click OK.
If necessary, select a data source, such as a table in an Excel worksheet or Access database, and then click OK.
The Mail Merge Recipient dialog box opens, displaying the data source for the merge.
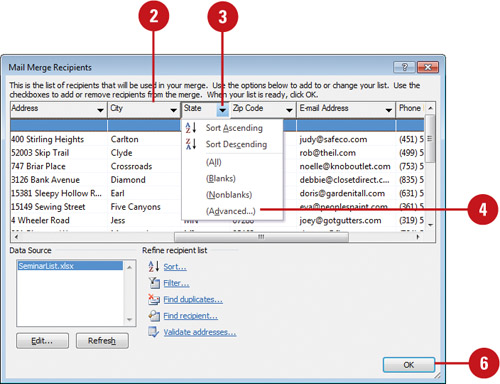
![]() Edit the recipient data (if necessary), and then click OK.
Edit the recipient data (if necessary), and then click OK.
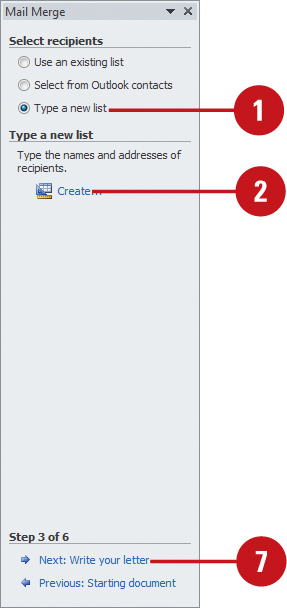
![]() Click Next: write your letter on the task pane to display Step 4 of 6.
Click Next: write your letter on the task pane to display Step 4 of 6.


Importing Data from Outlook
If you are already using Outlook to manage your contact database, you can import your Outlook contact records into the Mail Merge Wizard quickly and easily. For example, a contact record for a person or company might contain an address, telephone, e-mail address, and so forth. An item record might contain the part number, description, quantity on hand, and so on. The information in each record is organized by fields. The fields of the database correspond to the merge fields you specify in the Form Letter. Additional fields other than the ones to be used by the merge can exist, and will be ignored by the Mail Merge Wizard. For example, a direct mail piece would use the address field in a record as a merge field and ignore the e-mail address field for that record, whereas an e-mail merge would do exactly the opposite.
Import Data from Outlook
![]() On Step 3 of 6 in the Mail Merge task pane, click Select from Outlook contacts.
On Step 3 of 6 in the Mail Merge task pane, click Select from Outlook contacts.
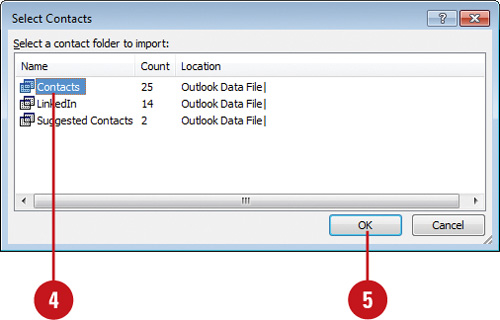
![]() Click Choose Contacts Folder.
Click Choose Contacts Folder.
![]() If an Outlook profile dialog box opens, select a profile, and then click OK.
If an Outlook profile dialog box opens, select a profile, and then click OK.
The Select Contact List Folder dialog box opens.
![]() Select the contacts list you want to use.
Select the contacts list you want to use.
![]() Click OK.
Click OK.
The Mail Merge Recipients dialog box opens, displaying the data source for the merge.
![]() Edit the recipient data (if necessary), and then click OK.
Edit the recipient data (if necessary), and then click OK.
![]() Click Next: Write your letter on the task pane to display Step 4 of 6.
Click Next: Write your letter on the task pane to display Step 4 of 6.

Did You Know?
You can connect the document to a data source manually. In the document, click the Mailings tab, click the Select Recipients button, and then select the data source you want, and any related options, if prompted.
Creating a Data Document
When you are only doing a limited number of pieces in a mail merge, or you cannot input the records into one of the previously mentioned programs for permanent use and then export them to the Mail Merge Wizard to perform the task at hand, you can use the Wizard to create your recipient list. You can also use Word to manually type a data document. The first line of the document should contain the merge field names separated by commas or tabs (choose one format and be consistent throughout the document). For example, FirstName, LastName, Address, City, State, Zip. Note that field names cannot contain spaces. At the end of the field name line, press Enter. Input all of the data for a given record separated by commas on the lines that follow, press Enter after each record entry. When all entries are entered, save the document as a text file and import it as an existing file in Step 3 of 6 in the Mail Merge Wizard.
Create a Data Document
![]() On Step 3 of 6 in the Mail Merge task pane, click the Type a new list option.
On Step 3 of 6 in the Mail Merge task pane, click the Type a new list option.
![]() Click Create.
Click Create.
![]() Input your information for the first record, and then click New Entry.
Input your information for the first record, and then click New Entry.
![]() Continue to input additional records; click New Entry after each one until all records have been entered, and then click OK.
Continue to input additional records; click New Entry after each one until all records have been entered, and then click OK.
The Save Address List dialog box opens, displaying the My Data Sources folder.
![]() Enter a name, and then click Save to save your work.
Enter a name, and then click Save to save your work.
The Mail Merge Recipients dialog box opens, displaying the data source for the merge.
![]() Edit the recipient data (if necessary), and then click OK.
Edit the recipient data (if necessary), and then click OK.
![]() Click Next: Write your letter on the task pane to display Step 4 of 6.
Click Next: Write your letter on the task pane to display Step 4 of 6.

Editing the Data Source
Regardless of the original source of your data, an external database, manually prepared list, Outlook records, or an Address List that you created within the Mail Merge Wizard, periodically you will want to make some changes to the data before completing the merge. The time to do so is in Step 3 of 6 of the Mail Merge Wizard.
Edit a Data Document
![]() On Step 3 of 6 in the Mail Merge task pane, click Edit recipient list.
On Step 3 of 6 in the Mail Merge task pane, click Edit recipient list.
![]() Select the data source.
Select the data source.
![]() Click Edit, and then make the changes you want to the fields.
Click Edit, and then make the changes you want to the fields.
![]() To add records to the merge, select any existing record, and then click New Entry.
To add records to the merge, select any existing record, and then click New Entry.
![]() To remove the selected record from the data document permanently, click Delete Entry.
To remove the selected record from the data document permanently, click Delete Entry.
![]() Click OK.
Click OK.
![]() If you want to retain the record in the data document, but exclude it from the merge, clear the check mark next to the record.
If you want to retain the record in the data document, but exclude it from the merge, clear the check mark next to the record.
All records begin selected by default and must be manually deselected from the merge.
![]() When you’re done, click OK.
When you’re done, click OK.
![]() Click Next: Write your letter on the task pane to display Step 4 of 6.
Click Next: Write your letter on the task pane to display Step 4 of 6.


Did You Know?
You can refine the data source manually. In the document, click the Mailings tab, click the Edit Recipient List button, and then make the changes you want, and any related options, if prompted.
Sorting and Filtering Data
When you are working with large numbers of records, it is often helpful to organize those records in a particular order. For example, if you are doing a bulk mailing via the USPS, they require that the pieces of the mailing be sorted in zip code order for you to receive the savings associated with the bulk mail rate. Word can easily accomplish this task for you so the records are merged and printed in zip code order. You can sort and filter records by any of the merge fields in the record.
Sort and Filter Records
![]() On Step 3 of 6 in the Mail Merge task pane, click Edit recipient list.
On Step 3 of 6 in the Mail Merge task pane, click Edit recipient list.
![]() To sort the data in a column, click the field column heading (not the list arrow inside of it).
To sort the data in a column, click the field column heading (not the list arrow inside of it).
![]() To filter out data in a field column by a specific criterion or value, click the list arrow in the column heading, and then select a filter option or value.
To filter out data in a field column by a specific criterion or value, click the list arrow in the column heading, and then select a filter option or value.
TIMESAVER Click the Filter link in the Mail Merge Recipients dialog box.
![]() To perform advance sorts, where you compare the values of certain fields, click the list arrow for any field, and then click Advanced.
To perform advance sorts, where you compare the values of certain fields, click the list arrow for any field, and then click Advanced.
![]() If you chose an advanced sort, select or enter filter and sort criteria in the Field, Comparison, and Compare to box, and then click OK.
If you chose an advanced sort, select or enter filter and sort criteria in the Field, Comparison, and Compare to box, and then click OK.
![]() When you’re done, click OK.
When you’re done, click OK.
![]() Click Next: write your letter on the task pane to display Step 4 of 6.
Click Next: write your letter on the task pane to display Step 4 of 6.

Did You Know?
You can display all the data in a column. In the Mail Merge Recipient dialog box, click the column heading list arrow used for a filter, and then click All.
Creating a Form Letter
The only difference between a normal letter and a form letter is the presence of merge fields in the latter. Merge fields can exist anywhere in the document, and correspond to any field in the data document. For example, you can insert the FirstName field periodically in a document to reaffirm to the reader that you are speaking directly to them, and minimize the negative reactions that many people feel when they receive a form letter. The most commonly used fields in a form letter are the address block and the greeting line. Each merge field corresponds to a piece of information in the data source and appears in the main document with the greater than and less than characters around it. For example, the <<Address Block>> merge field corresponds to name and address information in the data source. Word incorporates insert commands for each of these in the Mail Merge Wizard.
Create a Form Letter
![]() On Step 4 of 6 in the Mail Merge task pane, position the insertion point in the letter where you want the address block to appear.
On Step 4 of 6 in the Mail Merge task pane, position the insertion point in the letter where you want the address block to appear.
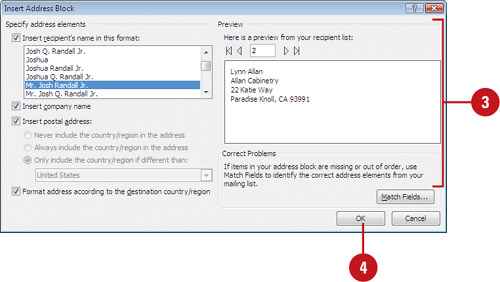
![]() Click Address Block on the task pane.
Click Address Block on the task pane.
![]() Select the Address Block options you want.
Select the Address Block options you want.
![]() Click OK to insert the block in the document.
Click OK to insert the block in the document.
![]() Position the insertion point where you want the greeting to appear.
Position the insertion point where you want the greeting to appear.
![]() Click Greeting Line.
Click Greeting Line.

Did You Know?
Word supports international languages in Mail Merge. Mail Merge chooses the correct greeting format based on the gender of the recipient if the language requires it. Mail Merge can also format addresses based on the geographical region of the recipient.
![]() Select the format you want for the greeting line.
Select the format you want for the greeting line.
![]() Click OK to apply the style to the merge field.
Click OK to apply the style to the merge field.
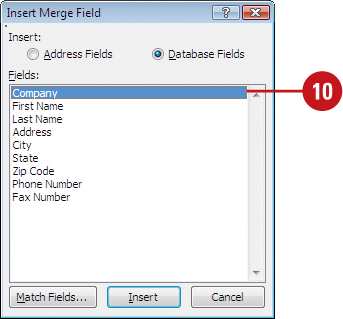
![]() If you want to add other merge fields in the body of the form letter, position the insertion point where you want the information, and then click More Items on the task pane.
If you want to add other merge fields in the body of the form letter, position the insertion point where you want the information, and then click More Items on the task pane.
![]() Select the merge field you want to place, click Insert, and then click Close.
Select the merge field you want to place, click Insert, and then click Close.
![]() When you’re done, click Next: Preview your letters on the task pane to display Step 5 of 6.
When you’re done, click Next: Preview your letters on the task pane to display Step 5 of 6.


Did You Know?
You can edit the style of a field. Right click on the field to bring up a menu of options, and then click Edit.
You can have common words used as field names. Information in a data file is stored in merge fields, labeled with one-word names, such as FirstName, LastName, City, and so on. You can insert merge field names in the main document as blanks or placeholders, for variable information. When you merge the data file and main document, Word fills in the blanks with the correct information.
You should beware of those extra spaces. Don’t press the Spacebar after entering data in a field. Extra spaces will appear in the document between the data and the next word or punctuation, leaving ugly gaps or floating punctuation. Add spaces and punctuation to your main document instead.
Previewing the Mail Merge
Although Word has automated much of the mail merge process for you, it is always a good idea to review the merged letters before printing them. You might find changes to the body text or even the merge fields that you want to make before the merge is final. The preview process occurs in Step 5 of 6 in the Mail Merge task pane.
Preview the Mail Merge
![]() On Step 5 of 6 in the Mail Merge task pane, click the double arrows on the task pane to scroll through the merge letters one at a time.
On Step 5 of 6 in the Mail Merge task pane, click the double arrows on the task pane to scroll through the merge letters one at a time.
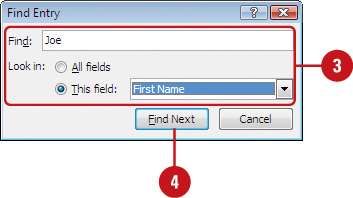
![]() To find a given recipient or group of recipients quickly, click Find a recipient on the task pane.
To find a given recipient or group of recipients quickly, click Find a recipient on the task pane.
![]() If you chose Find, enter search criterion, click the All fields option, or This field option, and then select a field.
If you chose Find, enter search criterion, click the All fields option, or This field option, and then select a field.
![]() Click Find Next to proceed to the next matching record.
Click Find Next to proceed to the next matching record.
![]() When you’re done, click Close.
When you’re done, click Close.
![]() Click Next: Complete the merge on the task pane to display Step 6 of 6.
Click Next: Complete the merge on the task pane to display Step 6 of 6.

Did You Know?
You can exclude a recipient from the merge. Click the Exclude This Recipient button on the task pane on Step 5 of 6.
You can preview the mail merge results manually. In the document, click the Mailings tab, click the Preview Results button, view the results, and then make the changes you want.
Completing the Mail Merge
After you set up a data document and enter merge fields into the main document, you are ready to merge the document to create a new document with all the merged information. The new document contains individualized copies of the main document for each record in the data source. You can edit the new document to personalize individual copies in the main document, and then print the end result.
Personalize and Print the Mail Merge
![]() Proceed to Step 6 of 6 in the Mail Merge task pane.
Proceed to Step 6 of 6 in the Mail Merge task pane.
![]() If you want to make additional changes to the letters, click Edit Individual Letters.
If you want to make additional changes to the letters, click Edit Individual Letters.
![]() Specify the settings you want to use for the merged records and the selected range of the records are saved to a separate file for editing.
Specify the settings you want to use for the merged records and the selected range of the records are saved to a separate file for editing.
![]() Click OK.
Click OK.
![]() When you’re ready to print, click Print on the task pane.
When you’re ready to print, click Print on the task pane.
![]() Click the All option to print the entire merge or click another option to print only a selected portion of the merge.
Click the All option to print the entire merge or click another option to print only a selected portion of the merge.
![]() Click OK.
Click OK.


Did You Know?
You can complete the mail merge manually. In the document, click the Mailings tab, click the Find & Merge button, and then click Print Documents or Edit Individual Documents. When you’re done, save the main document.
Merging to E-mail
Instead of merging data to create a form letter you can print, you can merge data to an e-mail document. The steps to merge an e-mail document rather than a letter are essentially the same, but there are a few small differences.
Mail Merge to E-mail
![]() On Step 1 of 6 in the Mail Merge task pane, click the E-mail messages option.
On Step 1 of 6 in the Mail Merge task pane, click the E-mail messages option.
![]() Click Next: Starting document on the task pane to display Step 2 of 6.
Click Next: Starting document on the task pane to display Step 2 of 6.
![]() Click a starting document option (such as Use The Current Document).
Click a starting document option (such as Use The Current Document).
![]() Click Next: Select Recipients on the task pane to display Step 3 of 6.
Click Next: Select Recipients on the task pane to display Step 3 of 6.
![]() Click a recipient option (such as Use an existing list or Type a new list).
Click a recipient option (such as Use an existing list or Type a new list).
![]() Click Browse, double-click a data document, and then click OK to select the mail recipients.
Click Browse, double-click a data document, and then click OK to select the mail recipients.
![]() Click Next: Write your e-mail message on the task pane to display Step 4 of 6.
Click Next: Write your e-mail message on the task pane to display Step 4 of 6.

Did You Know?
You can set up the main document for E-mail messages manually. Create a new or existing document, click the Mailings tab, click the Start Mail Merge button, and then click E-mail Messages.
![]() Type your e-mail, click a location in the document, click one of the field items on the task pane (such as Address Block or Greeting Line), select the options you want, and then click OK.
Type your e-mail, click a location in the document, click one of the field items on the task pane (such as Address Block or Greeting Line), select the options you want, and then click OK.
![]() Click Next: Preview your e-mail message on the task pane to display Step 5 of 6.
Click Next: Preview your e-mail message on the task pane to display Step 5 of 6.
![]() Preview the data in the letter, and then make any changes.
Preview the data in the letter, and then make any changes.
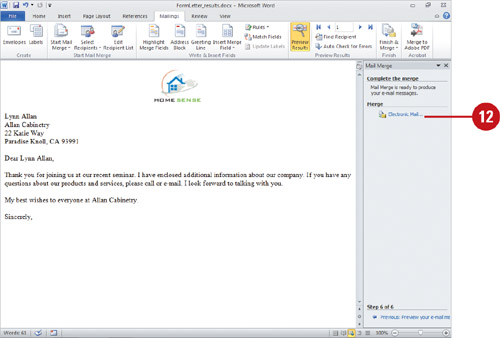
![]() Click Next: Complete the merge on the task pane to display Step 6 of 6.
Click Next: Complete the merge on the task pane to display Step 6 of 6.
![]() Click Electronic Mail.
Click Electronic Mail.
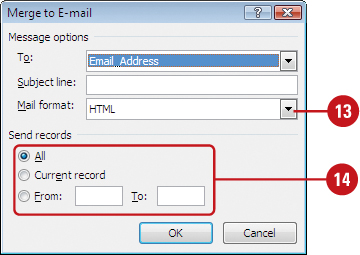
![]() Select the mail format you want to use, normal text, HTML mail, or sending the document as an attachment.
Select the mail format you want to use, normal text, HTML mail, or sending the document as an attachment.
![]() Specify the range of records you want to send, and then click OK.
Specify the range of records you want to send, and then click OK.
Creating Merged Mailing Labels
You can use a data document to create more than one kind of merge document. For example, you can use a data document to print mailing labels or envelopes to use with your mailing. The process for creating mailing labels is similar to the mail merge process for form letters, except that you insert the merge field into a main document that contains a table with cells in a specific size for labels. During the process for creating mailing labels, you can select brand-name labels in a specific size, such as Avery Standard 1529. After you merge the data into the main document with the labels, you can print the labels on a printer.
Create Labels Using Mail Merge
![]() Click the Mailings tab.
Click the Mailings tab.
![]() Click the Start Mail Merge button, and then click Step by Step Mail Merge Wizard.
Click the Start Mail Merge button, and then click Step by Step Mail Merge Wizard.
The Mail Merge task pane opens, displaying Step 1 of 6.
![]() Click the Labels option.
Click the Labels option.
![]() Click Next: Starting document on the task pane to display Step 2 of 6.
Click Next: Starting document on the task pane to display Step 2 of 6.
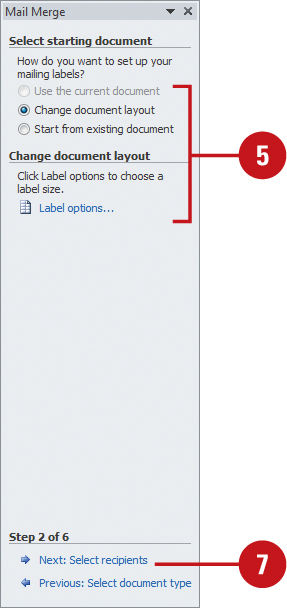
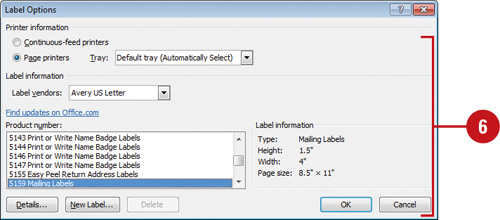
![]() Click a starting document option button (such as Change Document Layout), and then click Label Options.
Click a starting document option button (such as Change Document Layout), and then click Label Options.
![]() Select the label options you want, and then click OK.
Select the label options you want, and then click OK.
![]() Click Next: Select recipients on the task pane to display Step 3 of 6.
Click Next: Select recipients on the task pane to display Step 3 of 6.

Did You Know?
You can set up the main document for labels manually. Create a new or existing document, click the Mailings tab, click the Start Mail Merge button, click Labels, select the label options you want, and then click OK.
![]() Click a recipient option button (such as Use An Existing List or Type A New List), click Browse, double-click a data document, select a data source and click OK, select the recipients you want, and then click OK.
Click a recipient option button (such as Use An Existing List or Type A New List), click Browse, double-click a data document, select a data source and click OK, select the recipients you want, and then click OK.
![]() Click Next: Arrange your labels at the bottom of the task pane. Step 4 of 6 appears on the task pane.
Click Next: Arrange your labels at the bottom of the task pane. Step 4 of 6 appears on the task pane.
![]() Click in the first label of the document, and then click one of the field items on the task pane (such as Address Block or Greeting Line), select the options you want, and then click OK.
Click in the first label of the document, and then click one of the field items on the task pane (such as Address Block or Greeting Line), select the options you want, and then click OK.
![]() Click Update all labels.
Click Update all labels.
![]() Click Next: Preview your labels at the bottom of the task pane. Step 5 of 6 appears on the task pane.
Click Next: Preview your labels at the bottom of the task pane. Step 5 of 6 appears on the task pane.
![]() Preview the data in the letter and make any changes, and then click Next: Complete the merge at the bottom of the task pane. Step 6 of 6 appears on the task pane.
Preview the data in the letter and make any changes, and then click Next: Complete the merge at the bottom of the task pane. Step 6 of 6 appears on the task pane.
![]() Click Print.
Click Print.
![]() Click a Print Records option, and then click OK.
Click a Print Records option, and then click OK.
![]() When you’re done, click the Close button on the task pane, and then save the form letter.
When you’re done, click the Close button on the task pane, and then save the form letter.


Creating Merged Envelopes
If your printer is set up to accept a batch feed of blank envelopes, you can skip the steps required to create mailing labels, and merge the addresses from the data document directly onto the envelopes. To determine if your printer supports this function, consult the documentation that accompanied your hardware.
Create Envelopes
![]() Click the File tab‚ click New, click Blank Document, and then click Create.
Click the File tab‚ click New, click Blank Document, and then click Create.
![]() Click the Mailings tab.
Click the Mailings tab.
![]() Click the Start Mail Merge button, and then click Step by Step Mail Merge Wizard. The Mail Merge task pane opens. Step 1 of 6 appears on the task pane.
Click the Start Mail Merge button, and then click Step by Step Mail Merge Wizard. The Mail Merge task pane opens. Step 1 of 6 appears on the task pane.
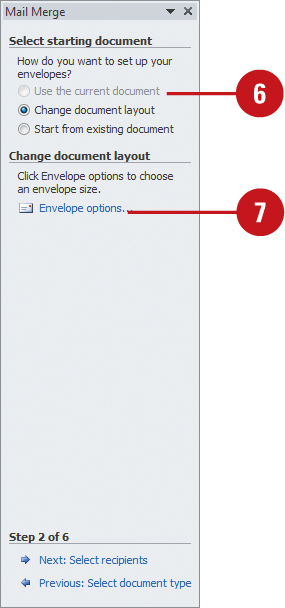
![]() Click the Envelopes option.
Click the Envelopes option.
![]() Click Next: Starting document on the task pane to display Step 2 of 6.
Click Next: Starting document on the task pane to display Step 2 of 6.
![]() If necessary, click the Use the current document option.
If necessary, click the Use the current document option.
![]() Click Envelope Options.
Click Envelope Options.

Did You Know?
You can set up the main document for envelopes manually. To create a new or existing document, click the Mailings tab, click the Start Mail Merge button, click Envelopes, select the envelope options you want, and then click OK.
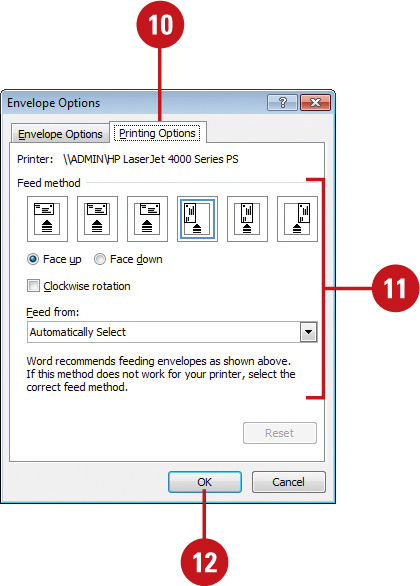
![]() Click the Envelope Options tab.
Click the Envelope Options tab.
![]() Select the appropriate envelope size and layout.
Select the appropriate envelope size and layout.
![]() Click the Printing Options tab.
Click the Printing Options tab.
![]() Select the printer, feed type, and tray to use for printing.
Select the printer, feed type, and tray to use for printing.
![]() Click OK.
Click OK.
![]() Click Next: Select recipients on the task pane to display Step 3 of 6.
Click Next: Select recipients on the task pane to display Step 3 of 6.
![]() If necessary, click the Use an existing list option, and then choose the same list you used mail merge to print the letters.
If necessary, click the Use an existing list option, and then choose the same list you used mail merge to print the letters.
![]() Click Next: Arrange your envelope on the task pane to display Step 4 of 6.
Click Next: Arrange your envelope on the task pane to display Step 4 of 6.
![]() If you want to include a return address on the mailing, type it now, position the insertion point where you want the recipient’s mailing address to appear, click Address Block on the task pane to insert the merge field, select your options, and then click OK.
If you want to include a return address on the mailing, type it now, position the insertion point where you want the recipient’s mailing address to appear, click Address Block on the task pane to insert the merge field, select your options, and then click OK.
![]() Complete the remaining steps just as you would with creating mailing labels.
Complete the remaining steps just as you would with creating mailing labels.


Addressing Envelopes and Labels
When you write a letter, you can use Word to print an address on an envelope or mailing label. Word scans your document to find a delivery address. You can use the one Word finds, enter another one, or select one from your Address Book. You can specify a return address, or you can omit it. Addresses can contain text, graphics, and bar codes. The POSTNET bar code is a machine-readable depiction of a U.S. zip code and delivery address; the FIM-A code identifies the front of a courtesy reply envelope. You can print a single label or multiple labels.
Address and Print Envelopes
![]() Click the Mailings tab, click the Envelopes button, and then click the Envelopes tab, if necessary.
Click the Mailings tab, click the Envelopes button, and then click the Envelopes tab, if necessary.
![]() Type the recipients name and address, or click the Insert Address button to search for it.
Type the recipients name and address, or click the Insert Address button to search for it.
![]() Type your name and address.
Type your name and address.
![]() Click Options, select a size, placement, bar code, font, and then click OK.
Click Options, select a size, placement, bar code, font, and then click OK.
![]() Insert an envelope in your printer, and then click Print.
Insert an envelope in your printer, and then click Print.

Address and Print Mailing Labels
![]() Click the Mailings tab, click the Labels button, and then click the Labels tab.
Click the Mailings tab, click the Labels button, and then click the Labels tab.
![]() Type the recipients name and address, or the Insert Address button to search for it.
Type the recipients name and address, or the Insert Address button to search for it.
![]() Select which labels to print.
Select which labels to print.
![]() Click Options, select a type or size, and then click OK.
Click Options, select a type or size, and then click OK.
![]() Insert labels in your printer, and then click Print.
Insert labels in your printer, and then click Print.
