
Microsoft Office Communicator is not included in all versions of the Microsoft Office system—it is included, however, in Microsoft Office Professional Plus 2007 and in Microsoft Office Enterprise 2007. A demo version is available for free download from the Microsoft Web site:
office.microsoft.com/communicator
Communicator installation will normally be part of the Microsoft Office system installation (if obtained as part of a Microsoft Office system package), or you might need to individually install it from the download if you are using the demo version. In either case, you should install Communicator before proceeding with this section of the chapter.
Live Communications Server is a complementary and required component for Communicator providing essential server-side support for instant messaging and presence information, as well as audio and video communications. For scheduling information or free/busy information, Communicator requires Microsoft Exchange Server (versions 2000 through 2007).
Communicator has a set of function-related menus containing groups of common operations, including the Connect, Contacts, View, and Action menus. To use Communicator, you must first configure it with the account information needed to connect to the server; therefore, we’ll jump ahead to the Action menu to get your account set up. Once the account is established, we’ll systematically explore how to use the capabilities available on all of the Communicator menus.
To set the account information, follow these steps:
Start Communicator.
Click Actions on the toolbar, and then select Options.
In the Options dialog box, select the Accounts tab, as shown in Figure 39-5.
In the Sign-In Name box, type the account name that you sign in with. For internal networks using Active Directory, the sign-in name corresponds to your user principal name (UPN) that was configured in Active Directory, in the form <username>@<domain>.<tld>. Click OK.

To connect to the server, follow these steps:
Start Communicator.
Click the Sign In button, shown in Figure 39-6, or choose Connect, Sign In.
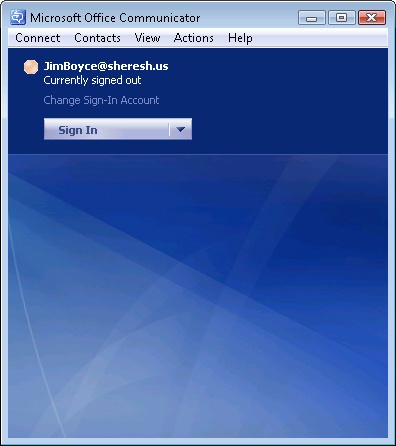
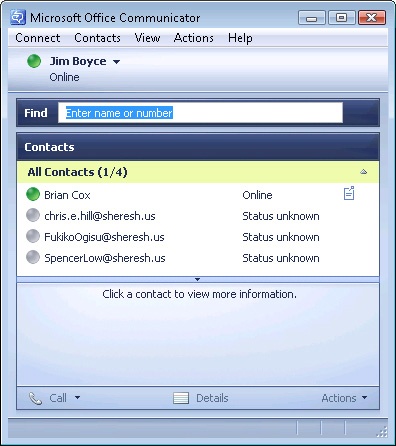
Communicator then connects to the server and changes the display to reflect that you are now online. Any contacts that you have assigned are shown (by default, this list is initially blank until you add contacts), along with a Find field to search for contacts, as shown in Figure 39-7.

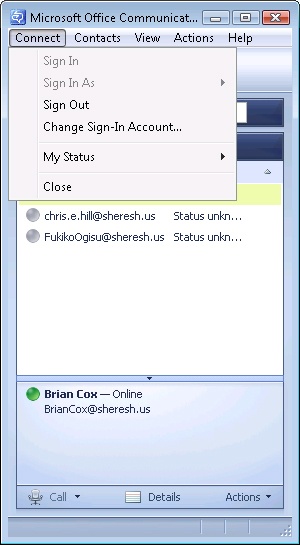
The Connect menu provides your sign-in and sign-out options, as well as the ability to sign in using another account via the Sign In As option. As shown in Figure 39-8, the sign-in options are disabled after you have signed in. You can change the default account that you use to connect to the server by choosing the Change Sign-In Account option and then changing the account information specified on the Accounts tab in the Options dialog box.
The My Status option lets you set the status of your Communicator account and indicates the current state of your account when displayed, as shown in Figure 39-9. Using this menu, you can set your online status to Online, Busy, Do Not Disturb, Be Right Back, Away, and Appear Offline, and you can opt to reset the status of your account with the Reset Status option.

The Set Note option lets you attach a note to your account, displaying a note after your name in your own Communicator window and displaying a note icon for other users who have your account added to their list, as shown in Figure 39-10. Selecting the user name or note icon causes the note contents to be displayed as a ScreenTip, and if your user account is selected, the note is displayed at the bottom of the Communicator window. The note set with the Set Note option can be removed with the Clear Note option.

Figure 39-10. You can set a note on your account to be displayed for people who have you in their contacts list.
The Personal Settings option on the Connect menu takes you to the Rules tab in the Options dialog box, letting you specify rules for handling your status display. For more information about settings in the Options dialog box, see "Managing Communicator Configuration Settings" later in this chapter.
To communicate with other people, you must add their accounts to your list of contacts. The Contacts menu in Communicator lets you add, delete, and review contact information and lets you establish groups of contacts for organizational purposes, as shown in Figure 39-11.

Figure 39-11. You can create a contacts list by adding new contacts or organize contacts into groups.
To add a new contact in Communicator, follow these steps:
Choose Contacts, Add A Contact.
The Add A Contact Wizard appears, as shown in Figure 39-12, prompting you to add a contact either by entering the e-mail address or sign-in name or by searching for the contact. If you know the account (sign-in) name or e-mail address of the contact that you want to add, select By E-Mail Address Or Sign-In Name; otherwise, select Search For A Contact. Click Next.
Type the account (sign-in) name or e-mail address of the contact that you want to look for, as shown in Figure 39-13, and then click Next.
Once the account is located and added to your contacts list, the account addition is confirmed, and you are provided an opportunity to assign the contact to a group, as shown in Figure 39-14. By default, the only group is the All Contacts group, and all new contacts are added to it. If you have created groups for your contacts (discussed shortly), select the group to add the new contact to, and then type the account (sign-in) name or e-mail address of the contact that you want to add to your list. Click Finish to finish adding contacts, or click Next if you want to add more contacts.
When you have finished, the contacts are shown in your contacts list, as shown in Figure 39-15, and you can start communicating with them using the Communicator instant messaging and audio and video connectivity features.


You can delete a contact from your list easily by choosing Contacts, Delete A Contact. In the Delete A Contact dialog box, select the name of the contact that you want to delete, and then click OK. You will be asked to confirm the deletion—click Yes to delete the contact, or click No to retain the contact. You can also select the contact and then press Delete. Click Yes to remove the contact from your list or No to keep it.
To review a contact’s information, including Status, Idle Since, Calendar, Note, and Phone Numbers settings, click Contacts, View A Contact’s Properties, select the contact that you want to view, and then click OK. You can also right-click a contact and then choose Properties.
You can establish groups to organize your contacts into. If you have many contacts in your list, for example, you might want to subdivide them into groups by department (Development, Sales, Support, and so on), by role (Managers, Technical Leads, and so on), or by any other grouping classification that is useful to you. One of the advantages of organizing your contacts by group is that you can start a conversation with the entire group—a feature that is particularly useful for groups of contacts that are all involved in the same project.
To create a group, simply choose Contacts, Create New Group. The new group will be automatically displayed in the Contacts list, and you will be prompted to assign a name for it. After you have created and named the group, you can move contacts into the group by dragging them into the new group or by right-clicking the contact, choosing Move Contact To, and then selecting the group to move the contact into. In the example shown in Figure 39-16, the Infrastructure Team group was created and two contacts were moved into it. Notice that once you create a group, the All Contacts group is renamed Other Contacts.

Deleting a group is a straightforward process of right-clicking the group and then choosing Delete Group—however, deleting a group will also delete the contacts within the group. If you want to retain some or all of the contacts but want to remove the group, move the contacts to another group first, and then delete the group. Renaming a group is likewise simple—just right-click on the group, choose Rename Group, and then type in the new group name. In this case, all of the contacts are retained.
You can change the display of the contact information in Communicator by using the View menu, as shown in Figure 39-17. By default, the Show Friendly Name, Show Extended Status Icons (such as the Note icon), and Tabs options are selected. The Show Extended View option displays contact information such as notes with the contact name. You can keep the Communicator window always visible on the screen by selecting the Always On Top option. To view the entire list of files that have been sent to you via Communicator, you can select the Received Files option, and the list of files that you have received is displayed.

To communicate with people in your Communicator contacts list, you can either use the Actions menu, shown in Figure 39-18, or right-click the contact and then select the desired action (such as Send An Instant Message). In addition to initiating instant messaging, audio, and video communications, you can also choose Send E-Mail or Send A File. The Audio And Video Tuning Wizard will assist you in configuring the audio and video settings. Choosing Options on the Actions menu displays the Options dialog box, in which you can configure Communicator settings.

Figure 39-18. The Actions menu lets you instant message, call, send e-mail, send a file, or even start audio and video conversations with people in your contacts list.
You can initiate an instant message session by choosing Actions, Send An Instant Message. The Send An Instant Message dialog box displays the list of contacts—to start an instant message session with a contact, select the contact, and then click OK. The Conversation window is displayed, as shown in Figure 39-19, showing the participants in the meeting and displaying the ongoing instant messaging conversation.

The menus in the Conversation window let you control and save the instant message session, and otherwise include the same options as the Communicator window menus. The Actions menu, however, has the additional option Invite Someone To Join This Conversation, enabling you to add other people to the instant message session.
You can send e-mail to anyone on your contacts list by choosing Action, Send E-Mail, or by right-clicking a contact and then choosing Send E-Mail. Your default e-mail client opens an e-mail form, with the selected contact e-mail address in the To field. Just fill in the message body, select any attachments or other content, and send the message to the intended recipient.
The Audio And Video Tuning Wizard analyzes your microphone, speakers, and video camera and checks to make sure that they are working correctly. To test your audio and video hardware, first verify that your hardware is connected properly—the microphone is plugged in, the speakers are plugged in and turned on, and your video camera is connected. Then choose Actions, Audio And Video Tuning Wizard. The wizard will walk you through testing your audio and video equipment—simply read each of the steps and then click Next when you are ready to proceed.
You can call a contact by right-clicking the contact’s name in the Conversation dialog box, choosing Call, and then selecting either a displayed phone number or Computer. If you are calling computer to computer, each party to the call must have a full-duplex sound card and a functioning microphone and speaker system (or USB equivalent). When you call using the phone number, Communicator initiates and manages the phone call, and also allows you to forward calls and put calls on hold.
In Communicator, to share an application or a whiteboard with a contact, select the contact, choose Action, More, and then select Start Sharing. In the Sharing Controls area of the Conversation window, select Start Application Sharing or Whiteboard.
For Communicator to establish a video conversation, both you and the recipient must have video-capable and audio-capable computers, and you have to perform audio and video tuning. Once you have completed the Audio And Video Tuning Wizard, you can begin a video session with a contact by choosing Action, More, and then selecting Start A Video Conversation. Once the recipient has accepted the conversation, the video session is established in the Conversation window, as shown in Figure 39-20. You can use the video controls to switch videos, stop a video conversation, or show the video full screen.

You can share files with your contacts by using the Send A File option in Communicator. To send files to someone on your contacts list, either choose Action, More, click Send A File, and then select the contact to receive the file, or right-click a contact and then choose Send A File. The Send A File dialog box opens—browse to the file that you want to send, select the file, and then click Open. Communicator is ready to send the file immediately, but it requires the contact to agree to receive the file before transmission occurs. The contact can press Alt+C to accept the file and have it saved to the default file transfer folder, Alt+S to save the file to a different folder, or Alt+D to decline the file transfer. If you want to cancel the file transfer that you initiated, press Alt+Q.
If Office Live Meeting is installed, you can begin a Live Meeting session with a contact by choosing Action, More and then selecting Start Microsoft Office Live Meeting. For more information about using Live Meeting, see "Using Microsoft Office Live Meeting" later in this chapter.
The configuration settings for Communicator 2005/2007 are available in the Options dialog box, accessible by choosing Actions and then choosing Options.
To include phone numbers with your contact information, you can use the Personal tab to enter phone numbers for work, mobile, home, and others, as shown in Figure 39-21. Next to each number you enter is a check box so you can specify whether the phone number is published with your contact information. You can also specify which personal information manager you use or select None. Communicator does not automatically complete these fields with information from either Active Directory or the Outlook Address Book, so if you want to make this information available to others, you must do so manually.

You can configure several options for Communicator on the General tab, shown in Figure 39-22, including specifying whether to Automatically Run Communicator When I Log On To Windows and whether to Automatically Open The Main Window When Communicator Starts. (Both of these options are selected by default.)

Figure 39-22. On the General tab, you can select the startup options, where to store transferred files, and which language to use.
The File Transfer field lets you select the folder where you want files that are sent to you to be stored. (By default, the files will be stored in the My Received Files folder under the Documents folder in your user profile.) To have Communicator operate in a language different from the default, click the drop-down list in the Language area, and then select the preferred language.
To control the font used in your instant messaging with other people on your contacts list, select the Instant Messages tab, shown in Figure 39-23, and then click Change Message Font. In the Change My Message Font dialog box, select the font, size, style, and color to use in your instant messaging, and then click OK. You can also enable or disable the availability of emoticons in your messages and turn on or off the time stamping of messages.

The Alerts tab, shown in Figure 39-24, enables you to control when Communicator displays status and incoming conversation alerts and whether to use sound in signaling the alert. You can set Communicator to show alerts for all contacts or only for tagged contacts and to determine when to do so dependent on status (either Busy or Do Not Disturb). By clicking Configure Sounds, you can specify what sounds are used in alerts by configuring the Communicator options (Background Message, Incoming Call, and others) in the Sounds dialog box.

On the Permissions tab, shown in Figure 39-25, you can specify how you are added to other people’s lists of contacts, and you can select who can see your status, send instant messages or files, and add you to their contacts list. You can choose to allow or block any specific user account that you add to the Permissions List. The All Other Contacts account has the option to set permissions to Allow, Block, or Notify. There is also an option to control how contacts from outside your Active Directory domain are handled—the Block Instant Messages From Federated Contacts Who Are Not Allowed To See My Status check box limits which federated user accounts can send instant messages.

You can configure how Communicator handles calling of other contacts on the Phones tab, shown in Figure 39-26, where you can set the default device to use for phone dialing. The Call Forwarding area enables configuration of the Communicator call forwarding operations.

You set the basic configuration for Communicator on the Accounts tab, shown in Figure 39-27, specifying the Sign-In Name and configuring the Phone Integration and Conferencing Information settings.

Figure 39-27. Use the Accounts tab to set the Sign-In Name as well as phone and conferencing information.
To configure the Live Communications Server address and protocol, click Advanced to display the Advanced Connection Settings dialog box, shown in Figure 39-28. Click Configure Settings, specify the Live Communications Server address in the Server Name Or IP Address field, and then specify the protocol by selecting either the TCP or the TLS protocol under Connect Using.

To establish the criteria for when Communicator changes your online status to Away or Do Not Disturb, configure the options on the Rules tab, shown in Figure 39-29. In the Status area, you can set the idle time limit when your status changes to Away by clicking the drop-down list and then selecting the time delay. You can also configure options to Enable Do Not Disturb on your phone and control Microsoft Office Outlook Integration. (These options are selected by default.) These Outlook 2007 options let Communicator Automatically Retrieve Out Of Office Settings From Outlook, and you can opt to have it Update My Status And Contact List Based On Calendar Data. You can also have Communicator send you e-mail when a call is missed or when a call is automatically forwarded from this computer. The Windows Media® Player check box enables you to have Microsoft Windows Media Player pause when you are using Communicator for phone, voice, and video conversations.
