The journal can be a useful tool, helping you track how you spend your time over the course of the workday. This information, collected over time, can be used for a range of things such as reporting, billing, and staffing allocation. You can analyze your work activities to get a clearer picture of which projects and activities occupy your time and then use that data to optimize your time and productivity.
The more information a journal item contains, the more useful it is. Get in the habit of entering critical information when you create a journal item, especially contacts, categories, and the contents of other fields used for organization and retrieval of journal items. It takes only a minute to make notes or update the time spent on an activity while it’s fresh in your mind, and by providing as much information as possible, you ensure that you have all of the information you might need.
By regularly using the journal, you will also become more familiar with how it operates and what sort of data it is recording. Although the journal can accumulate a lot of information, both automatically and manually, it’s unlikely that it will store exactly what you want right after you start using it. Taking a few minutes on a regular basis to fine-tune your journal settings will pay off when it comes time to analyze the accumulated data. If you find yourself deleting a specific sort of entry more often than not, stop automatically recording it.
The journal offers automatic recording of certain Outlook 2007 activities and time spent editing Microsoft Office system documents. Enabling automatic tracking of those items provides you with quite a bit of data with no additional effort. These options should be used judiciously, however, to ensure against collecting so much information that it becomes difficult to find the important items among the unneeded ones.
It might be tempting to turn on all of the automatic recording options for the journal so that you collect the maximum possible amount of information. Although you can do this, you might discover that doing so introduces a lot of unnecessary journal items. Outlook 2007 automatically records e-mail messages, journal items, notes, and upcoming tasks and appointments for each entry in the Contacts folder, so in general you don’t need to record these items in the journal. You can view these items by opening the Contacts folder and selecting Activities in the Show group.
Note
If you want to export a file containing records of items like e-mail messages and notes to work with in an Excel 2007 workbook or an Access 2007 database, you must track these items using the journal. Although these activities can be viewed on the Activities page for a contact, you cannot export information to a file from there.
Similarly, you might want to be careful about automatically recording all work that you do in a certain type of document. If most of your work in Excel 2007 is on projects that you want to track with the journal, turning on automatic recording for Excel 2007 files is a good idea; you can delete the occasional unneeded journal item. If, on the other hand, most of your time in Word 2007 is spent on projects or tasks that don’t need to be tracked, you should manually create journal items for those few Word 2007 documents that actually need them.
The automatic recording feature of the journal works only with the contents of your primary Contacts folder, not with the Exchange Server Global Address List (GAL) or any secondary Contacts folders. If you want to automatically record journal items associated with people whose e-mail addresses are in a secondary Contacts folder or provided by the GAL, you must first add them to your primary Contacts folder.
To copy or move contacts between folders, open the Outlook 2007 Contacts folder, and then select the source folder in the My Contacts list in the Navigation Pane. Right-click an entry and drag it to the destination Contacts folder (by default, the primary Contacts folder is the top one in the list), and then select Move or Copy.
Although there are a number of entry types in the default journal configuration, there are likely to be additional entry types that you would find useful. You might want the ability to track things such as travel time or research as discrete entry types to make billing for those activities easier and more accurate. You should add custom entry types so that your journal reflects how you spend your time in greater detail. See "Creating and Using Custom Entry Types" earlier in this chapter for detailed information about creating additional entry types.
Once you have started to use the journal to track your activities, you can analyze your current time usage to find ways to increase your productivity. You are likely to discover some unexpected time leaks—things that consume an inordinate amount of your time. Identifying these time leaks is the first step in correcting them and getting better control over your work time.
By examining journal items in a variety of views, you can assess how much time a given project, client, and activity is currently taking. If you need more extensive analysis and reporting functionality, journal information can be exported to a file for use with external programs.
Choosing the right view for the job will make it easier for you to understand and use the information collected by the journal. There are a number of predefined views available, allowing you to choose the view that makes it easiest to review a particular set of items.
The journal provides two types of views by default:
Timeline views. Journal items are displayed on a timeline, which can be set to show a single day, a week, or a month at a time, with items grouped by Entry Type, Contact, or Category. Timeline views are particularly good for looking at the specific tasks that occupied a given period of time and can be used to assess time usage and predict time allocation needs.
List views. These views display journal items in a simple tabular format, making them useful for reviewing a large amount of data quickly. Entry List view displays all journal items, Last Seven Days view limits the display to the past week, and Phone Calls view shows only that type of entry.
Although the existing journal views provide a number of ways to look at your journal, you will probably want your own customized views of the information. To create a custom view, on the View menu, choose Current View, Define Views. In the Custom View Organizer dialog box, select New. Give the view a name, specify where the view can be used and to whom it will be visible, and then click OK. In the Customize View dialog box, configure the available options for your custom view, and then click OK.
Note
For detailed information about creating custom views in Outlook 2007, see Chapter 27.
You might want to analyze the information contained in the journal using a database or a spreadsheet application, each of which offers certain capabilities not available in Outlook 2007. If you need to perform mathematical calculations on your journal data, for example, you can export the information to Excel 2007. For database style analysis and reporting, you can create an Access 2007 database from journal information.
To export your journal, follow these steps:
In Outlook 2007, on the File menu, choose Import And Export to open the Import And Export Wizard.
In the Choose An Action To Perform list, select Export To A File, and then click Next.
In the Create A File Of Type list, select the Microsoft Office Access or Microsoft Office Excel file format, and then click Next.
In the Select A Folder To Export From list, select the Journal folder, and then click Next.
Enter a name for the exported file, and then click Next.
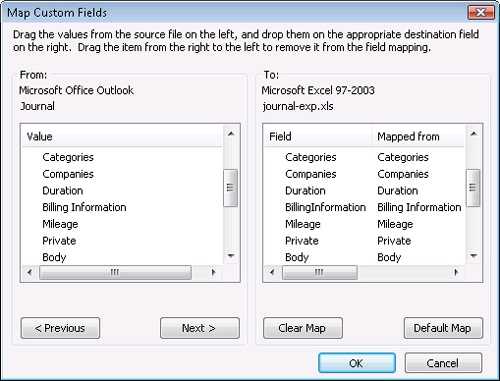
At this point, you can either click Finish to create the exported file or select Map Custom Fields if you want to customize the field mappings for the exported data. If you select Map Custom Fields, the Map Custom Fields dialog box will open, as shown in Figure 23-20, allowing you to drag a value from Outlook 2007 to a field in the exported document. To change the name of a mapped field, click the Field name in the To box and type the new name. After you have completed mapping the fields, you can click the Next button and review individual journal entries to verify that the mapping is correct. When you are satisfied with the field mappings, click OK to return to the Export To A File dialog box, and then click Finish to create the file.