Chapter 1
Introduction: The Basics of BIM
In this chapter, we cover principles of a successful building information modeling (BIM) approach within your office environment and summarize some of the many tactics possible using BIM in today’s design workflow. We explain the fundamental characteristics of maximizing your investment in BIM and moving beyond documentation with an information-rich model.
In this chapter, you’ll learn to:
- Understand a BIM workflow
- Leverage BIM processes
- Focus your investment in BIM
What Is Revit?
Autodesk® Revit® software is a BIM application that uses a parametric 3D model to generate plans, sections, elevations, perspectives, details, and schedules—all of the necessary instruments to document the design of a building. Drawings created using Revit are not a collection of 2D lines and shapes that are interpreted to represent a building; they are live views extracted from what is essentially a virtual building model. This model consists of a compilation of intelligent components that contain not only physical attributes but also functional behavior familiar in architectural design, engineering, and construction.
Elements in Revit are managed and manipulated through a hierarchy of parameters that we will discuss in greater detail throughout this book. These elements share a level of bidirectional associativity—if the elements are changed in one place within the model, those changes are visible in all the other views. If you move a door in a plan, that door is moved in all of the elevations, sections, perspectives, and so on in which it is visible. In addition, all of the properties and information about each element are stored within the elements themselves, which means that most annotation is merely applied to any view and is transient in nature. When contrasted with traditional CAD tools that store element information only in the annotation, Revit gives you the opportunity to more easily extract, report, and organize your project data for collaboration with others.
Before we get started with a detailed examination of Revit, let’s take a step back and develop a better understanding of the larger concepts of building information modeling and how they will affect your practice of architecture.
 Understanding a BIM Workflow
According to the National Institute of Building Sciences (www.nibs.org), a BIM is defined as “a digital representation of physical and functional characteristics of a facility” that serves as a “shared knowledge resource for information about a facility forming a reliable basis for decisions during its life cycle from inception onward.” Although this is the definition of the noun used to represent the electronic data, the verb form of building information modeling is equally important. BIM is both a tool and a process, and one cannot realistically exist without the other. This book will help you to learn one BIM tool—Revit Architecture—but it will also teach you about the BIM process.
Building information modeling implies an increased attention to more informed design and enhanced collaboration. Simply installing an application like Revit and using it to replicate your current processes will yield limited success. In fact, it may even be more cumbersome than using traditional CAD tools.
Regardless of the design and production workflow you have established in the past, moving to BIM is going to be a change. To begin, we’ll cover some of the core differences between a CAD-based system and a BIM-based one.
Moving to BIM is a shift in how designers and contractors approach the design and documentation process throughout the entire life cycle of the project, from concept to occupancy. In a traditional CAD-based workflow, represented in Figure 1.1, each view is drawn separately with no inherent relationship between drawings. In this type of production environment, the team creates plans, sections, elevations, schedules, and perspectives and must coordinate any changes between files manually.

Figure 1.1 A CAD-based workflow
In a BIM-based workflow, the team creates a 3D parametric model and uses this model to generate the drawings necessary for documentation. Plans, sections, elevations, schedules, and perspectives are all by-products of creating a building information model, as shown in Figure 1.2. This enhanced representation methodology not only allows for highly coordinated documentation but also provides the basic model geometry necessary for analysis, such as daylighting studies, energy usage simulation, material takeoffs, and so on.
Figure 1.2 A BIM-based workflow
Leveraging BIM Processes
As architects or designers, we have accepted the challenge of changing our methodology to adapt to the nuances of documentation through modeling rather than drafting. We are now confronted with identifying the next step. Some firms look to create even better documents, whereas others are leveraging BIM in building analysis and simulation. As we continue to be successful in visualization and documentation, industry leaders are looking to push BIM to the next level. Many of these possibilities represent new workflows and potential changes in our culture or habits, which require you to ask a critical question: What kind of firm do you want, and how do you plan to use BIM?
As the technology behind BIM continues to grow, so does the potential. A host of things are now possible using a building information model; in fact, that list continues to expand year after year. Figure 1.3 shows some of the potential opportunities.
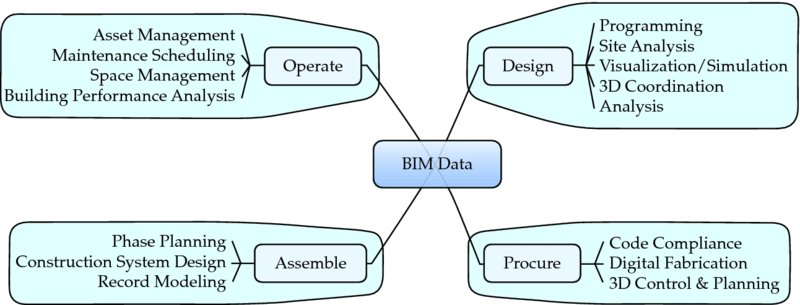
Figure 1.3 Service opportunities that BIM supports
We encourage you to explore ongoing research being conducted at Penn State University (http://bim.psu.edu), where students and faculty have developed a catalog of BIM uses and project implementation guidelines that have been adopted into the National BIM Standard-United States, version 2 (http://nationalbimstandard.org). Another important aspect of supporting numerous BIM uses is the development of open standards. The organization known as buildingSMART International (www.buildingsmart.org) provides a global platform for the development of such standards. Groups from a number of regional chapters around the world are generating information exchange standards that will soon have a profound impact on the ways in which we share model data with our clients and partners. Some of the latest developments are:
- IFC (Industry Foundation Classes) version 4
- COBie—Construction–Operations Building Information Exchange
- SPie—Specifiers’ Properties Information Exchange
- BCF—BIM Collaboration Format
- UK-based BIM Task Group (www.bimtaskgroup.org)
For a general overview of the approach to standardizing exchanges with information delivery manuals (IDMs) and model view definitions (MVDs), visit www.buildingsmart-tech.org/specifications.
When moving to the next step with BIM—be that better documentation, sustainable analysis, or facility management—you should look at your priorities through three different lenses:
- Visualize
- Analyze
- Strategize
Understanding these areas, specifically how they overlap within your firm, will help you define your implementation strategy for BIM tools and processes.
Visualizing
Creating documentation using BIM gives you the added advantage of being able to visualize the project in 3D. Although this was initially conceived as one of the “low-hanging fruits” of a BIM workflow, this benefit has led to an explosion of 3D graphics—perspectives, wire frames, cloud renderings, and animations—within the industry as a means to communicate design between stakeholders on a project.
This digital creation of the project has given us a variety of tools to communicate aspects of the project. It becomes “architecture in miniature,” and we can take the model and create a seemingly unlimited number of interior and exterior visualizations. The same model may be imported into a gaming engine for an interactive virtual experience. Clients no longer need to rely on the designer’s pre-established paths in a fly-through—they can virtually “walk” through the building at their own pace, exploring an endless variety of directions. The same model can then be turned into a physical manifestation either in part or in whole by the use of 3D printers (known as rapid prototyping), creating small models (Figure 1.4) in a fraction of the time it would take to build one by hand. Many types of visualization are currently possible with BIM.

Figure 1.4 An example of rapid prototyping using BIM data
Source: HOK
If we consider a complete spectrum of representations, from tabular data to 2D documentation and then to 3D visualization, tremendous opportunities exist to transform the notion of traditional design deliverables. Schedules give you instantaneous reports on component quantities and space usage, whereas plans, sections, and elevations afford you the flexibility to customize their display using the information embedded in the modeled elements. For example, the plan in Figure 1.5 shows how color fills can be automatically applied to illustrate space usage by department.

Figure 1.5 Even 2D views can evolve to illustrate and analyze spatial properties.
Expanding 2D documentation to include 3D imagery also gives you the ability to clearly communicate the intent of more complex designs. It may even have a positive effect on construction by transcending possible language barriers with illustrative documentation rather than cryptic details and notations. Figure 1.6 shows a basic example of a drawing sheet composed of both 2D and 3D views generated directly from the project model.

Figure 1.6 Construction documentation can begin to transform from 2D to 3D.
Source: HOK
The obvious benefit to creating a complete digital model of your building project is the ability to generate a wide variety of 3D images for presentation. These images are used to not only describe design intent but also to illustrate ideas about proportion, form, space, and functional relationships. The ease at which these kinds of views can be mass-produced makes the rendered perspective more of a commodity. In some instances, as shown in the left image of Figure 1.7, materiality may be removed to focus on the building form and element adjacencies. The same model is used again for a final photorealistic rendering, as shown in the right image of Figure 1.7.


Figure 1.7 Two different methods of using 3D presentation views
Source: HOK
By adding materiality to the BIM elements, you can begin to explore the space in color and light, creating photorealistic renderings of portions of the building design. These highly literal images convey information about both intent and content of the design. Iterations at this level are limited only by processing power. The photorealism allows for an almost lifelike exploration of color and light qualities within a built space even to the extent of allowing analytic brightness calculations to reveal the exact levels of light within a space.
The next logical step is taking these elements and adding the element of time. In Figure 1.8, you can see a still image taken from a phasing animation (commonly referred to as a 4D simulation) of a project. Not only do these simulations convey time and movement through space, but they also have the ability to demonstrate how the building will react or perform under real lighting and atmospheric conditions. All of this fosters a more complete understanding of the constructability and performance of a project before it is realized.

Figure 1.8 A still from an animation showing accurate physical conditions for the project
Source: HOK
Analyzing
As with visualization, the authoring environment of a BIM platform isn’t necessarily the most efficient one on which to perform analysis. Although you can create some rendering and animations within Revit, a host of other applications are specifically designed to capitalize on a computer’s RAM and processing power to minimize the time it takes to create such media. Analysis is much the same way—although some basic analysis is possible using Revit, other applications are much more robust and can create more accurate results. The real value in BIM beyond design documentation is the interoperability of model geometry and metadata between applications. Consider energy modeling as an example. In Figure 1.9, we’re comparing three energy-modeling applications: A, B, and C. In the figure, the darkest blue bar reflects the time it takes to either import model geometry into the analysis package or redraw the design with the analysis package. The lighter blue bar reflects the amount of time needed to add data not within Revit, such as loads, zoning, and so on. The lightest bar represents the time it takes to perform the analysis once all the information is in place.

Figure 1.9 BIM environmental analysis time comparison
In A and B, we modeled the project in Revit but were unable to use the model geometry in the analysis package. This caused the re-creation of the design within the analysis tool and also required time to coordinate and maintain the design and its iterations between the two models. In application C, you can see we were able to import Revit model geometry directly into the analysis package, saving nearly 50 percent of the time needed to create and run the full analysis. Using this workflow, you can bring analysis to more projects, perform more iterations, or do the analysis in half the time.
The same workflow is true for daylighting (Figure 1.10) and other types of building performance analysis. With the ability to repurpose the Revit model geometry, we are able to move away from anecdotal or prescriptive design solutions and begin to rely on calculated results. Using Revit also ensures consistency because the model is the sole source for design geometry.

Figure 1.10 Daylighting overlay from Autodesk® 3ds Max® Design software
Building analysis can reach beyond just the design phase and into the whole building life cycle. Once the building has been constructed, the use of BIM doesn’t need to end. More advanced facilities management systems support tracking—and thereby trending—building use over time. By trending building use, you can begin to predict usage patterns and help anticipate future uses such as energy consumption or future expansion. This strategy can help you become more proactive with maintenance and equipment replacement because you will be able to “see” how equipment performance begins to degrade over time. Trending will also aid you in providing a more comfortable environment for building occupants by understanding historic use patterns and allowing you to keep the building tuned for optimized energy performance.
Strategizing
To maximize your investment in a BIM-based workflow, it’s necessary to apply a bit of planning. As in design, a well-planned and flexible implementation is paramount to a project’s success. By identifying goals on a project early on in the process, it allows BIM to be implemented efficiently to reach those objectives. An effective strategy answers three key questions about a project:
- What processes do we need to employ to achieve our project goals?
- Who are the key team members to implement those processes?
- How will we support the people and processes with technology or applications?
Ask these questions of your firm as a whole so you can collectively work toward expertise in a given area, be that sustainable design or construction or something else. Ask the same questions of an individual project as well so you can begin building the model in early stages for potential downstream uses. In both cases (firm-wide or project-based), processes will need to change to meet the goals you’ve established. Modeling techniques and workflows will need to be established. Analysis-based BIM requires different constraints and requirements than a model used for documentation or clash detection. If you’re taking the model into facilities management, you’ll need to add a lot of metadata about equipment but at a lower level of detail than if you were performing daylighting studies. Applying a new level of model integrity during a design phase can be a frustrating and time-consuming endeavor. Regardless of the goal, setting and understanding those goals early on in the project process is a prerequisite for success.
Focusing Your Investment in BIM
One of the common assumptions is that larger firms have a better opportunity than smaller firms in their capacity to take on new technologies or innovate. Although larger firms might have a broader pool of resources, much of the investment is proportionally the same. We have been fortunate enough to help a number of firms implement Revit over the years, and each has looked to focus on different capabilities of the software that best express their individual direction. Although these firms have varied in size and individual desire to take on risk, their investments have all been relatively equal. From big firms to small, the investment ratio consistently equates to about 1 percent of the size of the firm. If you consider a 1,000-person firm, that equals about 10 full-time people; however, scale that down to a 10-person firm, and that becomes 1 person’s time for five weeks.
The key to optimizing this 1-percent investment is focusing your firm’s energy and resources on the most appropriate implementation objectives.
Identifying the importance of visualization, analysis, and strategy to your process will help guide you in selecting areas of implementation within your own practice. If your investment (regardless of scale) is focused and well planned, it will yield strong results. When choosing areas of implementation or how much focus to give to these areas, there are no wrong answers. Just choose a path that reflects the comfort level of your firm while maintaining focus on achieving success.
We elaborate on most of these topics throughout the remainder of this book. Using real-world examples, we illustrate a variety of techniques to visualize, analyze, and strategize using Revit.
Staffing for BIM
As you rethink the process of design and documentation, one of the fundamental changes you will need to address is staffing. A common misconception of project management when teams are first moving from CAD to BIM is that staffing the project will be the same in both workflows. This couldn’t be further from the truth because when the workflow changes, staffing allocations, the time to complete tasks, and the percentage of work by phase are all affected as a result of the changes.
Several years ago, Patrick MacLeamy, FAIA, set out to illustrate the fundamental benefit to more informed design that happened to be a by-product of building information modeling. The graph, which has come to be known as the MacLeamy Curve (Figure 1.11), is not intended to imply a simple shift in labor earlier in the design process; rather, it stresses the importance of being able to make higher-value decisions before it becomes too difficult to make changes to a design. The x-axis of the chart represents project phases from conceptual design through occupancy, whereas the y-axis represents the amount of effort in each phase.

Figure 1.11 The effort curves in the design and construction industry
Another way to think about this shift is as a diagram of leverage, as shown in Figure 1.12. Implementing BIM in earlier phases of a project gives you the greatest opportunity to add value to the overall compilation of building information delivered for a facility. When you begin BIM earlier, you may need to increase staff to build a better model or to perform energy analysis or preliminary quantity takeoffs; however, using a better tool like Revit software will not necessarily translate to the same labor used in a CAD-based project. You will find how this affects your team effort after a few BIM projects.

Figure 1.12 BIM provides the most leverage when it is implemented early in the design.
Source: Based on a graphic created by Lee Miller, HOK
Understanding Project Roles
With such a significant change in the effort behind a BIM-based project workflow, it’s also important to understand how this change affects the various roles and responsibilities for the project team. Project managers need to be able to predict staffing and time to complete tasks throughout the project phases and have relied on past precedent of staff and project types to do this. Because a BIM-based project can significantly alter the project workflow, many of the historic timetables for task completion are no longer valid. However, a BIM-based project can be broken down into a few primary roles that will allow you some level of predictability throughout the various project phases. Although the specific effort and staffing will vary between offices (and even projects), there are some general roles that will need to be accounted for on every project.
Here are three primary roles that should be considered on every BIM project:
Architect Generates design intent and coordinates issues such as material, code compliance, wall type, spatial program, and so on.
Modeler Creates 2D or 3D content that directly represents the design intent.
Drafter Works with annotations, sheet layout, view creation, and detail creation.
These roles represent efforts and general tasks that you need to take into account on any Revit project. On a large project, these roles could also represent individual people, whereas on a smaller project they might be all the same person fulfilling multiple roles. We’ll now explore each of these in more detail and discuss how these roles affect the project workflow.
DESCRIBING THE ROLE OF THE ARCHITECT
The role of the architect is to generate the design intent and manage the technical issues of the project. As the model is being created, you will naturally have to solve issues like constructability and wall types and managing the program of spatial and equipment requirements, as well as other issues involving code compliance and client relationships. This role will be the one applying standards to the project (as in wall types, keynotes, and so on) and organizing the document set. This role will need to be present on the project from the beginning to ensure consistency of the virtual building creation and isn’t necessarily limited to only one person. This role also might or might not be a “designer.” Although it is possible to do early design in Revit software, many project teams prefer to use other tools such as SketchUp or even a pencil and tracing paper. The job of the architect is steering the creation of the building within the Revit environment. This role includes the following tasks:
- Leading the creation of architectural elements and building from within the model
- Designing around code requirements and other building logistics
- Constructability and detailing aspects of the design
DESCRIBING THE ROLE OF THE MODELER
The role of the modeler—in some firms referred to as the BIM coordinator—is to create and manage the 3D families and detail components needed in the project, which include all the parametric families for things such as windows, doors, casework, wall types, stairs, railings, furnishings, and so on. Typically, this role is the responsibility of less-experienced staff who might not be able to fulfill the role of architect. This role tends to have longer periods of undisturbed time, making it better suited to deal with some of the longer, more involved tasks in modeling content. Finally, it also tends to have some familiarity with modeling applications from academia or prior work experience. The modeler might not have worked with Revit software directly but possibly with 3ds Max software or Rhino. This role includes the following tasks:
- Creating model content and families
- Creating drafting components
- Managing system families within the project
DESCRIBING THE ROLE OF THE DRAFTER
The role of the drafter is to create sheets and embellish associated views with annotations or other 2D content. The drafter is responsible for the bulk of the work needed to document the project. In earlier stages of the project, this role is typically assumed by either the architect or the modeler, but as documentation progresses into later phases of design, this can quickly become the role of multiple people on a larger project. This role includes the following tasks:
- Keynoting
- Dimensioning
- Creating sheets and configuring views
- Creating schedules
Establishing a BIM Execution Plan
To optimize your results with BIM, it’s important to start with the end in mind. Although a lot of tasks are possible with a BIM model before you draw your first wall, you will want to create a BIM execution plan. We go into more detail about creating these plans and some resources for them in Chapter 6, “Working with Consultants,” but essentially a BIM plan helps to drive the direction of the modeling effort and modeling outcomes. Will your project need to add parameters for energy modeling? Daylighting? Does the owner have expectations for a model deliverable? How much does everyone model without being too much? All of those possibilities and more are explored and documented in a BIM execution plan. It gives the project team a definitive outcome to model toward.
The BIM plan will also help address which team members you’ll need at which phases of the design. For instance, at the inception of a project design, a modeling role will be of the best use. This person can help create building form, add conceptual content, and get the massing for the building established. If you’re using the conceptual modeling tools (covered in Chapter 8, “Advanced Modeling and Massing”), the modeler can even do some early sustainable design calculations (covered in Chapter 9, “Conceptual Design and Design Analysis”).
Once the project begins to take a more established form and you complete conceptual design, you’ll need an architect role to step into the project. As in a typical project, you’ll have to mold the form into a building by applying materials, applying wall types, and validating spatial requirements and the owner’s program.
During schematic design, you’ll need to include the role of the drafter to begin laying out sheets and creating views. These sheets and views don’t have to be for a construction document set as of yet, but you’ll need to establish views for any schematic design submittals. If these views are set up properly, they can be reused later for design development and construction document submittals as the model continues to gain a greater level of detail.
You should avoid adding staff to your project during the construction documentation phase. In a BIM/Revit workflow, this can sometimes cause more problems than it solves and slow down the team rather than get work done faster.
Another proven technique of managing larger Revit projects is to assign work according to elements of the building rather than by drawing a series. For example, one person would be responsible for building enclosures and another for structure, interior partitions, furniture, vertical circulation, and so on. This strategy encourages each team member to develop their portion of the design more collaboratively because the modeling for each component must be coordinated with the surrounding systems.
Even though your team won’t be assigned work through a series of sheets, each person should be tasked with overseeing each sheet series. The annotation related to each building system is the responsibility of the respectively assigned team member, but someone else will be responsible for reviewing each series of sheets to ensure that they are appropriately maintained for presentation or distribution. On smaller projects, the project architect would likely be the person supervising the entire sheet set.
This dual responsibility is an important aspect of team management that will keep your BIM projects on track. Spending the majority of time working in the model and thus neglecting the preparation of properly annotated sheet views becomes very alluring.
ADDING TEAM MEMBERS TO FIGHT FIRES
In many projects, there might come a time when the schedule gets tight and project management wants to add more staff to meet a specific deadline. When in a 2D CAD environment, new team members would be added to help meet a deadline and would have the burden of trying to learn the architecture of the building, the thoughts behind its design, and how its various systems interact. In a Revit project, they have that same obligation, but they have the additional task of learning how the model has been configured. The model will have constraints set against various elements (such as locking a corridor width) and various digital construction issues (such as how floors and walls might be tied together, what the various family names are, or workset organization). New team members require additional time to “ramp up.”
Regardless of planning, deadlines still escape the best of architects and project managers. It’s a good idea to know when and how you can “staff up” to be sure to meet those deadlines. Keeping in mind that your team members new to the project have to learn about both the design and the model, here are some task ideas to both help production and make sure they don’t accidentally break anything:
- Content Creation You will find that you will be making model families or detail components until the end of the project. This will help get the new team members engaged in a specific part of the project and also isolate them enough until they learn a bit more about how the model has been configured.
- The Drafting Role Even if this isn’t their ultimate role, having new team members help create views and lay out sheets will get them familiar with the architecture while still allowing the team to keep progressing on the document set.
- Working on Detailing Every project can always use someone who knows how to put a building together. If you have someone new to the project and possibly even new to Revit software, let that individual embellish some of the views already created and laid out on sheets with 2D components, linework, and annotations.
The Bottom Line
Understand a BIM workflow. Understand how projects are completed in BIM and how the use of Revit software on a project can change how information within a project is created.
Master It Explain one of the primary differences between a more traditional 2D CAD-based workflow and producing documents using Revit.
Leverage BIM processes. Understanding the level of risk your firm is willing to take in new technologies will help you establish goals for your future use of BIM.
Master It Using the three areas of firm integration (visualization, analysis, and strategy), define how those areas overlap for your firm or project.
Focus your investment in BIM. Since using Revit software is a change in workflow, it is also important to understand the change in staffing and who is needed to perform what roles on a project.
Master It What are the three primary roles in a Revit project, and what are the responsibilities of those roles?