
Chapter 16
Using Images and Media
In This Chapter
![]() Displaying images in JavaFX components
Displaying images in JavaFX components
![]() Adding sounds to your programs
Adding sounds to your programs
![]() Displaying videos
Displaying videos
So far in this book, all the JavaFX applications have been pretty boring. They’ve had plenty of labels, text fields, combo boxes, and the like, but no pictures, sounds, or movies!
This chapter remedies that situation. You find out how to incorporate graphic images (that is, pictures — not necessarily images of a graphic nature) into your JavaFX applications. Just to make things interesting, I show you how to throw in sound effects and music, as well as video, too.
Using Images
An image is a file that contains a picture. Java supports pictures in several formats, including .jpg, .png, .gif, and .bmp. To incorporate images into your applications, you need to use two classes: Image and ImageView. The Image class represents an image in memory, whereas the ImageView class is a Node that you can add to a scene graph to display an Image on the screen.
Both of these classes are in the package javafx.scene.image, so you need to add the following statement to your programs:
import javafx.scene.image.*;
Using the Image class
To load an image from an external source, such as a disk file or a web location, you use the Image class. This class has six constructors, detailed in Table 16-1.
Table 16-1 The Image Class
|
Constructor |
Description |
|
Image(InputStream in) |
Creates an image by reading from the specified input stream. |
|
Image(InputStream in, double width, double height, boolean preserveRatio, boolean smooth) |
Creates an image by reading from the specified input stream and resizes it according to the width and height you specify. preserveRatio indicates whether the aspect ratio of the original image should be preserved, and smooth indicates whether image smoothing should be applied. |
|
Image(String url) |
Creates an image by reading from the specified URL. |
|
Image(String url, boolean backgroundLoading) |
Creates an image by reading from the specified URL. If backgroundLoading is true, the image is loaded in the background (that is, on a separate thread). |
|
Image(String url, double width, double height, boolean preserveRatio, boolean smooth) |
Creates an image by reading from the specified URL. This constructor specifies the width and height of the resulting image and indicates whether the aspect ratio of the original image should be preserved and whether image smoothing should be applied. |
|
Image(String url, double width, double height, boolean preserveRatio, boolean smooth, boolean backgroundLoading) |
Creates an image by reading from the specified web path and resizes it according to the width and height you specify. preserveRatio indicates whether the aspect ratio of the original image should be preserved, and smooth indicates whether image smoothing should be applied. If backgroundLoading is true, the image is loaded in the background (that is, on a separate thread). |
The easiest way to load an image is to do so directly from a file on your local computer by specifying a file path in the Image constructor. The file path string should be prefaced by the protocol string file:. For example, the following constructor creates an Image object from a file named pic001.jpg in the folder C:Pictures:
Image img = new Image("file:C:\Pictures\pic001.jpg");
You can also specify a web location using the http: protocol, as in this example:
Image img = new Image("http://www.domain.com/pic001.jpg");
Notice in the web example that you don’t have to double the slashes because HTTP addresses use forward slashes, not backward slashes.
In many cases, you want to load an image from a File object. To do that, use the File object’s toURI method to get the correct path from the file. Note: toURI returns an object of type URI; you must then call getString to convert the URI to a string:
File f = new File("C:\Pictures\pic001.jpg");
Image img = new Image(f.toURI().toString());
Here, a file is created from the path C:Picturespic001.jpg. Then, an image is created from the file.
When you create an Image object, you can specify that the image should be resized by providing the width and height parameters. You’ll also need to provide two boolean arguments. The first specifies whether you want JavaFX to preserve the image’s aspect ratio (that is, the ratio of width to height). If you specify true, the image may contain blank areas above and below or left and right as needed to preserve the image’s aspect ratio. If you specify false, the image may be distorted.
The second boolean argument specifies whether you want JavaFX to apply a smoothing algorithm to improve the clarity of the image. The smoothing process makes the image look better, but takes time.
Finally, you can specify an optional third boolean argument that indicates that you want the image to load in the background. This causes the image loading process to be spun off to a separate thread so that your main application thread can continue without waiting for the image to load.
Using the ImageView class
While the Image class holds an image in memory, the ImageView class displays an image on the screen. ImageView is a subclass of Node, which allows you to add an image view to the scene graph. The basic constructor accepts an Image object, like this:
Image img = new Image("file:C:\Pictures\pic001.jpg");
ImageView iview1 = new ImageView(img);
Then, you can add the image view to a layout pane and display it in your scene, just like any other node.
By default, the image view will display the image at full size. More often than not, you want to constrain the size by calling the setFitWidth and setFitHeight methods, and you want to call the setPreserveRatio method to ensure that the aspect ratio of the original image is preserved when it is resized. For example:
iview1.setFitWidth(200);
iview1.setFitWidth(200);
iview1.setPreserveRatio(true);
Here, the size of the displayed image is 200x200. Figure 16-1 shows how this image appears when displayed in a scene.

Figure 16-1: Displaying an image.
 Displaying a single image in two or more image views is perfectly acceptable. For example:
Image img = new Image("file:C:\Pictures\pic001.jpg");
ImageView iview1 = new ImageView(img);
ImageView iview2 = new ImageView(imt);
Because an image view is a node, you can apply special effects to it, as I describe in Chapter 14. For example, here’s a snippet of code that loads an image, places it into two image views, and then applies a motion blur to the second image view:
Image img = new Image("file:C:\Pictures\pic001.jpg");
ImageView iview1 = new ImageView(img);
iview1.setFitWidth(300);
iview1.setFitHeight(300);
iview1.setPreserveRatio(true);
ImageView iview2 = new ImageView(img);
iview2.setFitWidth(300);
iview2.setFitHeight(300);
iview2.setPreserveRatio(true);
MotionBlur blur = new MotionBlur();
blur.setRadius(25);
blur.setAngle(180);
iview2.setEffect(blur);
Figure 16-2 shows how this image appears in the two image views, the second of which has a motion blur effect.
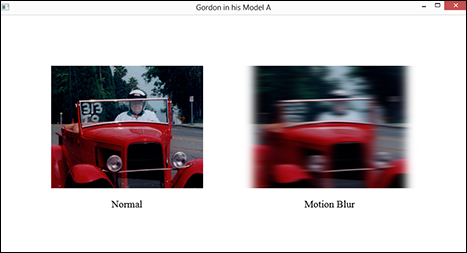
Figure 16-2: Applying an effect to an image.
Viewing an Image example
To show how the elements presented in the preceding two sections work together, Listing 16-1 shows a complete program that uses the Image and ImageView class to display all the images contained in a folder named C:Pictures on the local file system.
This program uses the Java File class to access the files in the folder. If you want more information about this class, please see my book, Java All-in-One For Dummies, 4th Edition (Wiley Publishing, Inc., of course).
Figure 16-3 shows the screen displayed by this program. As you can see, the name of the folder being accessed is displayed in the window title bar, and the name of each image is displayed by a Text field beneath each image. The images are placed in a TilePane so that they are automatically laid out in rows and columns and scroll bars are displayed as necessary.

Figure 16-3: The Photo Viewer application in action.
Listing 16-1: The Photo Viewer Application
import javafx.application.*;
import javafx.stage.*;
import javafx.scene.*;
import javafx.scene.layout.*;
import javafx.scene.control.*;
import javafx.scene.image.*;
import javafx.scene.shape.*;
import javafx.scene.text.*;
import javafx.geometry.*;
import java.io.*;
import java.util.*;
public class PhotoViewer extends Application
{
public static void main(String[] args)
{
launch(args);
}
private final String PATH = "C:\Pictures"; →19
@Override public void start(Stage primaryStage)
{
TilePane tile = new TilePane(); →23
tile.setHgap(20);
tile.setVgap(20);
tile.setPadding(new Insets(20));
tile.setPrefColumns(4);
File dir = new File(PATH); →29
File[] files = dir.listFiles(); →30
for (File f : files) →31
{
Image img = new Image(f.toURI().toString(), →33
200, 200, true, true);
ImageView iview = new ImageView(img); →36
iview.setFitWidth(200);
iview.setFitHeight(200);
iview.setPreserveRatio(true);
Text txt = new Text(f.getName()); →41
txt.setFont(new Font("Times New Roman", 16));
Region spacer = new Region(); →44
VBox box = new VBox(10, iview, spacer, txt); →46
box.setVgrow(spacer, Priority.ALWAYS);
box.setAlignment(Pos.CENTER);
tile.getChildren().add(box); →50
}
ScrollPane scroll = new ScrollPane(tile); →53
scroll.setMinWidth(920);
scroll.setMinHeight(450);
Scene scene = new Scene(scroll); →57
primaryStage.setScene(scene);
primaryStage.setTitle("Photo Viewer - " + PATH);
primaryStage.show();
}
}
The following paragraphs hit the highlights of this program:
→ 19: The PATH variable is declared here so that the class can access it.
→ 23: A TilePane is created, and its properties initialized. The tile pane will have a horizontal and vertical gap of 20 pixels and padding of 20 pixels on all four sides. Each row will show four images.
→ 29: Next, a File object is created to access the folder specified in the PATH variable. For simplicity, no error handling is provided for the file processing. In an actual program, of course, this section of code should be enclosed in a try block.
→ 30: A list of the files in the directory is retrieved by the listFiles method. The list is returned as an array of File objects.
→ 31: A for loop iterates over the list of files in the folder.
→ 33: For each file, an Image object is created. The toURI method is called to get the path to the file, and the image is resized to 200x200 pixels. Because this loop may process a lot of images, resizing the images is necessary to conserve memory.
→ 36: An ImageView is then created for the image. Its width and height are set to 200.
→ 41: A Text object is created to show the filename for the image. The font is set to 16-point Times New Roman.
→ 44: A Region is created to use as a spacer so that the Text objects will be aligned properly even if the images in the row are of different heights.
→ 46: A VBox is created to hold the image view, spacer, and text nodes. Note that the vgrow property of the spacer is set to always expand. This forces the text objects to align across the row.
→ 50: The VBox is added to the TilePane.
→ 53: The TilePane is added to a scroll pane.
→ 57: The ScrollPane is added to the scene, and the scene is displayed on the stage.
Playing Audio Files
JavaFX provides built-in support for playing audio files in common formats such as.mp3, .wav, and .aiff. Video files can be .mp4 or .flv. You only need to concern yourself with two classes: Media and MediaPlayer, designed to be analogous to the Image and ImageViewer classes you can read about earlier in this chapter.
Both the Media and MediaPlayer classes are in the package javafx.scene.media, so you need to add the following import statement to your program:
import javafx.scene.media.*;
To create a Media object, call the Media class constructor and specify the URI (Uniform Resource Identifier) to the media file. If you’re accessing a file from the local file system, the best way to get a valid URI is to first create a File object using a standard file path for the file. Then, call toURI().toString() on the File object to get the correct URI. Here’s an example that assumes the local file path is in the variable named PATH:
File f = new File(PATH);
Media media = new Media(f.toURI().toString());
After you obtain a Media object, you can easily play it by using the MediaPlayer class:
MediaPlayer mplayer = new MediaPlayer(media);
mplayer.setAutoPlay(true);
Here, the MediaPlayer constructor accepts the Media object as its only parameter. The setAutoPlay method directs the media player to play the audio clip as soon as it finishes loading.
 The MediaPlayer class is not a subclass of Node. That means that you can’t add a media player to the scene graph. If you want to display standard media controls such as play, stop, and pause buttons, you must manually create those buttons and use them to manipulate the media player object. The MediaPlayer has methods named play, pause, and stop to accomplish this.
Listing 16-2 shows a complete example that loads and plays a media clip when the user clicks a button. The example assumes that the media clip is named 574928main_houston_problem.mp3. This is a recording of astronaut Jim Lovell saying his famous line, “Houston, we’ve had a problem,” from the Apollo 13 mission. I chose this audio clip because you can freely download it from NASA’s website. Just browse to www.nasa.gov/connect/sounds, scroll down to the Apollo and Mercury section, right-click Apollo 13: Houston, We’ve Had a Problem, and choose Save Target As. I saved it to the folder C:Media. If you save it to a different location or use a different .mp3 file, you have to adjust the PATH variable accordingly.
Listing 16-2: Playing an Audio File
import javafx.application.*;
import javafx.stage.*;
import javafx.scene.*;
import javafx.scene.layout.*;
import javafx.scene.control.*;
import javafx.scene.media.*;
import javafx.geometry.*;
import java.io.*;
public class AudioApp extends Application
{
public static void main(String[] args)
{
launch(args);
}
private final String PATH = →17
"C:\Media\574928main_houston_problem.mp3";
@Override public void start(Stage primaryStage)
{
Button btn = new Button("Play Audio"); →22
btn.setOnAction(e -> playMedia());
HBox box = new HBox(20, btn); →25
box.setPadding(new Insets(20));
Scene scene = new Scene(box); →28
primaryStage.setScene(scene);
primaryStage.setTitle("Media Player");
primaryStage.show();
}
private void playMedia() →34
{
File f = new File(PATH);
Media media = new Media(f.toURI().toString());
MediaPlayer mplayer = new MediaPlayer(media);
mplayer.setAutoPlay(true);
}
}
The following paragraphs describe the high points of this program:
→ 17: A final variable named PATH specifies the path to the audio file to be loaded.
→ 22: A button is used to initiate the playing of the media file. The button’s action event handler calls the playMedia method.
→ 25: The button is added to an HBox.
→ 28: The HBox is added to the scene, and the scene is displayed.
→ 34: The playMedia method loads the audio file into a Media object and then creates a MediaPlayer to play the sound.
If your application needs to frequently play short sounds, use the AudioClip class instead of the Media and MediaPlayer classes for those sounds. The AudioClip class is designed to quickly load small sound files and then let you play them at will by calling the play method. Here’s an example that loads a file whose path is specified by the PATH variable:
AudioClip clip1 = new AudioClip(PATH);
After the clip loads, you can play it at will by calling the play method:
clip1.play();
Playing Video Files
Playing video files is similar to playing audio files, with one crucial difference: To play a video file, you must first add a MediaView control to the scene graph. Unlike MediaPlayer, MediaView is a subclass of Node, so you can manipulate it in the same manner you can manipulate any other node. In other words, you can control its size and position, and you can even translate or rotate it or apply special effects.
The MediaView class accepts a MediaPlayer in its constructor. To play a video file, you first create a Media object that loads the video file. Then, you create a MediaPlayer object that plays the video. And finally, you use a MediaView object to visualize the video file.
Listing 16-3 shows a simple example that loads and plays a video file that I downloaded from NASA’s website. I obtained this video file, named Solar_System_Birth_ipod_sm.mp4, from NASA’s website at www.jwst.nasa.gov/videos_science.html; just scroll to the bottom of the page and right-click the mp4 link next to the last video on the page.
Figure 16-4 shows this media clip being played in the media viewer shown by the program in Listing 16-3.
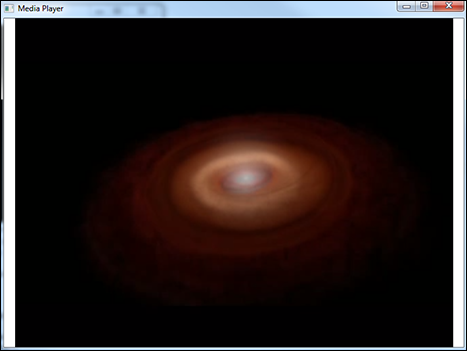
Figure 16-4: Playing a video file.
Listing 16-3: The VideoApp Program
import javafx.application.*;
import javafx.stage.*;
import javafx.scene.*;
import javafx.scene.layout.*;
import javafx.scene.control.*;
import javafx.scene.media.*;
import java.io.*;
public class VideoApp extends Application
{
public static void main(String[] args)
{
launch(args);
}
private final String PATH =
"C:\Media\Solar_System_Birth_ipod_sm.mp4";
@Override public void start(Stage primaryStage)
{
File f = new File(PATH);
Media media = new Media(f.toURI().toString());
MediaPlayer mplayer = new MediaPlayer(media);
mplayer.setAutoPlay(true);
MediaView mview = new MediaView(mplayer);
mview.setFitWidth(700);
mview.setFitHeight(500);
StackPane pane = new StackPane(mview);
Scene scene = new Scene(pane);
primaryStage.setScene(scene);
primaryStage.setTitle("Media Player");
primaryStage.show();
}
}