
Chapter 14
Adding Special Effects
In This Chapter
![]() Applying shadows to your shapes
Applying shadows to your shapes
![]() Working with reflections
Working with reflections
![]() Making items blurry
Making items blurry
![]() Working with the Bloom and Glow classes
Working with the Bloom and Glow classes
![]() Adding perspective to flat drawings
Adding perspective to flat drawings
![]() Combining special effects
Combining special effects
Welcome to the Special Effects chapter! Here, you read about how to embellish the appearance of the nodes in your scene graph by adding special effects such as blurs, shadows, color displacements, glows, and so on. You can even add perspective to give your application a three-dimensional look without having to do actual 3D programming.
You probably won’t win an Oscar for any of the special effects described in this chapter, but at the least you’ll have fun!
Introducing Special Effects
Special effects in JavaFX derive from the Effect class, an abstract class that has a wide variety of subclasses you can use to create a special effect. There are a total of 17 subclasses of the Effect class, but I don’t have room to cover all 17 of them here. Instead, this chapter focuses on those effects that let you make your shapes look more realistic by adding blurriness, shadows, reflections, and glow.
All the effects presented in this chapter work in a similar way. First, you create an instance of the effect’s class by calling its default constructor. Then, you optionally set the properties of the effect by calling one or more set methods. (In many cases, the default property values are appropriate, so you can often skip this step.) Finally, you apply the effect to a node by calling the node’s setEffect method.
For example, here’s a bit of code that creates a rectangle, fills it, and then adds a drop shadow:
Rectangle r1 = new Rectangle(50, 50, 100, 100);
r1.setFill(Color.LIGHTGRAY);
r1.setStroke(Color.BLACK);
r1.setStrokeWidth(2);
DropShadow shadow1 = new DropShadow();
r1.setEffect(shadow1);
Figure 14-1 shows the outcome of this effect. As you can see, the rectangle is surrounded by a subtle shadow.
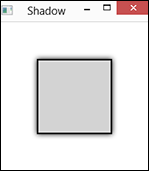
Figure 14-1: A rectangle with a shadow.
 The setEffect method is defined by the Node class, which means that you can apply an effect to any node in your scene graph. The effect is applied not only to the node whose setEffect method you call, but also to any children of that node. In fact, if you call setEffect on a scene’s root node, the effect will be applied to the entire scene.
Adding Shadows
You may have noticed that the shadow in the example shown in Figure 14-1 doesn’t look very realistic. That’s because it’s directly behind the rectangle, as if the light source causing the shadow were dead ahead. Usually, we expect shadows to be at a slight angle from the object casting the shadow, most often below the object and offset to one side.
Fortunately, the DropShadow class has several properties that let you control the size and positioning of the shadow. Those methods are listed in Table 14-1, which lists the details not only of the DropShadow class but also of its sister class, InnerShadow. The InnerShadow class creates a shadow inside of a shape instead of outside the shape. I get to the InnerShadow class in a moment. For now, I focus on DropShadow.
Table 14-1 The DropShadow and InnerShadow Classes
|
Constructor |
Explanation |
|
DropShadow() |
Creates a new DropShadow effect with default settings. |
|
InnerShadow() |
Creates a new InnerShadow effect with default settings. |
|
Common Methods |
Explanation |
|
void setColor(Color value) |
Sets the color to use for the shadow. The default is BLACK. |
|
void setWidth(double value) |
Sets the width of the shadow. The default is 21. |
|
void setHeight(double value) |
Sets the height of the shadow. The default is 21. |
|
void setOffsetX(double value) |
The horizontal offset for the shadow. The default is 0. |
|
void setOffsetY(double value) |
The vertical offset for the shadow. The default is 0. |
|
void setRadius(double value) |
The radius of the shadow’s blur effect. The default is 10. |
|
DropShadow Only |
Explanation |
|
void setSpread (double value) |
The proportion (from 0.0 to 1.0) of the shadow that should be a solid color rather than blurred. The default is 0. |
|
InnerShadow only |
Explanation |
|
void setChoke (double value) |
The proportion (from 0.0 to 1.0) of the shadow that should be a solid color rather than blurred. The default is 0. |
The methods of the DropShadow class allow you to specify the exact geometry of the shadow you want applied. The setWidth and setHeight methods let you specify the size of the shadow, and the setOffsetX and setOffsetY methods let you change the location of the shadow relative to the center of the shape. Typically, you’ll add a positive x- and y-offset so that the shadow appears below and to the right of the shape, like this:
DropShadow shadow1 = new DropShadow();
shadow1.setOffsetX(10);
shadow1.setOffsetY(10);
In this example, the shadow is placed 10 pixels to the right and 10 pixels below the shape.
The setRadius method lets you specify the size of the blur effect applied to the edges of the shadow. The larger this number, the fuzzier the shadow will appear. You can also control the spread, which indicates what portion of the shadow’s blur should be solid color before the blur effect kicks in. (I find that the effect of the spread setting is difficult to discern, so I usually don’t set it.)
Figure 14-2 shows a JavaFX application that demonstrates nine variations of the basic drop shadow.
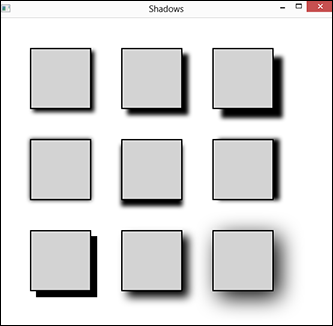
Figure 14-2: Drop shadows.
To create these shadowed rectangles, I created a utility method named createShadowedBox. Here’s the code for this method:
Rectangle createShadowedBox(double size,
double shadowWidth, double shadowHeight,
double offsetX, double offsetY,
double radius)
{
Rectangle r = new Rectangle(size, size);
r.setFill(Color.LIGHTGRAY);
r.setStroke(Color.BLACK);
r.setStrokeWidth(2);
DropShadow e = new DropShadow();
e.setWidth(shadowWidth);
e.setHeight(shadowHeight);
e.setOffsetX(offsetX);
e.setOffsetY(offsetY);
e.setRadius(radius);
r.setEffect(e);
return r;
}
As you can see, this method accepts six parameters: the size of the rectangle to create (the rectangle is actually a square, so the size is used for both the width and the height), the width and height of the shadow, the x- and y-offsets for the shadow, and the shadow’s blur radius. The method starts by creating a rectangle. Then, it creates a drop shadow, applies the width, height, x-offset, y-offset, and radius, and then applies the effect to the rectangle and returns the rectangle.
To create the actual shadowed rectangles, I called the createShadowBox method nine times, using different parameter values:
Rectangle r1 = createShadowedBox(100, 10, 10, 5, 5, 10);
Rectangle r2 = createShadowedBox(100, 20, 20, 10, 10, 10);
Rectangle r3 = createShadowedBox(100, 30, 30, 15, 15, 10);
Rectangle r4 = createShadowedBox(100, 20, 20, 0, 0, 10);
Rectangle r5 = createShadowedBox(100, 20, 20, 0, 10, 10);
Rectangle r6 = createShadowedBox(100, 20, 20, 10, 0, 10);
Rectangle r7 = createShadowedBox(100, 20, 20, 10, 10, 0);
Rectangle r8 = createShadowedBox(100, 20, 20, 10, 10, 20);
Rectangle r9 = createShadowedBox(100, 20, 20, 10, 10, 50);
For the first set of three, I varied the size and offset of the shadow, in each, using the same values for width and height and for the x-offset and the y-offset. Thus, the first row of rectangles in Figure 14-2 show various placements of the shadow below and to the right of the rectangles.
For the next set of three, I set the x-offset or y-offset to zero to demonstrate variations of the offset. And for the final set of three, I varied the radius. Notice that when the radius is set to 0, the shadow’s edges are crisp. With larger radius values, the shadow gets more blurry.
Figure 14-3 shows how inner shadows work. For this figure, I changed just one line of code in the createShadowBox method: Instead of creating a DropShadow, I created an InnerShadow:
InnerShadow e = new InnerShadow();
As you can see, the InnerShadow class places the shadow on the inside of the rectangle rather than on the outside.

Figure 14-3: Inner shadows.
Creating Reflections
A reflection projects an inverted copy of the shape in front of and below the shape, creating the impression that the shape is sitting on a reflective surface. You can create a reflection by using the Reflection class, whose members are shown in Table 14-2.
Table 14-2 The Reflection Class
|
Constructor |
Explanation |
|
Reflection() |
Creates a new Reflection effect with default settings. |
|
Methods |
Explanation |
|
void setBottomOpacity(double value) |
The opacity (0.0 to 1.0) at the bottom edge of the reflection. The default is 0. |
|
void setFraction(double value) |
The portion of the shape that will be reflected. The default is 0.75. |
|
void setTopOffset(double value) |
The distance between the bottom of the shape and the start of the reflection. The default is 0. |
|
void setTopOpacity(double value) |
The opacity (0.0 to 1.0) at the top of the reflection. The default is 0.5. |
Figure 14-4 shows a Text shape with a reflection applied. I used the following code to create this shape:
Text t = new Text("Reflection");
t.setFont(new Font("Times New Roman", 96));
t.setFill(Color.LIGHTGRAY);
t.setStroke(Color.BLACK);
t.setEffect(new Reflection());

Figure 14-4: A text with a reflection.
Making Things Blurry
JavaFX provides three effects classes that can make an object blurry. Each of these classes uses a different method for applying the blur:
- BoxBlur: Applies a simple and efficient blurring technique in which each pixel in the blurred region is calculated by averaging its neighboring pixels in the input image.
- GaussianBlur: Uses a Gaussian blurring algorithm, which is more accurate but less efficient than a box blur.
- MotionBlur: Blurs the shape directionally, creating the effect of motion.
Table 14-3 shows the members of the three blur effect classes.
Table 14-3 The BoxBlur, GaussianBlur, and MotionBlur Classes
|
Constructors |
Explanation |
|
BoxBlur() |
Creates a new BoxBlur effect with default settings. |
|
GaussianBlur() |
Creates a new GaussianBlur effect with default settings. |
|
MotionBlur() |
Creates a new MotionBlur effect with default settings. |
|
BoxBlur Methods |
Explanation |
|
void setHeight(double value) |
Sets the vertical size of the blur effect. |
|
void setWidth(double value) |
Sets the horizontal size of the blur effect. |
|
void setIterations(int value) |
Sets the number of times the effect should be repeated. The default is 1. |
|
GaussianBlur Methods |
Explanation |
|
void setRadius(double value) |
The radius of the blur effect. The default is 10.0. |
|
MotionBlur Methods |
Explanation |
|
void setAngle(double value) |
The angle of the motion effect, in degrees. The default is 0.0. |
|
void setRadius(double value) |
The radius of the blur effect. The default is 10. |
Figure 14-5 shows the effect of each of these blur types on a text shape. I used the following code to create these three blurs:
Text t1 = new Text("BoxBlur");
t1.setFont(new Font("Times New Roman", 60));
t1.setFill(Color.LIGHTGRAY);
t1.setStroke(Color.BLACK);
t1.setEffect(new BoxBlur());
Text t2 = new Text("GaussianBlur");
t2.setFont(new Font("Times New Roman", 60));
t2.setFill(Color.LIGHTGRAY);
t2.setStroke(Color.BLACK);
t2.setEffect(new GaussianBlur());
Text t3 = new Text("MotionBlur");
t3.setFont(new Font("Times New Roman", 60));
t3.setFill(Color.LIGHTGRAY);
t3.setStroke(Color.BLACK);
t3.setEffect(new MotionBlur());
As you can see, I used default values for each of the blurs. If you wish, you can use the methods listed in Table 14-3 to tweak the appearance of the blur effects.
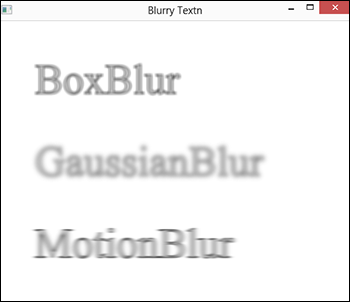
Figure 14-5: Three text objects with blur effects.
Blooming and Glowing
Tonight, on a very special episode of Blossom (or should that be, a very special episode of The Big Bang Theory?), you find out how to make your ordinary JavaFX shapes bloom and glow, all with the help of two simple classes, unsurprisingly named Bloom and Glow. Table 14-4 shows the members of these two classes.
Table 14-4 The Bloom and Glow Classes
|
Constructor |
Explanation |
|
Bloom() |
Creates a new Bloom effect with default parameters. |
|
Glow() |
Creates a new Glow effect with default parameters. |
|
Bloom Method |
Explanation |
|
void setThreshhold(double value) |
Sets the luminosity threshold. The bloom effect will be applied to portions of the shape that are brighter than the threshold. The value can be 0.0 to 1.0. The default value is 0.3. |
|
Glow Method |
Explanation |
|
void setLevel(double value) |
Sets the intensity of the effect’s glow level. The value can be 0.0 to 1.0. The default value is 0.3. |
Figure 14-6 shows the effect of the Bloom and Glow effects. All three of the text shapes shown in the figure are combined with a rectangle in a group. I used the following code to create the first group (shown at the top of the figure):
Rectangle r1 = new Rectangle(50, 50, 400, 100);
r1.setFill(Color.BLACK);
r1.setStroke(Color.BLACK);
Text t1 = new Text("Plain Text");
t1.setX(130);
t1.setY(125);
t1.setFont(new Font("Times New Roman", 60));
t1.setFill(Color.LIGHTGRAY);
Group g1 = new Group();
g1.getChildren().addAll(r1, t1);
I used the similar code to create the second group (shown in the middle of the figure), but added a Bloom effect:
Rectangle r2 = new Rectangle(50, 50, 400, 100);
r2.setFill(Color.BLACK);
r2.setStroke(Color.BLACK);
Text t2 = new Text("Blooming Text");
t2.setX(70);
t2.setY(125);
t2.setFont(new Font("Times New Roman", 60));
t2.setFill(Color.LIGHTGRAY);
Group g2 = new Group();
g2.getChildren().addAll(r2, t2);
Bloom e1 = new Bloom();
e1.setThreshold(0.3);
g2.setEffect(e1);
For the third group, I added a Glow effect instead:
Rectangle r3 = new Rectangle(50, 50, 400, 100);
r3.setFill(Color.BLACK);
r3.setStroke(Color.BLACK);
Text t3 = new Text("Glowing Text");
t3.setX(80);
t3.setY(125);
t3.setFont(new Font("Times New Roman", 60));
t3.setFill(Color.LIGHTGRAY);
Group g3 = new Group();
g3.getChildren().addAll(r3, t3);
Glow e2 = new Glow();
e2.setLevel(1.0);
g3.setEffect(e2);
The difference between the bloom and glow effect is subtle. To be honest, it’s barely noticeable. If you look very closely, you’ll see that the glowing text is just a tad brighter than the blooming text. (The distinction between glow and bloom is more noticeable when colors other than black and white are used.)

Figure 14-6: Bloomin’ and glowin’ text!
Gaining Perspective
The PerspectiveTransform class lets you distort a shape so that it appears to have a three-dimensional effect. Note: This is not the same thing as creating actual three-dimensional shapes in your scene graph; it simply distorts the geometry of a node to create a perspective effect.
The PerspectiveTransform class works by mapping the corners of the original shape’s bounding rectangle to an arbitrary quadrilateral. (The bounding rectangle is a rectangle that fully contains a shape, and a quadrilateral is any four-cornered shape.) All you have to supply is the x- and y-coordinates of each corner of the quadrilateral, using the methods listed in Table 14-5.
Table 14-5 The PerspectiveTransform Class
|
Constructor |
Explanation |
|
PerspectiveTransform() |
Creates a new PerspectiveTransform effect with default parameters. |
|
Methods |
Explanation |
|
void setUlx(double value) |
Sets the upper-left corner x-coordinate. |
|
void setUly(double value) |
Sets the upper-left corner y-coordinate. |
|
void setUrx(double value) |
Sets the upper-right corner x-coordinate. |
|
void setUry(double value) |
Sets the upper-right corner y-coordinate. |
|
void setLlx(double value) |
Sets the lower-left corner x-coordinate. |
|
void setLly(double value) |
Sets the lower-left corner y-coordinate. |
|
void setLrx(double value) |
Sets the lower-right corner x-coordinate. |
|
void setLry(double value) |
Sets the lower-right corner y-coordinate. |
To illustrate how the perspective transform works, I apply it to a chessboard created with the following bit of code:
Group board = new Group();
boolean isLight = true;
int size = 50;
for (int rank = 0; rank < 8; rank++)
{
for (int file = 0; file < 8; file++)
{
Rectangle r = new Rectangle(size, size);
r.setX(file * size);
r.setY(rank * size);
if (isLight)
r.setFill(Color.LIGHTGRAY);
else
r.setFill(Color.DARKGRAY);
isLight = !isLight;
board.getChildren().add(r);
}
isLight = !isLight;
}
This code uses a set of nested for loops to draw the ranks (rows) and files (columns) of the chessboard using 50x50 rectangles of alternating color. The isLight Boolean variable is used to keep track of the color of each square; this value is inverted after each rectangle is drawn. The isLight value is inverted after each file is drawn so that the subsequent file starts with the opposite color. Figure 14-7 shows how the chessboard appears when displayed in a scene.
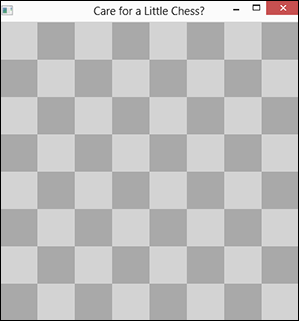
Figure 14-7: A chessboard with no perspective.
The entire chessboard occupies a 400x400 square. To add perspective, I create a PerspectiveTransform effect that maps the 400x400 square chessboard to a quadrilateral with the following corner coordinates:
|
Corner |
Original x, y |
New x, y |
|
Upper Left |
0, 0 |
100, 100 |
|
Upper Right |
400, 0 |
450, 100 |
|
Lower Left |
0, 400 |
0, 300 |
|
Lower Right |
400, 400 |
400, 300 |
The code to accomplish this transformation looks like this:
PerspectiveTransform e = new PerspectiveTransform();
e.setUlx(100); // Upper left
e.setUly(100);
e.setUrx(450); // Upper right
e.setUry(100);
e.setLlx(0); // Lower left
e.setLly(300);
e.setLrx(400); // Lower right
e.setLry(300);
board.setEffect(e);
Figure 14-8 shows how the chessboard looks when this perspective transform is applied.
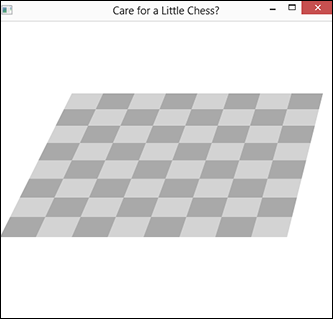
Figure 14-8: The chessboard has gained perspective.
Combining Effects
By now, I hope you’ll agree that JavaFX special effects can have a major impact on the appearance of your scenes. But wait, there’s more! JavaFX lets you improve the appearance of your scenes even more by allowing you to combine special effects, essentially laying one effect atop another.
To combine effects, you use the setInput method, which is available for all the effects classes I cover in this chapter. Simply put, you create an instance of an effect class, create an instance of a second effects class, and chain the first to the second by calling the first effect’s setInput method and specifying the second effect as the input.
For example, suppose you want to combine a reflection with a shadow and then apply the combined effect to a rectangle. You can do so like this:
Rectangle rect = new Rectangle(100,100);
DropShadow shadow = new DropShadow();
Reflection reflect = new Reflection();
reflect.setInput(shadow);
rect.setEffect(reflect);
In this example, the shadow effect will first be rendered on the rectangle. Then, the reflection effect will be rendered on the rectangle, creating a reflection of both the rectangle and its shadow.
Figure 14-9 shows how the chessboard that was created in the preceding section appears with a drop shadow chained to the perspective transform. The code that creates the perspective and shadow effects is as follows:
PerspectiveTransform e = new PerspectiveTransform();
e.setUlx(100); // Upper left
e.setUly(100);
e.setUrx(450); // Upper right
e.setUry(100);
e.setLlx(0); // Lower left
e.setLly(300);
e.setLrx(400); // Lower right
e.setLry(300);
DropShadow shadow = new DropShadow();
shadow.setWidth(20);
shadow.setHeight(20);
shadow.setOffsetX(20);
shadow.setOffsetY(20);
shadow.setRadius(30);
e.setInput(shadow);board.setEffect(e);
board.setEffect(e);
As you can see, the perspective transform is applied to the chessboard and its shadow, creating a realistic effect of the chessboard floating above a surface.
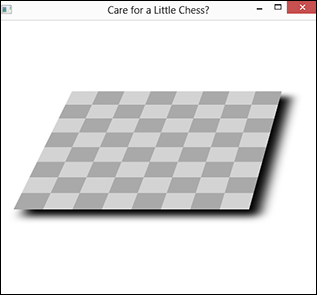
Figure 14-9: The chessboard with a shadow.