
Chapter 8
Choosing from a List
In This Chapter
![]() Using the ChoiceBox control
Using the ChoiceBox control
![]() Working with the ObservableList interface
Working with the ObservableList interface
![]() Listening for changes to the user’s selection
Listening for changes to the user’s selection
![]() Using the ComboBox and ListView controls
Using the ComboBox and ListView controls
![]() Using the TreeView control
Using the TreeView control
An entire category of JavaFX controls are designed to let the user choose one or more items from a list. This chapter presents three such controls: choice boxes, combo boxes, and lists. Along the way, you discover how to use the ObservableList interface, which is used to manage the list of items displayed by a choice box, combo box, or a list view control.
Actually, if you’ve read along so far, you’ve already been briefly introduced to the ObservableList interface, as it’s also used to manage the list of controls that are displayed in a layout pane. In Chapter 5, you read about how to use the addAll method of this interface. In this chapter, you read about the additional capabilities of this interface.
You also discover how to add an event listener that can respond when the user changes the current selection.
Using Choice Boxes
A choice box is a control that lets the user choose an item from a drop-down list. Initially, the choice box shows just the item that’s currently selected. When the user clicks the choice box, the list of choices reveals. The user can change the selection by clicking any of the items in the list. Figure 8-1 shows a scene with a simple choice box.

Figure 8-1: A scene with a choice box.
You use the ChoiceBox class to create choice boxes. Table 8-1 lists the most frequently used constructors and methods of this class.
Table 8-1 Common ChoiceBox Constructors and Methods
|
Constructor |
Description |
|
ChoiceBox<T>() |
Creates an empty choice list of the specified type. |
|
ChoiceBox<T>(ObservableList<T> items) |
Creates a choice list and fills it with the values in the specified list. |
|
Method |
Description |
|
ObservableList<T> getItems() |
Gets the list of items. |
|
void setItems(ObservableList<T> items) |
Sets the list of items. |
|
T getValue() |
Returns the currently selected item. |
|
void setValue(T value) |
Sets the currently selected item. |
|
void show() |
Shows the list of items. |
|
void hide() |
Hides the list of items. |
|
boolean isShowing() |
Indicates whether the list of items is currently visible. |
Creating a choice box
Creating a choice box is easy. The ChoiceBox class is generic, so specify a type for the list that will be associated with the choice box. For example:
ChoiceBox<String> choice = new ChoiceBox<String>();
Here, a choice box that displays strings is created.
The next step is to add items to the choice box. You can do that by calling the getItems method to access the list of items and then calling the add method to add an item:
choice.getItems().add("Bashful");
choice.getItems().add("Doc");
choice.getItems().add("Dopey");
choice.getItems().add("Grumpy");
choice.getItems().add("Happy");
choice.getItems().add("Sleepy");
choice.getItems().add("Sneezy");
Alternatively, you could call the addAll method and add all the strings at once, like this:
choice.getItems().addAll("Bashful", "Doc", "Dopey",
"Grumpy", "Happy", "Sleepy",
"Sneezy");
 The getItems method returns an object of type ObservableList, which offers a number of methods that let you work with the list. For more information, see the section “Working with Observable Lists” later in this chapter.
The ChoiceBox class also includes a constructor that lets you add an ObservableList object when you create the choice box. This lets you create the list before you create the choice box. You see an example of this constructor in action in the section “Working with Observable Lists” in this chapter.
 You can add any kind of object you want to a choice box. The choice box calls the toString method of each item to determine the text to display in the choice list. Suppose you have a class named Astronaut that represents an astronaut on a space mission:
class Astronaut
{
private String firstName;
private String lastName;
public Astronaut(String FirstName, String LastName)
{
firstName = FirstName;
lastName = LastName;
}
public String toString()
{
return firstName + " " + lastName;
}
}
Then, you could create a choice box listing the crew of Apollo 13 like this:
ChoiceBox<Astronaut> apollo13;
Apollo13 = new ChoiceBox<Astronaut>();
apollo13.getItems().add(new Astronaut("Jim", "Lovell"));
apollo13.getItems().add(new Astronaut(
"John", "Swigert"));
apollo13.getItems().add(new Astronaut("Fred", "Haise"));
If you wish, you can display the contents of a choice box without waiting for the user to click the box. To do that, call the show method, like this:
apollo13.show();
To hide the list, call the hide method:
apollo13.hide();
Setting a default value
By default, a choice box has no initial selection when it’s first displayed. To set an initial value, call the setValue method, passing it the list object that you want to make the initial selection.
If the choice box contains strings, you can set the initial value by passing the desired string value to the setValue method:
choice.setValue("Dopey");
If the specified string doesn’t exist in the list, the initial value will remain unspecified.
If the choice box contains objects, such as the Astronaut objects, illustrated in the preceding section, you must pass a reference to the object you want to be the default choice. For example:
Astronaut lovell = new Astronaut("Jim", "Lovell");
Astronaut swigert = new Astronaut("John", "Swigert");
Astronaut haise = new Astronaut("Fred", "Haise");
ChoiceBox apollo13 = new ChoiceBox<Astronaut>();
apollo13.getItems().addAll(lovell, swigert, haise);
apollo13.setValue(lovell);
Here, Jim Lovell is set as the default astronaut.
Getting the selected item
You can call the getValue method to get the item selected by the user. The type of the value returned depends on the type specified when you created the choice box. For example, if you specified type String, the getValue method returns strings. If you specified type Astronauts for the choice box, the getValue method returns astronauts.
The getValue method is often used in the action event handler for a button. For example:
public void btnOK_Click()
{
String message = "You chose ";
message += apollo13.getValue();
MessageBox.show(message, "Your Favorite Astronaut");
}
The MessageBox class used in this example can be found in Chapter 4.
Working with Observable Lists
As you saw in the previous section, the ChoiceBox class does not include methods that let you directly add or remove items from the list displayed by the choice box. Instead, it includes a method named getItems that returns an object of type ObservableList. The object returned by this method is an observable list; it represents the list displayed by the choice box.
To work with the items displayed by a choice box, you must first access the observable list and then use methods of the ObservableList class to access the individual items in the list.
Observable lists are used not only by the ChoiceBox class, but also by other control classes that display list items, such as ComboBox and List, which you can read about later in this chapter. Both of those classes also have a getItems method that returns an ObservableList.
Observable lists are also used by layout panes, such as HBox and VBox, which you can read about in Chapter 5. The getChildren method that’s common to all layout classes returns an ObservableList.
So far in this book, I’ve discussed just two methods of the ObservableList interface: add and addAll, which lets you add items to the observable list. Here’s an example of the add method from earlier in this chapter:
cbox.getItems().add("Bashful");
And here’s an example from Chapter 5, which uses the addAll method to add buttons to a layout pane:
pane.getChildren().addAll(btnOK, btnCancel);
The ObservableList interface has many other methods besides add and addAll. Table 8-2 shows the methods you’re most likely to use.
Table 8-2 Commonly Used ObservableList Methods
|
Method |
Description |
|
void add(E element) |
Adds the specified element to the end of the list. |
|
void add(int index, E element) |
Adds the specified object to the list at the specified index position. |
|
void addAll(E...elements) |
Adds all the specified elements to the end of the list. |
|
void addAll(Collection<E> c) |
Adds all the elements of the specified collection to the end of the list. |
|
E set(int index, E elem) |
Sets the specified element to the specified object. The element that was previously at that position is returned as the method’s return value. |
|
void clear() |
Deletes all elements from the array list. |
|
void remove(int fromIndex, int toIndex) |
Removes all objects whose index values are between the values specified. |
|
void removeAll(E...elements) |
Removes all objects whose index values are between the values specified. |
|
boolean contains(Object elem) |
Returns a boolean that indicates whether the specified object is in the list. |
|
E get(int index) |
Returns the object at the specified position in the list. |
|
int indexOf(Object elem) |
Returns the index position of the first occurrence of the specified object in the list. If the object isn’t in the list, it returns –1. |
|
boolean isEmpty() |
Returns a boolean value that indicates whether the list is empty. |
|
E remove(int index) |
Removes the object at the specified index and returns the element that was removed. |
|
boolean remove(Object elem) |
Removes an object from the list. Note: More than one element refers to the object; this method removes only one of them. It returns a boolean that indicates whether the object was in the list. |
|
int size() |
Returns the number of elements in the list. |
|
void addListener(ListChangeListener listener) |
Adds a ListChangeListener that’s called whenever the list changes. |
If you’re familiar with Java collection classes, such as ArrayList, you may have noticed that many of the methods listed in Table 8-2 are familiar. That’s because the ObservableList class extends the List class, which is implemented by classes, such as ArrayList and Vector. As a result, any method that can be used with an ArrayList can also be used with an ObservableList.
For example, you can clear the contents of a choice box in the same way you’d clear the contents of an array list:
cbox.getItems().clear();
If you need to know how many items are in a choice box, call the size method:
int count = cbox.getItems().size();
To remove a specific item from the list, use the remove method:
cbox.getItems().remove("Grumpy");
This method succeeds whether or not the string "Grumpy" appears in the list.
You can easily insert items from an existing Java collection, such as an array list, into a choice box by specifying the collection in the addAll method. For example, suppose you already have an array list named list that contains the items you want to display in the choice box. You can add the items like this:
cbox.getItems().addAll(list);
You might be wondering why an observable list is required for the items displayed by list-based JavaFX controls. Why not just use the existing collection classes? The reason is that for list-based controls to work efficiently, the controls themselves need to monitor any changes you might make to the list of items so that the control can automatically update the displayed items. The last method listed in Table 8-2 (addListener) provides this capability by allowing you to add a listener that’s called whenever the contents of the list changes. You will rarely call this method directly. But the controls that use observable lists do call this method to create event listeners that automatically update the control whenever the contents of the list changes.
Note: You do not use the addListener method to respond when the user selects an item in a choice box or other type of list control. Instead, you use an interesting construct called a selection model to respond to changes in the selected item, as described in the next section.
Listening for Selection Changes
It’s not uncommon to want your program to respond immediately when the user changes the selection of a choice box or other list control, without waiting for the user to click a button to submit the data. For example, you might have a label whose value you want to update immediately whenever the user changes the selection. You might even want to show or hide different controls based on the selection.
Unfortunately, the choice box and other list controls don’t generate an action event when the user changes the selection. As a result, the ChoiceBox class doesn’t have a setOnAction method. Instead, you must use a complicated sequence of method calls to set up a different type of event listener, called a change listener.
Here’s the sequence:
- Get the selection model by calling the getSelectionModel method on the choice box.
The getSelectionModel method returns the control’s selection model, which is an object that manages how the user can select items from the list. The selection model is an object that implements one of several classes that extend the abstract SelectionModel class. For a choice box, the selection model is always of type SingleSelectionMode, which implements a selection model that allows the user to select just one item from the list at a time.
- Get the selectedItem property by calling the selectedItemProperty method on the selection model.
The SelectionModel class has a method named selectedItemProperty that accesses a property named selectedItem, which represents the item currently selected. (A property is a special type of JavaFX object that I discuss more about in Chapter 19. For now, just assume that a property is an object whose value can be monitored by a listener that’s called whenever the value of the property changes.)
- Add a change listener by calling the addListener method on the selectedItem property.
The listener will be called whenever the value of the selectedItem property changes. The change listener implements a functional interface called, naturally, ChangeListener. Because ChangeListener is a functional interface (that is, it has just one method), you can use a Lambda expression to implement the change listener.
You normally do all three of these steps in a single statement, as in this example:
choice.getSelectionModel().selectedItemProperty()
.addListener( (v, oldValue, newValue) ->
lbl.setText(newValue); );
In the preceding example, the change listener sets the value displayed by a label control to the new value selected by the user.
Being a functional interface, ChangeListerner defines a single function named changed, which is called whenever the value of the property changes. The changed method receives three arguments:
- observable: The property whose value has changed
- oldValue: The previous value of the property
- newValue: The new value of the property
These three parameters are specified in the parentheses at the beginning of the Lambda expression. In the body of the Lambda expression, the newValue parameter is assigned to the text of a label. Thus, the value selected by the user will be displayed by the label, and the label will be updated automatically whenever the user changes the choice box selection.
Using Combo Boxes
A combo box is a more advanced sibling to the choice box control. The main improvements you get with a combo box are
- A combo box includes the ability to limit the number of items displayed when the list is shown.
If the number of items in the list exceeds the limit, a scroll bar is added automatically to allow the user to scroll through the entire list.
- A combo box includes a text field that lets the user enter a value directly rather than select the value from a list.
The text field is optional and is not shown by default, but you can add it with a single method call.
Figure 8-2 shows a combo box with the text field shown.
- A combo box fires an action event whenever the user changes the selection.
Thus, setting up an event handler to respond to the user’s selection change is easier with a combo box than it is with a choice box.
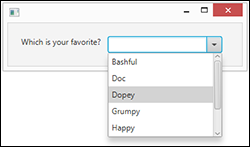
Figure 8-2: A combo box.
You use the ComboBox class to create combo boxes. Table 8-3 lists the most frequently used constructors and methods of this class.
Table 8-3 Common ComboBox Constructors and Methods
|
Constructor |
Description |
|
ComboBox<T>() |
Creates an empty combo box of the specified type. |
|
ComboBox<T>(ObservableList<T> items) |
Creates a combo box and fills it with the values in the specified list. |
|
Method |
Description |
|
void setEditable(boolean value) |
If true, a text field is displayed to allow the user to directly edit the selection. |
|
void setVisibleRowCount(int value) |
Sets the number of items to display. |
|
void setPromptText(String text) |
Sets the prompt text initially displayed in the text field. |
|
ObservableList<T> getItems() |
Gets the list of items. |
|
void setItems(ObservableList<T> items) |
Sets the list of items. |
|
T getValue() |
Returns the currently selected item. |
|
void setValue(T value) |
Sets the currently selected item. |
|
void show() |
Shows the list of items. |
|
void hide() |
Hides the list of items. |
|
void setOnAction(EventHandler<ActionEvent> handler) |
Sets an event handler that’s called whenever the selection changes. |
|
boolean isShowing() |
Indicates whether the list of items is currently visible. |
Creating combo boxes
Creating a combo box is much like creating a choice box. Because the ComboBox is generic, specify a type for the items it will contain, as in this example:
ComboBox<String> cbox = new ComboBox<String>();
Then you can use the getItems method to access the ObservableList object that contains the content of the list displayed by the combo box. For example, you can add items to the list like this:
cbox.getItems().addAll("Bashful", "Doc", "Dopey",
"Grumpy", "Happy", "Sleepy",
"Sneezy");
For more information about working with the ObservableList interface, flip to the section “Working with Observable Lists” earlier in this chapter.
By default, the user isn’t allowed to edit the data in the text field portion of the combo box. If you want to allow the user to edit the text field, use the setEditable method, like this:
cbo.setEditable(true);
Then the user can type a value that’s not in the combo box.
If you want, you can limit the number of items displayed by the list by calling the setVisibleRows method:
cbo.setVisibleRows(10);
Here, the list displays a maximum of ten items. If the list contains more than ten items, a scroll is added automatically so the user can scroll through the entire list.
You can also specify a prompt text to display in the text field component of a combo box by calling the setPromptText method:
cbo.setPromptText("Make a choice");
Here, the text Make a choice displays in the text field.
Getting the selected item
To get the item selected by the user, use the getValue method, just as you do for a choice box. You typically do that in an action event handler that responds to a button click. For example:
public void btnOK_Click()
{
String message = "You chose ";
message += cbo.getValue();
MessageBox.show(message, "Your Choice ");
}
The MessageBox class used in this example can be found in Chapter 4.
Bear in mind that the value returned by the getValue method may not be one of the values in the combo box’s list. That’s because the user can enter anything he wishes to in the text field of an editable combo box. If you want to know whether the user selected an item from the list or entered a different item via the text field, use the contains method of the ObservableList class, like this:
if (!cbo.getItems().contains(cbo.getValue()))
{
MessageBox.show("You chose outside the box",
"Good Thinking!");
}
Here, the message box displays if the user enters an item that’s not in the list.
Handling combo box events
When the user selects an item from a combo box, an action event is generated. In most applications, you simply ignore this event because you usually don’t need to do anything immediately when the user selects an item. Instead, the selected item is processed when the user clicks a button.
If you want to provide immediate feedback when the user selects an item, you can set up an event handler by calling the combo box’s setOnAction method. In most cases, the easiest way to do that is to create a method that contains the code you want to execute when the user selects an item and then pass this method to the setOnAction method via a Lambda expression.
For example, the following method displays a message box that says He’s my favorite too! if the user picks Dopey:
Public void cbo_Changed()
{
if (if cbo.getValue().equals("Dopey"))
{
MessageBox.show("He's my favorite too!",
"Good Choice");
}
}
Here’s the code to call this method whenever the user changes the combo box selection:
cbo.setOnAction (e -> cbo_Changed() );
Using List Views
A list view is a powerful JavaFX control that displays a list of objects within a box. Depending on how the list is configured, the user can select one item in the list or multiple items. In addition, you have amazing control over how the items in the list display. Figure 8-3 shows a sample scene with a list view.
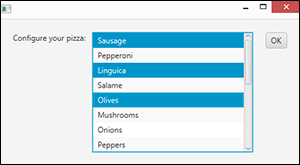
Figure 8-3: A list view control.
List views and combo boxes have several important differences:
- A list view doesn’t have a text field that lets the user edit the selected item. Instead, the user must select items directly from the list view.
- The list view doesn’t drop down. Instead, the list items display in a box whose size you can specify.
- The items in a list view can be arranged vertically (the default) or horizontally. Figure 8-4 shows a horizontal list box.
- List views allow users to select more than one item. By default, a list view lets users select just one item, but you can easily configure it to allow for multiple selections.
To select multiple items in a list, hold down the Ctrl key and click the items you want to select. To select a range of items, click the first item, hold down the Shift key, and click the last item.

Figure 8-4: A horizontal list view control.
You use the ListView class to create a list view control. Table 8-4 lists the most frequently used constructors and methods of this class.
Table 8-4 Common ListView Constructors and Methods
|
Constructor |
Description |
|
ListView<T>() |
Creates an empty list view of the specified type. |
|
ListView<T>(ObservableList<T> items) |
Creates a list view and fills it with the values in the specified list. |
|
Method |
Description |
|
ObservableList<T> getItems() |
Gets the list of items. |
|
void setItems(ObservableList<T> items) |
Sets the list of items. |
|
void setOrientation(Orientation o) |
Sets the orientation of the list. The orientation can be Orientation.HORIZONTAL or Orientation.VERTICAL. |
|
MultipleSelectionModel<T> getSelectionModel() |
Returns the selection model for the list view control. You can use the selection model to get an observable list of selected items by calling its getSelectedItems method. You can also retrieve the most recently selected item by calling getSelectedItem. |
Creating a list view
Creating a list view control is similar to creating a combo box. Here’s an example that creates the list view that’s shown in Figure 8-3:
ListView list = new ListView();
list.getItems().addAll("Sausage", "Pepperoni",
"Linguica", "Salame", "Olives", "Mushrooms",
"Onions", "Peppers", "Pineapple", "Spinach",
"Canadian Bacon", "Tomatoes", "Kiwi",
"Anchovies", "Gummy Bears");
Notice that the list view shown in Figure 8-3 shows only the first eight items in the list. As with a combo box, a scroll bar is automatically added to a list view if the total number of items in the items collection cannot be displayed.
By default, the list view control allows only a single selection to be made. To allow multiple selections, add this line:
list.getSelectionModel().setSelectionMode(SelectionMode.MULTIPLE);
To arrange the list view horizontally rather than vertically, add this line:
list.setOrientation(Orientation.HORIZONTAL);
Getting the selected items
Getting the selected items from a list view control is a bit tricky. First, you must get the selection model object by calling the getSelectionModel. Then, you call the selection model’s getSelectedItems method. This returns a read-only observable list that contains just the items that have been selected.
Here’s an example that builds a string that lists all the items selected by the user for the pizza toppings list view that is shown in Figure 8-3:
String tops = "";
ObservableList<String> toppings;
toppings = list.getSelectionModel().getSelectedItems();
for(String topping : toppings)
{
tops += topping + "
";
}
In the preceding example, the tops string will contain all the toppings selected by the user, separated by new line characters.
Using Tree Views
A tree view is a fancy JavaFX control that displays hierarchical data in outline form, which we computer nerds refer to as a tree. Tree structures are very common in the world of computers. The folder structure of your disk drive is a tree, as is a JavaFX scene graph.
Figure 8-5 shows a JavaFX scene that has a tree view control in it. In this example, I use a tree control to represent a few of my favorite TV series, along with series that were spun off from them.
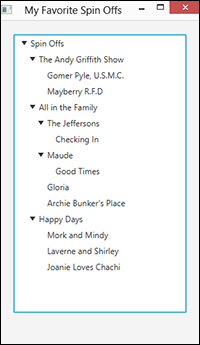
Figure 8-5: A tree view control.
Before I get into the mechanics of how to create a tree control, you need to know a few terms that describe the elements in the tree itself:
- Node: Each element in the tree is a node. Each node in a tree is created from TreeItem class. The TreeItem class is a generic class, so you can associate a type with it. Thus, you can create a tree using objects of any type you wish, including types you create yourself.
- Root node: A root node is the starting node for a tree. Every tree must have one — and only one — root node. When you create a tree component, you pass the root node to the TreeView constructor.
- Child node: The nodes that appear immediately below a given node are that node’s child nodes. A node can have more than one child.
- Parent node: The node immediately above a given node is that node’s parent node. Every node except the root node must have one — and only one — parent.
- Sibling nodes: Sibling nodes are children of the same parent.
- Leaf node: A leaf node is one that doesn’t have any children.
- Path: A path contains the node and all its ancestors — that is, its parent, its parent’s parent, and so on — all the way back to the root.
- Expanded node: An expanded node is one whose children are visible.
- Collapsed node: A collapsed node is one whose children are hidden.
Building a tree
Before you can actually create a tree view, you must first build the tree it displays. To do that, use the TreeItem class, the details of which I discuss in Table 8-5.
Table 8-5 The TreeItem Class
|
Constructor |
Description |
|
TreeItem<T> () |
Creates an empty tree node. |
|
TreeItem<T>(T value) |
Creates a tree node with the specified value. |
|
Method |
Description |
|
T getValue() |
Returns the tree item’s value. |
|
void setValue(T value) |
Sets the tree item’s value. |
|
ObservableList getChildren() |
Returns an ObservableList that represents the children of this tree item. |
|
TreeItem getParent() |
Gets this node’s parent. |
|
void setExpanded(boolean expanded) |
Specify true to expand the node. |
|
boolean isExpanded() |
Returns a boolean that indicates whether the tree item is expanded. |
|
boolean isLeaf() |
Returns a boolean that indicates whether the tree item is a leaf node (that is, has no children). A leaf node can’t be expanded. |
|
TreeItem nextSibling() |
Returns the next sibling of this tree item. If there is no next sibling, returns null. |
|
TreeItem prevSibling() |
Returns the previous sibling of this tree item. If there is no previous sibling, returns null. |
The TreeItem class provides three basic characteristics for each node:
- The value, which contains the data represented by the node.
In my example, I use strings for the user objects, but you can use objects of any type you want for the user object. The tree control calls the user object’s toString method to determine what text to display for each node. The easiest way to set the user object is to pass it via the TreeItem constructor.
- The parent of this node, unless the node happens to be the root.
- The children of this node, represented as an ObservableList.
The list will be empty if the node happens to be a leaf node. You can create or retrieve child nodes using the familiar methods of the ObservableList interface. For more information, refer to the section “Working with Observable Lists” earlier in this chapter.
In this section, I build a tree that lists spinoff shows from three popular television shows of the past:
- The Andy Griffith Show, which had two spinoffs: Gomer Pyle, U.S.M.C., and Mayberry R.F.D.
- All in the Family, which directly spawned four spinoffs: The Jeffersons, Maude, Gloria, and Archie Bunker’s Place.
In addition, two of these spinoffs had spinoffs of their own involving the maids: The Jeffersons’ maid became the topic of a short-lived show called Checking In, and Maude’s maid became the main character in Good Times.
- Happy Days, which spun off Mork and Mindy, Laverne and Shirley, and Joanie Loves Chachi.
You can take many approaches to building trees, most of which involve some recursive programming. I’m going to avoid recursive programming in this section to keep things simple, but my avoidance means that you have to hard-code some of the details of the tree into the program. Most real programs that work with trees need some type of recursive programming to build the tree.
The first step in creating a tree is declaring a TreeItem variable for each node that isn’t a leaf node. For my TV series example, I start with the following code:
TreeItem andy, archie, happy,
george, maude;
These variables can be local variables within the start method because once you get the tree set up, you won’t need these variables anymore. You see why you don’t need variables for the leaf nodes in a moment.
Next, I create the root node and set its expanded status to true so that it will be expanded when the tree displays initially:
TreeItem root = new TreeItem("Spin Offs ");
root.setExpanded(true);
To simplify the task of creating all the other nodes, I use the following helper method, makeShow:
public TreeItem<String> makeShow(String title,
TreeItem<String> parent)
{
TreeItem<String> show = new TreeItem<String>(title);
show.setExpanded(true);
parent.getChildren().add(show);
return show;
}
This method accepts a string and another node as parameters, and returns a node whose user object is set to the String parameter. The returned node is also added to the parent node as a child, and the node is expanded. Thus you can call this method to both create a new node and place the node in the tree.
The next step is creating some nodes. Continuing my example, I start with the nodes for The Andy Griffith Show and its spinoffs:
andy = makeShow("The Andy Griffith Show", root);
makeShow("Gomer Pyle, U.S.M.C.", andy);
makeShow("Mayberry R.F.D.", andy);
Here, makeShow is called to create a node for The Andy Griffith Show, with the root node specified as its parent. The node returned by this method is saved in the andy variable. Then makeShow is called twice to create the spinoff shows, this time specifying andy as the parent node.
Because neither Gomer Pyle, U.S.M.C., nor Mayberry R.F.D. had a spinoff show, I don’t have to pass these nodes as the parent parameter to the makeShow method. That’s why I don’t bother to create a variable to reference these nodes.
Next in my example, I create nodes for All in the Family and its spinoffs:
archie = makeShow("All in the Family", root);
george = makeShow("The Jeffersons", archie);
makeShow("Checking In", george);
maude = makeShow("Maude", archie);
makeShow("Good Times", maude);
makeShow("Gloria", archie);
makeShow("Archie Bunker's Place", archie);
In this case, The Jeffersons and Maude have child nodes of their own. As a result, variables are required for these two shows so that they can be passed as the parent parameter to makeShow when I create the nodes for Checking In and Good Times.
Finally, here’s the code that creates the nodes for Happy Days and its spinoffs:
happy = makeShow("Happy Days", root);
makeShow("Mork and Mindy", happy);
makeShow("Laverne and Shirley", happy);
makeShow("Joanie Loves Chachi", happy);
The complete tree is successfully created in memory, so I can get on with the task of creating a TreeView control to show off the tree.
Creating a TreeView control
You use the TreeView class to create a tree component that displays the nodes of a tree. Table 8-6 shows the key constructors and methods of this class.
Table 8-6 The TreeView Class
|
Constructor |
Description |
|
TreeView<T>() |
Creates an empty tree (not very useful, if you ask me). |
|
TreeView<T>(TreeItem root) |
Creates a tree that displays the tree that starts at the specified node. |
|
Method |
Description |
|
TreeItem getRoot() |
Gets the root node. |
|
void setRoot(TreeItem root) |
Sets the root node. |
|
MultipleSelectionModel<T> getSelectionModel() |
Returns the selection model for the list view control. You can use the selection model to get an observable list of selected items by calling its getSelectedItems method. You can also retrieve the most recently selected item by calling getSelectedItem. |
|
void setRootVisible(boolean visible) |
Determines whether the root node should be visible. |
The first step in creating a TreeView control is declaring a TreeView variable as a class instance variable so that you can access it in any method within your program, as follows:
TreeView tree;
Then, in the application’s start method, you call the TreeView constructor to create the tree view control, passing the root node of the tree you want it to display as a parameter:
tree = new TreeView(root);
By default, the user can select just one node from the tree. To allow the user to select multiple nodes, use this strange incantation:
tree.getSelectionModel().setSelectionMode(
SelectionModel.MULTIPLE);
Here the getSelectionModel method is called to get the selection model that manages the selection of nodes within the tree. This method returns an object of type MultipleSelectionModel, which includes a method named setSelectionMode that lets you set the selection mode. To allow multiple items to be selected, you must pass this method the SelectionModel.MULTIPLE.
That’s it! You now have a TreeView control that you can add to a layout pane and display in your scene.
Although the tree displayed by a tree view control must begin with a root node, in many cases the root node is superfluous. For example, in the example you’ve been looking at, what’s the point of showing the root node? The TreeView control lets you suppress the display of the root node if you don’t want it to be shown. To hide the root node, just call this method:
tree.setShowRoot(false);
Figure 8-6 shows how the tree appears with the root node hidden.

Figure 8-6: A tree view control with the root node hidden.
Getting the selected node
There are several ways to determine which node or nodes are currently selected in a tree view. One way is to access the tree’s selection model by calling the getSelectionModel. Then, you can call the selection model’s getSelectedItems method to return a read-only observable list that contains the items that have been selected.
For example:
String msg = "";
ObservableList<TreeItem<String>> shows =
tree.getSelectionModel().getSelectedItems();
for(TreeItem show : shows)
{
msg += show.getValue() + "
";
}
In the preceding example, the msg string will contain all the shows that the user has selected from the tree, separated by new line characters.
An alternative is to add an event handler that’s called whenever the selection changes. You can do that like this:
tree.getSelectionModel().selectedItemProperty()
.addListener( (v, oldValue, newValue) ->
tree_SelectionChanged(newValue) );
Here, the getSelectionModel method is called to retrieve the selection model. Then, the selectedItemProperty is called to retrieve the selected item property. Finally, an event listener is created for this property by using a Lambda expression that calls a method named tree_SelectionChanged. The value of the new selection is passed as a parameter.
Here’s what the tree_SelectionChanged method looks like:
public void tree_SelectionChanged(TreeItem<String> item)
{
if (item != null)
{
lblShowName.setText(item.getValue());
}
}
Here, a label named lblShowName is updated to display the value of the newly selected item. Note: An if statement is used to ensure that the item is not null. That’s necessary because if the user deselects an item, the tree_SelectionChanged method will be called with a null value as its item parameter.
Looking at a complete program that uses a tree view
Whew! That was a lot of information to digest. In this section, I put it all together.
Listing 8-1 shows the complete program that creates the scene shown in Figure 8-6. This program lets the user select a show from the tree and displays the title of the selected show in a label below the tree.
Listing 8-1: The Spinoff Program
import javafx.application.*;
import javafx.stage.*;
import javafx.scene.*;
import javafx.scene.layout.*;
import javafx.scene.control.*;
import javafx.geometry.*;
public class SpinOffs extends Application
{
public static void main(String[] args)
{
launch(args);
}
TreeView<String> tree; →15
Label lblShowName;
@Override public void start(Stage primaryStage)
{
TreeItem<String> root, andy, archie, →20
happy, george, maude;
root = new TreeItem<String>("Spin Offs"); →23
root.setExpanded(true);
andy = makeShow( →26
"The Andy Griffith Show", root);
makeShow("Gomer Pyle, U.S.M.C.", andy);
makeShow("Mayberry R.F.D", andy);
archie = makeShow("All in the Family", root); →31
george = makeShow("The Jeffersons", archie);
makeShow("Checking In", george);
maude = makeShow("Maude", archie);
makeShow("Good Times", maude);
makeShow("Gloria", archie);
makeShow("Archie Bunker's Place", archie);
happy = makeShow("Happy Days", root); →39
makeShow("Mork and Mindy", happy);
makeShow("Laverne and Shirley", happy);
makeShow("Joanie Loves Chachi", happy);
tree = new TreeView<String>(root); →44
tree.setShowRoot(false);
tree.getSelectionModel().selectedItemProperty() →46
.addListener( (v, oldValue, newValue) ->
tree_SelectionChanged(newValue) );
lblShowName = new Label();
VBox pane = new VBox(10);
pane.setPadding(new Insets(20,20,20,20));
pane.getChildren().addAll(tree, lblShowName); →54
Scene scene = new Scene(pane);
primaryStage.setScene(scene);
primaryStage.setTitle("My Favorite Spin Offs");
primaryStage.show();
}
public TreeItem<String> makeShow(String title, TreeItem<String> parent) →64
{
TreeItem<String> show = new TreeItem<String>(title);
show.setExpanded(true);
parent.getChildren().add(show);
return show;
}
public void tree_SelectionChanged(TreeItem<String> item) →73
{
if (item != null)
{
lblShowName.setText(item.getValue());
}
}
}
All the code in this program has already been shown in this chapter, so I just point out the highlights here:
→ 15: The tree and list models are defined as class instance variables.
→ 20: TreeItem variables are defined for the root node and each show that has spinoff shows.
→ 23: The root node is created with the text Spin-Offs.
→ 26: These lines create the nodes for The Andy Griffith Show and its spinoffs.
→ 31: These lines create the nodes for All in the Family and its spinoffs.
→ 39: These lines create the nodes for Happy Days and its spinoffs.
→ 44: This line creates the TreeView control, specifying root as the root node for the tree. The next line hides the root node.
→ 46: This line creates the event listener for the selected item property. The Lambda expression causes the method named tree_SelectionChanged to be called whenever the selection status of the TreeView control changes.
→ 54: The TreeView control and the label are added to a VBox layout pane, which is then added to the scene just before the stage is shown.
→ 64: The makeShow method creates a node from a string and adds the node to the node passed as the parent parameter.
→ 73: The tree_SelectionChanged method is called whenever the selected node changes. It simply displays the title of the selected show in the lblShowName label, provided the passed TreeItem is not null.