
From Chapter 2, Project Management, to Chapter 5, Screen Management, we looked at how JIRA can be used as an information system to gather data from users. In Chapter 6, Workflows and Business Processes, and Chapter 7, E-mails and Notifications, we discussed some of the features that JIRA provides to add values to the gathered data through workflows and notifications. In this chapter, we will look at the other half of the equation, getting the data out and presenting it as useful information to the users.
By the end of this chapter, you will have learned the following:
- Utilizing the search interface in JIRA
- The different search options available in JIRA.
- About filters and how you can share search results with other users
- Generating reports in JIRA
- Sharing information with dashboards and gadgets
As an information system, JIRA comes fully loaded with features and options to search for data. It allows you to search for issues quickly through simple text-based, more refined searches by specifying issue field criteria that must be fulfilled, and more advanced searches through JIRA's own search language.
However, before we start looking into the in-depth details of all the search options JIRA provides, let's first take a look at the main search interface that you will be using in JIRA while performing your searches.
The Issue Navigator is the primary location, where you will be performing all of your searches in JIRA. You can access the issue navigator by clicking on the Issues link in the top menu bar.
The issue navigator is roughly divided into three to four sections. The first section is where you will specify all of your search criteria, such as the project you want to search in and the issue type you are interested in. The second section is a table that lists the search results brought back. The third section includes the operations that you can perform on the search results, such as exporting them in a different format. The fourth and last section lists a number of useful, preconfigured filters and user-created filters.
When you access the issue navigator for the first time, you will be in Basic Search (we will discuss the different search options in more detail later in this chapter). If you have previously visited the issue navigator and chosen to use a different search option, such as Advanced Search, then JIRA will remember this and open up Advanced Search instead.
The following screenshot shows the issue navigator in the Basic Search mode. In Basic Search, you specify your search criteria with field controls at the top, selecting the values for each field:

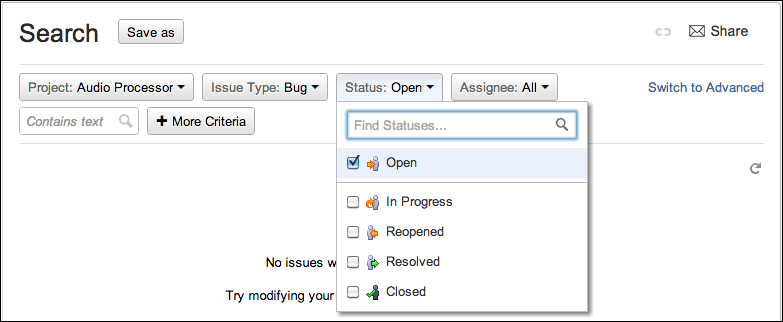
Also known as Simple Search, basic search allows you to construct your search criteria with a simple-to-use interface. The basic search interface lets you select the fields you want to search with, such as projects and issue types, and specify the values for these fields. As shown in the following screenshot, we are searching for issues of the type Bug in the project Audio Processor, and with the status as Open.
With basic search, JIRA will prompt you for the possible search values for the selected field. This is very handy for fields such as status- and select list-based custom fields, so you do not have to remember all the possible options. For example, for the status field, JIRA will list all the available statuses:
While working with the basic search interface, JIRA will have the default fields of project, issue type, status, and assignee visible. You can add additional fields to the search by clicking on the More Criteria button and then selecting the field you want to use in the search. Perform the following steps to construct and run a basic search:
JIRA will automatically update the search results every time you make a change to the search criteria.
Note
When working with basic search, one thing to keep in mind is that the project and issue type context of the custom fields are taken into consideration (please see Chapter 4, Field Management, for field configuration). If a custom field is set to be applicable to only specific projects and/or issue types, then you have to select the project and issue type as part of your search for the custom field to show up.
Basic search is useful and will fulfill most of the users' search needs. However, there are still some limitations. One such limitations is that basic search allows you to perform searches based on inclusive logic, but not exclusive logic. For example, if you need to search for issues in all but one project, with basic search, you will have to select every project except for the one to be excluded, since the basic search interface does not let you specify exclusions, and this is where advanced search comes in.
With advanced search, instead of using a field selection-based interface as in basic search, you will be using what is known as the JIRA Query Language (JQL). JQL is a custom query language developed by Atlassian. If you are familiar with the Structured Query Language (SQL), then you will notice that it has a similar syntax, however, JQL is not the same as SQL.
One of the most notable
differences between JQL and SQL is that JQL does not start with a select statement. A JQL query consists of a field, followed by an operator, and then by a value or a function (which will return a value). You cannot specify what fields to return from a query with JQL, which is different to SQL. You can think of a JQL query as the part that comes after the where keyword in a normal SQL select statement. The following table summarizes the components in JQL:
|
Description | |
|---|---|
|
Keywords in JQL are special reserved words that do the following:
| |
|
Operators are symbols or words that can be used to evaluate the value of a field on the left and the values to be checked on the right. Examples include the following: | |
|
Fields are JIRA system and custom fields. When used in JQL, the value of the field for issues is used to evaluate the query. | |
|
Functions in JQL perform specific calculations or logic and return the result as values that can be used to for evaluation with an operator. |
Each JQL query is essentially made up of one or more components. A basic JQL query consists of the following three elements:
- Field: This can be an issue field (for example, status) or a custom field.
- Operator: This defines the comparison logic (for example,
=or>) that must be fulfilled for an issue to be returned in the result. - Value: This is what the field should be compared to. It can be a literal value expressed as text (for example,
Bug) or a function that will return a value.
Queries can then be linked together to form a more complex query with keywords such as logical AND or OR. For example, a basic query to get all the issues with a status of Resolved will look similar to the following:
status = Resolved
A more complex query to get all the issues with a status of Resolved, issue type of Bug, and assigned to the currently logged-in user will look similar to the following (where currentUser()
is a JQL function):
issuetype = Bug and status = Resolved and assignee = currentUser()
Discussing each and every JQL function and operator is out of the scope of the book, but you can get a full reference by clicking on the Syntax Help link in the advanced search interface. The full JQL syntax reference can be found at http://confluence.atlassian.com/display/JIRA/Advanced+Searching.
You can access the advanced search interface from the Issue Navigator, as follows:
- Browse to the Issue Navigator.
- Click on the Switch to Advanced link in the top-left corner.
- Click on the New filter button on the left to start a new search.
- Construct your JQL query.
- Click on the Search button or press the Enter key on your keyboard.
As JQL can has a complex structure and it takes some time to get familiar with, the advanced search interface has some very useful features to help you construct your query. The interface has an auto-complete feature (which can be turned off) that can help you pick out keywords, values, and operators to use. It also validates your query in real time and informs you if your query is valid:
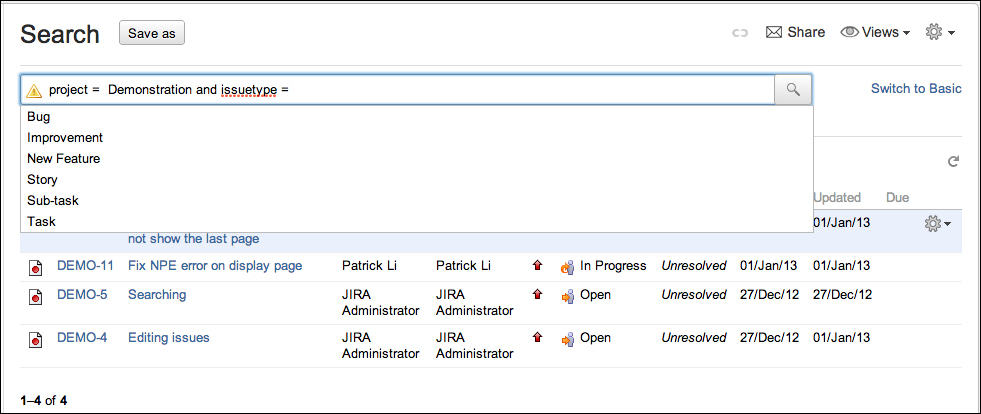
If there are no syntax errors with your JQL query, JIRA will display the results in a table below the JQL input box.
You can switch between the basic and advanced search by clicking on the Switch to Basic/Advanced link while running your queries, and JIRA will automatically convert your search criteria into and from JQL. In fact, this is a rather useful feature and can help you learn the basic syntax of JQL when you are first starting up, by first constructing your search in basic and then seeing what the equivalent JQL is. You need to a take note that, however, not all JQLs can be converted into basic search since you can do a lot more with JQL than with the basic search interface.
JIRA provides a quick search functionality, which allows you to perform quick simple searches based on text contained in the issue's summary, description, or comments. This allows you to perform quick text-based searches on all issues in JIRA.
The quick search function has several additional features to let you perform more specialized searches with minimal typing, through smart querying. JIRA has a list of built-in queries, which you can use as your quick search terms to pull up issues with a specific issue type and/or statuses. Some useful queries include the following:
|
Smart query |
Result |
|---|---|
|
Issue key (for example, |
Takes you directly to the issue with the specified issue key. |
|
Project key (for example, |
Displays all the issues in the project specified by the key in the Issue Navigator. |
|
|
Displays all the issues that are assigned to the currently logged-in user. |
|
|
Displays all issues that are due before today. |
|
Issues with a particular status (for example, |
Displays all issues with the specified status. |
|
Issues with a particular resolution (for example, |
Displays all issues with the specified resolution. |
You can combine these queries together to create quick and yet powerful searches in JIRA. For example, the following query brings back all the resolved issues in the HD project:
HD resolved
Running a quick search is much simpler than either basic or advanced searches. All you have to do is to type in either the text you want to search with or the smart query in the Quick Search box in the top-right corner, and hit Enter on your keyboard.
As you can see, the goal of quick search is to allow you to find what you are looking for in the quickest possible way, and with smart query, you are able to perform more than just simple text-based searches.
You have seen how you can execute searches in JIRA. With the exception of using the issue key smart query, which will take you directly to the target issue, all other search results will be shown in the issue navigator.
The issue navigator is capable of more than letting you run searches and presenting you with the results; it also has other features including the following:
- Export search results into different views
- Select the columns you want to see for the issues in the results
- Share your search results with other people
- Create and manage filters
From the Issue Navigator, JIRA allows you to export your search results in a variety of formats, such as MS Word and Excel. In JIRA, these are called views. JIRA is able to present your search results in different views such as XML or print-friendly pages. When you select views, such as MS Word, JIRA will generate the appropriate file and let you download it directly. Perform the following steps to export your results to a different format:
- Browse to the Issue Navigator page.
- Execute a search.
- Bring down the Views drop-down menu in the top-right corner.
- Select the view you wish to see your search results in.
Depending upon the view you select, some views will be on screen (printable), while others will prompt you with a download dialog box (MS Word).
JIRA lets you configure the columns in your issue navigator to specify which fields are displayed when showing your search results. In JIRA, you can customize your issue navigator at a global level, which will affect all your searches, and also on a per search level with filters (see later in the chapter). Perform the following steps to customize your global issue navigator's column layout:
- Browse to the Issue Navigator page.
- Bring down the Tools drop-down menu in the top-right corner.
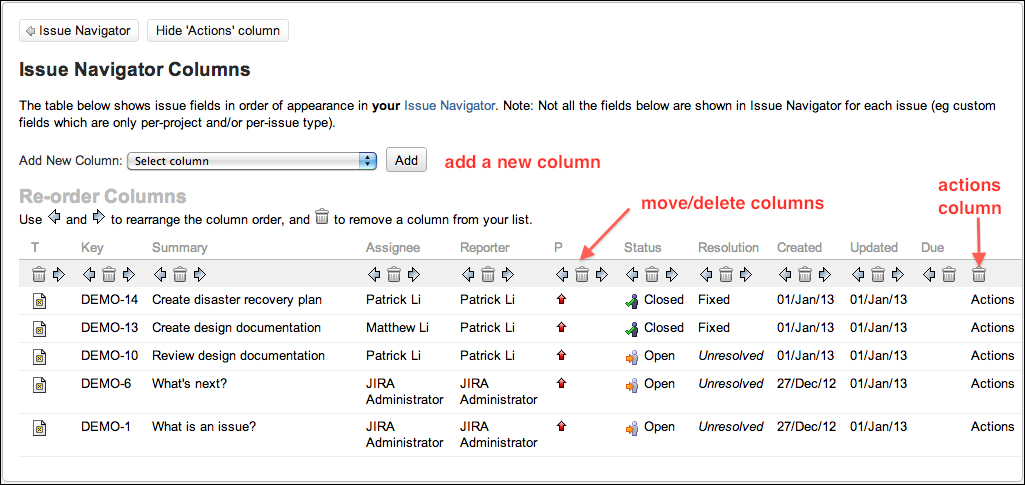
- Select the Configure Columns option. This will bring you to the Issue Navigator Columns page.
In the Issue Navigator Columns page, you can add new columns to the navigator layout, remove existing columns, and reorder columns. There is also an option to hide the Actions column, which is always the last column and shows some short-cut links for the actions you can perform on issues directly from the navigator.
Once you have updated the column layout of the issue navigator, the layout will be used for all future searches you perform. If you want to have dedicated layouts for searches, you need to create named searches called filters and configure the column layout on the filters. We will look at filters in the later sections of this chapter.
After completing a search, you might want to share the results with your colleagues. Now, you can tell your colleagues to run the same search or as we will see later in the chapter, save your search as a filter and then share it with people, but a more convenient way is to use the built-in share feature, especially if this is a one-off sharing.
To share your current search results, all you have to do is click on the Share link in the top-right corner and type in the user's name or an e-mail address (using an e-mail address lets you share your search results with people who are not JIRA users), and you can add multiple users or e-mail addresses, so you can share this with more than one person. You can also add a quick note, letting people know the purpose, and JIRA will send out e-mails to all the selected users and e-mail addresses.