
As we have seen so far, JIRA uses fields such as summary and description to capture data. This works for most cases, but when you have complex data such as application log files or screenshots, fields become insufficient. This is where attachments come in. JIRA allows you to attach files to issues as support documents.
Attachments are saved as files on the JIRA file server and not in the database, so you need to ensure that there is sufficient disk space to accommodate the volume of attachments for now and future growth. As attachments are not stored in the database, JIRA will not backup the files as a part of its backup process. Attachments need to be backed up separately.
Attachments are enabled by default in JIRA, so users will be able to attach files to issues as soon as JIRA is installed. However, if it is disabled for some reason, you can re-enable it. Perform the following steps to enable attachments for JIRA:
- Log in to JIRA as a JIRA administrator.
- Browse to the administration console by clicking on the Administration link at the top navigation panel.
- Click on Attachments under the Advanced section at the bottom-right end of the page. This will take you to the Attachment Settings page.
- Click on the Edit Settings button. This will bring up the Edit Attachment Settings page.
- Select Use Default Directory for the Attachment Path.
- Click on the Update button to enable attachments in JIRA.
On the Attachment Settings page, as shown in the following screenshot, there are a few options that you will need to configure when enabling attachments in JIRA:
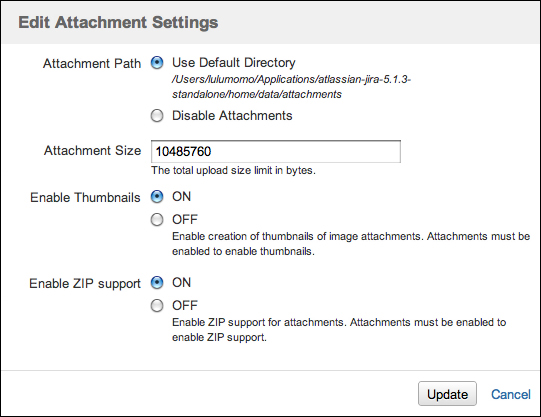
The following table summarizes the configuration options:
|
Options |
Description |
|---|---|
|
This specifies the location where attachments will be stored on the filesystem. The only options are the default directory, which is inside your | |
|
This specifies the maximum size of the attachment that users can upload. | |
|
This specifies whether or not to enable thumbnail generation when the attachment is an image. | |
|
This specifies whether or not to enable ZIP support, which allows users to download multiple attachments as a single ZIP file, and also view the contents of ZIP attachment files. |
Attachments are enabled and disabled globally across JIRA. You cannot selectively enable or disable attachment functions on a per project basis. You can, however, achieve a similar result by controlling the permission around who can attach files. Permissions are discussed in Chapter 8, Securing JIRA.
JIRA allows you to attach any arbitrary files to issues. These can be image files, Microsoft Office documents, and other binary files. Perform the following steps to attach a file to an issue:
- Browse to the issue you wish to attach a file.
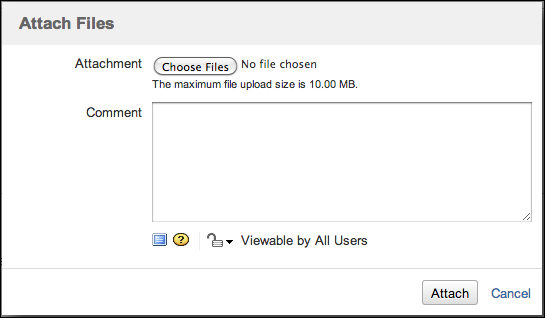
- Select Attach File from the More Actions menu. This will bring up the Attach Files page.
- Click on the Browse button to select the file you wish to attach.
- Optionally, provide a comment for the attached file. The comment will be added as a normal comment to the issue.
- Optionally, select the security level for who can see the comment.
- Click on the Attach button:
Apart from letting you attach any files to an issue, JIRA also allows you to directly attach a screenshot from your system clipboard to issues. This saves you from having to take a screenshot, save it as a physical file on the disk, and finally attach it to JIRA.
Perform the following steps to attach a screenshot:
- Browse to the issue you wish to attach a screenshot.
- Select Attach Screenshot from the More Actions menu. This will bring up the Attach Screenshot page.
- Click on Yes when prompted for whether you want to trust the applet.
- Click on the Paste button and the screenshot will be pasted into the panel above.
- Enter a file name for the screenshot or accept the default name.
- Optionally, provide a comment for the attached file. The comment will be added as a normal comment to the issue.
- Optionally, select the security level for who can see the comment.
- Click on the Attach button.
Just like attaching a file to JIRA, the same file name restriction applies to attaching a screenshot.