
While JIRA's built-in fields are quite comprehensive for basic general uses, most organizations will soon find that they have special requirements that cannot be addressed simply with the default fields available. To help you tailor JIRA to your organization's needs, JIRA lets you create and add your own fields to the system, called custom fields.
Every custom field belongs to a custom field type, which dictates its behavior, appearance, and functionality. So, when you add a custom field to JIRA, you really add another instance of a custom field type.
JIRA comes with over 20 custom field types that you can use straight out of the box. Many of the custom field types are identical to the built-in fields, but provide you with more control and flexibility that are not available with their built-in counterparts. The following tables breaks down and lists all the JIRA standard custom field types and their characteristics.
These fields are the most basic field types in JIRA. They are usually simple and straightforward to use, such as text field, which allows users to input any text:
|
Custom field type |
Description |
|---|---|
|
These are multiple line text-areas enabling entry for large text contents. | |
|
These are input fields that store and validate numeric values. | |
|
These are radio buttons that ensure only one value can be selected. | |
|
These are single select lists with a configurable list of options. | |
|
These are basic single link input fields to allow simple text inputs of less than 255 characters. | |
|
These are input fields that validate a valid URL. |
These fields provide specialized functions. For example, the Date Picker field provides you with a calendar to let you pick a date from, and User Picker has an auto-complete feature to help you find the user you want to select:
|
Custom field type |
Description |
|---|---|
|
These are multiple select lists where the options for the second select list are dynamically updated based on the value of the first. | |
|
These are input fields that allow input with a date picker and enforcing valid dates. | |
|
These are input fields that allow inputs with a date and time picker and enforcing valid date timestamps. | |
|
These choose a user group using a pop-up picker window. | |
|
These are input fields that allow labels to be added to an issue. | |
|
These select lists displaying the projects viewable by the user in the system. | |
|
These are read-only text fields that do not allow users to set their data. It's only possible to programmatically set the data. | |
|
These choose a single version from the available versions in the project. | |
|
These choose a user from the JIRA user base via either a pop-up user picker window or through auto completion. | |
|
These choose one or more versions from the available versions in the current project. |
These fields are like their single value versions and allow you to select multiple values rather than only one. For example, the Multi Select field lets you select one or more values, while its singular equivalent, the Select List field, only lets you choose one. The only exception is the Multi Checkboxes field, which does not come with a singular variety:
|
Custom field type |
Description |
|---|---|
|
These are checkboxes that allow multiple values to be selected. | |
|
They choose one or more user groups using a pop-up picker window. | |
|
They select lists allowing multiple values to be selected. | |
|
They choose one or more users from the user base via a pop-up picker window. |
As you can see, JIRA provides you with a comprehensive list of custom field types. In addition, there are many custom field types developed by third-party vendors (called plugins or add-ons) that you can add to your JIRA to enhance its functionality. These custom fields provide many specialized functionalities, such as automatically calculating values, retrieving data from databases directly, or connecting to an external system. Once you have installed the plugin, the process of adding custom fields from other vendors is mostly the same as adding custom fields shipped with JIRA.
We will look at plugins in Chapter 10, General Administration, and discuss where to find plugins, and how to install and manage them. The following list shows some examples of plugins that provide additional useful custom fields:
- JIRA Enhancer Plugin: This includes a number of custom fields that will automatically display dates when key events occur for an issue. For example, when the issue was last closed.
- JIRA Toolkit Plugin: This provides a number of useful custom fields, such as automatically showing you all the users that participate in a given issue, and the date when the issue was last commented on.
- nFeed: This provides a suite of custom fields that let you connect to databases, remote files, and web services to retrieve data and display them in JIRA.
- CFR Part 11 E-Signature: This lets users electronically sign issues in JIRA as they work on them; for example, approving an issue to be closed.
- SuggestiMate for JIRA: This provides a specialized custom field that shows similar and potentially duplicated issues when you are creating new fields or browsing existing ones.
For any information system, capturing data is only half of the equation. Users will need to be able to retrieve the data at a later stage, usually through searching, and JIRA is no different. While fields in JIRA are responsible for capturing and displaying data, it is their corresponding searchers that provide the search functionality.
In JIRA, all the built-in fields have searchers associated by default, so you will be able to search issues by their summary or assignee, without any further configuration. For custom fields, however, you will need to specify a searcher for each custom field you add. If you do not specify a searcher, you will not be able to search data based on that field.
For all custom field types that come with JIRA, one or more searchers are available for you to choose from. You can select a searcher when you create a new custom field and later change the searcher, as we will see when we cover how to manage custom fields.
Built-in fields, such as priority and resolution, are static across JIRA. What this means is that these fields will have the same set of selections for all projects. Custom fields, on the other hand, are a lot more flexible.
Custom field types, such as select list and radio buttons, can have different sets of options for different projects, or different issue types within the same project. This is achieved via what is called custom field context.
A custom field context is made up of a combination of applicable projects and applicable issue types. When you are working with an issue, JIRA will check the project and issue type of the current issue to determine if there is a specific context that matches the combination. If one is found, JIRA will load the custom field with any specific settings such as selection options. However, if no context is found, the custom field will not be loaded.
We will look at how to set custom field contexts in a later section. What you need to remember now is when adding a custom field, you need to make sure that it has the correct context setting.
Just like built-in fields, custom fields are used globally across JIRA, so you will need to have the JIRA Administrator global permission to carry out management operations, such as creation and configuration.
JIRA maintains all the custom fields in a centralized location for easy management. Perform the following steps to access the custom field management page:

On the Custom Fields page, all existing custom fields will be listed. From here, you can see the name of each custom field, their type, the context they belong to, and the screens they are on.
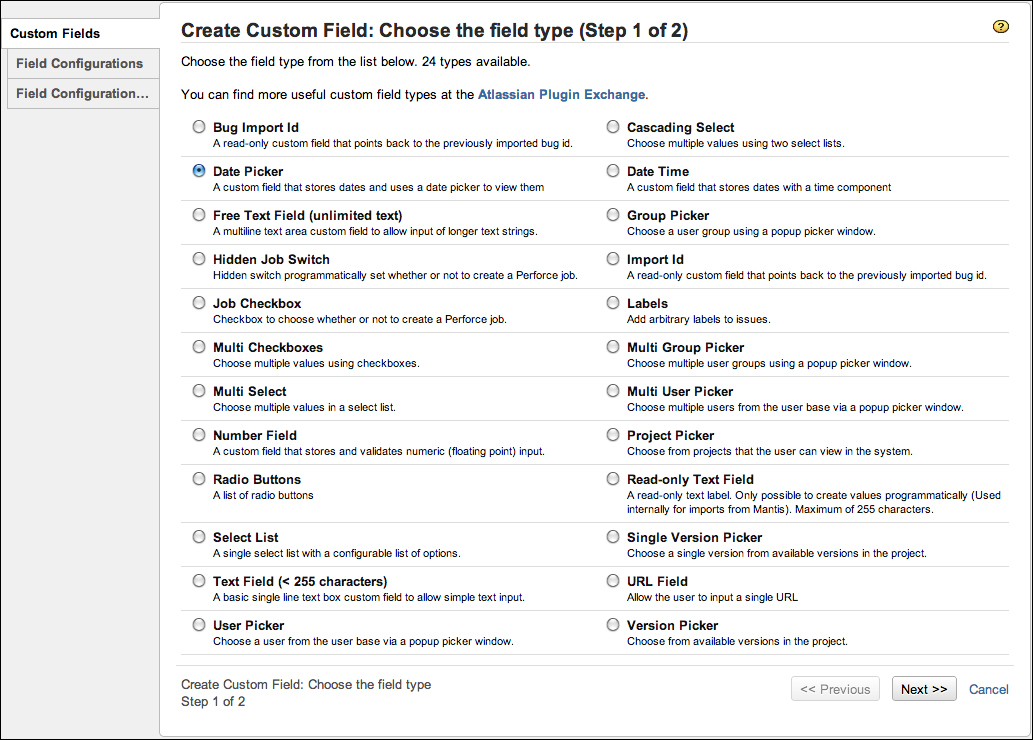
Creating a new custom field is a multi-step process, and JIRA provides a wizard to help you through the process. There are two required steps and an optional step when adding a new custom field. You need to first determine the type of custom field, and then its searcher and context. The last optional step is to decide what screens to add the field onto. We will be walking through the following process:
- Browse to the Custom Fields page.
- Click on the Add Custom Field button. This will bring you to step 1 of the process where you can select the custom field type.
- Select the custom field type you wish to add and click on Next. This will bring you to step 2 of the process, where you can specify other aspects of the new custom field:
- Enter values for the Field Name and Field Description fields. You can have multiple custom fields with the same name. However, doing so will make it harder for maintenance.
- Select a search template, if available. All custom field types that are shipped with JIRA will have one or more search templates. If you do not wish the field to be searchable, then select None.
- Select which issue types the custom field will be available for. If you select the All issue type option, the custom field will be available to all the issue types (assuming if it is also available for the project).
- Select the projects the custom field will be available for. Global context means all the projects are in JIRA. If you select specific projects, then the custom field will only be available for issues within those projects (if it is available for the issue type):
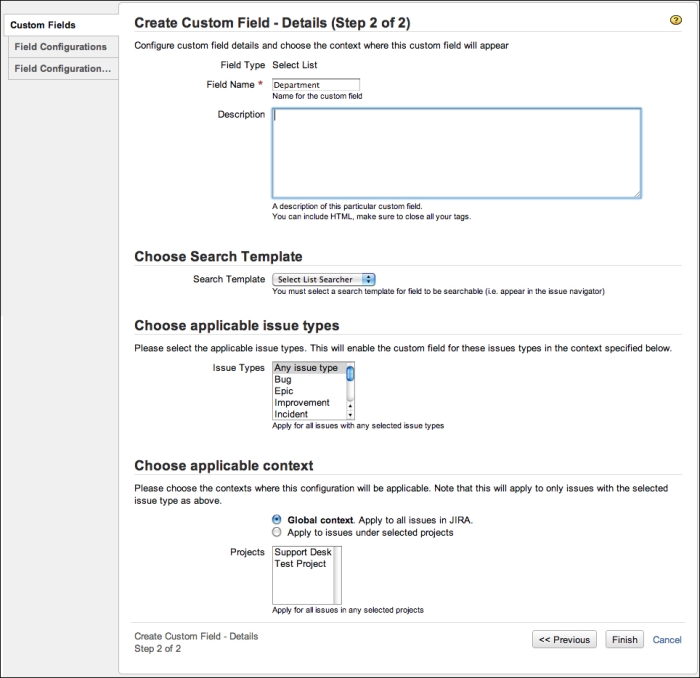
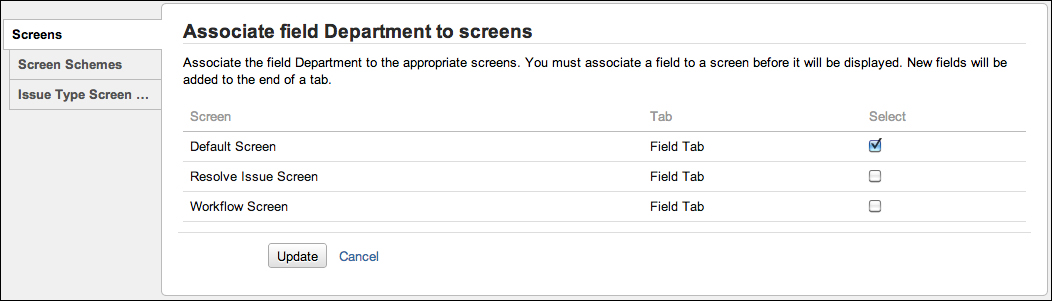
- Click on Finish. This will bring you to the last step of the process, where you can specify which screen you would like to add the field onto. This step is optional, as the custom field has already been added in JIRA. You do not have to add the field onto a screen. We will be discussing fields and screens in Chapter 5, Screen Management.
- Select the screens and click on Update:
Once a custom field has been created, you will be able to manage its configurations and settings.
Once a custom field has been created, you can edit its details at any time. You might have already noticed that there is a Configure option and an Edit option for each custom field. It can be confusing in the beginning to differentiate between the two. Configure specifies options related to custom field context, which we will discuss in the following sections. Edit specifies options that are global across JIRA for the custom field; these include its name, description, and search templates:
- Browse to the Custom Fields page.
- Select the Edit option by clicking on the tools icon for the custom field you wish to edit from the list of custom fields.
- Change the custom field details.
- Click on the Update button to apply the changes.
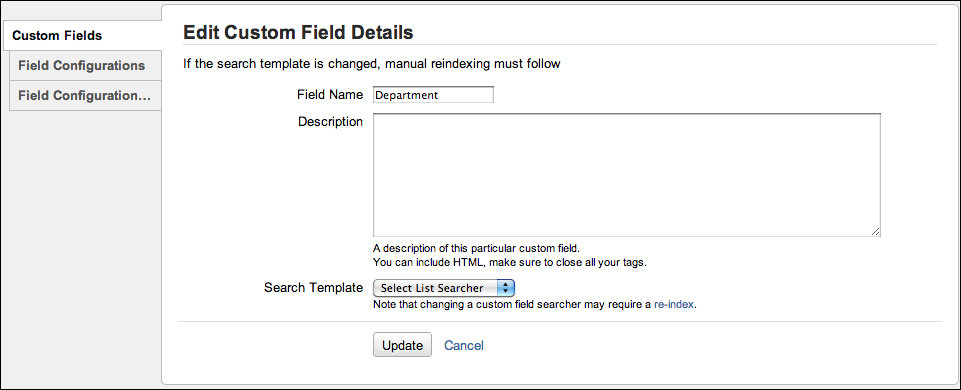
When making changes to the search templates for your custom fields, it is important to note that while the change will take effect immediately, you need to perform a full system reindex in order for JIRA to return correct search results. This is because for each search template, the underlying search data structure might be different, and JIRA will need to update its search index for the newly applied search template.
For example, if you have a custom field that did not have a searcher and you have just applied a searcher to it (while the searcher will now be available), no results will be returned until you reindex JIRA. When you make changes to the search template, JIRA will alert you with a message that a reindex will be required.
We will be discussing searching and indexing in more detail in Chapter 9, Searching, Reporting, and Analysis.
You can also delete the existing custom fields, as follows:
- Browse to the Custom Fields page.
- Select the Delete option by clicking on the tools icon for the custom field you wish to delete.
- Click on the Delete button to delete the custom field.
Once deleted, you cannot get the custom field back and you will not be able to retrieve and search the data held by those fields. If you try to create another custom field of the same type and name, it will not inherit the data from the previous custom field, as JIRA assigns unique identifiers to each of them. It is highly recommended to back up your production JIRA before you delete the field; we will discuss backup strategies in Chapter 10, General Administration.
Now that we have seen how to create and manage custom fields, we can start looking at the more advanced configuration options. Different custom field types will have different configuration options available to them. For example, while all custom fields will have the option to specify one or more contexts, selecting list-based custom fields will also allow you to specify a list of options. We will look at each of the configuration options in the following sections.
To configure a custom field, you need to access the Configure Custom Field page, as follows:
- Browse to the Custom Fields page.
- Select the Configure option by clicking on the tools icon for the custom field you wish to configure from the list of custom fields. This will bring you to the Configure Custom Field page.
The following screenshot shows that the Department custom field has two available contexts, the default context (Default Configuration Scheme for Department), and Support Context, which is applied only to the Support Desk project:
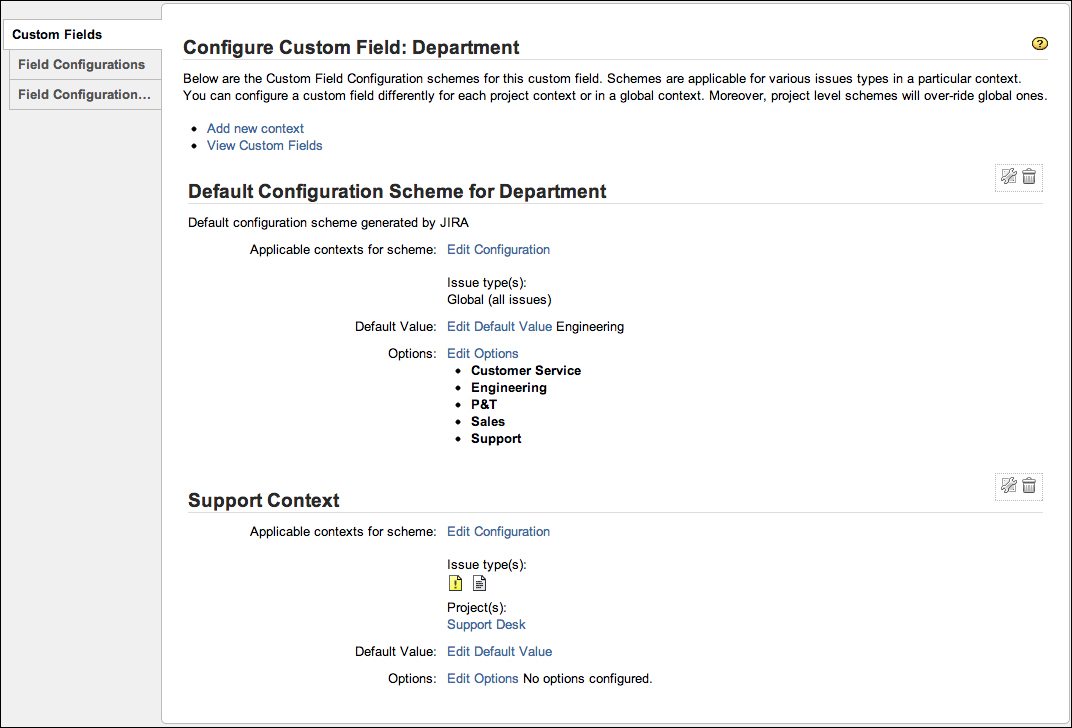
From time to time, you may need your custom fields to have different behaviors depending on what project the issue is in. For example, if we have a select list custom field called Department, we may want it to have a different set of options based on which project the issue is being created, or even a different default value.
To achieve this level of customization, JIRA allows you to create multiple custom field contexts for a custom field. As we have seen already, a custom field context is a combination of issue types and projects. So, in our example, we can create a context for issue type Bug and project Support, and set the default department to Engineering.
Creating a new custom field context is simple. All you need to do is decide the issue type and project combination that will define the context:
- Browse to the Configure Custom Field page for the custom field you wish to create a new context for.
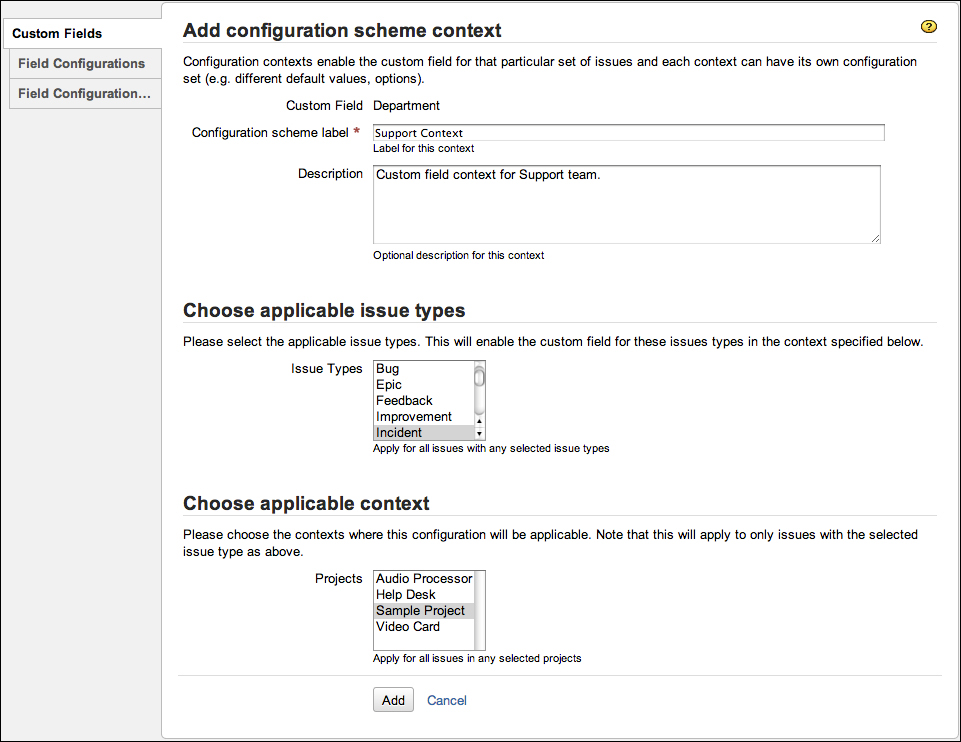
- Click on the Add new context link. This will take you to the Add configuration scheme context page.
- Give a name to the new custom field context in the Configuration scheme label field.
- Select the applicable issue types.
- Select the applicable projects.
- Click on the Add button to create the new custom field context.
Each project can only belong to one custom field context per custom field (global context is not counted for this). Once you have selected a project for a context, it will not be available the next time you create a new context. For example, if you have created a new context for Project A, it will not be listed as an option when you create another context for the same custom field. This is to prevent you from accidentally creating two contexts for the same project.
After a new custom field context has been created, it will not "inherit" any configuration values such as Default Value and Select Options from other contexts, such as the default context. You will need to repopulate and maintain the configuration options for each newly created context:
For custom fields of types select list, checkboxes, radio buttons, and their multi versions, you need to configure their select options before they can become useful to the users. The select options are configured and set on a per custom field context basis. This provides the custom field with the flexibility to have a different set of options for a different context.
To configure the select options, you need to first select the custom field and then the context that the options will be applied to, as follows:
- Browse to the Custom Fields page.
- Click on the Configure option for the custom field you wish to configure select options for.
- Click on the Edit Options link for the custom field context to apply the options for.
- Fill in the option values in the Add New Custom Field Option section, and click on the Add button to add the value. The options will be added in the order they are entered into the system. You can manually move the option values up and down or click on Sort options alphabetically to let JIRA perform the sorting for you.
- Click on the Done button once you have finished configuring the select options:

For most custom fields, you can set a default value so that your users will not need to fill them in unless they have special needs. For text-based custom fields, the default values will be displayed as text by default, when the users create or edit an issue. For selection-based custom fields, the default values will be options pre-selected for the users.
Just like setting selection options, default options are also set on a per-custom field context basis:
- Browse to the Custom Fields page.
- Click on the Configure option for the custom field you wish to configure select options for.
- Click on the Edit Default Value link for the custom field context to apply the default values for.
- Set the default value for the custom field.
- Click on the Set Default button to set the default value.
The way to set the default value will be different for different custom field types. For text-based custom fields, you will be able to type any text string. For select-based custom fields, you will be able to select from the options you have added (if you have not set any options for the custom field, the only option available as a default value will be None). For picker-based custom fields, such as user picker, you will be able to select a user directly from the user base:
