
The post-installation configuration steps are optional depending on your needs and environment. If you set up JIRA for evaluation purposes, you probably do not need to perform any of the following steps, but it is always a good practice to be familiar with these as a reference:
In both standalone and WAR distributions, you can configure some of the applications server settings, such as context path and port number. This is useful, for example, if you have multiple servers running on the same machine, then they can co-exist by listening on different port numbers. If JIRA is the only application running on your machine, then you may choose not to make any changes. Another reason you might want to change the port number to a standard port such as 80 instead of 8080, is so that you will not need to type in the port number as a part of the URL.
To configure the settings, locate and open the server.xml file in a text editor. The file can be found in the JIRA_INSTALL/conf directory:
<Server port="8005" shutdown="SHUTDOWN">
… … … …
<Connector port="8080" protocol="HTTP/1.1">
… … … …
<Context path="/jira" docBase="${catalina.home}/atlassian-jira" reloadable="false" useHttpOnly="true">
Let's examine the relevant contents in this file:
- Line 1: This line specifies the port for command to shutdown JIRA/Tomcat. By default, it is port 8005. If you already have an application that is running on that port (usually another Tomcat instance), you need to change this to a different port.
- Line 2: This line specifies which port JIRA/Tomcat will be running on. By default, it is port 8080. If you already have an application that is running on that port, or if the port is unavailable for some reason, you need to change it to another available port.
- Line 3: This line allows you to specify the context that JIRA will be running under. By default, the value is empty, which means JIRA will be accessible through the URL of
http://hostname:portnumber. If you decide to specify a context, the URL will behttp://hostname:portnumber/context. In our example here, JIRA will be accessible through the URL ofhttp://localhost:8080/jira.
By default, JIRA runs with standard, non-encrypted HTTP protocol. This is acceptable if you are running JIRA in a secured environment, such as an internal network. However, if you plan to open up access to JIRA over the Internet, you will need to tighten up security by encrypting sensitive data, such as usernames and passwords that are being sent, by enabling HTTPS (HTTP over SSL).
For a standalone installation, you will need to perform the following tasks:
- Obtain and install a certification
- Enable HTTPS on your application server (Tomcat)
- Redirect traffic to HTTPS
First, you need to get a digital certificate. This can be from a certification authority such as VeriSign (CA certificate), or a self-signed certificate generated by you. CA certificate will not only encrypt data for you, but also identify your copy of JIRA to users. A self-signed certificate is useful when you do not have a valid CA certificate and you are only interested in setting up HTTPS for encryption. Since a self-signed certificate is not signed by a Certification Authority, it is unable to identify your site to the public, and users will be prompted with a warning that the site is untrusted when they first visit it. However, for evaluation purposes, a self-signed certificate will suffice until you can get a proper CA certificate.
For the purpose of this exercise, we will create a self-signed certificate to illustrate the complete process. If you have a CA certificate, you can skip the following steps.
Java comes with a handy tool for certificate management called keytool
, which can be found in the JAVA_HOMElib directory. To generate a self-signed certificate, run the following commands from a command prompt:
keytool –genkey –alias tomcat –keyalg RSA
keytool –export –alias tomcat –file file.cer
This will create a keystore (if one does not already exist) and export the self-signed certificate (file.cer). When you run the first command, you will be asked to set the password for the keystore and Tomcat. You need to use the same password for both. The default password is changeit. You can specify a different password of your choice, but you then have to let JIRA/Tomcat know, as we will see later.
Now that you have your certificate ready, you need to import it into your trust store for Tomcat to use. Again, you will use the keytool application in Java:
keytool –import –alias tomcat –file file.cer JAVA_HOMEjrelibsecuritycacerts
This will import the certificate into your trust store, which can be used by JIRA/Tomcat to set up HTTPS.
To enable HTTPS on Tomcat, open the server.xml file in a text editor from the JIRA_INSTALL/conf directory. Locate the following configuration snippet:
<Connector port="8443" maxHttpHeaderSize="8192" SSLEnabled="true"
maxThreads="150" minSpareThreads="25" maxSpareThreads="75"
enableLookups="false" disableUploadTimeout="true"
acceptCount="100" scheme="https" secure="true"
clientAuth="false" sslProtocol="TLS" useBodyEncodingForURI="true"/>
This enables HTTPS for JIRA/Tomcat on port 8443. If you have selected a different password for your keystore, you will have to add the following line to the end of the preceding snippet, before the closing tag:
keystorePass="<password value>"
The last step is to set up JIRA so that it automatically redirects from a non-HTTP request to an HTTPS request. Find and open the web.xml file in the JIRA_INSTALL/atlassian-jira/WEB-INF directory, and add the following snippet to the end of the file, before the closing </web-app> tag:
<security-constraint>
  <web-resource-collection>
    <web-resource-name>all-except-attachments</web-resource-name>
    <url-pattern>*.js</url-pattern>
    <url-pattern>*.jsp</url-pattern>
    <url-pattern>*.jspa</url-pattern>
    <url-pattern>*.css</url-pattern>
    <url-pattern>/browse/*</url-pattern>
  </web-resource-collection>
  <user-data-constraint>
    <transport-guarantee>CONFIDENTIAL</transport-guarantee>
  </user-data-constraint>
</security-constraint>
Now, when you access JIRA with a normal HTTP URL, such as http://localhost:8080/jira, you will be automatically redirected to its HTTPS equivalent, https://localhost:8443/jira.
With the standalone distributions, JIRA comes bundled with the necessary database drivers for all the supported database systems. However, if you are using the WAR distribution or if for some reason, the database driver gets corrupted, you will need to manually obtain and install the driver.
To install a database driver, simply perform the following steps:
- Obtain the database driver from the vendor.
- Copy the driver (usually a JAR file) into your
JIRA_INSTALL/libdirectory. - Restart JIRA so the driver can be properly loaded.
As we have already seen, the JIRA setup wizard takes care of setting up the database connection for us during the installation process. However, there will be times when you will need to make changes to this. The database name or user credentials may have changed, or there may be a need to use a different database altogether.
When the wizard sets up your database connections, these settings are written to a file called dbconfig.xml in the JIRA_HOME directory. Now, you can edit this file directly in a text editor, or you can use a built-in GUI tool to help you with this.
The tool is called JIRA Configuration Tool
, a utility application that comes bundled with JIRA. You can find the application in the JIRA_INSTALL/bin directory called config.bat. Double-click on the file to start the application.
Click on the Database tab once the application starts up. You will see that all the configuration options are populated with the settings you just configured:
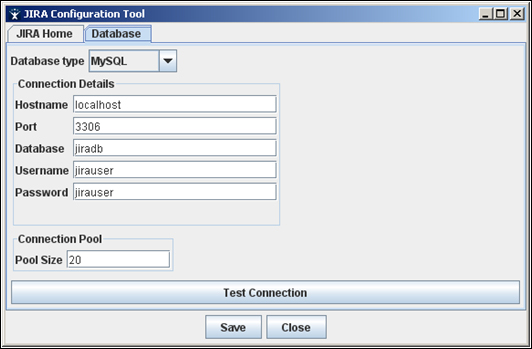
To verify that your settings are correct, make sure that the database is running and click on the Test Connection button. If everything is correct, you should see a confirmation message as shown in the preceding screenshot. From now on, you can use this utility application to update database configurations for JIRA, and you will know what files are being touched when changes occur.