Now that you have seen how to manage fields in JIRA, it is time to expand on your Help Desk project to include some customized fields and configurations to help your support staff.
What we will do this time is add a few new custom fields to help capture some additional useful data from the business users when they log an incident. We will also create a customized field configuration specially designed for our support team. Lastly, we will tie everything together by associating our fields, configurations, and projects through the field configuration schemes.
Since you are implementing a support system, one common feature is to be able to escalate the incident, and for every escalation, a group of users will be notified automatically. The automatic escalation and notification aspects of this feature will be covered and implemented in later chapters, but what we do need right now is a way to capture the information, such as the following:
- Does the issue require escalation?
- What is the current escalation level?
- Who should be notified when the issue is escalated?
So, to address these requirements, we will be adding three custom fields, one per data requirement.
The first custom field we are going to add is Is Escalation Required. We want to have this option, so that not all tickets raised will require escalation. Some tickets may not be urgent or they are simply for investigation purposes. We will also make this field required, so the users will need to indicate if they require an escalation. To help our users, we will provide a default value of Yes, so tickets by default will require escalation. Since this is a single selection field, we will be using radio buttons:
- Browse to the View Custom Fields page.
- Click on the Add Custom Field link.
- Select the Radio Buttons custom field type.
- Give the custom field the name of
Is Escalation Required. - Accept the default options and click on Finish.
- Select Default Screen and click on Update.
The second custom field is a simple text-based field, which will indicate what level of escalation the ticket is currently at. We do not want users (support or business) to be able to change the values as this should be determined by the system automatically, so we will be using a read-only text field. We will make use of this field in later chapters.
- Browse to the View Custom Fields page.
- Click on the Add Custom Field link.
- Select the Read-only Text Field custom field type.
- Give the custom field the name of
Escalation Level. - Accept the default options and click on Finish.
- Select Default Screen and click on Update.
Finally, the third custom field will contain a list of users from JIRA's user base who will receive notifications when the ticket is being escalated:
- Browse to the View Custom Fields page.
- Click on the Add Custom Field link.
- Select Multi User Picker custom field type.
- Give the custom field the name
Escalation List. - Accept the default options and click on Finish.
- Select Default Screen and click on Update.
Now that we have created the necessary custom fields, the next step is to configure them. Remember our Is Escalation Required custom field will allow users to specify if the tickets they raised need escalation, so we need to add the options of Yes and No to the field. We also need to set the default all tickets to require escalation:
- Browse to the View Custom Fields page.
- Click on the Configure link for the Is Escalation Required custom field.
- Click on Edit Options.
- Add the options of
YesandNo, click on the Done button when finished. - Click on the Edit Default Value link.
- Select the Yes option for the default value.
Now that we have our custom fields, the next step is to create a new field configuration so that we can specify the behaviors of our custom fields. Previously, we had decided to make the Is Escalation Required field required, so there will be no ambiguity when it comes to determining if a ticket needs to be escalated. So, let's start with creating a new field configuration first.
- Browse to the View Field Configurations page.
- Name the new field configuration
Help Desk Field Configuration. - Provide a helpful description Field configuration for the help desk team.
- Click on the Add button to create a new field configuration.
Now that we have our new field configuration, we can start adding configurations to our new custom fields:
- Click on the Configure link for Help Desk Field Configuration.
- Click on the Required link for the Is Escalation Required custom field. (If you do not see the Is Escalation Required field in the list of fields, please go back to the View Custom Fields page to verify whether the field has been created successfully.)
We have our custom fields, we have configured the relevant options, created a new field configuration, and set the behavior of our fields. It is time to add them to a scheme:
- Browse to the View Field Configuration Schemes page.
- Name the new field configuration scheme
Help Desk Field Configuration Scheme, as we will be applying this to our Help Desk project. - Provide a helpful description Field configuration scheme for the help desk team.
- Click on the Add button to create a new field configuration.
With the field configuration scheme in place, we can now activate our configurations. Since this is designed for our help desk team, we would want to apply the field configurations to the issue types that are applicable to the Help Desk project; that is, Ticket and Incident:
- Click on the Configure link for Help Desk Field Configuration Scheme.
- Select the issue type as Ticket and field configuration as Help Desk Field Configuration.
- Click on the Add button to add the association.
- Repeat steps 1 to 3 for the Incident issue type.
OK, we have done all the hard work. We have created new custom fields, a new field configuration, and a new field configuration scheme; the last step is to put everything together and see it in action:
- Browse to the Project Administration page for our Help Desk project.
- Click on the Select link for Field Configuration Scheme.
- Select Help Desk Field Configuration Scheme and click on the Associate button.
Alright, we are all done! You can pat yourself on the back, sit back, and take a look at your hard work in action.
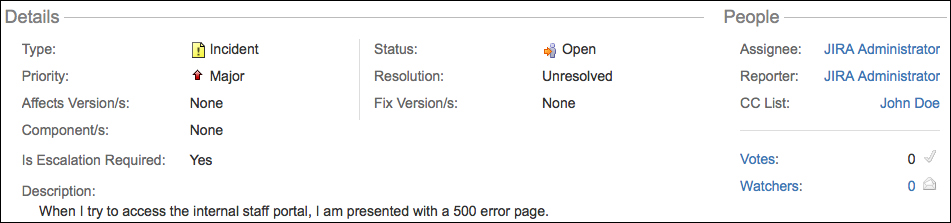
Create a new issue type Incident under the Help Desk project and you will see your new custom fields at the bottom of the page (you will not see Escalation Level, as it is read-only, so it does not appear on the Create/Edit screen).

Go ahead and create the incident by filling the fields. On the View Issue page, you will see your new custom fields displayed along with the values you have provided: