
With multiple field configurations, JIRA determines when to apply each of the configurations through the field configuration scheme. A field configuration scheme maps field configurations to issue types. This scheme can then be associated with one or more projects.
This allows you to group multiple field configurations mapped to issue types, and apply them to a project in one go. The project will then be able to determine which field configuration to apply, based on the type of the issue. For example, for a given project, you can have different field configurations for bugs and tasks.
This grouping of configurations into schemes also provides you with the option to reuse existing configurations without duplicating work, as each scheme can be reused and associated to multiple projects.
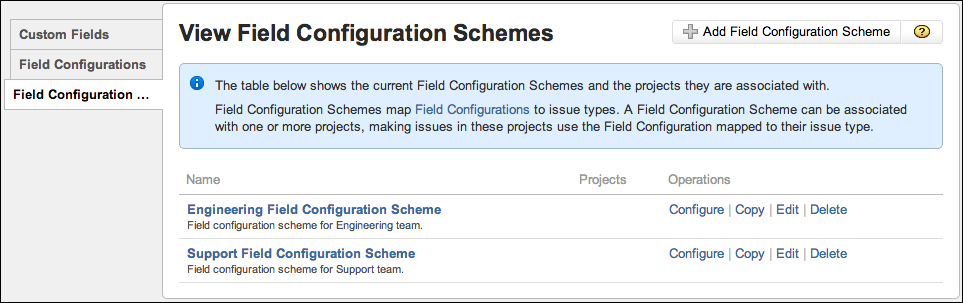
You can manage all your field configuration schemes from the View Field Configuration Schemes page. From there, you will be able to add, configure, edit, delete, and copy schemes:
- Log in to JIRA as a JIRA administrator.
- Click on Administration at the top menu bar.
- Select Field Configuration Schemes at the left-hand side panel. This will bring you to the View Field Configuration Schemes page:
The first step to group your field configurations is to create a new field configuration scheme. By default, JIRA does not come with any field configuration schemes. All the projects will use the system default field configuration. The new field configuration scheme will hold all the mappings between our field configurations and issue types.
To create a new field configuration scheme, all you need to do is specify the name and an optional description for the scheme:
- Browse to the View Field Configuration Schemes page.
- Fill in a name for the new field configuration scheme in the Add Field Configuration Scheme section.
- Optionally, provide a short description for the scheme.
- Click on the Add button to create the scheme.
Since field configuration schemes are applied to projects, it is a good practice to name your them according to the projects. For example, the scheme for the Sales project can be named Sales Field Configuration Scheme. You can add a version number after the name to help you maintain changes.
Once the new field configuration scheme is created, it will be displayed in the table that lists all the existing schemes. At this time, the scheme is in the inactive state, as it does not contain any configuration mappings and is not yet active in JIRA.
You can update existing field configuration scheme details and delete them altogether. The details you can edit are the scheme's name and description. You can also update its field configurations mapping, which will be covered in later sections:
- Browse to the View Field Configuration Schemes page.
- Click on the Edit link for the field configuration scheme you wish to edit. This will take you to the Edit Field Configuration Scheme page.
- Update the Name and Description fields with new values.
- Click on the Update button to apply the changes.
Just like field configurations, you can only delete a field configuration scheme if it is in the inactive state. Once you have associated the scheme with a project, which will put the scheme into the active state, you cannot delete it until it is back in the inactive state. To inactivate a field configuration scheme, you will have to unassociate the scheme from all the projects you have applied it to:
- Browse to the View Field Configuration Schemes page.
- Click on the Delete link for the field configuration scheme you wish to delete. This will take you to the Delete Field Configuration Scheme page for confirmation.
- Click on the Delete button to delete the scheme.
There will be times when you need a new field configuration scheme and the requirements are very similar to a scheme that you already have. So, instead of creating a new scheme from scratch, you can choose to copy the existing scheme as a base, and simply make some quick modifications. JIRA allows you to achieve this by letting you copy the existing schemes:
- Browse to the View Field Configuration Schemes page.
- Click on the Copy link for the field configuration scheme you wish to copy. This will take you to the Copy Field Layout Configuration page.
- Specify the name and description of the new scheme.
- Click on the Copy button to create a copy.
Once the new-copied scheme is created, you will be able to modify its field configuration and issue type mappings as per your requirements, which we will look at in the next section.
Once you have a new field configuration scheme setup, you will be able to add mapping between field configurations and issue types. For each field configuration scheme, one issue type can be mapped to only one field configuration, while each field configuration can be mapped to multiple issue types. The following screenshot shows how Development Field Configuration is being applied to both the Technical Task and Improvement issue types, and Bug Field Configuration is applied to the Bug issue type.
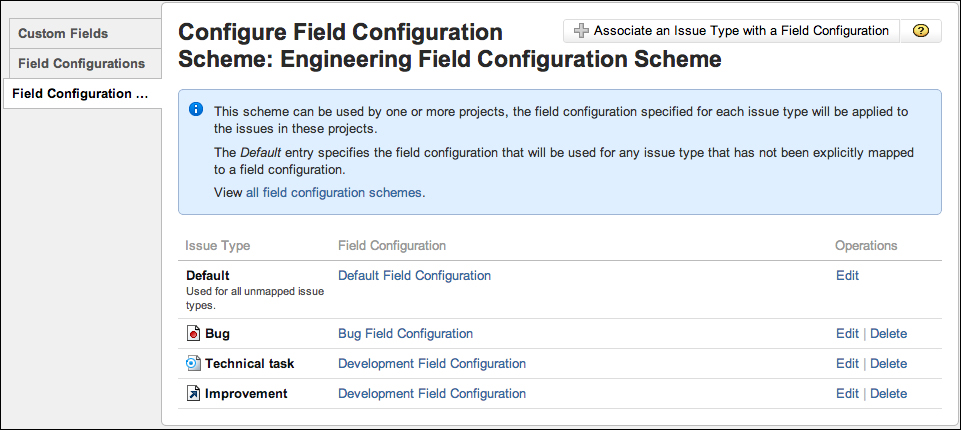
When a field configuration scheme is first created, JIRA creates a default mapping, which maps all unmapped issue types to the default field configuration. You cannot delete this default mapping as it acts as a "catch all" condition for mappings that you do not specify in your scheme. What you need to do is to add more specific mappings that will take precedence over this default mapping:
- Browse to the View Field Configuration Schemes page.
- Click on the Configure link for the field configuration scheme you wish to configure. This will take you to the Configure Field Configuration Scheme dialog.
- Select the issue type and field configuration from the Add Issue Type To Field Configuration Association section to establish the mapping.
- Click on the Add button to add the mapping.
You will notice that once you have added a mapping, the mapped issue type will disappear from the list of selectable issue types. This is JIRA preventing you from double mapping an issue type by accident. Once you have mapped all the available issue types, you will not be able to add any more mappings.
After you have created a new field configuration scheme and established the mappings, the configurations will not take effect immediately. The scheme is still in the inactive state. In order to activate the scheme, you need to associate the scheme with a project for the configurations to take effect.
It is important to note that once you have associated the field configuration scheme with a project, you cannot delete it until you have removed all the associations so that the scheme becomes inactive again.
To activate a field configuration scheme, you need to establish the association on a per-project level. This means you need to go to each individual project and set the field configuration scheme option for them:
- Log in to JIRA as a JIRA Administrator.
- Click on Administration at the top menu bar.
- Select the project you wish to associate the field configuration scheme to. This will bring up the Project Administration page.
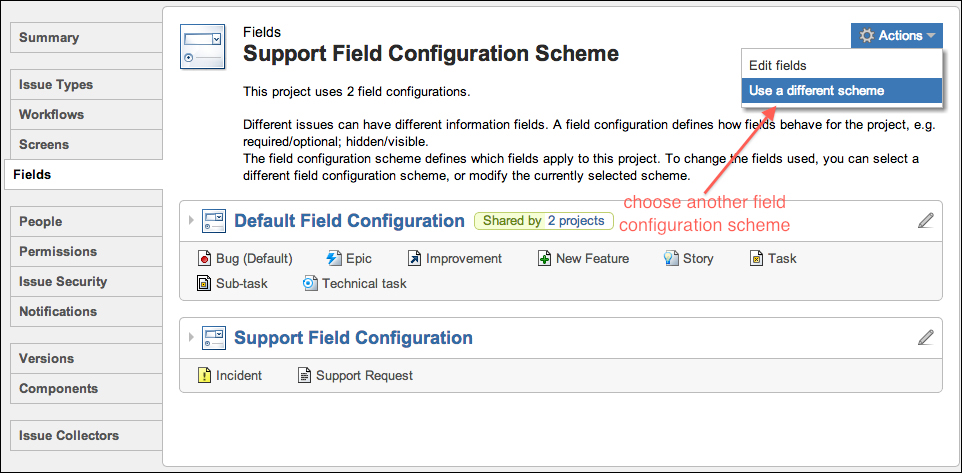
- Click on the Fields tab at the left-hand side panel.
- Select Use a different scheme from the Actions menu. This will bring up the Field Layout Configuration Association page.
- Select the new field configuration scheme and click on the Associate button:
You can repeat steps 3 to 6 to associate the field configuration scheme with more projects.