After you have performed a query, sometimes it will be useful to save the query for later use. For example, you might have created a query to list all the open bugs and new features in a project that are to be completed by a certain date in several projects, so you can keep an eye on their progress. Instead of recreating this search query every time you want to check up on the statuses, you can save the query as a filter, which can be reused at a later stage. You can think of filters as named search queries that can be reused.
Other than being able to quickly pull up a report without having to recreate the queries, saving search queries as filters provides you with other benefits, including the following:
- Share saved filters with other users
- Use the filters as a source of data to generate reports
- Display results on a dashboard as a gadget
- Subscribe to the search queries to have results e-mailed to you automatically
We will explore all of the advanced operations you can perform with filters and explain some of the new terms and concepts, such as dashboard and gadgets in later sections, but first, let's look at how we can create and manage filters.
To create a new filter, you will first have to construct and execute your search query. You can do this with any of the three available search options provided in JIRA, but please note that the search result must bring you to the Issue Navigator. So if you are using the quick search option and search by issue key, you will not be able to create a filter. Once you have executed your query, regardless of if it brings back any result, you will be able to create a new filter based on the executed search:
- Browse to Issue Navigator.
- Click on the New filter button in the left-hand side.
- Construct and execute a search query in JIRA.
- Click on the Save as button at the top.
- Provide a meaningful name for the filter.
- Click on the Submit button to create the filter.
Once you have created the filter, all your search parameters will be saved. In future, when you re-run the saved filter, JIRA will retrieve the updated results based on the same parameters.
Take note that you need to click on the New filter button to start a new search. Since issue navigator remembers your last search, if you were working with an existing filter, without starting a new search, you will be in fact modifying the current filter instead.
As the number of created filters grows, you will need a centralized location to manage and maintain them. There are two ways to access the Manage Filters page. You can access the page through the issue navigator, as follows:
- Browse to Issue Navigator.
- Click on the Find Filters link at the left-hand side. This will bring you to the Manage Filters page.
You can also access the Manage Filters page by going through the top navigator bar:
- Bring the drop-down menu from Issues.
- Click on the Manage Filters option at the bottom of the list.
The Manage Filters page displays the filters that are visible to you in three main categories, as set out in the tabs to the left, along with the option to search for existing filters:
- Favorite: This option filters with a golden star next to their names. These filters will be listed in the Issues drop-down menu. You can mark a filter as favorite by clicking on the star directly.
- Popular: This option lists the top 20 filters that have the most people marking them as favorite.
- My: This option lists the filters that are created by you.
- Search: This option searches for existing filters that are shared by other users.

As shown in the preceding screenshot, both the Demonstration Filter and Unresolved Incidents filters are marked as favorite, and the My Unresolved Audio Processor Tasks filter is set to private.
After creating a filter, you can update its details such as name and description, sharing permission, and search parameters:
- Browse to the Manage Filters page.
- Click on the Edit link for the filter you wish to edit. This will bring you to the Edit Current Filter page.
- Update the details of the filter.
- Select the group/project role to share the filter with.
- Click on the Save button to apply the changes:

For you to be able to share a filter, you will also need to have the Create Shared Object global permissions (please refer to Chapter 8, Securing JIRA, for more information on global permissions).
After you have shared your filter, other users will be able to search for it and subscribe to it. They, however, will not be able to make changes to your filter. Only the owner of the filter is able to make changes to its search parameters. As we will see later, ownership of a filter can only be changed by a JIRA administrator.
You have seen in Chapter 7, E-mails and Notifications, that JIRA is able to send out e-mails when certain events occur to keep the users updated. With filters, JIRA takes this feature one step further, by allowing you to subscribe to a filter.
When you subscribe to a filter, JIRA will run a search based on the filter and send you the results in an e-mail. You can specify the schedule of when and how often JIRA should perform this. For example, you can set up a subscription to have JIRA send you the results every morning before you come to work, so when you open up your mail inbox, you will have a full list of issues that require your attention.
To subscribe to a filter, you will need to be able to see the filter (either created by you or shared with you by other users):
- Browse to the Manage Filters page.
- Locate the filter you wish to subscribe to.
- Click on the Subscribe link for the filter. This will take you to the Filter Subscription page.
- Select the recipient of the subscription. Normally, this will be you (Personal Subscription). But you can create subscriptions for other people by selecting a group.
- Select Email this filter, even if there are no issues found option if you wish to have an e-mail sent to you if there are no results returned from the filter. This can be useful to make sure that the reason you are not getting e-mails is not due to other errors.
- Specify the frequency and time when JIRA should send you the e-mails.
- Click on the Subscribe button. This will create the subscription and take you to the Subscription Summary page.
- Click on the Run Now link to test your new subscription:

You can delete a filter when it is no longer needed. However, since you can share your filters out with other users and they can create subscriptions, you need to keep in mind that if you are deleting a shared filter, you might impact other users. Luckily, when you delete a filter, JIRA will inform you if other people are using the filter:
- Browse to the Manage Filters page.
- Click on the Delete link for the filter you wish to remove. This will bring up the Delete Filter confirmation dialog box.
- Make sure that the removal will not impact other users.
- Click on the Delete button to remove the filter:
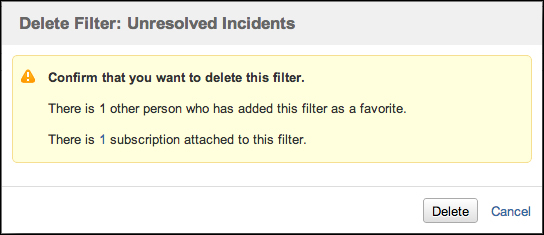
In your example, the Unresolved Incidents filter is shared and there is one user subscribing to it. JIRA informs you of that and by clicking on the 1 link, you will be taken to the View Subscription page, where you can see a list of users that are subscribed to the filter. You can then decide either to proceed with deleting the filter and letting the other users know, or leave the filter in JIRA.
JIRA only allows the filter's owner to make changes, such as the search criteria. This is usually not a problem for most cases, but when a filter is shared with other users, this can be problematic when the owner leaves the organization.
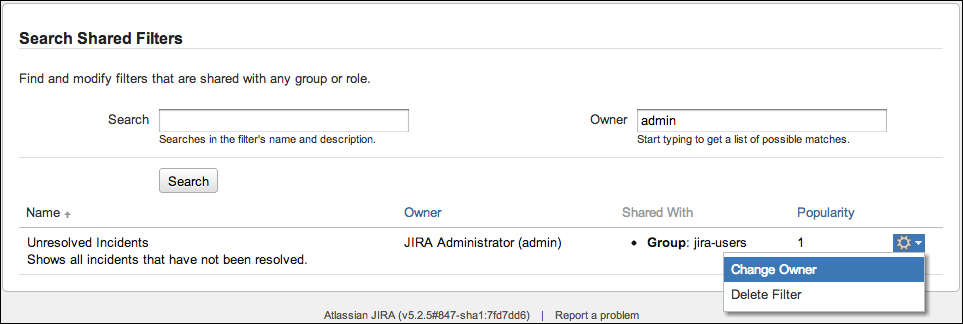
In JIRA 5, jira-administrators changes a filter's ownership to address situations like this. Perform the following steps to change a filter's ownership:
- Browse to the JIRA Administration console.
- Click on the Shared Filters link under the Users section.
- Search for the filter you wish to change ownership of.
- Bring down the Actions menu for the filter and select the Change Owner option.
- Search and select the user that will be the new owner.
- Click on the Change Owner button: