
Chapter 2 Text
Bruce Lawson
NOW THAT YOU’VE marked up the main page landmarks with HTML5 and seen how a document’s outline can be structured, this lesson looks deeper to show how you can further structure your main content.
To do this, you’ll mark up a typical blog with HTML5. We’ve chosen a blog because over 70 percent of web professionals have a blog (www.aneventapart.com/alasurvey2008), and everyone has seen one. It’s also a good archetype of modern websites with headers, footers, sidebars, multiple navigation areas, and a form, whether it’s a blog, a news site, or a brochure site (with products instead of news pieces).
Structuring Main Content Areas
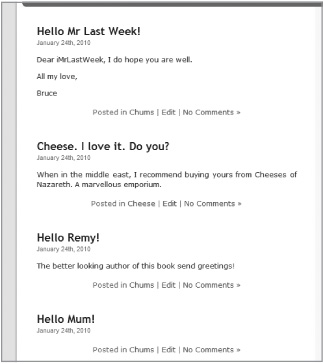
Take a look at the main content area of a blog (Figure 2.1). There may be multiple articles, each containing “metadata” and the actual textual content of that article.
FIGURE 2.1 A series of articles on a typical blog.
Here’s some typical markup (simplified from the default Word-Press theme)
<div class="post">
<h2>Memoirs of a Parisian lion-tamer</h2>
<small>January 24th, 2010</small>
<div class="entry">
<p>Claude Bottom's poignant autobiography is this
¬ summer's must-read.</p>
</div>
<p class="postmetadata">Posted in <a href="/?cat=3">
¬ Books category</a> | <a href="/?p=34#respond">
¬ No Comments</a></p>
</div>
There is nothing major wrong with this markup (although we query use in HTML 4 of the presentational <small> element for the date). It will work fine in “HTML5” browsers, but apart from the heading for the blog post, there is no real structure—just meaningless <div>s and paragraphs. HTML 4 gives us generic structures to mark up content. <div>, for example, is just a generic “box” that tells the browser “here’s some stuff, it all belongs together,” but it doesn’t mean anything; there’s no semantic value beyond “these belong together.” Where possible, we’ll replace generic boxes with new HTML5 elements, while still using <div> where there isn’t an appropriate element, just as we did in HTML 4.
Let’s concentrate on an individual article first. As you saw in Chapter 1, you can replace the outer <div class=”post”> with <article>, but you can still go further. The HTML5 <header> and <footer> elements can be used multiple times on a page, each time referring to the section it’s in.
The heading and the time of posting is “introductory matter” and thus the job for <header>, right? Similarly, the metadata about the post that is currently in a paragraph with class”=postmetadata” is better marked up in HTML5 as a <footer>, which “typically contains information about its section, such as who wrote it, links to related documents, copyright data, and the like.”
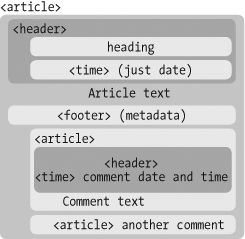
Diagrammatically, the revised structure is shown in Figure 2.2.
FIGURE 2.2 A single blog article using new HTML5 structures.


Let’s look at this in more detail.
The <time> Element
<time> is a new element for unambiguously encoding dates and times for machines, while still displaying them in a human-readable way. The uses of this in web pages aren’t hard to imagine: a browser could offer to add future events to a user’s calendar; content aggregators could produce visual timelines of events; a Thai-localised browser could offer to transform dates into Thai Buddhist era dates, which are numerically 543 years greater than their corresponding Western-style years.
The spec says “The time element represents either a time on a 24-hour clock, or a precise date in the proleptic Gregorian calendar, optionally with a time and a time-zone offset.”
The machine-readable part of the <time> element is usually encapsulated in the element’s datetime attribute. The content inside the element is what gets presented to end users.
<time datetime=2009-11-13>13 November 2009</time>
<time datetime=2009-11-13>13<sup>th</sup> November last
¬ year</time>
<time datetime=2010-11-13>Bruce's 21st birthday</time>
<time datetime=2010-11-13T020:00Z>8PM on my birthday</time>
<time datetime=20:00>8 PM</time>
If you’re happy to have the machine-readable format visible to the end user as well, you don’t need to use a separate datetime attribute. User agents should then simply pick the content of the element and interpret it:
<time>20:00</time>
The only trouble with <time> is that it must contain a positive date on the Proleptic Gregorian calendar—meaning you can’t encode a date before the Christian Era. Neither can you encode imprecise dates such as “July 1904.” This seriously limits its use for sites such as museums, history/encyclopedia pages, or family trees, where precise dates may not be known.
The pubdate Attribute
pubdate is a Boolean attribute to indicate that this particular <time> is the publication date of an <article> or the whole <body> content.
You might be wondering why the pubdate attribute is needed at all. Why not just assume that any <time> element in an <article>’s <header> is its publication date?
Consider this example:

You’ll see that there are two dates within the <header>: the date of the actual party and the publication date of the article. The pubdate attribute is required to remove any ambiguity. And yes, you are invited—just don’t get drunk this time.
More Fun with Headers and Footers
This main surprise with our article makeover is that each article can have its own <header> and <footer>. This means that, in addition to the “main” header and footer on a page, each article can have its own headers and footers. They can be separately styled with CSS: body>header and body>footer target the “main” headers and footers (assuming that they’re direct descendants of <body>), whereas article>header and article>footer target the inner structures.
To include old versions of IE, you can take advantage of specificity. Define generic header and footer styles, and then redefine/override them for article header and article footer:
header {display:block; color:red; text-align:right;}
¬ /*page header */ article header {color:blue; text-align:center;}
¬ /*article header */
Note that so far, you’ve introduced no ids or classes as hooks for CSS.
Using Multiple <footer>s on the Same Element
The spec says “Footers don’t necessarily have to appear at the end of a section, though they usually do,” and it allows an element to have two or more footers. A simplified version of the example in the spec is
<body>
<footer><a href="/">Back to index…</a></footer>
<h1>Lorem ipsum</h1>
<p>Lorem ipsum</p>
<footer><a href="/">Back to index…</a></footer>
</body>
The reason for this is that the elements are supposed to be nonpresentational. If “back to index” is the footer below the article, and you choose to have “back to index” above the article, too, you should use the same element for the same content, regardless of where it appears.
Using <blockquote> <footer>s
Very groovily, <blockquote> can have a footer, which is a very useful way of citing the source in a way that’s unambiguously associated with the quotation but also nicely presented to your users (previously, the cite attribute on <blockquote> wasn’t displayed anywhere):
<blockquote>
Thou look'st like antichrist, in that lewd hat.
<footer>Ananias <cite>Scene 4.3, <a href="http://
¬ www.gutenberg.org/files/4081/4081-h/4081-h.htm">The
¬ Alchemist</a></cite> (Ben Jonson)</footer>
</blockquote>
Adding Blogposts and Comments
So, you have a page with a header, footer, navigation, content area containing several articles (blog posts), each with its own header and footer. But wait…what is a blog without comments?
The specification mentions this case, and recommends the use of nested <article>s: “When article elements are nested, the inner article elements represent articles that are in principle related to the contents of the outer article. For instance, a blog entry on a site that accepts user-submitted comments could represent the comments as article elements nested within the article element for the blog entry.”
So let’s do that. Note as well that blog comments are typically shown in chronological order and have information such as author’s name and URL—in short, header information. Diagrammatically it looks like what is shown in Figure 2.3.
FIGURE 2.3 The structure of a blog post, with comments as nested articles.
The code is as you’d expect, with comments highlighted:

Working with HTML5 Outlines
Some word processing applications have a function to show you the outline of a document. For example, Figure 2.4 shows this chapter in Microsoft Word 2007’s outline view.
FIGURE 2.4 Microsoft Word 2007’s outline view.

HTML5 has a tightly-defined outlining algorithm that allows user agents to produce a similar outline from a web page. Just as with a word-processing package, this could be used to give the user a quick overview of the web page (and, of course, there’s no reason why the web page shouldn’t actually be a word-processing application). The other main use for the outlining algorithm is for syndication: grabbing content and inserting it somewhere else and ensuring that the destination web page still has a logical structure.
This section of the chapter is pretty dense, and it hasn’t been implemented by any browsers yet (although there is a JavaScript implementation at http://code.google.com/p/h5o/). You need to understand the concept of the document outline in order to know when to use <section>, <aside>, or <div>.
One major departure from HTML4, and an important concept to grasp before you proceed, is that certain HTML5 elements—<article>, <section>, <nav>, and <aside>—are sectioning content, which begin new sections in the outline. To explain this concept, let’s take this simple code:
<h1>Hello</h1>
<div>
<h1>World</h1>
</div>
To illustrate how this algorithm works, I’m using a web-based utility at gsnedders.html5.org/outliner/, as no browsers currently have this logic embedded. The outline this code generates is as you would expect (Figure 2.5).
FIGURE 2.5 A simple outline.
![]()
Figure 2.6 shows what happens if you change the meaningless <div> to an <article>, which is sectioning content:
<h1>Hello</h1>
<article>
<h1>World</h1>
</article>
FIGURE 2.6 A document outline after <div> is replaced by <article>.
![]()
You can see that the presence of sectioning content has shifted its content to be hierarchically “below” the content that preceded it. Or, to put it more simply: the <h1> inside the article is a logical <h2> because <article> has started a new section. Using <section>, <nav>, or <aside> instead of <article> does the same thing, as they are all sectioning content.
In fact, it doesn’t matter what level of heading you use here; the outlining algorithm cares about nesting and relative levels, so this code
<h3>Hello</h3>
<article>
<h6>World</h6>
</article>
produces exactly the same result as Figure 2.6.
You might be saying, “So what. What’s the use for that?” Well, firstly, it means you’re not restricted to six levels of headings, as you are in HTML 4. A heading element nested inside seven levels of <section>, <article>, <nav>, or <aside> (or any combination of them) becomes a logical <h7> element (however, unless you’re marking up legal documents or some other horrors, you should reconsider your content if you need so many levels).
Another advantage is with syndication. Suppose Remy posts an article:
<article>
<h1>What I did on my holiday</h1>
<p>I went to Narnia. I was bitten by a trilobite. Then I
¬ came home.</p>
</article>
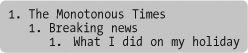
Let’s say you run a large online newspaper and naturally wish to syndicate this story. When the magic syndication machines slot it into your template, the resulting code is
<h1>The Monotonous Times</h1>
<section>
<h2>Breaking news</h2>
<article>
<h1>What I did on my holiday</h1>
<p>I went to Narnia. I was bitten by a trilobite.
¬ Then I came home.</p>
</article>
..
</section>
It’s obvious that “breaking news” is higher in the hierarchy of headings than the title of Remy’s blog post, but due to a mismatch between Remy’s template and your template, there’s an <h2> that is more important than the <h1>.
Checking the outline, however, shows us that everything is as it should be (Figure 2.7). You clever thing, you.
FIGURE 2.7 The outlining algorithm produces the correct outline in syndication, too.
<nav>, <aside> and Untitled Sections
A quick word about the outlining tool at gsnedders.html5.org/outliner/, as you’ll probably get into the habit of checking your document’s outline as part of your development process, much as you regularly validate your code and check it in different browsers.
If it finds sectioning content that has no heading, it will report it:
<article>
<p>I have no heading</p>
</article>
This gives the outline “Untitled Section.” For <section>s and <article>s, this is a useful warning as these elements nearly always begin with a heading.
However, inside <nav> and <aside> it’s perfectly legitimate not to have a heading. You may want to do it for some <nav> blocks, such as “Most popular posts” or “Recent comments,” but you probably don’t want a redundant heading on your main site <nav> that just says “Navigation.”
Therefore, if you see “Untitled Section,” don’t automatically assume that you should put a heading there. Treat it as a warning, not an error. A bug has been filed to give a friendlier message for untitled sections in <nav>, but so far has not been addressed.
<hgroup>
Sometimes you have a heading and a subheading, or tag line. Slashdot uses “news for nerds. News that matters”; dev.Opera has “Follow the Standards. Break the Rules”; Metafilter is a “community weblog.” How do you mark up those taglines? In HTML 4, you could use
<h1>Metafilter</h1>
<p>community weblog</p>
but that doesn’t feel right, as the subtitle feels like it should be a heading. An alternate method of marking this up could be
<h1>Metafilter</h1>
<h2>community weblog</h2>
but then every header on the site would need to be <h3> to <h6> as they’re subordinate to the tagline. In HTML5, the subtitle can be marked up as a heading element but removed from the document outline, like so:
<hgroup>
<h1>Metafilter</h1>
<h2>community weblog</h2>
</hgroup>
This gives the outline shown in Figure 2.8.
FIGURE 2.8 The outline shows only “Metafilter” as part of the outline.
![]()
The spec for <hgroup> says “For the purposes of document summaries, outlines, and the like, the text of hgroup elements is defined to be the text of the highest-ranked h1–h6 element descendant of the hgroup element.”
So:
<article>
<hgroup>
<h2>Get the beers in! Here comes</h2>
<h1>Remy Sharp!</h1>
</hgroup>
</article>
shows the text “Remy Sharp” in the outline, as that’s the highest-ranking heading element in the group.
![]() NOTE We haven’t used a
NOTE We haven’t used a <header> element in this <article>. <header> is a grouping element that collects together introductory content; as you only have headings, already grouped in <hgroup>, there is no need for a further layer of grouping. It wouldn’t be an error to use it, but it’s superfluous in this example.
Sectioning Roots
Note that certain elements—<blockquote>, <body>, <details>, <fieldset>, <figure>, <td>—are said to be sectioning roots, and can have their own outlines, but the sections and headings inside these elements do not contribute to the outlines of their ancestors. This is because, for example, you could quote several sections of an article in a <blockquote>, but those quoted sections don’t form part of the overall document outline.
In the following example:

the outline does not include the contents of blockquote: (Figure 2.9).
FIGURE 2.9 The outline does not include content in a sectioning root.

Styling Headings in HTML5
All this clever stuff presents a challenge to authors of CSS. Given that
<article><section><h1>…</h1></section></article>
<article><article><h1>…</h1></article></article>
<section><section><h1>…</h1></section></section>
<section><aside><h1>…</h1></aside></section>
<h3>…</h3>
can potentially be the same logical levels, you might naturally wish to apply the same styling (you may equally wish not to). This can lead to gigantic blocks of rules in your style sheets. There has been some talk of a new CSS pseudo-class or pseudo-element like :heading(n), which would be possible (because the browser “knows” what level a heading is from the outlining algorithm) and which would simplify styling:
*:heading(1) {font-size: 2.5em;} /* a logical <h1> */
*:heading(2) {font-size: 2em;} /* a logical <h2> */
However, at time of writing, this is but a wonderful dream. As a stop-gap, Mozilla is experimenting with a new selector grouping mechanism to Firefox nightlies called :-moz-any() that allows a form of CSS shorthand—see hacks.mozilla.org/2010/05/moz-any-selector-grouping/.
Perhaps, for this reason, you would be tempted to use only <h1> elements to simplify styling, and let the outlining algorithm do the rest. After all, the spec says “Sections may contain headings of any rank, but authors are strongly encouraged to either use only h1 elements, or to use elements of the appropriate rank for the section’s nesting level.” But you shouldn’t (yet) as it harms accessibility.
The Outlining Algorithm and Accessibility
A recent survey by WebAim showed that 76 percent of screen reader users “always or often” navigate by headings (see the full survey for more vital information at (www.webaim.org/projects/screenreadersurvey2/). These people use the hierarchy of headings both to give themselves a mental overview (an outline!) of the document they’re in and also to navigate through that content. Most screen readers have keyboard shortcuts that allow users to jump from heading to heading. For example, the JAWS screen reader uses the H key to jump from heading to heading, the 1 key to jump to the next <h1>, the 2 key to go to the next <h2>, and so on.
![]() NOTE Watch the excellent video entitled “Importance of HTML Headings for Accessibility,” available at www.youtube.com/watch?v=AmUPhEVWu_E. The video shows how a blind accessibility consultant navigates a page with JAWS. In an ideal world, it would be compulsory to watch and understand this video before you’re allowed to call yourself a professional designer or developer. Sadly, it’s not an ideal world.
NOTE Watch the excellent video entitled “Importance of HTML Headings for Accessibility,” available at www.youtube.com/watch?v=AmUPhEVWu_E. The video shows how a blind accessibility consultant navigates a page with JAWS. In an ideal world, it would be compulsory to watch and understand this video before you’re allowed to call yourself a professional designer or developer. Sadly, it’s not an ideal world.
Currently, no browser builds an internal model of the page structure based on all the complex rules previously mentioned and therefore can’t expose this model to any screen reader or assistive technology. So, using only <h1> wrecks the navigability and therefore hinders the accessibility of your page.
Our advice is again, follow the spec: “Use elements of the appropriate rank for the section’s nesting level.” That is, ensure that, in your pages, the hierarchy of headings is correct even without factoring in new HTML5 elements. It will also make writing CSS much easier.
In cases when articles are syndicated from one site to the other and the levels might be out of logical order, a completely unscientific Twitter poll of screen reader users suggested that badly nested section headers is better than all headings being at the same level (which is still better than no headings at all).
And, having done your best, wait for the browsers and the screen readers that sit on top of them to implement the outlining algorithm. As I said, it’s not an ideal world.
What’s the Difference between <article> and <section>?
This is a question that is regularly asked of us at html5doctor.com.
An article is an independent, stand-alone piece of discrete content. Think of a blog post, or a news item in a document-based site. In a web application, an <article> could be individual emails within an email application or stories in a web-based feed reader, as each email or story is both a component of the application and can be independently reused.
<article>
Consider this real-world blog/news article:
<article>
<h1>Bruce Lawson is World's Sexiest Man</h1>
<p>Legions of lovely ladies voted luscious lothario Lawson
¬ as the World's Sexiest Man today.</p>
<h2>Second-sexiest man concedes defeat</h2>
<p>Remington Sharp, jQuery glamourpuss and Brighton
¬ roister-doister, was gracious in defeat. "It's cool being
¬ the second sexiest man when number one is Awesome Lawson"
¬ he said from his swimming pool-sized jacuzzi full of
¬ supermodels.</p>
</article>
It could be syndicated, either by RSS or other means, and makes sense without further contextualisation. Just as you can syndicate partial feeds, a “teaser” article is still an article:
<article>
<a href=full-story.html>
<h1>Bruce Lawson is World's Sexiest Man</h1>
<p><img src=bruce.png alt="bruce lawson">Legions of lovely
¬ ladies voted luscious lothario Lawson as the World's
¬ Sexiest Man today.</p>
<p>Read more</p>
</a>
</article>
As you’ve seen, comments on blog posts are <article>s inside a parent <article>. There are other uses for this nesting beside comments, for example a transcript to a video:
<article>
<h1>Stars celebrate Bruce Lawson</h1>
<video>…</video>
<article class=transcript>
<h1>Transcript</h1>
<p>Supermodel #1: "He's so hunky!"</p>
<p>Supermodel #2: "He's a snogtabulous bundle of gorgeous
¬ manhood! And I saw him first, so hands off!"</p>
</article>
</article>
The transcript is complete in itself, even though it’s related to the video in the outer <article>. The spec says “When article elements are nested, the inner article elements represent articles that are in principle related to the contents of the outer article.”
<section>
![]() NOTE A
NOTE A <section> generally begins with a heading that introduces it. An exception to this might be a <section> that will have a heading injected using JavaScript. If you wouldn’t use a heading, or you want some wrapping element purely for styling purposes you probably should be using a <div>.
<section>, on the other hand, isn’t “a self-contained composition in a document, page, application, or site and that is intended to be independently distributable or reusable.” It’s either a way of sectioning a page into different subject areas, or sectioning an article into, well, sections.
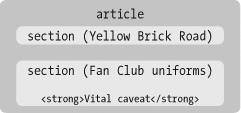
Consider this HTML 4 markup—the rules from Remy’s previous job in an off-Broadway production of Wizard of Oz:
<h1>Rules for Munchkins</h1>
<h2>Yellow Brick Road</h2>
<p>It is vital that Dorothy follows it—so no selling bricks
¬ as "souvenirs"</p>
<h2>Fan Club uniforms</h2>
<p>All Munchkins are obliged to wear their "I'm a friend of
¬ Dorothy!" t-shirt when representing the club</p>
<p><strong>Vital caveat about the information above:
¬ does not apply on the first Thursday of the month.
¬ </strong></p>
Does the “Vital caveat about the information above” refer to the whole article, that is, everything under the introductory <h1>, or does it refer only to the information under the preceding <h2> (“Fan Club uniforms”)? In HTML 4, that paragraph would fall under the <h2>, and there’s no easy way to semantically change this. In HTML5, the <section> element makes its meaning unambiguous (which is what we really mean as web developers when we use the word “semantic”):

Figure 2.10 illustrates this diagrammatically.
FIGURE 2.10 Now you can see that the vital caveat refers to the whole <article>.
If it had been inside the final section element:
<article>
…
<section>
<h2>Fan Club uniforms</h2>
<p>All Munchkins are obliged to wear their "I'm a friend
¬ of Dorothy!" t-shirt when representing the club</p>
<p><strong>Vital caveat about the information above:
¬ does not apply on the first Thursday of the month
¬ </strong></p>
</section>
</article>
it would unambiguously refer to that section alone, as illustrated in Figure 2.11.
FIGURE 2.11 The <section> element removes any ambiguity.

It would not have been correct to divide up this article with nested article elements, as they are not independent discrete entities.
OK. So you’ve seen that you can have <article> inside <article> and <section> inside <article>. But you can also have <article> inside <section>. What’s that all about then?
<article> Inside <section>
Imagine that your content area is divided into two units, one for articles about llamas, the other for articles about root vegetables. That’s my kind of content.
You’re not obliged to mark up your llama articles separately from your root vegetable articles, but you want to demonstrate that the two groups are thematically distinct. Perhaps, because they’re thematically distinct, you want them in separate columns, or you’ll use CSS and JavaScript to make a tabbed interface.
In HTML 4, you’d use our good but meaningless friend <div>. In HTML5, you use <section>, which, like <article>, invokes the HTML5 outlining algorithm (whereas <div> doesn’t, because it has no special structural meaning).
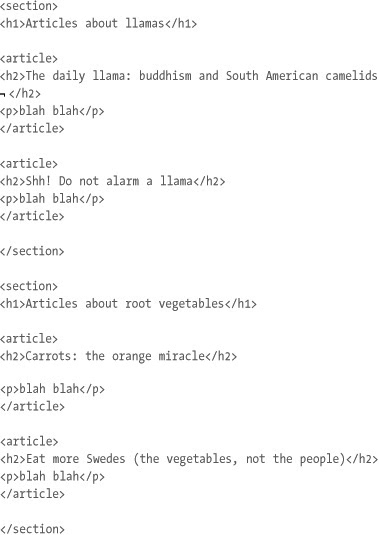
Why didn’t you mark the two <section>s up as <article>s instead? Because, in this example, each <section> is a collection of independent entities, each of which could be syndicated—but you wouldn’t ordinarily syndicate the collection as an individual entity.
Note that a <section> doesn’t need to contain lots of <article>s; it could be a collection of paragraphs explaining your creative commons licensing, an author bio, or a copyright notice. In our example, each article could contain sub-articles or sections, as explained earlier—or both.
Estelle Weyl has a nice analogy at www.standardista.com/html5-section-v-article: “Think of a newspaper. The paper comes in sections. You have the sports section, real estate section, maybe home & garden section, etc. Each of those sections, in turn, has articles in it. And, some of those articles are divided into sections themselves.
In other words, you can have parent <section>s with nested <article>s that in turn have one or many <section>s. Not all pages documents need these, but it is perfectly acceptable and correct to nest this way.”
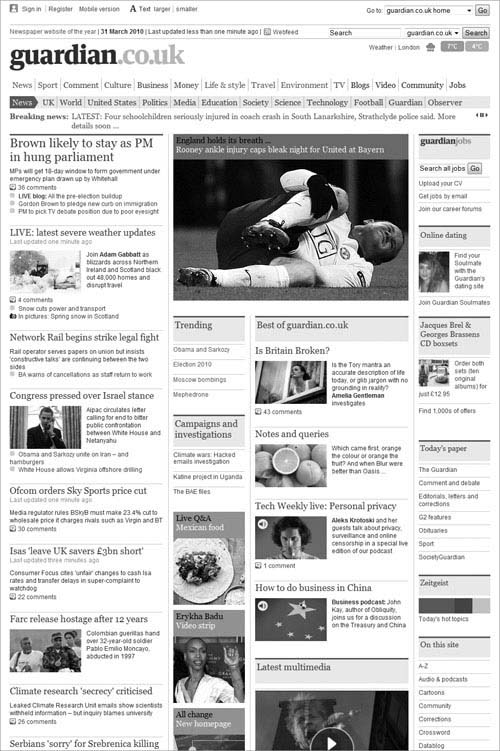
Case Study: www.guardian.co.uk
Let’s continue with the newspaper theme and look at a real site and work out where you would use the new structures. Figure 2.12 shows a screenshot from my favourite newspaper, “The Guardian” at www.guardian.co.uk. Let’s see how this could be represented in HTML5.
Note that the following is how I would mark up this page; you might choose different structures, and that’s OK. There’s not necessarily “one true way” of doing this; it depends in part on how you intend to use the content—will you syndicate it, or pull it out of a database for display in several different page templates with a variety of heading hierarchies?
FIGURE 2.12 The Guardian homepage.
It’s pretty easy to see the branding and introductory matter that forms the <header>, which also includes two <nav> structures for site-wide navigation (Figure 2.13).
FIGURE 2.13 The Guardian homepage’s branding and introductory matter.

Immediately below the header is an area with the title “breaking news” and a “ticker” of text. Each summary is a link to an expanded story (Figure 2.14).
FIGURE 2.14 The “breaking news” area of Guardian homepage.
![]()
Aside from the JavaScript-controlled ticker effect, this “breaking news” is simply a list of links to other pages. Therefore, it matches the <nav> element. Don’t be fooled by the fact that it’s horizontal, with the heading on the same line; CSS will sort that out:
<nav>
<h2>Breaking news</h2>
<ul>
<li><a href=#>Four schoolchildren injured…</a></li>
<li><a href=#>Terrible thing happens to someone</a></li>
…
</ul>
</nav>
Although visually this area appears closely tied with the header, it’s not introductory matter or site-wide navigation. The difference is subtle, but in my opinion, links to comments, TV, and sports pages are part of site-wide navigation, while navigating news stories on a news site is “shortcut navigation” to deeper content. Therefore, this is a <nav> after rather than inside the <header> element.
There’s more navigation on the right of the main content area (Figure 2.15).
As you saw in Chapter 1, this sidebar can be conceived of as a group of separate <nav> elements, each with its own heading (Jobs, Dating, CD box sets, Today’s paper, and so on), styled with blue-grey background and thick red border-top.
FIGURE 2.15 A sidebar of navigation on the right side of the Guardian homepage.
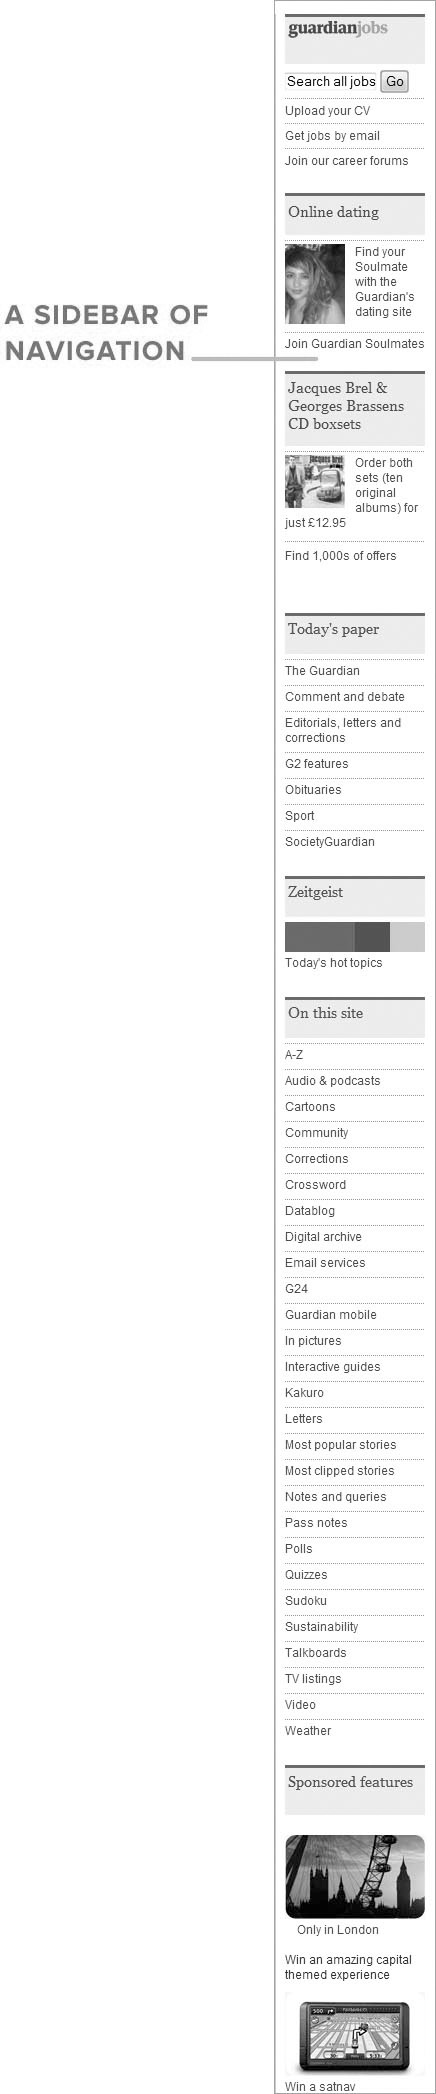

Note that I’ve included a search form in the <nav>; it seems appropriate to me to regard a search form than a navigational aid. I’ve also given it the ARIA role appropriate to its function.
“Sponsored Features” isn’t inside <nav> as it’s not primary navigation; presumably, its main purpose is to advertise. You may disagree with me (I promise I won’t get all huffy), and so you might choose to mark everything up in one wrapping <nav>:

Now let’s look at the main content area (Figure 2.16).
FIGURE 2.16 The main content area of the Guardian homepage.
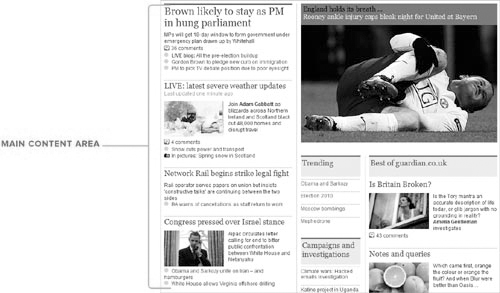
Unsurprisingly for a newspaper site, the main content area of the Guardian homepage is given over to news articles. It’s important to notice that there is no overriding heading grouping the main articles (such as “top stories”), otherwise you could wrap the whole thing up in a <section>. Therefore, you just have a list of <article>s. Because <section> isn’t appropriate here, if there is a need to wrap all the articles with an element for styling purposes, you’d use the semantically empty <div> element.
There is one featured article that is mostly comprised of an image, presumably because it’s the most striking image available (Figure 2.17).
FIGURE 2.17 The featured picture.

This remains simply an <article>, although we’d probably need a class or id to allow special styling.
Below the featured article, you have some sections that aren’t the top stories (there is less information on the homepage, and they’re primarily, but not solely, links to other pages). They each have their own heading (“Best of guardian.co.uk,” “Latest multimedia,” “What you’re saying”), and then a group of articles. The natural elements are therefore <article>s within <section>s:
On the website (but not in the screenshot), there are also a couple more <nav> blocks (“Trending,” “Campaigns and Investigations”) and a “fat footer” that, as we saw in Chapter 1, should be a couple of page-wide <nav> blocks outside the “real” <footer> that contains the usual privacy, terms and conditions, and accessibility information.
And there, ladies and gentlemen: an HTML5 version of www.guardian.co.uk. Like any other exercise in markup above the level of the trivial, there are legitimate differences of opinion. That’s OK. HTML is a general language, so there aren’t elements for every specific occasion.
Understanding WAI-ARIA
The W3C Web Accessibility Initiative’s Accessible Rich Internet Applications suite (WAI-ARIA) is an independent spec that “plugs the holes” in HTML 4 (or any other markup language) to help web applications and web pages to be made more accessible.
Imagine that you have scripted a slider control. In HTML 4 there is no native slider, so if you just have some HTML elements (an <input>, some images) with some JavaScript attached to act and look like a slider. There is no way to tell the operating system that the role of this widget is a slider and what its current state and value are, and if the operating system doesn’t know that vital information, assistive technology such as screen readers can’t convey it to the user either.
![]() NOTE If you start using these new ARIA attributes, you may notice that your HTML 4 pages won’t validate anymore. As long as the rest of your markup is OK, that doesn’t matter—accessibility trumps validity.
NOTE If you start using these new ARIA attributes, you may notice that your HTML 4 pages won’t validate anymore. As long as the rest of your markup is OK, that doesn’t matter—accessibility trumps validity.
ARIA aims to bridge this situation by introducing a whole series of new attributes that browsers and assistive technologies can hook into.
So, using horrible old-school HTML you could—in theory—add ARIA to
<font size="+5" color="red">I should be a heading</font>
to make
<font size="+5" color="red" role="heading" aria-level="2">
¬ I should be a heading</font>
This tells the user agent that this text is a heading, level 2. But of course, this would be nonsense, as HTML already has a perfectly valid and semantic way of defining this sort of structure with
<h2>I AM a heading</h2>
A developer might forget to bolt on the necessary ARIA attributes, whereas using the correct <h2> element has built-in “heading-ness” and built-in level so it’s a lot more robust. ARIA is not a panacea or “get out of jail free” card for developers to start abusing markup and make everything out of <div>s and <span>s. Whenever possible, use the correct markup and only use ARIA for situations where the correct semantics can’t be otherwise expressed (a slider in HTML 4 example, for instance).
The ARIA spec says “It is expected that, over time, host languages will evolve to provide semantics for objects that previously could only be declared with WAI-ARIA. When native semantics for a given feature become available, it is appropriate for authors to use the native feature and stop using WAI-ARIA for that feature.”
So something like HTML5 <nav> shouldn’t need ARIA role= navigation added to it, because it should (in an ideal world) have that built-in. However, HTML5 is very new, whereas ARIA already has some support in assistive technology. So it shouldn’t hurt to use the built-in element plus the ARIA information, and it can only help users who rely on assistive technology. The HTML5 validator at html5.validator.nu therefore validates ARIA as well as HTML5 (whereas HTML 4 validators report ARIA information as an error because HTML 4 predates ARIA).
ARIA Document Structure and Landmark Roles
WAI-ARIA defines several roles that tell assistive technology about landmarks and structure of a document. Some of these are:
• application
• article
• banner
• complementary
• contentinfo
• document
• form
• heading
• main
• navigation
• search
Looking at a simple page from an ARIA perspective, you might see what is shown in Figure 2.18.
FIGURE 2.18 A simple page with a header, sidebar, and main content area and ARIA roles.

Some of these obviously match HTML5 elements, such as <article>, <form>, <header>, and <nav>.
Others do not have such an obvious one-to-one correspondence. For example, role=banner “typically includes things such as the logo or identity of the site sponsor, and site-specific search tool. A banner usually appears at the top of the page and typically spans the full width.” That initially seems to match HTML5 <header>, but as you’ve seen, there can be multiple <header>s on a page. So the “page header” is the only one allowed to have role=banner.
Similarly, contentinfo is defined as “A large perceivable region that contains information about the parent document. Examples of information included in this region of the page are copyrights and links to privacy statements.” This sounds like <footer>, but only the “page footer” and not each footer in a page with multiple footers.
role=main defines the “main content area” of a page. We discussed in Chapter 1 how that can be algorithmically deduced, but as assistive technologies can make use of ARIA now, it makes sense to add this role to the element you’re using to group your main content. You can even use it as a hook for CSS in browsers that understand attribute selectors:
div[role=main] {color:red; background-color:yellow;
¬ font-family: "Comic Sans MS", cursive; … }
There you have it: accessibility and gorgeous typography in perfect harmony.
Combining ARIA and HTML5
We recommend that you consider using ARIA where appropriate in addition to HTML5 as a transitional measure to improve accessibility that won’t harm validation (but see the following note on screen readers). However, we don’t do that in this book (as we’re teaching you HTML5, not ARIA).
ARIA Resources
There is a useful cross-reference in the spec of HTML5 and ARIA at dev.w3.org/html5/spec/embedded-content-0.html#annotations-for-assistive-technology-products-aria. Steve Faulkner of The Paciello Group has a list of ARIA information that is not built-in to HTML5 at www.paciellogroup.com/blog/?p=585.
For more information on ARIA in general, see Gez Lemon’s Introduction to WAI-ARIA http://dev.opera.com/articles/view/introduction-to-wai-aria/ and follow The Paciello Group’s blog (www.paciellogroup.com/blog/). Two recommended books are Universal Design for Web Applications by Wendy Chisholm and Matt May (O’Reilly) and Designing with Progressive Enhancement: Building the Web that Works for Everyone by Todd Parker et al (New Riders) for useful information on practical uses of ARIA.
The ARIA spec itself is at www.w3.org/WAI/PF/aria/.
Even More New Structures!
You ain’t seen nothing yet. Actually, that’s untrue: you’ve seen loads already. So while we’re in the zone, let’s look at other new elements that HTML5 provides us, some of the changes from HTML4. We’ll look at global attributes allowed on any element, as well as wave “hi” to a few HTML5 features that we won’t cover in this book.
<aside>
In Chapter 1 you saw <aside> used to mark up sidebars. It represents “a section of a page that consists of content that is tangentially related to the content around the aside element, and which could be considered separate from that content. Such sections are often represented as sidebars in printed typography. The element can be used for typographical effects like pull quotes or sidebars, for advertising, for groups of nav elements, and for other content that is considered separate from the main content of the page.”
Using an <aside> inside an <article>, for example, is the right place for tangentially related information or pull quotes about that article, but not, we hasten to add, page-wide navigation.
<aside> has an implied ARIA role of “note”, but can be given role=”complementary” or (if it surrounds a search form) role=”search”.
<details>
I’m very fond of the <details> element, even though it has no implementations yet. However, Remy has a clever script that fakes it at http://gist.github.com/370590.
It’s cool because it introduces native support for a common behaviour, removing the need for custom JavaScript (or, something I’ve seen on far too many sites to be funny, pulling in the full jQuery library). <details> provides an expanding/collapsing area. It takes the following form
<details>
<summary>Photograph details</summary>
<p>Photograph taken on <time datetime=2009-12-25>Xmas
¬ Day 09</time> with a Canon IXUSi.</p>
<p><small>Copyright Bruce Lawson,
¬ <address>[email protected]</address></small>.</p>
</details>
The contents of the descendent <summary> element are focusable and act as a control that, when activated by mouse or keyboard, expand or collapse the remainder of the element. If no <summary> element is found, the browser supplies its own default control text, such as “details” or a localised version. Browsers will probably add some kind of icon to show that the text is “expandable” such as a down arrow.
<details> can optionally take the open attribute to ensure that the element is open when the page is loaded:
<details open>
Note that the element isn’t restricted to purely textual markup—it could be a login form, an explanatory video, a table of source data for a graph, or a description of the structure of a table for users who use assistive technology, have learning disabilities, or who (like me) simply don’t “get” numbers.
<figure>
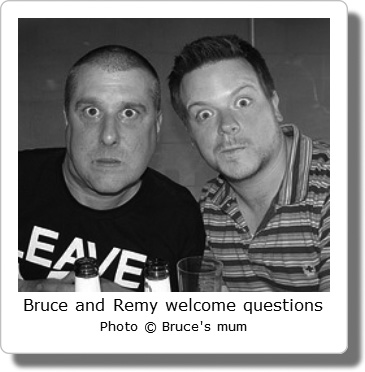
I’ve always felt a bit semantically grubby when adding a caption to a picture to explain the image or to give attribution to the photographer, because the only way to do it has been with text that runs into surrounding content, with no way to explicitly associate it with the image. There simply haven’t been any markup constructs for this before. Perhaps I’m just weird, but that’s why I’m very glad to see the <figure> element that wraps an image (or a video, or block of code, or a supporting quotation) and its caption, which goes in the <figcaption> element:
<figure>
<img src=welcome.jpg
alt=""> <!-- no alt, as it's covered by the figcaption -->
<figcaption>
Bruce and Remy welcome questions
<small>Photo © Bruce's mum</small>
</figcaption>
</figure>
Styling this markup can produce some nice effects (Figure 2.19).
Note that <figcaption> can only contain “phrasing content”—in HTML4 terms, it can’t contain “block-level” elements.
FIGURE 2.19 <figure> and <figcaption> elements with some CSS3 designer bling. (Hey, this is a caption for a figure that’s illustrating captions and figures. Now that’s what I call “meta”.)
<mark>
The <mark> element allows you to do the markup equivalent of using a highlighter pen to bring out some words on a printed page. It’s not the same as emphasis—for that you use <em>. But if you had some existing text and wanted to bring something to the fore that isn’t emphasised in the text, you could use <mark> and style it to be italics, or with a yellow highlighter-pen background colour. In print, you’ll often see the phrases “my italics” or “emphasis added”.
The spec also says “When used in the main prose of a document, it indicates a part of the document that has been highlighted due to its likely relevance to the user’s current activity.”
As an illustration, on my own site, I use an adapted version of Stuart Langridge’s Searchhi script (www.kryogenix.org/code/browser/searchhi/), which checks to see if the referrer to a page was a search engine and the search terms are in the query string. If they are, the script walks the DOM and surrounds each instance of a search term with a <mark> element, which is then styled a pretty pink. It would have been wrong to wrap these search terms in <strong> or <em> as they’re not emphatic—and this would have changed the meaning of the content of our page—but are relevant to the user’s current activity: arriving at a page on our site looking for information about a certain search term.
<ruby>, <rp>, <rt>
ruby is a useful addition for those writing content in some Asian languages. Daniel Davis has a very useful article, “The HTML5 <ruby> element in words of one syllable or less” (http://my.opera.com/tagawa/blog/the-html5-ruby-element-in-words-of-one-syllable-or-less), in which he explains how it works in the context of Japanese (quoted with kind permission):
Any piece of Japanese text (banner ad, article, legal doc, and so on) uses a combination of kanji, hiragana, and katakana writing systems. It is sometimes the case that people reading the text can’t read the kanji, especially because kanji characters can have more than one pronunciation. People and place names are one example of kanji having numerous or irregular pronunciations.
![]() can be pronounced “nichi,” “hi,” or “ka”
can be pronounced “nichi,” “hi,” or “ka”
![]() can be pronounced “hon” or “moto”
can be pronounced “hon” or “moto”
![]() can be pronounced “nihon” or “nippon”
can be pronounced “nihon” or “nippon”
To help the reader, sometimes the pronunciation is written above the kanji using the hiragana alphabet. This is called furigana in Japanese and ruby in English (from the name of the small 5.5pt type size used for similar sorts of annotations in British print tradition). It is often used in newspapers and books but not so much on websites, due to the difficulty of squeezing miniature text above larger text on a single line. The <ruby> element aims to solve this.
According to the current HTML5 spec, the <ruby> element is an inline element and is placed around the word or character you’d like to clarify, like so:
![]()
By itself this does nothing, so you add the pronunciation either for each character or, as in this case and our personal preference, for the word as a whole. For this, you use the <rt> tag, meaning ruby text.
![]()
You could leave it like that and supporting browsers would show the hiragana pronunciation above the kanji text, but nonsupporting browsers would ignore the tags and show both the text and its pronunciation side by side. To solve this, you have another tag, <rp>, meaning ruby parentheses, which cleverly hides characters (namely parentheses) in supporting browsers. This means you can write the pronunciation in parentheses, which nonsupporting browsers will show, and supporting browsers will continue to show the pronunciation without parentheses above the main text (Figure 2.20).
![]()
FIGURE 2.20 In supporting browsers, ruby text is shown above main text. In nonsupporting browsers, ruby text is shown next to main text but in parentheses.

At time of writing, the <ruby> element is discussed a lot in the W3C HTML5 Japanese Interest group, so the spec is liable to change based on that feedback.
Redefined Elements
HTML5 redefines some existing elements as well as adding new ones. Here are some old friends: some have radically changed, others have simply finessed their hairstyles.
<ol>
In HTML 4, the start attribute on <ol> was deprecated, as it was deemed presentational. Luckily, HTML5 reverts this wrong decision. If you want an ordered list to start at five rather than line one, use:
<ol start=5>
Something nice that isn’t yet implemented in any browser is the reversed attribute. Consider the following example:
<h3>Top five dreamy mega-hunks</h3>
<ol reversed>
<li>Brad Pitt</li>
<li>George Clooney</li>
<li>Orlando Bloom</li>
<li>Remy Sharp</li>
<li>Bruce Lawson</li>
</ol>
This creates a list that counts down from five (Mr. Pitt) to one (me). Sorry, Brad, George, and Orlando—but what do you guys know about HTML5?
<dl>
In HTML 4, <dl> was a definition list containing a term and one or more definitions for that term. This definition was muddy and confused, as it also mentioned the potential use of <dl> to mark up dialogues. It was regularly misused to mark up any name and value pairs regardless of whether one defined the other.
HTML5 widens the element to be “an association list consisting of zero or more name-value groups… Name-value groups may be terms and definitions, metadata topics and values, or any other groups of name-value data.” Here’s an example listing the books in Remy’s collection, using <dt> and <dd> to group title and author(s).
<dl>
<dt>Directory of French plastic sandal manufacturers</dt>
<dd>Phillipe Philloppe</dd>
<dt>J-Lo's plastic surgery: a profile</dt>
<dd>Hugh Jarce</dd>
<dt>The Orpheus and Eurydice myth</dt>
<dd>Helen Bach</dd>
<dt>The Proctologist and the Dentist</dt>
<dd>Ben Dover</dd>
<dd>Phil McCavity</dd>
</dl>
<cite>
In HTML 4, the <cite> element could be used to mark up the name of a speaker:
As <CITE>Harry S. Truman</CITE> said,<Q lang="en-us">
¬ The buck stops here.</Q>
HTML5 disallows this: “A person’s name is not the title of a work—even if people call that person a piece of work—and the element must therefore not be used to mark up people’s names.”
This is bonkers. It makes existing content that conforms to the rules of HTML 4 nonconforming to the rules of HTML5, although it will never be flagged as invalid by a validator, as a machine has no way of knowing that “Harry S. Truman” is a name rather than the title of a biography called “Harry S. Truman.”
In his 24ways.org article, “Incite a riot”, Jeremy Keith wrote “Join me in a campaign of civil disobedience against the unnecessarily restrictive, backwards-incompatible change to the cite element.”
I agree. Use <cite> for names if you want to.
<address>
<address> is for contact details of the author of the current <article> or document, not as a generic element for postal addresses. The contact details can be email address, postal address, or any others. These can be marked up as a micro-format, RDFa, or microdata if you wish.
What’s new is that you can have multiple addresses in a document, one inside each <article>. Author information associated with an <article> element does not apply to nested article elements, so a blog post in an <article> can have an <address> for its author, and each blog comment (which you remember is a nested <article>) can have the <address> of its commenter.
<em>, <i>
em marks up emphasis of the kind that subtly changes the meaning of a sentence; if the question is “Did you say you live in Paris?” the answer might be marked up as
<p>No, my <em>name</em> is Paris. I live in <em>Troy</em>.
¬ Cloth-ears.</p>
If you have relative levels of importance, you can nest em elements to make the contents extra emphatic.
The <i> element “represents a span of text in an alternate voice or mood, or otherwise offset from the normal prose, such as a taxonomic designation, a technical term, an idiomatic phrase from another language, a thought, a ship name, or some other prose whose typical typographic presentation is italicized.”
Here are some examples of <i> where <em> would not be appropriate:
<p>The <i>Titanic</i> sails at dawn.</p>
<p>The design needs a bit more <i lang=fr>ooh la la</i>.</p>
<p>You, sir, deserve a jolly good kick up the <i>gluteus
maximus</i>!</p>
<strong>, <b>
The strong element represents strong importance for its contents but, unlike <em>, it does not change the meaning of the sentence. For example,
<p><strong>Warning! This banana is dangerous.</strong></p>
You can nest strong elements to make them extra-important.
The <b> element “represents a span of text to be stylistically offset from the normal prose without conveying any extra importance, such as key words in a document abstract, product names in a review, or other spans of text whose typical typographic presentation is boldened.”
For example:
<p>Remy never forgot his fifth birthday—feasting on
¬ <b>powdered toast</b> and the joy of opening his gift:
¬ a <b>Log from Blammo!</b>.</p>
<hr>
The <hr> element is now media-independent and indicates “a paragraph-level thematic break.” A comment on HTML5doctor put it nicely: It’s the markup equivalent of the “* * *” that is often used in stories and essays. We were about to write it off as a historical curiosity when fellow Doctor Oli Studholme wrote “<hr> is used as a section separator quite frequently in Japanese design. They’re generally hidden via CSS but visible when viewed on cHTML cell phone browsers, which only support very basic CSS and don’t get the visual design (and with it the visual separation of sections).”
Our advice: use sectioning content and headings instead with CSS for pretty dividers.
<small>
The <small> element has been completely redefined, from simply being a generic presentational element to make text appear smaller to actually represent “small print,” which “typically features disclaimers, caveats, legal restrictions, or copyrights. Small print is also sometimes used for attribution, or for satisfying licensing requirements.”
If the whole page is a “legalese” page, don’t use <small>. In that case, the legal text is the main content, so there is no need to use an element to differentiate the legalese. It’s only for short runs of text. <small> has no bearing on <strong> or <em> elements.
Removed Elements
Some elements you may know from HTML4 have been made completely obsolete in HTML5, such as <applet> (use <embed> instead), <big>, <blink>, <center>, <font>, and <marquee>. They will not validate and must not be used by authors. Frames are gone (but <iframe> remains). Good riddance.
HTML5 browsers must still render these dear departed elements, of course, as there are plenty of them still out there in the wild. But you must avoid them as if they were tarantulas, zombies, man-eating tigers, plutonium sandwiches, or Celine Dion songs.
Global Attributes
There are also several new global attributes, which can be added to any element. They are covered in this section.
contenteditable
Invented by Microsoft, and reverse-engineered and implemented by all other browsers, contenteditable is now officially part of HTML.
contenteditable means two things for browsers: first, that users can edit the contents of elements with this attribute, so the element must be selectable and the browser must provide a caret to mark the current editing position; second, that changes made to the document affect the selected content specifically selected and editable, that is you can make the text bold, change the font, add lists, headings, and so on. contenteditable is a Boolean attribute, so it can be set to true or false. Although markup capitalisation is irrelevant, the DOM attribute requires contentEditable (note the capital E). The DOM also has isContentEditable to assess whether this element is editable—since the contenteditable flag could have been inherited from a parent element.
You can also set document.designMode = ‘on’ (notice, not ‘true’) to enable the entire document to be editable. This can only be done using JavaScript.
Finally, any selected (that is, highlighted) content by the user can have a number of commands run against it, such as document.execCommand(‘bold’). Typical keyboard commands to make text bold or italic affect the DOM in the editable element.
If you want to use contenteditable for some form of CMS, you will want to save the changes to your server at some point. There’s no particular API method for doing this, but since your user’s changes have modified the DOM, you need to send the innerHTML of the editable element (or entire document if using designMode) back to the server for saving in your CMS.
contextmenu
contextmenu is related to <menu>, <command> which are not appearing in this book (see the section “Features not covered in this book”).
data-*
You can pass information to scripts from markup using the data-* attribute. It can be any XML-compatible name. See Chapter 4 for an explanation.
draggable
draggable indicates that the element can be dragged using the drag-and-drop API (see Chapter 8).
hidden
This attribute is analogous to aria-hidden, which tells the browser that the content of this element shouldn’t be rendered in any way. It doesn’t only hide the content, but keeps it “in the wings,” so that for instance you could use JavaScript later on to remove the attribute and cause the element to “pop” into being.
Quoting the specification (rather than attempting to paraphrase it any further): “The hidden attribute must not be used to hide content that could legitimately be shown in another presentation. For example, it is incorrect to use hidden to hide panels in a tabbed dialog, because the tabbed interface is merely a kind of overflow presentation—one could equally well just show all the form controls in one big page with a scrollbar. It is similarly incorrect to use this attribute to hide content just from one presentation—if something is marked hidden, it is hidden from all presentations, including, for instance, screen readers.”
Even if you know that you’ll be “unhiding” stuff later with some scripting, you should treat hidden stuff as if it literally wasn’t there. So don’t add links pointing to content that’s hidden and don’t tie other elements to it with aria-describedby or aria-labelledby.
item, itemprop, subject
These attributes are associated with the microdata specification (see the section “Features not covered in this book”), which this book doesn’t cover.
role, aria-* attributes
As you’ve seen, HTML5 treats WAI-ARIA as legal additions to the language.
spellcheck
This Boolean attribute tells the browser to check the element’s spelling and grammar. If it’s missing, “the default state indicates that the element is to act according to a default behavior, possibly based on the parent element’s own spellcheck state.”
tabindex (=-1)
tabindex is a largely archaic concept that allows you to specify the order in which elements are focused when the user navigates a page with the keyboard (traditionally using the Tab key, though some browsers—most notably Opera—may use different key combinations for this).
This used to be quite popular when sites were built using deeply nested layout tables, but nowadays this is not usually necessary. The default tab order is determined by the order in which elements appear in your markup, so a properly ordered and structured document should never require additional tabbing hints.
However, tabindex does have a useful side-effect. Normally, only links, form elements, and image map areas can be focused via the keyboard. Adding a tabindex can make other elements also focusable, so executing a focus() command from JavaScript would move the browser’s focus to them. However, this would also make these elements keyboard-focusable, which may not be desirable.
Using a negative integer (by convention, tabindex=”-1”) allows the element to be focused programmatically, “but should not allow the element to be reached using sequential focus navigation.”
It’s very useful in overcoming a bug in Internet Explorer whereby, under some circumstances, elements such as headings that were targets of in-page links were never focused for screen reader users, leaving the information inaccessible. (See www.juicystudio.com/article/ie-keyboard-navigation.php for more information.) In HTML 4, “-1” was an invalid value for the attribute, and the attribute itself was invalid on any element other than form fields and links. However, as it works in browsers now and it solves a real problem, HTML5 legalises it everywhere. Yay!
Features not Covered in this Book
For completeness, here are some of the most interesting features of HTML5 that, for reasons of page count or lack of implementation, aren’t discussed further.
<embed>
<embed> is well-known and has been used for years, but was always an outlaw element that never validated. But like that other outlaw, Robin Hood, it was widely supported because it performed a useful function: It’s the only way to get plug-ins such as Flash to work reliably in all browsers, which explains its overwhelmingly common usage (see 2008 stats at http://dev.opera.com/articles/view/mama-plug-ins/). Because of this, there’s no reason to keep it from validating. HTML5 paves that particular cowpath and finally includes it into the formal language specification.
But hang on. Isn’t HTML5 supposed to replace all these plug-in-based technologies? Contrary to the sensationalist headlines of some journalists, HTML5 won’t magically replace plug-ins overnight, and now we can embed them into HTML5 without incurring the wrath of the validator.
<keygen>
This element, which is already well supported in all browsers other than the big IE elephant in the room, is used in situations where your form needs to send a public key. If you don’t know what public-key cryptography is, take a look at http://en.wikipedia.org/wiki/Public_key.
And if you’re still lost, you don’t actually need this element!
<progress>, <meter>
<progress> is used to represent a “progress meter,” to indicate the completion of a task—downloading a file, for example.
<meter> “represents a scalar measurement within a known range, or a fractional value; for example disk usage, the relevance of a query result, or the fraction of a voting population to have selected a particular candidate.”
<menu>, <command>
These are exciting elements that allow you to define toolbars or context menus for your application, with icons and associated commands that execute scripts when activated. They’re cooler than a bucket full of Lou Reeds. However, no browser yet supports them, so we don’t discuss them further.
microdata
Microdata is a method of marking up elements with additional machine-readable data, so that crawlers, search engines, or browsers can extract information from the page. It’s similar to RDFa (a W3C standard) and microformats (a popular set of conventions), and is already indexed by the Google search engine if used in markup. However, no browser supports its associated API.
<style scoped>
The scoped attribute on a style element tells the browser to apply the styles to the element that the <style scoped> element is in, and its children. This allows for highly localised styling right inside your HTML, an <article> that contains a scoped style block can be syndicated and retain its special styles, for instance.
However, no browser supports it yet.
Summary
Phew, that was quite a ride, wasn’t it? You’ve seen a lot of new structures, new elements, and quite a few changes to existing elements. If you’ve studied our markup examples carefully, you also know the favoured weaponry of fairies, so beware if you’re a goblin or an orc.
HTML5 allows us to mark up common website structures with dedicated elements, rather than empty <div> or <span> elements. These are still completely necessary parts of the language. Just as with HTML 4, you should use these generic containers when there aren’t any more appropriate elements, but now you have a larger arsenal of elements to choose from. You’ve also seen that some of these new elements have conceptually built-in roles to help assistive technologies. However, while we’re in this transitional period and browser (and more importantly screen reader) support for these built-in roles may still be lacking, you can still (validly and legally) add extra ARIA information.
It probably seems pretty complex, but take my word for it: as you use these new constructs, they soon become much easier to understand. The only way to familiarise yourself with these new constructs is to start using them, so get stuck in!