
Chapter 10 Messages, Workers, and Sockets
Remy Sharp
WEB MESSAGING, Web Workers, and Web Sockets are all different APIs but all have the same communication API, which is why I will show you all three together. Only the Messaging API is part of the official HTML5 spec, but all three of these APIs are valuable additions to any web application.
Messaging allows for sending messages from one domain to another, something that Ajax security policies have long prevented—for good reason—but is now starting to open up with the right security measurements in place.
![]() NOTE The new XMLHttpRequest level 2 object (http://www.w3.org/TR/XMLHttpRequest2/), out of scope for this book but already in WebKit and Firefox, supports cross-domain requests (with the right level of server security). It also includes progress events for monitoring uploads.
NOTE The new XMLHttpRequest level 2 object (http://www.w3.org/TR/XMLHttpRequest2/), out of scope for this book but already in WebKit and Firefox, supports cross-domain requests (with the right level of server security). It also includes progress events for monitoring uploads.
Browsers are effectively single threaded applications, in that when JavaScript is running or perhaps being parsed, the page isn’t rendering. Equally, when JavaScript is performing a long and complicated function, the whole browser can be seen to lock up. What Web Workers does is introduce a simplified idea of threads for browsers. A worker allows me to ring fence a particular block of code and it will run without affecting the browser at all, as if I have created a new thread of operation allowing the main browser thread to continue uninterrupted.
Finally, sockets are a way of creating a connected stream to your server (for server boffs out there: a TCP connection), and allows two-way real-time communication between the server and the client. The typically hello world app is a chat client, but the possibilities of use are endless. Sockets go a long way towards replacing Comet-based code. Comet uses a variety of techniques to achieve real-time streaming data from a server. Web Sockets simplify this process on the client side, as we’ll see later in this chapter.
Chit Chat with the Messaging API
I wanted to show you the Messaging API first because the next two APIs, Web Workers and Web Sockets, both use this common method of communication. So think of this as your gentle primer on communication.
The Messaging API has very good support across all browsers (yes, including IE) and offers a simple API for posting plain text messages from one origin (or domain, to you and me) to another. For example, if you want to send some information to a widget you have in an iframe, you can do it using the Messaging API. This will still work if the widget is on a completely different domain than the site hosting the iframe.
Sending Messages Across Domains
If Bruce has a document that wants to communicate with my document, say either in an iframe or perhaps in a popup window, it needs a reference to the window object (of my document) and he can then call the postMessage method to pass some message to it. The JavaScript in Bruce’s document will look like this:
var t = document.getElementsByTagName('iframe')[0];
t.contentWindow.postMessage('favourite instrument?',
¬ 'http://brucelawson.co.uk');
The target origin argument being passed to postMessage is required. This must match the origin of your contentWindow object (the target window, my document in this example) and it must be supplied. If the origins don’t match, a security error will be thrown, stopping the script from continuing. If the origin isn’t passed in, the JavaScript will throw a syntax error—not helpful, but something to watch out for if you forget. One last tip: Remember to wait for the target to finish loading. The target is still a document that needs to be parsed and loaded. If the browser hasn’t loaded the document and you try to send it a message, the JavaScript will fail entirely with a similar syntax error.
![]() NOTE The previous code list uses
NOTE The previous code list uses addEventListener rather than onmessage because Firefox doesn’t appear to respond to onmessage on the window object. This is best practice anyway, but it would mean we also need to hook IE using attachEvent, which I’ve not included in my example.
My document is being referenced via an iframe on Bruce’s page, and it contains the following JavaScript:
window.addEventListener('message', function (event) {
if (event.data == 'favourite instrument?') {
if (event.origin == 'http://remysharp.com') {
event.source.postMessage('brand new clarinet',
¬ event.origin);
} else if (event.origin == 'http://brucelaweson.co.uk') {
event.source.postMessage('rusty old trombone',
¬ event.origin);
}
}
}, false);
My script sets an event listener listening for messages being passed to the window. Inside the event object is a data property containing the message that was passed in. Along with the data property, there are a number of other useful properties sitting inside the event: origin and source.
The event.origin gives me the domain that the message came from. I can use this, as I have in the previous code listing, to determine whether I want to process the message. This is policy control at a very rudimentary level.
The event.source points back to the window object making the original call to my document, i.e., Bruce’s document. This is useful to be able to communicate back and forth. Of course your onmessage event handler could do a lot more, like make an Ajax request to the server on the same domain.
What About Sending more than Strings?
In the examples I’ve shown you so far, I’ve only passed strings in messages back and forth. What about if you want to send more than just a string? What if you have an object with properties and values?
Well, the good news is the specification describes what’s supposed to happen when a browser has to safely send data from one source to another. It describes how to clone the data and how it should be treated.
However … most browsers don’t support this process. In fact, most browsers simply coerce the object into a string. That sucks for you and me. It means that instead of the nicely constructed object, you’ll get [object Object] in the event.data property. In fact, we saw this before in Chapter 6, “Data Storage,” where we try to store objects in localStorage. So in the same way as we got around the issue with localStorage, you can use JSON.stringify to convert your JavaScript object into a string, pass it to postMessage and then, on the receiving side, convert it back to a native JavaScript object using JSON.parse.
Using JSON.stringify and JSON.parse will be useful methods for transferring more complicated objects from window to target, as we’ll see in the next sections on Web Workers and Web Sockets.
Threading Using Web Workers
Web Workers are part of a separate specification to the HTML5 spec, but are a key feature in building web applications.
A worker is a way of running a discrete block of JavaScript in a background process to the main browser. This is effectively a thread. What this means is the worker runs in the background without interfering with the main browser thread.
The browser is already responsible for requesting and parsing files, rendering the view, and executing JavaScript, and anything that consumes the browser’s processing time causes all other jobs to wait. This is where Web Workers come to the rescue.
Why use a Worker?
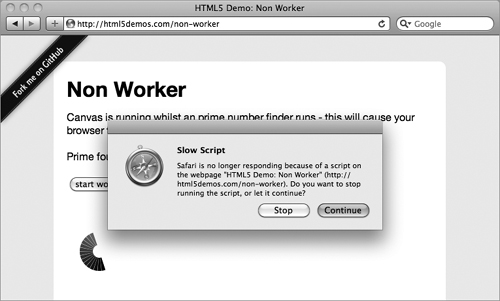
If you’ve ever written any dodgy JavaScript that goes haywire, causing your browser to start fuming like it’s about to explode, then you have experienced the single-threadedness of browsers. Eventually, if the browser’s smart, it’ll give you the option to terminate the dodgy code, something like Figure 10.1.
FIGURE 10.1 Some browsers will interrupt JavaScript that’s gone wild, and give you the option to nuke it into space.
More worrying is the much more subtle issues. Say you’ve written the latest and greatest web application that does the most amazing photo manipulation. You’re using all the l33t skills you learnt from this book—canvas, storage, offline applications—but when it comes to adding a photo filter, it takes 30 seconds. It’s not the 30 seconds that’s the problem; it’s the fact they can’t do anything in the browser for those 30 seconds. What if your user changed her mind and wanted to cancel the filter? Obviously a situation you want to avoid.
This scenario is perfect for a Web Worker because the entire filter processing can happen in the background, and the main browsing window is left alone to continue to be responsive to your visitor’s requests.
Creating and Working with Workers
You can test for Web Worker support by checking whether the object is undefined:
if (typeof Worker != "undefined") {
// do the jazzy stuff
}
Now that we know we’ve got support (Safari, Chrome, Opera, and Firefox currently support Web Workers) we can go about creating a new worker:
var worker = new Worker('my_worker.js');
A new worker object is fired up, reads in the my_worker.js JavaScript file and is now happily running and ready to be used. At this point, you’d be forgiven for thinking that you can call methods inside the worker from your document, and in fact that data can be returned from the worker to your document. Poppycock! No, in fact to work with a worker, everything must be communicated through posting messages between the worker and your document. Like some scene from Romeo and Juliet, exchanging letters of love between the browser and the worker.
The only way you get can information to the worker is via postMessage:
worker.postMessage('hello worker!');
The only way you can receive information from the worker is via the onmessage event handler:
worker.onmessage = function (event) {
alert('The worker just sent me this: ' + event.data);
};
You should now be recognising the postMessage/onmessage combination from the Messaging API from earlier in this chapter. You remember how we can only send and receive strings in the Message API? You won’t be surprised to know, then, that the Web Workers have the same constraint.
![]() NOTE A slight caveat: Web Workers are supposed to be able to send objects, just as the Messaging API is, but most browsers coerce the object to a string. However, Firefox has implemented internal
NOTE A slight caveat: Web Workers are supposed to be able to send objects, just as the Messaging API is, but most browsers coerce the object to a string. However, Firefox has implemented internal JSON.stringify/JSON.parse behind the scenes of sending and receiving messages to and from workers so you don’t have to. So there’s hope if the other browsers follow suit and allow us to send object through the messaging system.
Equally, the code inside the worker must also communicate using the postMessage/onmessage combo. However a Web Worker doesn’t have the same access as your normal document: It’s very much sandboxed in and has access to only a select few APIs and functions, as I’ll show you in the next section.
The only other method available to you via the worker object is terminate, which does exactly what it says on the tin. The worker ceases to run and worker object becomes limp and useless. In particular, you can’t resume the worker; you’d have to create a brand new one.
What you can do Inside a Worker
Within a Web Worker you don’t have access to such pleasures as the DOM. In fact, if you need to do anything with the DOM, you’re going to have to prepare the work in the worker, then pass it to the parent document to do the actual DOM manipulation.
![]() NOTE Currently there are no Web Worker implementations that support accessing Web SQL Databases, though there are fixes in the works.
NOTE Currently there are no Web Worker implementations that support accessing Web SQL Databases, though there are fixes in the works.
However there are a number of things you can do in a worker (according to the specification):
• postMessage and listen for inbound messages via onmessage
• close, to end the current worker
• Set event listeners
• XMLHttpRequest, for Ajax requests
• Timers, such as setTimeout, setInterval, and their clearing counterparts
• All the core JavaScript functions: eval, isNaN, escape, etc.
• Location object, the href of the worker script
• Web Sockets (which we’ll discuss in the final section of this chapter)
• Web SQL Databases
• Web Workers
• importScripts
The following code is all I need in my_worker.js to communicate with the document from the earlier code listing:
onmessage = function (event) {
if (event.data == "hello worker!") {
postMessage("hello there, right back at you");
} else {
postMessage("Can't you see I'm busy, leave me alone");
}
};
It’s useful to know that, in a normal document, the this keyword would refer to the global scope, the window object. Here in the worker, the global scope is the worker instance. It also means that the this keyword inside of setTimeout and setInterval is he worker instance (where this would otherwise be the window object).
In these examples so far, our worker hasn’t done anything particularly special. How about a worker that searches for prime numbers? This requires a super tight loop in JavaScript constantly spinning around looking for values that match a prime. All this and at the same time allowing your visitor to draw on a canvas while your app searches for prime numbers? Perhaps a strange use case, but we have workers to come to your rescue.
The main document will handle starting the worker and drawing on the canvas. The only code that’s offloaded to the worker is the prime number searching.
var worker = new Worker('prime.js');
prime = document.getElementById('prime');
worker.onmessage = function(event) {
prime.innerHTML = event.data;
};
The page continues to handle mousedown, move, and up events to draw on a canvas on the page. Inside the prime.js script we have:
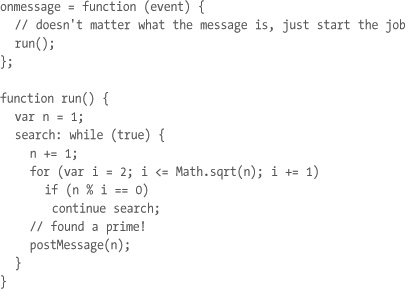
When the prime.js worker receives any message, it starts the prime number search. When you run this prime number drawing extravaganza of an application, everything runs smoothly, and you’re able to create your perfect work of art whilst also searching for primes as seen in Figure 10.2.
FIGURE 10.2 Everything you could ever need: prime number and drawing executed without interruption thanks to Web Workers.

Matryoshka Dolls: Workers Inside Workers
If you had a watchful eye, you would have spotted that from within a worker you can also create new workers. Currently only Firefox supports this, but it’s part of the spec, so you should expect that other browsers will update to include this feature.
What this means is that you could spawn one worker, who then goes and splits its job into lots of delegated little jobs and passes them to sub-workers. Let’s go back to the example of applying a complex filter to a photo in your super-sexy online image web app. To speed up the processing of the image—and if it made sense in the filter—you could split the image up into regions and pass each region of image data to a sub-worker.
As each worker returns, you reduce the pending count and once all the workers have finished, the main worker returns the final processed image data to the parent document. Something like this (I’ve left out some functions from the listing as this is just to demonstrate the idea):

When the message is received from the sub-worker, the main worker above decreases the number of outstanding sub-workers. Once all the sub-workers have returned their slice of the image data, the final result is returned to the parent document.
The sub-worker, photofilter.js worker, would contain the following code to handle processing just a small region of the image data:

Notice also how photofilter.js, once it’s done performing its task, calls the close() method. This allows the worker to terminate, since it’s not required for use again.
Importing Scripts and Libraries to your Worker
Web Workers is very much about modularising a block of code or functionality and running it in a stand-alone environment (that is, the worker itself). Web Workers can also load external JavaScript files and libraries via the importScripts method.
This is one of the few worker-specific methods. It accepts a list of URLs and loads them into the worker synchronously. You can load one script at a time, or you can load multiple scripts from within the worker:
importScripts('xhr.js');
importScripts('prime.js', 'number_crunch.js',
¬ 'captain_crunch.js');
Each script is processed one at a time. The script must be on the same origin as the worker—the same domain, cname, etc. The worker then synchronously loads the JavaScript into itself, returning to continue only once the script has finished processing.
Sharing a load with SharedWorkers
Another type of Web Worker is the SharedWorker, currently only supported in Chrome and WebKit (rather than Safari). A shared worker is pretty much like an average Web Worker except that multiple documents can access the same single instance of the worker. So this means that if you have several popups or several iframes, all of those documents can access this single shared worker and this single shared worker will serve all of those documents.
This would be useful for applications, for example, like Gmail or Facebook, where there may be some client-side data that needs to be maintained, such as the messages for the user, and you have several different windows open.
The worker can access and manage the website’s client-side Web SQL Databases (discussed in Chapter 6) and it can also maintain the connection with the server, handling all the data that’s coming in and out or even via a Web Socket to the server so that data is handled in real-time. The shared worker can then maintain all of the changes to the client-side messages database and then push all of those updates via postMessage to each of the popups, iframes, and so on.
This means that there’s no getting data out of sync or race conditions if each of the popups, iframes, etc. was individually connecting to the server and trying to each manage the client side, since the shared worker is the single point of contact for all of that type of work.
The SharedWorker works very slightly differently when it comes to communication. For starters there’s the concept of ports—this is an array-like object that contains a reference to each of the communication channels the shared worker has. Also, if you bind to the message event using addEventListener, you have to manually start the worker, which I’ll show you in the following code sample.
In addition, within the worker the connect event fires when the SharedWorker is created, which can be used to keep track of how many connections the worker has to other documents.
The documents creating the SharedWorker contain the following code:
var worker = new SharedWorker('messages.js');
worker.port.addEventListener('message', function(event) {
var messages = JSON.parse(event.data);
showNewMessages(messages);
}, false);
worker.port.start();
In the previous example, you can see we’re accessing the worker via the port property. This is how you interact and, in fact, distinguish between shared and nonshared workers. As the example binds to the message event using addEventListener, the worker must be connected manually using the .start() method. The code wouldn’t need this if it used onmessage. Next is the messages.js worker:
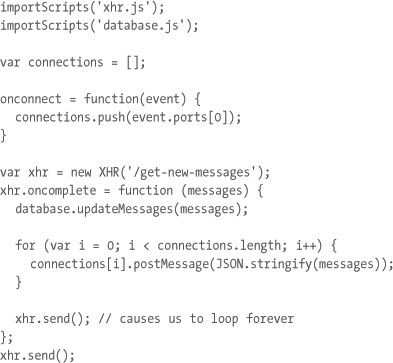
When a client document connects to the worker, the connect event is fired, which allows me to capture the connection port. This is collected through the event.ports[0] reference, even though there will never be more than one item inside the ports property. However the worker reference is inside this, so we can use this to post messages and receive messages.
As you see in the previous example, when the Ajax complete function runs, I loop through all of the connected ports and send them each a message of the new email messages that have come in. This way the connected clients act as dumb terminals, oblivious to any of the real work going on to store the messages in the client-side database.
Debugging a Worker
We’ve gotten to the point in web development where the tools for debugging are so much better than 10 years ago. All the latest browsers come with their own JavaScript debugger (though Firefox still requires Firebug as a plugin); it’s a haven of debugging when compared to the bad old days of using alert boxes left, right, and centre.
Since now, with a Web Worker, you’re working in a sandboxed environment, there is no access to the console debuggers. There’s no native way to do console.log(“who’s the daddy?”) in a worker. To compound this hurdle, there’s not even an alert box we can use.
To debug a Web Worker, you may have to make up your own debugging methods.
![]() TIP Chrome recently added a way to allow you to debug workers from the script tab in their Web Inspector, but what it’s really doing is running the worker scripts through iframes; this does mean the console.log lines actually appear in the console. Very useful for debugging a closed black box!
TIP Chrome recently added a way to allow you to debug workers from the script tab in their Web Inspector, but what it’s really doing is running the worker scripts through iframes; this does mean the console.log lines actually appear in the console. Very useful for debugging a closed black box!
Since you can move messages back and forth to the parent document, you can create some system for posting messages that should be sent to the console log. However with that, you need to create a system that doesn’t just process strings, you need to have some agreed language between your workers and your main document, and this will depend entirely on your application. For instance, you could prefix debug messages with the keyword “log:”
importScripts('xhr.js');
var xhr = new XHR('/someurl');
xhr.oncomplete = function (data) {
log('data contains ' + data.length + ' items');
};
xhr.send();
function log(msg) {
postMessage('log ' + msg);
}
Note that xhr.js is my made-up XMLHttpRequest script that returns me some JSON data—you’ll have to make your own!
In the main page in the onmessage event, I’ll be looking for prefixes in messages and actioning them:

![]() NOTE It’s possible for a worker to get aborted or terminated through a method unknown to your code. If your worker is being killed off by the browser for some reason, then the
NOTE It’s possible for a worker to get aborted or terminated through a method unknown to your code. If your worker is being killed off by the browser for some reason, then the worker.onerror event is going to fire. If you’re closing the worker manually, you’re having to do this from within the worker via .close() so you have the opportunity to notify the connected documents that your worker is closing.
In this example, my agreed grammar is all messages are prefixed with an action. This could be log, set, run, etc. What’s important is I now have a way to inspect data that’s inside the worker by sending data to my log function.
It’s also useful to be able to poke around inside a worker, something I’ve found to be exceptionally useful when experimenting in JavaScript. In a non-worker environment, I can pop open my console of choice (Firebug, Dragonfly, etc.,) and from within there, I would log out and inspect all the properties on the window object, the document, then their properties, just to see what’s supported and what I can play with. Since a worker is a closed environment, I would need to do this manually. So one of the online examples for this book includes a console that allows you to inspect a Web Worker and test code inside the worker and see what it produces. You can see the worker console at http://introducinghtml5.com/examples/ch10/echo.html (Figure 10.3).
FIGURE 10.3 A demo console to inspect inside a Web Worker.

Web Sockets: Working with Streaming Data
Web Sockets are one of the shiniest new APIs outside of the realm of HTML5, but they’re actually really important for some of the real-time-based web applications that have emerged in recent times.
Web Sockets give you a bi-directional connection between your server and the client, the browser. This connection is also real-time and is permanently open until explicitly closed. This means that when the server wants to send your client something, that message is pushed to your browser immediately.
This is what Comet was aiming to achieve, and succeeding. Comet is a way of creating a real-time connection to your server, but it would do it using a variety of different hacks. Ultimately, if none of these hacks work, it would eventually fall back down to Ajax polling, which would constantly hit your server and that doesn’t scale up very well.
If you have a socket open, your server can push data to all those connected sockets, and the server doesn’t have to constantly respond to inbound Ajax requests. This is the move from polling to pushing, from reactive to proactive. This is what Comet was achieving through hacks, and this is what Web Sockets achieves natively in the browser.
![]() NOTE If the browser doesn’t natively support Web Sockets, there’s always a way using Flash. Hiroshi Ichikawa has written a Flash-based shim for Web Sockets that’s available here: http://github.com/gimite/web-socket-js.
NOTE If the browser doesn’t natively support Web Sockets, there’s always a way using Flash. Hiroshi Ichikawa has written a Flash-based shim for Web Sockets that’s available here: http://github.com/gimite/web-socket-js.
Sockets Solve Latency of Real-Time Applications
Low latency is a massive benefit of Web Sockets. Since your socket is always open and listening, as soon as data is pushed from the server, it just has to make its way to your browser, making the latency exceptionally low in comparison to something like an XMLHttpRequest-based Ajax request.
In theory, with Google Wave, if you have lots of people all in the same document, and you’re all typing, you want to send all those keystrokes to all the connected people as soon as they happen. However, if you’re using vanilla Ajax to do that, you would have to create a new XHR object every time a key is hit, and every one of those requests will contain all the headers that are sent with a normal XHR request, like the user agent string, the referrer URL, the accepted content type, and so on. All of this data for what was essentially only a keypress.
Whereas with sockets, because the connection is always open, all you need to send is the keystroke, which would then be disseminated to all the connected clients via the server, and only that keystroke would be sent.
The data sent has gone from Ajax, which will be perhaps 200–300 bytes of data, to a socket connection, which will be just a few bytes of data, perhaps around 10–20 bytes, which will be much more responsive and faster to transfer around the connected sessions.
The Simple Web Socket API
The Web Socket API is also exceptionally easy to work with. Currently browsers only support sending strings (with the exception of Firefox and Web Workers), which we’ve seen with the Messaging API and Web Workers using postMessage and onmessage. Sockets work almost exactly the same.
This means that you can’t (currently) send binary data—but I’d argue that in the web world we’re used to working with JSON and it’s not particularly a big deal to encode to JSON as the messages come in from a socket since we’re already doing it for JSON Ajax requests.
The API is limited down to creating the connection, sending data down the socket, receiving and closing the socket. There’s also an error handler and a state flag, for connecting, open, closing, and closed. Once you’ve closed the socket, the socket is completely closed down and can’t be reopened. So if you need to reopen it, you need to create a new socket to go out.
![]() NOTE Regarding the
NOTE Regarding the ws:// server protocol: Writing about how to set up the server side is beyond the scope of this book, but there are already several libraries out in the wild that can add the Web Socket protocol. Using servers like Node.js I was able to get a Web Socket server up and running in around 20 minutes and documented it online: http://remysharp.com/slicehostnodejs-websockets/.
Creating a new Web Socket is easy, and very much like a Web Worker. The protocol of the URL must be ws:// but the rest of the URL can be structured just as you would a normal URL to be:
var socket = new WebSocket('ws://myserver.com/tweets:8080/');
For this example, I’m only going to be listening to the messages that come from the tweets URL. Each is a new tweet from Twitter that my server has been set up to listen for (Figure 10.4).
FIGURE 10.4 A streaming connection showing tweets that my server was listening for.

![]() TIP The URL that you use for the Web Socket does not have to be the same origin as your document. This means that you can connect to servers from third-party services, which expands the possibilities of what can be done.
TIP The URL that you use for the Web Socket does not have to be the same origin as your document. This means that you can connect to servers from third-party services, which expands the possibilities of what can be done.
The messages from the server are being delivered as JSON messages, forwarded on from Twitter’s streaming API. So when they come in, I’ll convert the JSON to data and render the tweet on the screen:
socket.onmessage = function(event) {
var tweetNode = renderTweet(JSON.parse(event.data));
document.getElementById('tweets').appendChild(tweetNode);
};
Now in as many as four lines of JavaScript (excluding the renderTweet function), I’ve got streaming real-time tweets on my page.
Doing more than Listening with a Socket
As I said before, there are more methods available on a socket over just listening. Since chat is the hello world of Comet, I felt it only fair to show you a simple example of what chat would look like using Web Sockets:

This simple pseudo code shows you how the same techniques we used in the Message API can help to get around the limitations of plain text. The Web Sockets API really is as simple as that. All the negotiation is done out of sight by the browser for you; all the buffering is done for you (though you can check the current bufferedAmount on the socket). In fact, the communication process is even easier than setting up an XHR object!
Summary
This final chapter has equipped you with the last of your HTML5 web application armory. You can now create multi-threaded, multi-window, cross-domain, low-latency, real-time thingymegiggies using the simplest of string-based communication methods. Now go build something awesome.
And Finally…
Hopefully, you’ve been enlightened by our brief foray into the new structures and APIs that you can use.
There are loads more cool stuff in the spec that we haven’t shown you because it’s not implemented yet. For example, you can register the browser as a content handler so that clicking a document or photo or video on your desktop opens the browser and goes to a web application that can edit that document, complete with application toolbars, all built with HTML5. But it’s still awaiting implementation.
Forget the marketing B.S. of “Web 2.0.” We’re at the beginning of Web Development 2.0: powerful languages like HTML5, SVG, and CSS3 will revolutionise the way we build the Web. Browsers support more and more of these aspects of these languages (and you can be certain that more and more support is being added daily).
Have a play with the new features. Experiment with the new markup structures, manipulate video on the fly, and build fun and attractive games and apps that use <canvas>. By reading this book, you’re demonstrating that you’re an early adopter, ahead-of-the-curve, so please set a good example to your colleagues; respect those visitors to your new creations who have older browsers or assistive technologies.
Thanks for buying this book and sticking with us. See you around. All the code (and more) is available at www.introducinghtml5.com. Bon voyage: enjoy building incredible things. kthxbai.
—Bruce Lawson and Remy Sharp
Bali, Birmingham, and Brighton, Nov 09–May 10