Chapter 4 Video and Audio
Bruce Lawson and Remy Sharp
A LONG TIME AGO, in a galaxy that feels a very long way away, multimedia on the Web was limited to tinkling MIDI tunes and animated GIFs. As bandwidth got faster and compression technologies improved, MP3 music supplanted MIDI and real video began to gain ground. All sorts of proprietary players battled it out—Real Player, Windows Media, and so on—until one emerged as the victor in 2005: Adobe Flash, largely because of the ubiquity of its plugin and the fact that it was the delivery mechanism of choice for YouTube.
HTML5 provides a competing, open standard for delivery of multimedia on the Web with its native video and audio elements and APIs. This chapter largely discusses the <video> element, as that’s sexier, but most of the markup and scripting are applicable for both types of media.
Native Multimedia: Why, What, and How?
In 2007, Anne van Kesteren wrote to the Working Group:
“Opera has some internal experimental builds with an implementation of a <video> element. The element exposes a simple API (for the moment) much like the Audio() object: play(), pause(), stop().The idea is that it works like <object> except that it has special <video> semantics much like <img> has image semantics.”
While the API has increased in complexity, van Kesteren’s original announcement is now implemented in all the major browsers, and during the writing of this book Microsoft announced forthcoming support in Internet Explorer 9.
An obvious companion to a <video> element is an <audio> element; they share many similar features, so in this chapter we discuss them together and only note the differences.
<video>: Why do you need a <video> Element?
Previously, if developers wanted to include video in a web page, they had to make use of the <object> element, which is a generic container for “foreign objects.” Due to browser inconsistencies, they would also need to use the previously invalid <embed> element and duplicate many parameters. This resulted in code that looked much like this:

This code is ugly and ungainly. Worse than that is the fact that the browser has to pass the video off to a third-party plugin; hope that the user has the correct version of that plugin (or has the rights to download and install it, or the knowledge of how to); and then hope that the plugin is keyboard accessible—along with all the other unknowns involved in handing the content to a third-party application.
Plugins can also be a significant cause of browser instability and can create worry in less technical users when they are prompted to download and install newer versions.
Whenever you include a plugin in your pages, you’re reserving a certain drawing area that the browser delegates to the plugin. As far as the browser is concerned, the plugin’s area remains a black box—the browser does not process or interpret anything that is happening there.
Normally, this is not a problem, but issues can arise when your layout overlaps the plugin’s drawing area. Imagine, for example, a site that contains a movie but also has JavaScript or CSS-based dropdown menus that need to unfold over the movie. By default, the plugin’s drawing area sits on top of the web page, meaning that these menus will strangely appear behind the movie.
Problems and quirks can also arise if your page has dynamic layout changes. If the dimensions of the plugin’s drawing area are resized, this can sometimes have unforeseen effects—a movie playing in the plugin may not resize, but instead simply be cropped or display extra white space. HTML5 provides a standardised way to play video directly in the browser, with no plugins required.
![]() NOTE
NOTE <embed> is finally standardised in HTML5; it was never part of any previous flavour of (X)HTML.
One of the major advantages of the HTML5 video element is that, finally, video is a full-fledged citizen on the Web. It’s no longer shunted off to the hinterland of <object> or the non-validating <embed> element.
So now, <video> elements can be styled with CSS; they can be resized on hover using CSS transitions, for example. They can be tweaked and redisplayed onto <canvas> with JavaScript. Best of all, the innate hackability that open web standards provide is opened up. Previously, all your video data was locked away; your bits were trapped in a box. With HTML5 multimedia, your bits are free to be manipulated however you want.
What HTML5 Multimedia Isn’t Good for
Regardless of the somewhat black and white headlines of the tech journalists, HTML5 won’t “kill” all plugins overnight. There are use-cases for plugins not covered by the new spec.
Copy protection is one area not dealt with by HTML5—unsurprisingly, given that it’s a standard based on openness. So people who need DRM are probably not going to want to use HTML5 video or audio, as they will be as easy to download to a hard drive as an <img> is now. Some browsers offer simple context-menu access to the URL of the video, or even to save the video. (Of course, you don’t need us to point out that DRM is a fools’ errand, anyway. All you do is alienate your honest users while causing minor inconvenience to dedicated pirates.)
Plugins remain the best option for a browser to transmit video and audio from the user’s machine to a web page such as Daily Mugshot or Chat Roulette. (There is a highly nascent <device> element rudimentarily specified for “post-5” HTML, but there is no support in browsers for it). After shuddering at the unimaginable loneliness that a world without Chat Roulette would represent, consider also the massive amount of content out there that will require plugins to render it for a long time to come.
Anatomy of the Video Element
At its simplest, including video on a page in HTML5 merely requires this code:
<video src=turkish.ogv></video>
The .ogv file extension is used here to point to an Ogg Theora video.
![]() NOTE So long as the http end point is a streaming resource on the web, you can just point the
NOTE So long as the http end point is a streaming resource on the web, you can just point the <video> or <audio> element at it to stream the content.
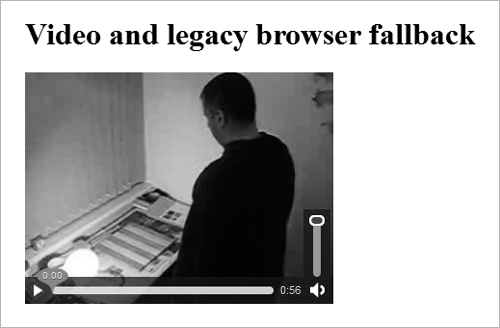
Similar to <object>, you can put fallback markup between the tags, for older Web browsers that do not support native video. You should at least supply a link to the video so users can download it to their hard drives and watch it later on the operating system’s media player. Figure 4.1 shows this code in a modern browser and fallback content in a legacy browser.
<h1>Video and legacy browser fallback</h1>
<video src=leverage-a-synergy.ogv>
Download the <a href=leverage-a-synergy.ogv>How to
¬ leverage a synergy video</a>
</video>
FIGURE 4.1 HTML5 video in a modern browser and fallback content in a legacy browser.

However, this example won’t actually do anything just yet. All you can see here is the first frame of the movie. That’s because you haven’t told the video to play, and you haven’t told the browser to provide any controls for playing or pausing the video.
autoplay
You can tell the browser to play the video or audio automatically, but you almost certainly shouldn’t, as many users (and particularly those using assistive technology, such as a screen reader) will find it highly intrusive. Users on mobile devices probably won’t want you using their bandwidth without them explicitly asking for the video. Nevertheless, here’s how you do it:
<video src=leverage-a-synergy.ogv autoplay>
</video>
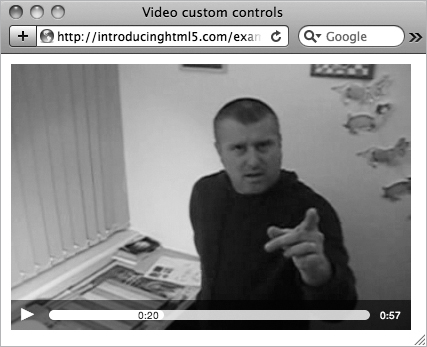
controls
Providing controls is approximately 764 percent better than autoplaying your video. See Figure 4.2. You can use some simple JavaScript to write your own (more on that later) or you can tell the browser to provide them automatically:
<video src=leverage-a-synergy.ogv controls>
</video>
Naturally, these differ between browsers, in the same way that form controls do, for example, but you’ll find nothing too surprising. There’s a play/pause toggle, a seek bar, and volume control.
FIGURE 4.2 The default controls in Firefox 3.6 (similar in all modern browsers).
![]() NOTE Browsers have different levels of keyboard accessibility. Firefox’s native controls don’t appear when JavaScript is disabled (the contextual menu allows the user to stop and start the movie, but there is the issue of discoverability, and it doesn’t seem possible to choose these options without JS.) Opera’s accessible native controls are always present when JavaScript is disabled, regardless of whether the
NOTE Browsers have different levels of keyboard accessibility. Firefox’s native controls don’t appear when JavaScript is disabled (the contextual menu allows the user to stop and start the movie, but there is the issue of discoverability, and it doesn’t seem possible to choose these options without JS.) Opera’s accessible native controls are always present when JavaScript is disabled, regardless of whether the controls attribute is specified.
Chrome and Safari have issues with keyboard accessibility. We anticipate increased keyboard accessibility as manufacturers iron out teething problems.
Notice that these controls appear when a user hovers over a video or when she tabs to the video. It’s also possible to tab through the different controls. This native keyboard accessibility is already an improvement on plugins, which can be tricky to tab into from surrounding HTML content.
If the <audio> element has the controls attribute, you’ll see them on the page. Without the attribute, nothing is rendered visually on the page at all, but is, of course, there in the DOM and fully controllable via JavaScript and the new APIs.
poster
The poster attribute points to an image that the browser will use while the video is downloading, or until the user tells the video to play. (This attribute is not applicable to <audio>.) It removes the need for additional tricks like displaying an image and then removing it via JavaScript when the video is started.
If you don’t use the poster attribute, the browser shows the first frame of the movie, which may not be the representative image you want to show.
height, width
These attributes tell the browser the size in pixels of the video. (They are not applicable to <audio>.) If you leave them out, the browser uses the intrinsic width of the video resource, if that is available. Otherwise it is the intrinsic width of the poster frame, if that is available. Otherwise it is 300 pixels.
If you specify one value, but not the other, the browser adjusts the size of the unspecified dimension to preserve the video’s aspect ratio.
If you set both width and height to an aspect ratio that doesn’t match that of the video, the video is not stretched to those dimensions but is rendered “letter-boxed” inside the video element of your specified size while retaining the aspect ratio.
loop
The loop attribute is another Boolean attribute. As you would imagine, it loops the media playback.
preload
Maybe you’re pretty sure that the user wants to activate the media (he’s drilled down to it from some navigation, for example, or it’s the only reason to be on the page), but you don’t want to use autoplay. If so, you can suggest that the browser preload the video so that it begins buffering when the page loads in the expectation that the user will activate the controls.
<video src=leverage-a-synergy.ogv controls preload>
</video>
There are three spec-defined states of the preload attribute. If you just say preload, the user agent can decide what to do. A mobile browser may, for example, default to not preloading until explicitly told to do so by the user.
1. preload=auto (or just preload)
A suggestion to the browser that it should begin downloading the entire file. Note that we say “suggestion.” The browser may ignore this—perhaps because it detected very slow connection or a setting in a mobile browser “Never preload media” to save the user’s bandwidth.
2. preload=none
This state suggests to the browser that it shouldn’t preload the resource until the user activates the controls.
3. preload=metadata
This state suggests to the browser that it should just prefetch metadata (dimensions, first frame, track list, duration, and so on) but that it shouldn’t download anything further until the user activates the controls.
![]() NOTE The specification for
NOTE The specification for preload changed in March 2010 and is not implemented anywhere as of April 2010.
src
As on an <img>, this attribute points to the file to be displayed. However, because not all browsers can play the same formats, in production environments you need to have more than one source file. We’ll cover this in the next section. Using a single source file with the src attribute is only really useful for rapid prototyping or for intranet sites where you know the user’s browser and which codecs it supports.
Codecs—the Horror, the Horror
Early drafts of the HTML5 specification mandated that all browsers should at least have built-in support for multimedia in two codecs: Ogg Vorbis for audio and Ogg Theora for movies. Vorbis is a codec used by services like Spotify, among others, and for audio samples in games like Microsoft Halo, it’s often used with Theora for video and combined together in the Ogg container format.
However, these codecs were dropped from the HTML5 spec after Apple and Nokia objected, so the spec makes no recommendations about codecs at all. This leaves us with a fragmented situation. Opera and Firefox support Theora and Vorbis. Safari doesn’t, preferring instead to provide native support for the H.264 video codec and MP3 audio. Microsoft has announced that IE9 will also support H.264, which is also supported on iPhone and Android. Google Chrome supports Theora and H.264 video, and Vorbis and MP3 audio. Confused?
As we were finishing this book, Google announced it is open-sourcing a video codec called VP8. This is a very high-quality codec, and when combined with Vorbis in a container format based on the Matroska format, it's collectively known as “webM”.
Opera, Firefox and Chrome have announced it will support it. IE9 will, if the codec is separately installed. VP8 will be included in Adobe's Flash Player and every YouTube video will be in webM format.
Like Theora, it's a royalty-free codec. In this chapter, you can substitute .ogv examples with .webm for high quality video, once browser support is there.
The rule is: provide both royalty-free (webM or Theora) and H.264 video in your pages, and both Vorbis and MP3 audio so that nobody gets locked out of your content. Let’s not repeat the mistakes of the old “Best viewed in Netscape Navigator” badges on websites.
Multiple <source> Elements
To do this, you need to encode your multimedia twice: once as Theora and once as H.264 in the case of video, and in both Vorbis and MP3 for audio.
Then, you tie these separate versions of the file to the media element. Instead of using the single src attribute, you nest separate <source> elements for each encoding with appropriate type attributes inside the <audio> or <video> element and let the browser download the format that it can display.
Note that in this case we do not provide a src attribute in the media element itself:

![]() NOTE Stop press: iPad bug: Since going to press we’ve been told of a bug that affects some iPads that means they can only read the first
NOTE Stop press: iPad bug: Since going to press we’ve been told of a bug that affects some iPads that means they can only read the first <source> element. Therefore your mp4 version should come before your royalty-free version in the source order.
Line 1 tells the browser that a video is to be inserted and to give it default controls. Line 2 offers an Ogg Theora video and uses the type attribute to tell the browser what kind of container format is used (by giving the file’s MIME type) and what codec was used for the encoding of the video and the audio stream. We could also offer a WebM video here as a high-quality royalty-free option. Notice that we used quotation marks around these parameters. If you miss out on the type attribute, the browser downloads a small bit of each file before it figures out that it is unsupported, which wastes bandwidth and could delay the media playing.
Line 3 offers an H.264 video. The codec strings for H.264 and AAC are more complicated than those for Ogg because there are several profiles for H.264 and AAC. Higher profiles require more CPU to decode, but they are better compressed and take less bandwidth.
Inside the <video> element is our fallback message, including links to both formats for browsers that can natively deal with neither video type but which is probably on top of an operating system that can deal with one of the formats, so the user can download the file and watch it in a media player outside the browser.
OK, so that’s native HTML5 video for all users of modern browsers. What about users of legacy browsers—including Internet Explorer 8 and older?
Video for Legacy Browsers
Older browsers can’t play native video or audio, bless them. But if you’re prepared to rely on plugins, you can ensure that users of older browsers can still experience your content in a way that is no worse than they currently get.
![]() NOTE The content between the tags is fall-back content only for browsers that do not support the
NOTE The content between the tags is fall-back content only for browsers that do not support the <video> element at all. A browser that understands HTML5 video but can’t play any of the formats that your code points to will not display the “fallback” content between the tags. This has bitten me on the bottom a few times. Sadly, there is no video record of that.
Remember that the contents of the <video> element can contain markup, like the text and links in the previous example? Because the MP4 file type can also be played by the Flash player plugin, you can use the MP4 movie in combination as a fallback for Internet Explorer 8 and older versions of other browsers.
The code for this is as hideous as you’d expect for a transitional hack, but it works everywhere a Flash Player is installed—which is almost everywhere. You can see this nifty technique in an article called “Video for Everybody!” by its inventor, Kroc Camen http://camendesign.com/code/video_for_everybody.
Alternatively, you could host the fallback content on a video hosting site and embed a link to that between the tags of a video element:
<video controls>
<source src=leverage-a-synergy.ogv type='video/ogg;
¬ codecs="theora, vorbis"'>
<source src=leverage-a-synergy.mp4 type='video/mp4;
¬ codecs="avc1.42E01E, mp4a.40.2"'>
<embed src="http://www.youtube.com/v/cmtcc94Tv3A&hl=
¬ en_GB&fs=1&rel=0" type="application/x-shockwave-flash"
¬ allowscriptaccess="always" allowfullscreen="true"
¬ width="425" height="344"> </video>
You can use the html5media library http://static.etianen.com/html5media/ to hijack the <video> element and automagically add necessary fallback by adding one line of JavaScript in the head of your page.
Sending Differently-Compressed Videos to Handheld Devices
Video files tend to be large, and sending very high-quality video can be wasteful if sent to handheld devices where the small screen sizes make high quality unnecessary. There’s no point in sending high-definition video meant for a widescreen monitor to a handheld device screen. Compressing a video down to a size appropriate for a small screen can save a lot of bandwidth, making your server and—most importantly—your mobile users happy.
HTML5 allows you to use the media attribute on the source element, which queries the browser to find out screen size (or number of colours, aspect ratio, and so on) and send different files that are optimised for different screen sizes.
![]() NOTE We use
NOTE We use min-device-width rather than min-width to cater to devices that have a viewport into the content—that is, every full-featured smartphone browser, as this gives us the width of the viewport display.
This functionality and syntax is borrowed from the CSS Media Queries specification dev.w3.org/csswg/css3-mediaqueries/) but is part of the markup, as we’re switching source files depending on device characteristics. In the following example, the browser is “asked” if it has a min-device-width of 800px—that is, does it have a wide screen. If it does, it receives hi-res.ogv; if not, it is sent lo-res.ogv:
<video controls>
<source src=hi-res.ogv … media="(min-device-width:
¬ 800px) ">
<source src=lo-res.ogv>
</video>
Also note that you should still use the type attribute with codecs parameters and fallback content previously discussed. We’ve just omitted those for clarity.
Rolling Custom Controls
One truly spiffing aspect of the media element, and therefore the audio and video elements, is that the JavaScript API is super easy. The API for both audio and video descend from the same media API, so they’re nearly exactly the same. The only difference in these elements is that the video element has height and width attributes and a poster attribute. The events, the methods, and all other attributes are the same. With that in mind, we’ll stick with the sexier media element: the <video> element for our JavaScript discussion.
As you saw at the start of this chapter, Anne van Kesteren talks about the new API and that we have new simple methods such as play(), pause() (there’s no stop method: simply pause and and move to the start), load(), and canPlayType(). In fact, that’s all the methods on the media element. Everything else is events and attributes.
Table 4.1 provides a reference list of media attributes and events.
TABLE 4.1 Media Attributes and Events


Using JavaScript and the new media API you can create and manage your own video player controls. In our example, we walk you through some of the ways to control the video element and create a simple set of controls. Our example won’t blow your mind—it isn’t nearly as sexy as the video element itself (and is a little contrived!)—but you’ll get a good idea of what’s possible through scripting. The best bit is that the UI will be all CSS and HTML. So if you want to style it your own way, it’s easy with just a bit of web standards knowledge—no need to edit an external Flash player or similar.
Our hand-rolled basic video player controls will have a play/pause toggle button and allow the user to scrub along the timeline of the video to skip to a specific section, as shown in Figure 4.3.
FIGURE 4.3 Our simple but custom video player controls.
Our starting point will be a video with native controls enabled. We’ll then use JavaScript to strip the native controls and add our own, so that if JavaScript is disabled, the user still has a way to control the video as we intended:

Play, Pause, and Toggling Playback
Next, we want to be able to play and pause the video from a custom control. We’ve included a button element that we’re going to bind a click handler and do the play/pause functionality from. Throughout my code examples, when I refer to the play variable it will refer to the button element:
<button class="play" title="play">►</button/>
We’re using BA;, which is a geometric XML entity that looks like a play button. Once the button is clicked, we’ll start the video and switch the value to two pipes using ▐, which looks (a little) like a pause, as shown in Figure 4.4.
FIGURE 4.4 Using XML entities to represent play and pause buttons.

For simplicity, I’ve included the button element as markup, but as we’re progressively enhancing our video controls, all of these additional elements (for play, pause, scrubbing, and so on) should be generated by the JavaScript.
In the play/pause toggle we have a number of things to do:
- If the video is currently paused, start playing, or if the video has finished then we need to reset the current time to 0, that is, move the playhead back to the start of the video.
- Change the toggle button’s value to show that the next time the user clicks, it will toggle from pause to play or play to pause.
- Finally, we play (or pause) the video:

The problem with this logic is that we’re relying entirely on our own script to determine the state of the play/pause button. What if the user was able to pause or play the video via the native video element controls somehow (some browsers allow the user to right click and select to play and pause the video)? Also, when the video comes to the end, the play/pause button would still show a pause icon. Ultimately we need our controls to always relate to the state of the video.
Eventful Media Elements
The media elements fire a broad range of events: when playback starts, when a video has finished loading, if the volume has changed, and so on. So, getting back to our custom play/pause button, we strip the part of the script that deals with changing its visible label:
if (video.ended) {
video.currentTime = 0;
}
if (video.paused) {
video.play();
} else {
video.pause();
}
// which could be written as: video[video.paused ? 'play' :
¬ 'pause']();
![]() NOTE In these examples we’re using the
NOTE In these examples we’re using the addEventListener DOM level 2 API, rather than the attachEvent, which is specific to Internet Explorer up to version 8. The upcoming IE9 will support video, but it thankfully also supports the standardised addEventListener, so our code will work there, too.
In the simplified code if the video has ended, we reset it, then toggle the playback based on its current state. The label on the control itself is updated by separate (anonymous) functions we’ve hooked straight into the event handlers on our video element:

Now whenever the video is played, paused, or has reached the end, the function associated with the relevant event is fired, making sure that our control shows the right label.
Now that we’re handling playing and pausing, we want to show the user how much of the video has downloaded and therefore how much is playable. This would be the amount of buffered video available. We also want to catch the event that says how much video has been played, so we can move our visual slider to the appropriate location to show how far through the video we are, as shown in Figure 4.5. Finally, and most importantly, we need to capture the event that says the video is ready to be played, that is, there’s enough video data to start watching.
FIGURE 4.5 Our custom video progress bar, including seekable content and the current playhead position.

Monitoring Download Progress
The media element has a “progress” event, which fires once the media has been fetched but potentially before the media has been processed. When this event fires, we can read the video.seekable object, which has a length, start(), and end() method. We can update our seek bar (shown in Figure 4.5 in the second frame with the whiter colour) using the following code (where the buffer variable is the element that shows how much of the video we can seek and has been downloaded):
video.addEventListener('progress', updateSeekable, false);
function updateSeekable() {
var endVal = this.seekable && this.seekable.length ?
¬ this.seekable.end() : 0;
buffer.style.width = (100 / (this.duration || 1) *
¬ endVal) + '%';
}
The code binds to the progress event, and when it fires, it gets the percentage of video that can be played back compared to the length of the video. Note that the keyword this refers to the video element, as that’s the context in which the updateSeekable function will be executed, and the duration attribute is the length of the media in seconds
However, there’s sometimes a subtle issue in Firefox in its video element that causes the video.seekable.end() value not to be the same as the duration. Or rather, once the media is fully downloaded and processed, the final duration doesn’t match the video.seekable.end() value. To work around this issue, we can also listen for the durationchange event using the same updateSeekable function. This way, if the duration does change after the last process event, the durationchange event fires and our buffer element will have the correct width:
video.addEventListener('durationchange', updateSeekable,
¬ false);
video.addEventListener('progress', updateSeekable, false);
function updateSeekable() {
buffer.style.width = (100 / (this.duration || 1) *
(this.seekable && this.seekable.length ? this.seekable.
¬ end() : 0)) + '%';
}
When the Media File is Ready to Play
When your browser first encounters the video (or audio) element on a page, the media file isn’t ready to be played just yet. The browser needs to download and then decode the video (or audio) so it can be played. Once that’s complete, the media element will fire the canplay event. Typically this is the time you would initialise your controls and remove any “loading” indicator. So our code to initialise the controls would typically look like this:
video.addEventListener('canplay', initialiseControls,
¬ false);
Nothing terribly exciting there. The control initialisation enables the play/pause toggle button and resets the playhead in the seek bar.
![]() NOTE The events to do with loading fire in the following order:
NOTE The events to do with loading fire in the following order: loadstart, durationchange, loadeddata, progress, canplay, canplaythrough.
However, sometimes this event won’t fire right away (or at least when you’re expecting it to fire). Sometimes the video suspends download because the browser is trying to save downloading too much for you. That can be a headache if you’re expecting the canplay event, which won’t fire unless you give the media element a bit of a kicking. So instead, we’ve started listening for the loadeddata event. This says that there’s some data that’s been loaded, though not particularly all the data. This means that the metadata is available (height, width, duration, and so on) and some media content—but not all of it. By allowing the user to start to play the video at the point in which loadeddata has fired, it forces browsers like Firefox to go from a suspended state to downloading the rest of the media content, allowing it to play the whole video. So, in fact, the correct point in the event cycle to enable the user interface is the loadeddata:
video.addEventListener('loadeddata', initialiseControls,
¬ false);
Fast Forward, Slow Motion, and Reverse
The spec provides an attribute, playbackRate. By default the assumed playbackRate is 1, meaning normal playback at the intrinsic speed of the media file. Increasing this attribute speeds up the playback; decreasing it slows it down. Negative values indicate that the video will play in reverse.
Not all browsers support playbackRate yet (only WebKit-based browsers support it right now), so if you need to support fast forward and rewind, you can hack around this by programmatically changing currentTime:

As you can see from the previous example, if playbackRate is supported, you can set positive and negative numbers to control the direction of playback. In addition to being able to rewind and fast forward using the playbackRate, you can also use a fraction to play the media back in slow motion using video.playbackRate = 0.5, which plays at half the normal rate.
Multimedia Accessibility
We’ve talked about the keyboard accessibility of the video element, but what about transcripts, captions for multimedia? After all, there is no alt attribute for video or audio as there is for <img>. The fallback content between the tags is only meant for browsers that can’t cope with native video; not for people whose browsers can display the media but can’t see or hear it due to disability or situation (for example, in a noisy environment or needing to conserve bandwidth).
The theory of HTML5 multimedia accessibility is excellent. The original author should make a subtitle file and put it in the container Ogg or MP4 file along with the multimedia files, and the browser will offer a user interface whereby the user can get those captions or subtitles. Even if the video is “embedded” on 1,000 different sites (simply by using an external URL as the source of the video/audio element), those sites get the subtitling information for free, so we get “write once, read everywhere” accessibility.
That’s the theory. In practice, no one knows how to do this; the spec is silent, browsers do nothing. That’s starting to change; at the time of this writing (May 2010), the WHATWG have added a new <track> element to the spec, which allows addition of various kinds of information such as subtitles, captions, description, chapter titles, and metadata.
The WHATWG is specifying a new timed text format called WebSRT (www.whatwg.org/specs/web-apps/current-work/multipage/video.html#websrt) for this information, which is one reason that this shadowy 29th element isn’t in the W3C version of the spec. The format of the <track> element is
<track kind=captions src=captions.srt>
But what can you do right now? There is no one true approach to this problem, but here we’ll present one possible (albeit hacky) interim solution.
Bruce made a proof of concept that displays individual lines of a transcript, which have been timestamped using the new HTML5 data-* attributes:
<article class=transcript lang=en>
<p><span data-begin=3 data-end=5>Hello, good evening and
¬ welcome.</span>
<span data-begin=7.35 data-end=9.25>Let's welcome Mr Last
¬ Week, singing his poptabulous hit &ldquot;If I could turn
¬ back time!&rdquot;</span>
</p>
…
</article>
JavaScript is used to hide the transcript <article>, hook into the timeupdate event of the video API, and overlay spans as plain text (therefore stylable with CSS) over (or next to) the video element, depending on the current playback time of the video and the timestamps on the individual spans. See it in action at http://dev.opera.com/articles/view/accessible-html5-video-with-javascripted-captions/. See Figure 4.6.
FIGURE 4.6 The script superimposes the caption over the video as delectable selectable text.

The BBC has a similar experiment at http://open.bbc.co.uk/rad/demos/html5/rdtv/episode2/ that takes in subtitles from an external JavaScript file http://open.bbc.co.uk/rad/demos/html5/rdtv/episode2/rdtv-episode2.js, which is closer to the vision of HTML5, but it doesn’t have the side effect of allowing search engines to index the contents of the transcript.
Silvia Pfeiffer, a contractor for Mozilla, has some clever demos using HTML5 videos and some extra extensions (that are not part of the spec) at www.annodex.net/~silvia/itext/.
Summary
You’ve seen how HTML5 gives you the first credible alternative to third-party plugins. The incompatible codec support currently makes it harder than using plugins to simply embed video in a page and have it work cross-browser.
On the plus side, because video and audio are now regular elements natively supported by the browser (rather than a “black box” plugin) and offer a powerful API, they’re extremely easy to control via JavaScript. With nothing more than a bit of web standards knowledge, developers can easily build their own custom controls, or do all sorts of crazy video manipulation with only a few lines of code. As a safety net for browsers that can't cope, we recommend that you also add links to download your video files outside the <video> element.
There are already a number of ready-made scripts available that allow you to easily leverage the HTML5 synergies in your own pages, without having to do all the coding yourself. The Kaltura player (http://www.html5video.org/) is an open source video player that works in all browsers. jPlayer (http://www.happyworm.com/jquery/jplayer/) is a very liberally-licensed jQuery audio player that degrades to Flash in legacy browsers, can be styled with CSS and can be extended to allow playlists.
Accessing video with JavaScript is more than writing new players. In the next chapter, you’ll learn how to manipulate native media elements for some truly amazing effects. Or at least, our heads bouncing around the screen—and who could conceive of anything amazinger than that?