
Chapter 1 Main Structure
Bruce Lawson
ALTHOUGH MUCH OF HTML5 is for making interactive applications, there is a great deal of interest to markup monkeys as well as JavaScript junkies; 28 new elements exist with new semantics that can be used in traditional “static” pages, as well as a swathe of new form controls that can abolish JavaScript form validation altogether.
Let’s get straight into the code and begin marking up a typical page with HTML5. We’ll transform the current markup structure of <div>s into a more semantic system using new HTML5 structural elements like <nav>, <header>, <footer>, <aside>, and <article>. We’ll look at how these work, and how HTML5 documents have an unambiguous outline and are—arguably—more “semantic.”
But first things first. We need to open a code editor and enter a DOCTYPE and preliminary information.
The <head>
First, the DOCTYPE:
<!doctype html>
That’s it. No URLs that even the most prolific web authors need to cut and paste. Note that there is no version number. That’s all. It’s not so much an instruction as an incantation: it’s required by browsers that need the presence of a doctype to trigger standards mode, and this string is the shortest string that does this reliably.
Then we need to define the document’s character encoding. Not doing so can result in an obscure but real security risk (see http://code.google.com/p/doctype/wiki/ArticleUtf7). This should be in the first 512 bytes of the document. Unless you can think of a splendid reason not to use it, we recommend UTF-8 as the character encoding:
<!doctype html>
<meta charset=utf-8>
Take a look at that <meta> tag very carefully. Those who are used to writing XHTML will notice three oddities. The first is that the <meta> tag is much shorter than that we have used up until now—we’ve been used to using <meta http-equiv=”Content-Type” content=”text/html; charset=UTF-8”>. This is still possible, but the shorter way is preferred as it’s easier to type and works everywhere already.
You’ll also notice that I haven’t quoted the attribute charset=”utf-8”. Neither have I self-closed the tag <meta charset=utf-8 />.
HTML5 is not an XML language, so you don’t need to do those things. But you can if you prefer. All of these are equally valid HTML5:
<META CHARSET=UTF-8>
<META CHARSET=UTF-8 />
<META CHARSET="UTF-8">
<META CHARSET="UTF-8" />
<meta charset=utf-8>
<meta charset=utf-8 />
<meta charset="utf-8">
<meta charset="utf-8" />
<MeTa CHARset=utF-8>
Why such appallingly lax syntax? The answer is simple: browsers never cared about XHTML syntax if it was sent as text/html—only the XHTML validator did. Therefore, favouring one form over the other in HTML5 would be entirely arbitrary, and cause pages that didn't follow that format to be invalid, although they would work perfectly in any browser. So HTML5 is agnostic about which you use.
While we’re on the subject of appallingly lax syntax rules (from an XHTML perspective), let’s cheat and, after adding the document title, we’ll go straight to the content:
<!doctype html>
<meta charset=utf-8>
<title>Interesting blog</title>
<p>Today I drank coffee for breakfast. 14 hours later,
¬ I went to bed.</p>
If we validate this exhilarating blog, we find that it validates fine, yet it has no <html> tag, no <head>, and no <body> (Figure 1.1).
FIGURE 1.1 Shockingly, with no head, body, or html tag, the document validates.

This is perhaps one of those WTF? moments I mentioned in the introduction. These three elements are (XHTML authors, are you sitting down?) entirely optional, because browsers assume them anyway. A quick glance under the browser hood with Opera Dragonfly confirms this (Figure 1.2).
FIGURE 1.2 Opera Dragonfly debugger shows that browsers add the missing elements.

Figure 1.3 shows it using the IE8 developer tools.
FIGURE 1.3 Internet Explorer 8, like all other browsers, adds missing elements in the DOM. (IE seems to swap <title> and <meta>, however.)

Because browsers do this, HTML5 doesn’t require these tags. Nevertheless, omitting these elements from your markup is likely to confuse the heck out of your co-workers. Also, skipping the <html> tag hurts your screen reader users, as that’s where you set the primary language of the document:
<html lang=en>
This is important as the word six, for example, is pronounced differently depending on whether the language is English or French.
Also, as we’ll see later, IE requires the <body> element before it will apply CSS to style new HTML5 elements.
So, in the interest of maintainability, we’ll add those optional elements to make what’s probably the minimum maintainable HTML5 page:
<!doctype html>
<html lang=en>
<head>
<meta charset=utf-8>
<title>Interesting blog</title>
</head>
<body>
<p>Today I drank coffee for breakfast. 14 hours later,
¬ I went to bed.</p>
</body>
</html>
Using new HTML5 Structural Elements
In 2004, the editor of the HTML5 spec, Ian Hickson, mined 1 billion web pages via the Google index, looking to see what the “real” web is made of. One of the analyses he subsequently published (http://code.google.com/webstats/2005-12/classes.html) was a list of the most popular class names in those HTML documents.
More recently, in 2009 the Opera MAMA crawler (see http://devfiles.myopera.com/articles/572/idlist-url.htm) looked again at class attributes in 2,148,723 randomly chosen URLs and also ids given to elements (which the Google dataset didn’t include) in 1,806,424 URLs. See Table 1.1 and Table 1.2.
TABLE 1.1 Class Names

TABLE 1.2 ID Names

As we can see, once we remove obviously presentational classes, we’re left with a good idea of the structures that authors are trying to use on their pages.
Just as HTML 4 reflects the early Web of scientists and engineers (so there are elements like <kbd>, <samp>, and <var>), HTML5 reflects the Web as it was during its development: 28 elements are new, many of them inspired by the class and id names above, because that’s what developers actually build.
So, while we’re in a pragmatic rather than philosophical mood, let’s actually use them. Here is a sample blog home page marked up as we do in HTML 4 using the semantically neutral <div> element:

By applying some simple CSS to it, we’ll style it:
#sidebar {float:left; width:20%;}
.post {float:right; width:79%;}
#footer {clear:both;}
Diagrammatically, the page looks like Figure 1.4.
FIGURE 1.4 The HTML 4 structure of our blog.
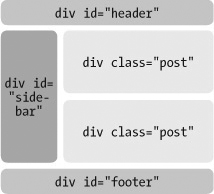
While there is nothing at all wrong with this markup (and it’ll continue working perfectly well in the new HTML5 world), most of the structure is entirely unknown to a browser, as the only real HTML element we can use for these important page landmarks is the semantically neutral <div> (defined in HTML 4 as “a generic mechanism for adding structure to documents”).
It’s possible to imagine a clever browser having a shortcut key that would jump straight to the page’s navigation. The question is: how would it know what to jump to? Some users use <div class=”menu”>, others use class=”nav” or class=”navigation” or class=”links” or any number of equivalents in languages other than English. The Opera MAMA tables above suggest that menu, nav, sidebar, and navigation could all be synonymous.
HTML5 gives us new elements that unambiguously denote landmarks in a page. So, we’ll rewrite our page to use some of these elements:

Diagrammatically, the HTML5 version is shown in Figure 1.5.
FIGURE 1.5 The HTML5 structure of our blog.

Before we look in detail at when to use these new elements, and what they mean, let’s first style the basic structures of the page.
Styling HTML5 with CSS
In all but one browser, styling these new elements is pretty simple: you can apply CSS to any arbitrary element, because, as the spec says, CSS “is a style sheet language that allows authors and users to attach style … to structured documents (e.g., HTML documents and XML applications)” and XML applications can have any elements they want.
Although you can use the new HTML5 elements now, most browsers—even current ones—don’t necessarily understand them. They don’t do anything special with them and treat them like unknown elements you make up.
Therefore, using CSS we can float <nav>, put borders on <header> and <footer>, and give margins and padding to <article> almost as easily we can with <div>s.
What might surprise readers is that, by default, CSS assumes that elements are display:inline, so if you just set heights and widths to the structural elements as we do <div>s, it won’t work properly in the current crop of browsers until we explicitly tell the browser that they are display:block. In current browsers, there is a rudimentary style sheet built into the browser that overrides the default inline styling for those elements we think of as natively block-level (one such style sheet can be found at http://www.w3.org/TR/CSS2/sample.html). However, those browsers don’t yet have rules to define <header>, <nav>, <footer>, <article> as display:block, so we need to specify this in our CSS. When browsers do include such rules, our line will be harmless but redundant, acting as a useful helper for older browsers, which we all know can linger on well beyond their sell-by dates.
So, to style our HTML5 to match our HTML 4 design, we simply need the styles
header, nav, footer, article {display:block;}
nav {float:left; width:20%;}
article {float:right; width:79%;}
footer {clear:both;}
And a beautiful HTML5 page is born. Except in one browser.
Styling HTML5 in Internet Explorer
In current versions of Internet Explorer, your page will be unstyled. (Actually, it’s worse than that: any new elements are unstyled, but CSS is applied to those HTML 4 elements that IE does support.)
The way to cajole IE into applying CSS to HTML5 is to use JavaScript. Why? This is an inscrutable secret, and if we told you we’d have to kill you. (Actually, we don’t know.) If you add the following JavaScript into the head of the page
<script>
document.createElement('header'),
document.createElement('nav'),
document.createElement('article'),
document.createElement('footer'),
</script>
IE will magically apply styles to those elements, provided that there is a <body> element in the markup. You only need to create each element once, no matter how many times it appears on a page.
![]() NOTE The
NOTE The <script> element no longer requires you to specify the type of script; JavaScript is assumed by default. This works on legacy browsers also so you can use it right away.
Remember, HTML5 itself doesn’t require a body element, but this heady brew of Internet Explorer 8 (and earlier versions), CSS, HTML5, and JavaScript does.
Although this JavaScript is unnecessary for other browsers, it won’t cause them any harm. However, you might wish to give your page a speed optimisation and only download and execute this script in IE by surrounding it with conditional comments (see http://dev.opera.com/articles/view/supporting-ie-with-conditional-comments/).
Whenever you use a new HTML5 element, you’ll need to remember to add the document.createElement for it in the <head>. Alternatively, you can use Remy’s tiny HTML5-enabling script http://remysharp.com/2009/01/07/html5-enabling-script/ that will perform this for all new elements in one fell swoop.
Also note that the print modules of IE seem not to be affected by our JavaScript voodoo, so pages which are styled on the screen do not carry those styles to the printer. IE Print Protector (http://www.iecss.com/print-protector/) is a piece of JavaScript that allows you to print HTML5 pages in IE. (This is also included in Remy's HTML5 shiv.) A user with JavaScript turned off, whether by choice or corporate security policy, will be able to access your content but will see a partially styled or unstyled page. This may or may not be a deal-breaker for you. Simon Pieters has shown that, if you know what the DOM looks like, you can style some HTML5 without JavaScript but it’s not particularly scalable or maintainable; see “Styling HTML5 markup in IE without script” at http://blog.whatwg.org/styling-ie-noscript.
Styling HTML5 in Old Versions of Firefox and Camino
Firefox and Camino both use the Gecko rendering engine, which had a bug that wouldn’t render HTML5 unless it was perfect XHTML and served as XML. Firefox 3+ and Camino 2 use a more up-to-date version of Gecko that has fixed this bug, and users of those browsers upgrade frequently so this is much less of a problem than the IE weirdness.
![]() NOTE See Remy’s HTML5doctor article “How to get HTML5 working in IE and Firefox 2” at http://html5doctor.com/how-to-gethtml5-working-in-ie-and-firefox-2/ for more information.
NOTE See Remy’s HTML5doctor article “How to get HTML5 working in IE and Firefox 2” at http://html5doctor.com/how-to-gethtml5-working-in-ie-and-firefox-2/ for more information.
Other Legacy Browser Problems
There are other legacy browser problems when styling HTML5. In some circumstances, setting a background colour on elements does nothing unless you explicitly set the background-color to inherit on the children, even though that is supposedly the default behaviour. In some Gecko-based browsers, styling block-level anchors (that is, <a> elements that surround block-level elements as HTML5 now allows—see Chapter 2, “Text”) can be problematic, and in all current browsers you must explicitly set such anchors to be display:block—see http://mattwilcox.net/sandbox/html5-block-anchor/test.html.
We don’t propose to compose an exhaustive list of these behaviours; they are temporary problems that we expect quickly to disappear as new versions come out. If, as an early-adopter developer, you come across such bugs, you might wish to file a bug report; John Resig has a good article on how to do this: “A Web Developer’s Responsibility”at http://ejohn.org/blog/a-web-developers-responsibility/.
When to use the new HTML5 Structural Elements
We’ve used these elements to mark up our page, and styled them, and although the use of each might seem to be self-evident from the names, it’s time to study them in a little more detail.
<header>
In our example above, as on most sites, the header will be the first element on a page, and contains the title of the site, logos, links back to the home page, etc. The specification says:
“The header element represents a group of introductory or navigational aids … Note: A header element is intended to usually contain the section’s heading (an h1–h6 element or an hgroup element), but this is not required. The header element can also be used to wrap a section’s table of contents, a search form, or any relevant logos.”
Let’s dissect this. The first thing to note is that a header element is not required; in our example above, it’s superfluous as it surrounds just the <h1>. Its value is that it groups “introductory or navigational” elements, so here’s a more realistic example:
<header>
<a href="/"><img src=logo.png alt="home"></a>
<h1>My interesting blog</h1>
</header>
Many websites have a title and a tagline or subtitle. To mask the subtitle from the outlining algorithm (so making the main heading and subtitle into one logical unit; see Chapter 2 for more discussion), the main heading and subtitle can be grouped in the new <hgroup> element:
<header>
<a href="/"><img src=logo.png alt="home"></a>
<hgroup>
<h1>My interesting blog</h1>
<h2>Tedium, dullness and monotony</h2>
</hgroup>
</header>
The header can also contain navigation. This can be very useful for site-wide navigation, especially on template-driven sites where the whole of the <header> element could come from a template file. So, for example, the horizontal site-wide navigation on www.thaicookery.co.uk could be coded as in Figure 1.6.
<header>
<hgroup>
<h1>Thai cookery school</h1>
<h2>Learn authentic Thai cookery in your own home</h2>
</hgroup>
<nav>
<ul>
<li>Home</li>
<li><a href="courses.html">Cookery courses</a></li>
<li><a href="contact.html">Contact</a></li>
</ul>
</nav>
</header>
FIGURE 1.6 www.thaicookery.co.uk’s header.

Of course, it’s not required that the <nav> be in the <header>. The Thai cookery example could just as easily be marked up with the main <nav> outside the <header>:
<header>
<hgroup>
<h1>Thai cookery school></h1>
<h2>Learn authentic Thai cookery in your own home</h2>
</hgroup>
</header>
<nav>
<ul>
<li>Home</li>
<li><a href="courses.html">Cookery courses</a></li>
<li><a href="contact.html">Contact</a></li>
</ul>
</nav>
It depends largely on whether you believe that site-wide navigation belongs in the site-wide header and also pragmatic considerations about ease of styling. Take, for example, my personal site, which has a very long site-wide navigation on the left of the content area, which can be much longer than a post. Putting this <nav> in the <header> would make it very hard to put the main content in the right place and have a footer, so in this case, the site-wide navigation is outside the <header>, and is a sibling child of the <body>, as in our previous example (Figure 1.7).
FIGURE 1.7 Typical page with site-wide navigation out of the main header area.

Note that we’re currently only creating the main <header> for the page; there can be multiple <header>s—we’ll come to that in Chapter 2.
<nav>
The <nav> element is designed to mark up navigation. Navigation is defined as being links around a page (so, for example, a table of contents at the top of an article that links to anchor points on the same page) or within a site. But not every collection of links is <nav>; a list of sponsored links isn’t <nav>. Neither is a page of search results, as that is the main content of the page.
As with <header>s and <footer>s (and all of the new elements), you’re not restricted to one <nav> per page. You might very well have site-wide <nav> in a header, a <nav> which is a table of contents for the current article, and a <nav> below that which links to other related articles on your site.
The contents of a <nav> element will probably be a list of links, marked up as an unordered list (which has become a tradition since Mark Newhouse’s seminal “Taming Lists” (http://www.alistapart.com/articles/taminglists/) or, in the case of breadcrumb trails, an ordered list. Note that the <nav> element is a wrapper; it doesn’t replace the <ol> or <ul> element, but wraps around it. That way, legacy browsers that don’t understand the element will just see the list element and list items and behave themselves just fine.
While it makes sense to use a list (and it gives you more hooks for CSS) it’s not mandatory. This is perfectly valid:
<nav>
<p><a href="/">Home</a></p>
<p><a href="/about">About</a></p>
</nav>
You can include headings for navigation, too:
<nav>
<h2>Main navigation</h2>
<ul>
<li><a href="/about">About me</a></li>
<li><a href="/news">News</a></li>
</ul>
</nav>
Grouping <nav> and Other Elements in a Sidebar
Many sites have a sidebar that includes multiple blocks of navigation and other non-navigation content. Take, for example, my personal site www.brucelawson.co.uk (Figure 1.8).
FIGURE 1.8 My blog sidebar, mixing navigation with colophon information and pictures of hunks.
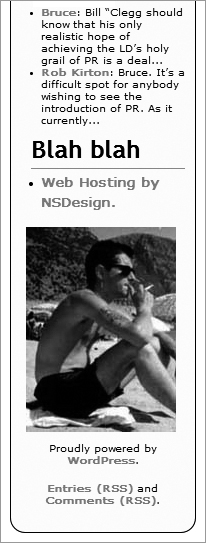
The sidebar on the left of the main content has many nav areas (not pictured) such as pages, categories, archives, and most recent comments. These are marked up as a series of <nav> elements (a single <nav> containing a list with sublist is also possible but I prefer to use discrete <nav> elements for each type of nav).
The <nav> elements contained in the new <aside> element “can be used for typographical effects like pull quotes or sidebars, for advertising, for groups of nav elements, and for other content that is considered separate from the main content of the page.” http://dev.w3.org/html5/spec/semantics.html# the-aside-element.

Note that the “Blah blah” section is not marked up as <nav>, as the link to my web host, a picture of me, and two RSS links are not “sections that consist of major navigation blocks” as the spec defines <nav>. It’s wrapped in a <section> in order that the sidebar headings remain the same level in the outlining algorithm (see Chapter 2 for more). Another way to mark up this sidebar would be to use one single over-arching <nav> rather than multiple <nav> elements. As any feline taxidermist will tell you, there is more than one way to skin a cat.
<footer>
The <footer> element is defined in the spec as representing “a footer for its nearest ancestor sectioning content or sectioning root element.” (“Sectioning content” includes article, aside, nav, section, and “sectioning root elements” are blockquote, body, details, fieldset, figure, td).
Note that, as with the header element, there can be more than one footer on a page; we’ll revisit that in Chapter 2. For now, we’re just having one footer on the page that is a child of the body element. As the spec says, “When the nearest ancestor sectioning content or sectioning root element is the body element, then it applies to the whole page.”
The spec continues “A footer typically contains information about its section such as who wrote it, links to related documents, copyright data, and the like.”
Our footer holds copyright data, which we’re wrapping in a <small> element, too. <small> has been redefined in HTML5; previously it was a presentational element, but in HTML5 it represents small print: “Small print typically features disclaimers, caveats, legal restrictions, or copyrights. Small print is also sometimes used for attribution, or for satisfying licensing requirements.”
Your site’s footer probably has more than just a single copyright notice. You might have links to privacy policies, accessibility information (why are you hiding that out of the way?), and other such links. These should be wrapped in <nav>, despite the spec’s advice (see previous <nav> section).
You might even have a fashionable “fat footer” like www.thecssdiv.co.uk (Figure 1.9).
FIGURE 1.9 The “fat footer” of thecssdiv.co.uk.

It is legitimate to wrap the links to other pages on the site with an <aside> inside the footer—but ask yourself whether the <aside> is part of the footer, or whether it would be better for the <aside> to instead be a sibling of the <footer>. After all, the links to other pages are presumably tangentially related to the whole page rather than just the content of the footer.
Here, I would use the following markup:

Figure 1.10 shows how to avoid a “fat footer.”
FIGURE 1.10 Avoiding a “fat footer” by making external links an aside of whole page

<article>
The main content of this blog’s home page contains a few blog posts. We wrap each one up in an <article> element. <article> is specified thus: “The article element represents a component of a page that consists of a self-contained composition in a document, page, application, or site and that is intended to be independently distributable or reusable, e.g., in syndication.”
A blog post, a tutorial, a news story, comic strip, or a video with its transcript all fit perfectly into this definition. Less intuitively, so can individual emails in a Web-based email client, maps and re-usable Web widgets. For <article> don't think newspaper article, think article of clothing—a discrete item. Note that, as with <nav>, the heading goes inside the element, so
<h1>My article</h1>
<article>
<p>Blah blah</p>
</article>
is incorrect; it should be
<article>
<h1>My article</h1>
<p>Blah blah</p>
</article>
There are many more interesting facets to <article> which (you’ve guessed it) we’ll look at in the next chapter.
Summary
In this chapter, we’ve taken our first look at HTML5, and its DOCTYPE. We’ve seen its forgiving syntax rules such as optional uppercase/lowercase, quoting and attribute minimisation, omitting implied elements like head/body, omitting standard stuff like type=”text/javascript” and ”text/css” on the <script>, and <style> tags. We’ve structured the main landmarks of a web page using <header>, <footer>, <nav>, <aside>, and <article>, providing user agents with more semantics than the meaningless generic <div> element that was our only option in HTML 4 and styled the new elements with the magic of CSS. Not bad for one chapter, eh?