
Any way you cut it, everyone learns in different ways, especially when they are learning about Autodesk 3ds Max 10 or any other computer graphics (CG) package. You should realize that the best education you'll get is through months or even years of working with the software in different capacities. Ask any successful student, and they will tell you one thing: There is no such thing as book smarts when it comes to good CG production— it all comes down to what you can achieve.
Achievement comes only from practice. You can't avoid the many pitfalls of production work without falling into and climbing out of them. Some readers may find this idea frustrating, but it is an intractable truth. The more you work with 3ds Max, the better you will become with it. And the more you struggle, fail, and recover, the more you will learn.
This chapter introduces you to basic concepts in computer graphics production. Topics in this chapter include:
How to Read This Book
What Is CGI?
Production Workflow
Core Concepts for Animation
First and foremost, you don't need to read this book cover to cover and front to back to get the most from it. If you are the type who loves to jump right into the pool to learn to swim, then skip this chapter and jump into Chapter 2, "Your First 3ds Max Animation" to start working with the interface. If you already know how to navigate 3ds Max, you can begin with any of the other chapters. You can leave this chapter for bathroom reading when you're bored or the cable goes out.
If you like slowly dipping your toe in the water first, then by all means sit back, put on your bifocals, and have a long soak in this chapter. It will cover a lot of basic concepts and core topics with which you may or may not already be familiar. It will gently ease you into the powerful program that is Autodesk 3ds Max 10 and into computer graphics in general.
No matter how you choose to read this book, it is crucial that you approach the lessons as a way to begin the learning process. This book aims to give you a solid foundation in many aspects of 3ds Max, so that you can take this beginning and move on to more study. In keeping with that ideal, you will need to understand that you will not necessarily become proficient in any one aspect of 3ds Max just by reading this book. Instead, you'll gain an understanding of how it works and how you can work with the program to create animations and models.
Frequently, students are annoyed by tutorials that don't seem to lead them to perfection in the first go-around. This is the case for all tutorials, and indeed for all books that purport to teach anything. The key is to use the lessons as a guideline not just once, but repeatedly. Doing a lesson multiple times will help you understand the concepts better and give you opportunities to try out a few different methods, stray a little from the dictated steps, and try your own ideas on for size. Ideally, you will obtain a stronger education this way, but doing so will perhaps be slower and require you to be more patient. However, getting a good education always requires this sort of dedication.
In addition to standing for computer graphics, CG is sometimes used as an acronym for computer generated. You may have heard the term CGI (computer-generated imagery). These terms refer to any image or images that are created with the aid of a computer. In this day and age, you'd be hard-pressed to find anyone with any computer experience who hasn't messed around with electronic images such as scanned pictures or digital photos. Learning a CG package such as 3ds Max is just an extension of the simple concept of playing around with a digital photo. The obvious differences are that 3ds Max adds the dimension of depth as well as control over time.
Computer graphics is a more common toolset in the hands of the masses than it was just a few years ago. Within the next decade or so, 3D rendering will be as ubiquitous as "Photoshopping" a photo is today. Artists who are not in the 3D or CG industry are finding that programs such as 3ds Max are valuable tools for generating elements for their own work, digital or not. Let's take a look at the concepts behind 3D creation.
The following sections break down the fundamental concepts behind CG.
3D Space
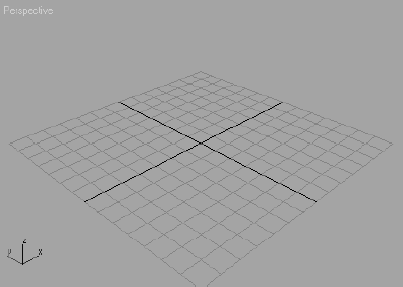
3D space, the virtual canvas in which you create 3D objects, is a simulation of space that is divided into three axes, X,Y, and Z, representing (in loose terms) left/right, up/down, and in/out. Figure 1.1 shows 3D space in a Max window.
So what the heck do you with 3D space? In many ways, setting up a scene in CG is like setting up a photo shoot. With a photo shoot, you gather your subjects and pose them in your composition. You set up lights to illuminate them as dramatically or naturally as you need them to look and then take pictures with your camera, framing the composition as you like it. Next, you develop and fine-tune your photos or adjust them with tools such as Photoshop before you print them. Finally comes the happy part of showing them off and sharing your work with others.
Computer graphics production has much the same workflow, although with CG you create nearly everything from scratch in your 3D space. Instead of running out and hunting down the perfect models and all the props and settings you need for a photo, you create them. You model everything first and then apply colors and texture to the surfaces you created. Once you lay out your scene with all the settings and props you need, you set up your CG lights to illuminate the models. Lighting is perhaps the most important aspect of CG, as this stage of CG production really makes or breaks a scene.
Once your lighting is ready, you render the scene. This is akin to developing your photos. Knowing what the end result should be will dictate how you decide to render. You can choose several settings for quality and output, for example, so you can show off your scene to your friends (although a QuickTime movie can't be hung on the fridge the way a photo can).
Of course, with CG you also have control over time, because you can animate your scene. The workflow we'll discuss in this chapter is best illustrated with a film production example. The next section will briefly describe a film production workflow and how it relates to CG production.
There are three major stages to producing films: preproduction, production, and postproduction. In preproduction, the script is written, storyboards are drawn up to outline the action, costumes and sets are designed and built, the actors are cast and prepared, and a production crew is put together. During the production phase, the scenes are set up and shot according to a production schedule that lays everything out in the most efficient manner possible. Finally, in postproduction, everything else happens. The film is printed and edited, a score and soundtrack are laid, any digital effects are added, and scenes are colored to match an overall aesthetic. When all of this is finished, the film is distributed for people to see.
Although the specific tasks of CG are vastly different from those of live-action photography, understanding this framework is useful to understanding CG.
Preproduction
Preproduction for a CG workflow requires that the artist or artists gather together all the reference materials, motion tests, layout drawings, model sketches, and other components to make the actual CG production as uncomplicated as they can.
Because everything is essentially made from scratch, you have to formulate a strong plan of attack. You can't just take some actors into the park and begin shooting. With CG, you have to make it all from nothing, or at least acquire assets such as models from places such as TurboSquid.com. The time spent in preproduction planning is vital to smooth production and postproduction, and it helps the overall outcome of the project. Never underestimate how much time and planning you should put into a CG project.
Note
You will seriously sandbag your project if you don't plan it effectively. Although you may get sick of hearing this, it will always be true.
A poorly planned production will always fall short of its potential and give you many headaches throughout your project.
Writing a Script
Whether a CG project has a ton of dialogue or doesn't have a single spoken word, both the project and you will benefit from having at least a rudimentary script. Even abstract animations can benefit from a script that presents a highly detailed explanation of timings and colors, whether that script is typed neatly or scribbled on a cocktail napkin.
A script serves as your intention. Without having a clear intention of what you wish to say with your film, your production time may as well be spent lying on a lounge chair drinking iced tea; you will not get much done in either case.
Storyboards
A storyboard is the next step in defining the action laid out in the script. It shows the timing and framing for the camera, as well as the action and dialogue (if any). To create an effective storyboard, you should dissect your script into scenes, and further dissect the scenes into shots, with each shot presenting a distinct view from the camera or a distinct cut of action. Each storyboard panel describes what is happening in that shot. The panels show you the overall action of the project in a linear, shot-by-shot fashion, and how it should come together in editing.
Even if your storyboards are simple ones composed of stick figures, they are important to preproduction.
Concept Art
Conceptuals (also called concept art) are the design elements that are needed for a CG production. If you don't have concept art, whether it's your own drawings or photos or images grabbed from the Internet, you are in trouble. You must have an idea of how you want your CG to look; otherwise, you are just burning calories and not saying anything.
If you have CG characters, create character sheets for each character that show them in three different neutral poses: from the front, from the side, and from an angle called a 3/4 view. You can even sculpt reference characters in clay or Play-Doh if you need to have a better idea of how they should look in 3D space. In Figure 1.2, you can see a character sheet generated for a student-produced short at The Art Institute of California at Los Angeles.

Sketch or download images of the props and sets you need in your scene. You should map out the "look" for everything that you need to have in your scene. When you are working on your project, you won't be limited to the things you picked out at this stage; however, you will find that knowing how things should look will help enormously in getting you to your final product. The better your concept art and research, the smoother the production and the better your end result will be.
Production
Production is the meat of any project. Film production begins when you start filming your project. In the case of CG, production begins when you start creating assets for your projects, such as models or textures, based on well-researched reference materials. The production phase lasts until the rendering phase, where you actualize your scene into image files.
Animation, texturing, and lighting are all performed between the modeling and rendering phases. Later in this chapter, we'll divide the CG production phase into more stages; however, most of the techniques you'll learn in this book are components of the production phase.
Postproduction
Postproduction begins when your scene elements and animation are all set up and raring to be completed. Postproduction for a CG project is very similar to postproduction for a film. When you click the Render button, you'll end up with several image files or movie files that are then edited and put together to make your project. You add sound, correct color, combine elements, and add any finishing touches in postproduction. Here is a quick rundown of the CG postproduction pipeline.
Rendering
All CG scenes need to be rendered to their final image or movie files. Again, this is the process by which the computer calculates how everything in the scene should look and displays it. Rendering makes your computer work hard. It usually requires the full attention of your PC and can take a lot of time. As you'll learn throughout this book, the decisions you make, such as how much detail you give the objects you create for a scene, can make a big difference in the rest of the process and can affect the rendering speed.
You can render one scene while another scene is in production, but working on a system that is rendering is not advisable unless you're using a dual-processor machine with plenty of memory. Once everything has been rendered properly, the final images will be sorted and the CG project assembly will begin. Rendering is the subject of Chapter 11, "3ds Max Rendering."
Compositing, editing, and adding sound are advanced postproduction activities, and a detailed discussion of them is beyond the scope of this book. However, a multitude of books are available on these topics for further study.
Compositing
CG is often rendered in different layers. These segments ultimately need to be put back together. For example, in a scene where multiple characters interact, each character can be rendered separately from the others and from the setting. Compositing is the process of bringing together rendered elements to form the final scene, usually using compositing software such as Autodesk's Combustion, Adobe's After Effects, or Apple's Shake.
Compositing can greatly affect the look of a CG project and professionals consider it to be an integral part of CG creation. Compositing programs allow you to compose CG elements together, but they also give you additional control over color, timing, and a host of other additions and alterations you can make to a scene.
Note
A lot of students assume that they need to render a scene in a single pass and create its intended look on the first try. This is not the case. CG has an inherently modular nature. You can render items separately and composite them in the finishing stage while retaining the ability to make changes in the project without rendering everything again. Rendering a project in different layers (sometimes called passes) also gives you much greater control over the project's look.
Editing
During editing, rendered and composited CG footage is collected and edited to fit the script and storyboards. This process is usually more straightforward for a CG film than for a live-action movie, provided that you made good storyboards during preproduction to follow when assembling the finished film.
With live-action shoots, you shoot much more footage than will ultimately end up in the film. You do this to make sure you have enough material for all your scenes and to leave extra room for creative editing. Additionally, you have to run through all the footage and choose which takes will be in the final product.
Because CG footage is generally much more time-consuming to generate than live action, scenes and shots should be tightly arranged in preproduction storyboards. The entire production can be edited beforehand in storyboards, so the scenes that are built and animated can match the story almost down to the frame. If your preproduction was done well, it can be just a matter of putting the shots together using an editing program such as Adobe's Premiere or even Apple's Final Cut Pro. (If you don't have an editing program, you can use the Video Post module in 3Ds Max.). This functionality is not covered in this introductory text, however.
Sound
Sound design can add an entirely new dimension of reality or mood to any CG. The audience needs to associate visuals with audio. Even a basic soundtrack adds a boost to a simple animation by enhancing realism, mood, narrative, and other aspects of its "feel." A good music soundtrack and well-placed sound effects can be very powerful.
Sound effects, such as footsteps, can be added to match the action in the animation; this type of sound effect is also known as Foley sound. Just as with any film, adding music to most animations can help with pacing as well as mood. In this case, music and live action sound design are pretty similar. Once you combine everything, you assess the sound needs.
The one glaring difference between CG and live action sound relates to dialogue. When you shoot live action, you generally capture the sound and dialogue live as you shoot. With CG, all dialogue needs to be recorded and edited at the beginning of the production phase. In other words, dialogue is a part of the CG preproduction and postproduction phases. This is because animators need to hear dialogue spoken so they can animate images to match the lips of the characters speaking (this is known as lip-sync). Recording the dialogue with actors also helps you animate the CG characters because you can imitate the gestures and actions of the live actors to help make your animation more real.
CG is a collaborative effort in which all the stages of production work hand-in-hand to achieve your final images. Because of how CG comes together, following a structured production pipeline or workflow generally works best. The layout of this book and its exercises follow this overall workflow. You begin by modeling, texturing, animating, lighting, and then rendering. You can texture after you animate, if you wish; however, for most projects, the workflow described here is best. What is universally true is that you will go back and forth between these stages several times throughout the process as you assess and further define your needs. For example, you may have to change some textures once you see the lighting or change a model according to an unexpected animation need.
Modeling
Modeling is the topic of Chapters 4 through 6 of this book. Modeling is usually the first step in CG creation, and it can sometimes take the longest time. You probably already know that modeling and modeling tutorials are popular on the Internet, where you will also find a generous number of free and fee-based models. You might be able to find a lot of the props and characters you need for your scene there. Unless you enjoy modeling, take a look through Google (or another search engine) and see what's already available, especially at sites such as www.turbosquid.com.
When you model, of course, you'll be faced with many choices about how to proceed. Most Max modeling is done using polygons (geometric representations of surfaces and objects); however, the specific tools you use to create the models will depend on how you like to work. The process of modeling can be easier when you have a good idea of your whole story via a storyboard and copiously reference the object you are modeling. If you identify your project needs as fully as you can at the outset, you'll be able to fulfill them more easily when you start modeling or gathering models.
With forethought, you will know how detailed your models need to be. In many cases, you can add sufficient detail to a model through texture. If a park bench is shown in a wide shot from far away, there is no need for abundant detail or complicated surfacing. If you create a highly detailed model for that far-away shot, you will have wasted your time and will also increase your rendering time. However, if you have to show that park bench prominently in a close-up, it will need as much detail as possible. In such cases, viewers will see more of the bench and have more of an opportunity to question it. The more you use models in scenes, the better you will be at sensing exactly how much detail to give a specific model. As you begin with CG, however, it's better to give too much attention to detail than needed than to give too little. The detailing process will teach you a majority of what you need to learn about modeling. This in turn will benefit your overall speed and technique. With more experience, you will be able to discern the level of detail you really need and work more efficiently.
Here is a quick rundown of some different kinds of modeling.
Character Modeling
Character modeling includes the modeling of any characters in your scene, from humanoids to animals to ordinary objects that are animated to life. Most characters are organic forms, such as animals, humans, aliens, and so on. However, a talking cheese sandwich is just as much a character as the person holding it. As a good character modeler, you need to keep in mind the animation needs of a character when you're modeling. It's important to know what you need from your shot way ahead of time, so you can model appropriately.
Traditional characters, such as humans, need to appear seamless once they're modeled. Character animation usually requires the model to deform in some way, such as bending and warping at certain points like the elbows. The pieces that make up the model may tear apart if the character is not built to accommodate deformation and movement.
Like the park bench we talked about earlier, your character must be built with the level of detail required by the scene. As a matter of fact, you could wind up with multiple models for a single character that are built to account for differences in detail level. Using different versions of the same character can help keep the scene efficient and workable. A low-resolution model of a character (one that uses few polygonal faces) can easily be placed in wide shots, and a more detailed, higher-resolution model can be used in close-ups.
Architectural and Environmental Modeling
3ds Max is a natural tool for architectural and environmental modeling. In fact, architects and engineers use it to model and render designs for previsualizing. This type of modeling includes the generation of backgrounds for sets and environments. To do this, you model any buildings or interiors, as well as mountains and other required scenery, such as trees, roads, lampposts, and mailboxes.
Do not create overly detailed environments when they are far off in the background. The biggest common mistake new CG practitioners make is over-creating detail. Doing this adds more geometry to a scene, creates inefficiency, and can crash a scene. The more geometry that is used in a scene, the more slowly the computer will run and the more time you will need to render the scene.
You can create a good deal of the environment using clever textures on simple geometry. Detailed maps on bare surfaces are used frequently for game environments.
Note
Because your computer stores everything in a scene as vector math, the term geometry refers to all the surfaces and models in a scene.
Props Modeling
A prop is any object in a scene that is actively used by a character in his or her action. Props are useful to the narrative of the story. They help the characters' actions. A prop can be anything from a baseball bat that a character is swinging to a purse that a character is carrying.
Any objects not used by the characters as props are called scenics, as they are often used to add realism to the set by "setting the scene." Think about it. If your scene takes place in front of a desk, that desk will need scenics such as pens, notebooks, and papers to make it look more realistic. Just showing an empty desk may not be enough to make the scene believable. You usually can find the props and scenics you need on the Internet, frequently in a format for 3ds Max.
Texturing
Once you have created a model, you'll want to finish its look. You can apply materials to its surface(s) to make it look right, whether it is supposed to look "real" or not. Texturing is typically applied immediately after modeling and heavily tweaked when the scene is lighted. The process of texturing essentially applies colors and tactile feeling to models. 3ds Max automatically assigns simple colored materials to objects as you create them.
You don't need to finalize every texture at the beginning, because you'll be coming back and making adjustments all the time. Remember that the materials you create for your scene will probably look different when you light and animate everything.
You'll learn more about texturing in Chapter 7, "Materials and Mapping."
Animation
Animation puts your scene into action and adds life to your characters. Animation is change over time. Anything in a scene that needs to change from one second to another will need to be animated to do so.
Everyone has their own reflexive sense of how things move. This knowledge is gleaned through years of perception and observation. Therefore, your audience can be more critical of a CG scene's motion than lighting, coloring, or anything else. You know when something doesn't look right. So will your audience.
Animation takes quite a lot of setup, sometimes more than just modeling. For a character, you will need to create a rig (a character's setup or digital armature used to drive character animation, such as a Character Studio Biped) to attach to the model and then create controls to make animation easier to operate.
It's thrilling to see your hard work on a scene come to life with animation. On the flip side, it can be extremely aggravating to see your creation working improperly. Making mistakes is how you learn things, and your frustrations will ease over time. Your first several attempts at animating a scene will not look like Pixar films, but that should not dissuade you from working on more animations and scenes. You will get better with more practice.
Chapter 8, "Introduction to Animation," and Chapter 9, "Character Studio and IK Animation" cover animation techniques in 3ds Max.
Lighting
Lighting is the most important aspect of CG production. This area is where you get to see your models and textures, as well as set the mood of the project. During lighting, you set up virtual lights in 3D space that will illuminate the objects in your scene when it comes time to render. Lighting can drastically change how your scene looks. Using lighting wisely is a learned skill, and it takes tons of time to master; there are no shortcuts to becoming a good lighter. Not only are you dealing with the aesthetics of getting your shot to look great, but you are also dealing with rendering issues and bottlenecks that could make rendering your shot a nightmare. These issues come up with much larger scenes than the ones you will be using in the first years of your CG education; however, it's important to start learning how to use lighting efficiently as well as aesthetically.
Lighting can make or break all your hard work. You can use lighting to affect the believability of your models and textures as well as to create the proper mood and tone.
In this stage of the pipeline, the lighting workflow begins when you are texturing your objects. You need to light your scene initially to evaluate how your textures are progressing. However, the final lighting and look really happen after everything else is done, and you are left to go back and forth with the render to check and recheck, fix and refix issues that come up in the rendered images. You may even find, for example, that a model you've built needs to be altered because a lighting scheme works for everything but that model. Therefore, a back-and-forth workflow with lighting does not just apply to texturing.
The more experience you gain with lighting, the more you will start to notice that lighting affects every stage of CG creation. Once you start mastering the subtleties of lighting, and after years of modeling, you may change how you model to accommodate how you now light. Even your animation and texturing preferences may take a back seat to how a scene needs to be lighted.
CG is fundamentally all about light. Manipulating how light is created and reflected is what you're doing with CG.
Luckily, in 3ds Max, lighting is set up to mimic the behavior of real lights used in live action (at least in principle), making the lighting process easier to use. You will learn how to light in 3ds Max in Chapter 10, "3ds Max Lighting."
Rendering
You've modeled it all, textured it, and lit your scene like a pro. Hundreds of hours and several cases of Red Bull later, you are ready to render. Rendering is the stage where your computer makes all the computations necessary to create images from your 3D objects. Depending on how much stuff is in your scene, rendering may be super quick or painfully slow. The amount of geometry (the number of polygons) you used to model, the number and types of lights, the size of texture images, and the effects in your scene all affect render times. When time or resources are limited, you need to build your scene intelligently so that you don't spend hours rendering a single frame. The more efficient your scene is, the faster the rendering will go.
Having said that, there is really no magic formula to figure out how long is too long for a render. Some scenes require a massive amount of time to render, for whatever reason, and you are stuck with that—but most do not. In time you'll be able to ascertain for yourself how long is too long for your renders.
A good gauge for render times is to identify what computers you have to render with and how much time you have before a project has to be completed. With a little simple math, you can determine an acceptable render time for your scenes and adjust your quality and output settings, as well as your lighting setup, to fit within your constraints.
Note
The general rule in production is: You're always out of time. Therefore, the most efficient pipeline will be your savior, because eventually your producer or boss will tire of hearing, "But I'm still rendering...."
For now, go ahead and use as much geometry and lighting as you think is necessary. With more experience, you'll start pruning your scenes and getting more efficient renders. Right now, knowing how a scene is put together is more important than knowing how efficient it needs to be.
As in most professions, CG professionals specialize in specific areas. Those areas coincide with the stages of CG production outlined earlier in this chapter.
Modelers create models for shows or projects. They need to have a keen eye for detail, as well as a sense of how objects come together. Environment modelers create settings, and character modelers specialize in creating organic surfaces for characters such as people. In all cases, professional modelers need to understand form and function and be experienced in lighting, rendering, and texturing to effectively model professionally.
Animators are artists who work directly with the animation of a project. Character animators specialize in character movement, ranging from mimicking human movement to outlandish cartoon animation. There are also animators who specialize in mechanical objects. Frequently, good animators can span the divide between character animation and other types of animation because they inherently understand motion and timing.
In some cases, great animators are also great riggers. Studios hire character TDs (technical directors) who specialize in rigging characters for motion. This usually includes creating skeleton structures, such as Bipeds or Bones, for the character as well as skinning the model to such a system before handing it off to the animator(s). Character TDs can also work with motion-capture systems to transfer motion to a character. They use recorded data from a live-action stage where actors are outfitted in special equipment that records their movements.
Effects TDs are specialists who generally animate special effects such as tornadoes, clouds, or explosions. These specialists generally rely on particles and dynamics, as well as textures, lights, and rendering tricks to perform their effects. This specialty requires a strong eye in all stages of CG production and a strong ability to troubleshoot and come up with solutions that are frequently not standard techniques in a program such as 3ds Max.
Lighters light and render a scene once it is completed. Lighters specialize in being able to final a shot; in other words, to complete a shot for final approval and output. A good lighter needs to understand how models and textures behave in a scene and sometimes must remodel or retexture an object to make it work. Good lighters also need to be good compositors, because so much of CG can be broken into elements that later need to be put back together. For example, the shadows in a scene may be rendered separately from the rest of the scene.
Compositing as a specialty requires much less knowledge of CG, although today's competitive compositors should know as much as they can cram in their brains about CG. Compositors not only have to assemble and color time (make final color decisions about) CG shots, but they also have to work with live-action footage that needs to be altered or affected. For example, a compositor will need to remove a green screen from behind an actor and "place" that actor into a virtual rendered set. With color correction and other tools at their disposal, the compositors must make sure everything looks as though it belongs in the shot. In many cases, the line between lighter and compositor is blurred, and the two specialties can become one.
Generalists are CG artists who can do everything. This is not to say they are the be-all and end-all of all things CG. Many studios and boutiques have short-term jobs that are small in scale (as compared to a production of the DreamWorks film Madagascar, for example). When a short turnaround is required, you need artists who can take a shot from beginning to end by modeling, texturing, lighting, animating, and rendering a scene. Generalists are more likely to work on commercials, for example, than feature films.
CG touches many disciplines, and you will come across many different concepts as you learn CG. You'll need to understand something about physics, computer output, film, photography, sculpting, painting, and other disciplines. This section introduces several key concepts that will make it easier for you to understand how CG is created. Again, if you've been around the block a few times, you can skip large parts of this chapter. However, you never know when you might come across a little tidbit that fills in an educational gap you never thought you had.
Computer Graphics Basics
Here are some general terminologies and methodologies used in computer graphics. Understanding them will help you understand how 3ds Max works. First on our plate is the critical distinction between raster (bitmap) and vector graphics and how this distinction affects you as a 3ds Max user.
Raster Images
Raster images (also known as bitmap images or bitmaps) make up the world of computer images today. In raster images, colored pixels are arranged to display an image on a screen; these pixels come together to form the image like a tapestry. The same is true of printouts, where dots of ink serve as pixels to form the printed image. The printed dots, like each colored pixel, come together to form the overall image.
When you work in a program such as Photoshop, you are editing the pixels of an image directly by adjusting existing settings such as color, size, and position for all or part of an image. In this manner, you can bring a scanned photo or a digital picture of your house into Photoshop and paint one wall red just to see how it would look before you buy paint at the store.
Essentially, a raster or bitmap image is a mosaic of pixels, each pixel corresponding to a mosaic tile. The resolution—fineness of detail—of an image is defined by the number of pixels per inch (or other unit of measure) in the horizontal and vertical directions. Because raster images are based on a fixed grid, these images do not scale larger very well. The closer you zoom into a raster image (or the larger a raster image is scaled), the larger the pixels seem, which makes the zoomed or enlarged image blocky, or pixelated. To use larger raster images, you need to start with a higher resolution when the image is created. The higher the resolution, the larger the file size will be. Figure 1.3 shows what happens when you blow up a raster image.
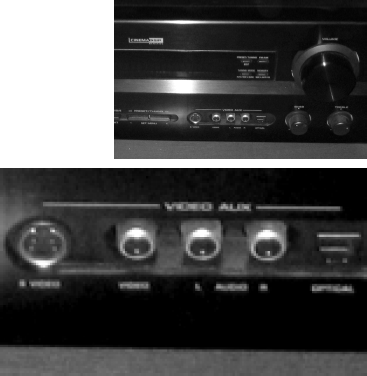
Figure 1.3. A raster image does not scale up very well. Here is the front of a stereo receiver that has been blown up by several hundred percent. The pixels look blocky.
So why are raster images even used if you can't scale them well? Most common displays and output methods such as television or computer screens, or even printers, are actually raster displays. The display devices need raster images to display the pictures properly. The term raster originally referred to the display area of a television or computer monitor. To form an image, the electronics in these devices "paint" it as a grid of red, green, and blue pixels on a glowing screen. Every image generated by a computer, therefore, must either begin as a raster image or be rasterized as part of rendering for display.
Vector Images
Why does the interface for 3ds Max look so different from Photoshop's interface? Where is the original image that gets altered in 3ds Max? Autodesk 3ds Max and other 3D programs work with vectors. Vectors are created using mathematical algorithms and geometric functions. A vector program defines its images using coordinates and geometric formulas to plot points that define areas, volumes, and shapes instead of defining the color of each and every pixel in a grid of a raster image.
Popular vector-based image applications include Adobe Illustrator and Macromedia Flash, as well as practically all computer-aided design (CAD) programs, including Auto- CAD and SolidWorks. These programs let you define shapes and volumes and add color and texture to them through their toolsets.
Vector files store the scene in 3D space using coordinates and equations of points in space; and the color values are assigned through materials. Therefore, when a vector image is scaled, the image does not suffer from the same blocky limitations as a raster image would. As you can see in Figure 1.4, vectors can be scaled with no loss of quality. They will never pixelate because they always redraw at the new scale.
Motion in a raster movie, such as a QuickTime movie, is stored in a long sequence of image files that, when played back, show animation or movement. By contrast, motion in vector programs is stored in the changes in the coordinates of the geometry and in the math that defines the shapes and volumes.
When a Flash cartoon plays on a web page you are visiting, for example, the information for that cartoon is downloaded into your computer in vector form. The data contains the position, size, and shape of all the elements of the animation. The vector information is then converted into raster images (called rasterization) so you can view the final image or animation. Your computer renders this information on-the-fly, in real time, into a raster display that you can enjoy on your screen.
This is roughly how things are done with 3D programs such as 3ds Max. You begin your work in Max's 3D space in vectors. When you are ready to render, Max renders the scene contents into raster images or movie files that you can display. You use the tools in 3ds Max to change the geometric information, which in turn changes the scene, and then rerender to show the output. Changing a raster image, such as a digital photo, alters that original file (assuming you do not have a backup file) once you save your work because it directly affects the pixels of the image.
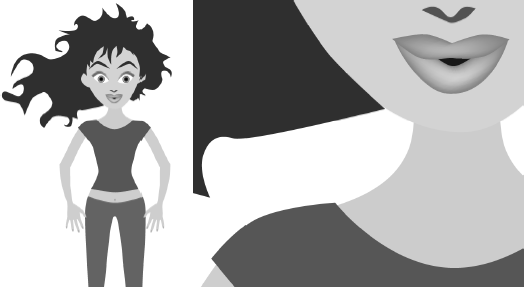
Figure 1.4. A vector image of a girl at its original size (left) and blown up to a few hundred percent (right) shows no loss in quality. The curves are not stepped or pixelated.
When you're done with all your CG, you will probably want as many people to see your work as possible. To accomplish this, you will need to render the scene out to image files or a movie file. These files can be output and saved in many different ways. The kind of file output you will use will be determined by a combination of disk space, personal preference, project needs, and output requirements.
Color Depth
An image file stores the color of each pixel as three values, representing red, green, and blue. Image type depends on how much storage is allotted to each pixel (the color depth). These are the color depths common to image files in CG production:
Grayscale The image is black and white with varying degrees (typically 256) of gray in between. Grayscale images are good for rendering out black-and-white subjects because no extraneous color information is stored in the image file.
16-Bit Color Display or High-Color 5-Bit Image File Each color channel (red, green, blue) gets 5 bits of space to store its value, resulting in an image that can display a maximum of 32,768 colors. Each color channel has a limited range of shades, but still gives a nice color image. You might notice the gradation in the different shades of each color, which can result in color banding in the image. There is little use of these limited-color images in CG work, though you will find them used in web pages to maximize efficiency.
8-Bit Image File This format is referred to as 24-bit color display or True Color, especially in Microsoft Windows desktop settings. Each color channel is given 8 bits for a range of 256 shades of each red, green, and blue channel. A total of 16 million colors are available to use in the image. This color depth gives the best color quality for an image and is widely used in most animation applications. The human eye cannot see quite as many shades of color as there are in a True Color image. Most of your renders from 3ds Max will be 24-bit color files.
16-Bit Image File Used primarily in film work using such file types as TIFF16, this type of image file holds 16 bits of information for each color channel, resulting in an astounding number of color levels and ranges. Each file can exceed several megabytes even at low resolutions. These files are primarily used in the professional workplace and are more standard for film work because outputting CG to film can require high levels of color and brightness range in the image.
Floating Point/32-Bit Image File Thirty-two-bit floating-point images are commonly used in film production to give the utmost attention to color depth. Most computers are capable of rendering a huge range of tones and colors, and 32-bit floating-point images capture that range effectively. These files (such as EXR and HDR images) are not easy to work with and require a lot of tweaking in compositing to output properly.
EXR (based on the OpenEXR format pioneered by Industrial Light and Magic for high-end film work) and High Dynamic Range (HDR) images are usually in 32-bit float format and are incredibly detailed in the range of contrast they store. You should not worry about 32-bit images and high dynamic ranges such as this until you have gained a good amount of experience with lighting and rendering.
Color Channels
As mentioned, each image file holds the color information in channels. All color images have a red, green, and blue color channel. Each channel is a measurement of the amount of red, green, or blue in areas of the image. A fourth channel, called the alpha channel, is used as a transparency channel. This channel, also know as the matte channel, defines which portions of the image are transparent or opaque. Not all image files have alpha channels.
FILE FORMATS
In addition to image types, several image file formats are available today. The most common is probably JPEG (Joint Photographic Experts Group), which is widely used on the Internet for its small size and reasonable image quality. However, JPEGs are too compressed and lossy (meaning they lose color detail when compared to the original) to be used in most CG renders.
The main difference among file formats relates to how they store images. Some formats compress the file to reduce file size; however, the greater the compression, the poorer the image's color.
The popular formats to render into from 3ds Max are TIFF (Tagged Image File Format) and Targa (TGA). These file formats maintain a good 24-bit color depth using an 8-bit image file, are either uncompressed or hardly compressed (lossless compression), and are frequently used for broadcast or video work. These formats also have an alpha channel, giving you better control when you later composite images together.
To see an animation rendered in a file sequence of TIFFs, you will need to play them back using a frame player, such as 3ds Max's RAM Player, or you can compile them into a movie file, such as a QuickTime file.
Your final image output format will depend on the project's needs. If, for example, you need to composite your CG together, you will need to output in a format that can be used in your compositing or editing program. TIFF files are perhaps the best format to use as they are widely compatible, store uncompressed color, and have an alpha channel.
MOVIE FILES
Animations can also be output to movie files such as AVI or QuickTime. These usually large files are self-contained and hold all the images necessary for the animation that they play back as frames. Like image files, movie files can be compressed to keep their sizes to a minimum, but they suffer from quality loss as well.
3ds Max can render directly to an AVI or QuickTime movie file. This may seem like it saves you the hassle of rendering out large sequences of image files. In reality, you shouldn't render directly to a movie file, at least for your final output. It is best to render a sequence of files, because image sequences can easily be compiled into a movie file later using a program such as Autodesk Combustion, Adobe After Effects, Premiere, or even QuickTime Pro.
Rendering to images is less risky than rendering to a movie. In addition to having a sequence you can easily manipulate, you do not have to worry about crashing and losing rendering time. Sometimes, your render will crash or your machine will freeze. If you are rendering to a movie file when that happens, you'll need to restart rendering from the beginning, because you can't append content to a half-rendered QuickTime. With a file sequence render, you can simply pick up the render from the last good frame.
With a sequence, you also have the option of reordering the frames or easily adjusting a few individual frames' properties, such as hue or saturation, without affecting the entire movie file.
Color
Color is how we perceive the differences in the frequency of light. The wide range of colors that we see (the visible spectrum) results when any of three primary colors of light—red, green, and blue—are mixed together. Color can be mixed in two ways, subtractive and additive. These color definitions are most often displayed in color wheels, which place primary colors equally spaced around a ring and place the colors that result when the primaries are mixed in between the appropriate primaries.
Understanding how color works will help you gain more from your CG's color scheme and help you design your shots with greater flexibility and better outcomes.
SUBTRACTIVE AND ADDITIVE COLOR
Subtractive color mixing is used when an image will be seen with an external light source. It's based on the way reflected light creates color. Light rays bounce off colored surfaces and are tinted by the different pigments on the surface. These pigments absorb and reflect only certain frequencies of the light hitting them, in essence subtracting certain colors from the light before it gets to your eyes. Pile up enough different colors of paint and you'll get black; all the color is absorbed by the pigment and only black is reflected.
With subtractive color mixing for painting, the traditional color wheel's primary colors are red, blue, and yellow. These three pigments can be mixed together to form any other color pigment. This is the basis for the color wheel most people are exposed to in art education. However, in the world of print production, a CMYK (Cyan, Magenta, Yellow, and blacK) color wheel is used, which places cyan, yellow, and magenta ink colors as the primary colors used to mix all the other ink colors for print work.
Projected light, however, is mixed as additive color. Each light's frequency adds upon another's to form color. The additive primary colors are red, green, and blue. These three colors, when mixed in certain ratios, form the entire range of color. When all are equally mixed together, they form a white light.
A computer monitor uses only additive color, mixing each color with amounts of red, green, and blue (RGB). Output for print is converted to a CMYK color model.
Warm colors are those in the magenta to red to yellow range, and cool colors are those in the green to cyan to blue range of the additive color wheel. Warm colors seem to advance from the frame, and cool colors seem to recede into the frame.
HOW A COMPUTER DEFINES COLOR
Computers represent all information, including color, as sets of numeric values made up of binary 0s and 1s (bits). With a 24-bit RGB color depth, each pixel is represented by three 8-bit values corresponding to the red, green, and blue "channels" of the image. An 8-bit binary number can range from 0 to 255; therefore, you have 256 possible levels for each primary color. With three channels, you have 256 × 256 × 256 (16.7 million) possible combinations of each primary color mixed to form the final color.
Color value need not be expressed in values for red, green, and blue. It can also be set on the hue, saturation, and value (HSV) channels of a color. Again, each channel holds a value from 0 to 255 (in an 8-bit image) that defines the final color. The hue value defines the actual tint (from red to green to violet) of the color. The saturation defines how much of that tint is present in the color. The higher the saturation value, the deeper the color. Finally, value defines the brightness of the color, from black to white. The higher the value, the brighter the color.
HSV and RGB give you different methods to control color, allowing you to use the method you prefer. All the colors available in 3ds Max, from textures to lights, are defined as either RGB or HSV values for the best flexibility. You can switch from HSV to RGB definition in 3ds Max at any time.
CMYK COLOR SPACE
A CMYK color wheel is used for print work. This is referred to as the four-color process. Color inkjet printers produce color printouts by mixing the appropriate levels of these inks onto the paper.
All output from a computer that is RGB-based to a printer goes through a CMYK conversion as it is being printed. For professional print work, specially calibrated monitors are used to better preview the CMYK color of an RGB image before it is printed. Fortunately, only print professionals need to worry about this conversion process because most of it is handled by graphics software to a fairly accurate degree.
VIEWING COLOR
The broadcast standard for North America is called NTSC, which stands for National Television Standards Committee. Industry folks sometimes refer to the acronym as Never The Same Color, calling attention to the fact that the color you see on one TV screen will inevitably look different on another TV. The same is true for computer monitors, especially flat panel displays. Unless made to do so, different screens are not calibrated to show the same color the same way, so what you see on one screen will display differently on another screen. If it is paramount that the color appear as you see it on a specific screen, it makes sense to finalize the work and show it on that screen. You can also download color bars from the Internet to display on monitors in an attempt to calibrate them to your eye. This is not the best way to go, but at least it will help a little, without exacting the costs and trouble of using color calibration equipment.
Resolution, Aspect Ratio, and Frame Rate
Resolution expresses the size of an image by the number of horizontal and vertical pixels it contains, and usually is stated as "x × y"; an example of this would be 640 × 480. The higher the resolution, the finer the image detail will be.
You will adjust your final render size to suit the ultimate medium for which you are creating the animation. Table 1.1 lists some typical video resolutions.
Table 1.1. Typical Video Resolutions
Any discussion of resolution must include the matter of aspect ratio. Aspect ratio is the ratio of the screen's width to its height. There are a variety of standard aspect ratios (Table 1.2).
Table 1.2. Standard Aspect Ratios
The number of frames that are played back per second determines the frame rate of an animation. This is denoted as fps, or frames per second. The three standard frame rates for media are:
NTSC: 30fps
PAL: 25fps
Film: 24fps
Knowing what your final output medium is going to be before you begin your project is pretty important. It is not crucial by any means, but knowing what the screen will look like (i.e., whether it will be a small web window or a large television) will help you better compose your scenes. You can always change your frame rate and render resolution later, but it is much simpler to begin with it already worked out.
Playing back a 24fps animation at 30fps will yield a slower-moving animation and will either require repeating some frames to fill in the gaps or ending the animation early. Conversely, playing a 30fps animation at 24fps will create a faster-moving animation that will either skip some frames or end later than it should.
Games do not typically have a set playback rate for animation. When a scene is created for a game, the assets in the scene are rendered and played back on the user's computer system in real time; therefore, many factors contribute to the playback speed of scenes created for games.
On the Internet, typical playback speeds for animated content on websites average about 12 to 15 frames per second, about half of what you would see on a TV or film screen. This saves the viewer considerable download time because the files are much smaller.
Coordinates are numerical representations of where an object is in 3D space. Every object in 3ds Max has a coordinate of where it exists. Without this coordinate, it would be gone— poof—into thin air! Max's 3D space is organized with the Cartesian coordinate system, which uses a three-pronged axis to define width, height, and depth as X, Y, and Z, respectively. The overall coordinate system in Max is called the world coordinate system. It is an absolute coordinate system that is fixed and unchangeable.
Objects in Max can have their own coordinate systems as well. When an object is created, it has its own width, height, and depth, again expressed as X, Y, and Z. Upon creation, the local coordinate system (belonging to the created object) and the world coordinate system are aligned. However, when the object is rotated, its Local Coordinate System rotates with it. Because of this, an object created in a Front viewport (for instance) will have a different Local axis than if it were created in the Top viewport.
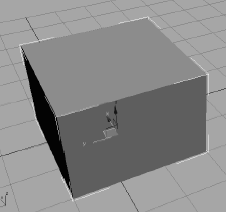
Figure 1.5 shows a box. The X-, Y-, and Z-axes of the box are displayed in the center of the box and align with the axes of the home grid (which shows the World Space axes) displayed in the lower-left corner of the window.
When the box in the scene is rotated, Max retains them as Local space instead of substituting its own axes. The X-axis of the box does not change. Now the Local axis and the World Space axis are not aligned. This is a very good feature because it allows you to manipulate the box based on its original Local axes.
A wealth of information regarding animation concepts and techniques is available on the Internet. There are tons of books out there that also teach the basics of animation. In this very brief section, you will be exposed to a few important concepts behind animation. These concepts will help you better understand what you're doing in 3ds Max.
Frames, Keyframes, and In-Betweens
Animation is based on change over time; so you need a unit of measure for time. In animation, time is almost always expressed in frames. One frame is a single rendered image in an animation, or a single drawing in a traditional animation. Frame also refers to a single unit of time in your animation. The exact length of that time depends on the final frame rate at which the animation will be played back. For example, at film rate (24fps), a single frame will last 1/24 of a second. At NTSC video rate (30fps), that same frame will last 1/30 of a second. Therefore, a video based output will require more frames for the same amount of time as would a film.
Keyframes (or keys) are points at which the animator creates a pose for a character (or whatever is being animated). A keyframe, in CG terms, is a frame in which a pose, a position, or some other parameter's value has been saved in time. Animation is when the object travels or changes between keyframes. Because the change happens between keys, these frames are called in-between frames. The computer extrapolates what needs to happen to get the object from its state in keyframe 1 to its state in keyframe 2. You will have plenty to keyframe in the coming chapters of this book.
In 3ds Max, a keyframe can be set on almost any parameter of an object, such as its color, position, or size. In reality, you can set several keyframes on any one frame in CG animation. Figure 1.6 illustrates a keyframe sequence.

Figure 1.6. In the first frame of this sequence, a keyframe is set on the position, rotation, and scale of the cone. On frame 30, the same properties are again keyframed. The computer calculates all the movement inbetween.
Weight
Weight is an implied facet of design and animation. Weight denotes the heaviness or presence of an element in a design. The more weight an element has, the more power it has in the composition. The weight of an object in a composition is affected by its color, its contrast, its background, its position in the frame, and other variables.
The weight of an object in animation roughly follows that idea, but more pragmatically denotes the actual weight of the object as it relates to its environment. Giving an object a good weight in animation is critical to the believability of the animation. You will have a chance to animate an object and edit the animation to give it weight in Chapter 8's Bouncing Ball and Knife exercises.
Weight in animation is a perception of mass. An object's movement and how it reacts in motion and to other objects are critical to conveying the feeling of weight. Otherwise, the animation will look bogus or "cartoonish."
Over the years, animators have created a set of techniques to give their subject weight in animation. Manipulating these concepts correctly in your work will greatly help your animations.
Squash and Stretch
"Squash and stretch" is a cartoon concept that allows a character to physically squash down when he is landing from a jump, or stretch out thin while he is jumping up. The overall mass of an object should never really change. When you squash an object down, you should also reduce its height to make it seem as if it's squashing down. Similarly, when you stretch an object up, you should also thin it. This technique will make a character seem to respond to gravity. You will see how this applies in the Bouncing Ball exercise in Chapter 8.
Ease-In and Ease-Out
Things in the real world don't immediately come to an abrupt stop. There is always a slowing before a stoppage, no matter how fast the stop may be. This is called ease-out.
Just as objects don't suddenly stop, they don't immediately start moving either. Pretty much everything needs to accelerate, no matter how fast it begins moving. This is called ease-in. The mechanics of ease-in and ease-out will also be illustrated in the Bouncing Ball exercise in Chapter 8.
Follow-Through and Anticipation
Exaggerating the weight of an object in animation is sometimes necessary. Objects ending an action usually have some type of follow-through motion. For example, a ponytail on a girl jumping down from a chair will continue to move after she lands on the floor. There should be a slight resting follow-through to her action. For example, she may bend slightly at the waist to center herself once she lands.
You can also create a small amount of movement before your action is in full swing. Before committing to an action, a character may "wind up" to a greater or lesser extent. Doing so will create a slight anticipation in the movement (for example, a hammer cocking back slightly before it strikes or a cartoon superhero that bends down before he jumps up to fly away). These concepts are covered in Chapter 8.
Any 3D program has terms and concepts you need to learn to become a good artist in that tool. Most of these concepts are fairly transferable, meaning they apply to more than one CG package, although their names may vary depending on which package you are using. Here are several terms and concepts you will encounter in the world of CG as they relate to 3ds Max. If you are not already familiar with 3ds Max's interface, running through this list before diving into the next chapter might be a good idea.
Objects An element in your 3ds Max scene is called an object. An object may be converted to a more easily editable mesh at any time. You will learn about this concept in Chapter 4, "Modeling in 3ds Max: Part I."
Primitives Primitives are basic Max objects such as spheres or boxes. Primitives can be shaped and altered to suit the needs of the model.
Sub-objects Many (though not all) objects are made up of components called sub-objects. You can select and manipulate sub-objects in 3ds Max to alter the look or function of an object. Kinds of sub-objects include vertices, faces, polygons, edges, gizmos, and centers. The types of sub-object you are able to manipulate depend on the type of object you are manipulating. See Chapter 4 for more on sub-objects.
Normals Each face of a polygon has a direction in which it points. A normal is a vector that defines which way a face points.
Spinners Spinners are a function of the user interface (UI) in Max. Spinners are the little arrows to the right of value readouts; they allow you to adjust the values by clicking up or down on them. A spinner for a sphere's radius value is shown here
Flyouts Another UI term, a flyout is an icon in 3ds Max that is actually several icons in one. If you press and hold a flyout icon, the other icons "fly out" and display themselves. Scroll to the icon you need and click to activate its flyout properties. A flyout icon has a black triangle in its lower-right corner (as here:
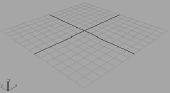
Home Grid The Home Grid is a gray grid that displays the origin (0,0,0). It is useful for grounding yourself in the viewports, and it helps with proportion and direction as well. A Perspective viewport Home Grid is shown in Figure 1.7.
Absolute/Relative Absolute refers to an adjustment on an object that is based on a fixed reference, such as World Space. An absolute scale of 2 will scale the object to a flat unit of 2. Relative refers to an adjustment made to an object that takes its current state into account. Scaling with a relative value of 2 will make that object twice its current size.
Track In 3ds Max a track is a display of animation data for an animated object. When an object has animation on several parameters, such as Translation X and Y, as well as Scale in X and Z, it is said to have four tracks. One track defines one animation on one parameter of that object on one axis.
In this chapter, you learned the basic concepts that drive the CG field. Starting with production workflow and moving into CG workflow, we discussed how productions are generally run. Next, you learned the different types of tasks used in CG production and the professional specialties that have arisen from them. After that, you learned about core computer concepts, color space, and output formats. Finally, you saw a preview of some of the key 3ds Max terms and concepts that are covered in depth in the following chapters.
No matter how you use this chapter—or even if you skip it entirely to get right to the action—there is a lot of background information here that can be useful in your overall knowledge of CG production. Although it takes some extra time to develop a good foundation, having one is an excellent idea because gaining true understanding of a subject is fundamental to its mastery. Having said this, take the rest of the book as it comes, enjoy the challenges of the exercises, and remember that some frustration with an exercise will inevitably help you learn the concepts better; so keep at it.