Whose Line Is It Anyway?: ...and more text

Ever notice that you can’t use all of the features of the Free Transform tool (E) when you’re working with type? You won’t be able to use the Command key (PC: Control key) to skew or warp it in certain ways. If you want to do this with the Free Transform tool, you’ll first have to convert the type to outlines by selecting it and choosing Type>Create Outlines. Now you’re free to transform away.

One simple way to add text to an Illustrator document is to drag-and-drop a text document from the desktop into the artwork—just make sure you hold down the Shift key as you drag in the text file. A text block will be created that contains all the text.
When you open documents from previous versions of Illustrator that contain type, you’ll get a warning about updating the legacy text. Although you could choose to update all the text at once, you will not be able to see the difference between the legacy text and the updated text in CS2. Instead, click OK and then update individual pieces of text by using the Type tool (T) to click on the text you want to edit. In the dialog that appears, click the Copy Text Object button and a dimmed copy of the original (legacy) text will appear below the updated text. Use the original text for comparison as you manually adjust the updated type to match the original. Once you’re done, go to the Type menu, choose Legacy Text, and from the submenu, choose to hide or delete the copy that was created for you.

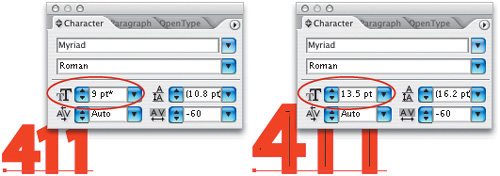
For those times where you just don’t want to “do the math” yourself, let Illustrator do it for you. In the Font Size field of the Character palette (Window>Character), type * (for multiply) and the number (we used 1.5 in our example). Press Return (PC: Enter) and Illustrator will do the math for you. In our case, change 9-point type to 13.5 points. Use * for Multiply and / for Divide—just remember to click after the unit of measurement.
In order to fill text with a gradient, you cannot simply click on a gradient swatch. Too bad...but there is an easy solution that you can use over and over again. Create an object and fill it with your chosen gradient by clicking on a gradient swatch in the Swatches palette (Window>Swatches). Then with the Selection tool (V), drag the object into the Graphic Styles palette (Windows>Graphic Styles) or choose New Graphic Style from the palette’s flyout menu. Now, anytime you need to fill some text with the gradient, just select your text with the Selection tool, and click the gradient in the Graphic Styles palette, applying it to your text. You can still edit the type with the Type tool (T) and change the direction of the gradient using the Gradient tool (G) from the Toolbox. This is simple but effective; especially since you can reuse the graphic style anytime you need it.

When you highlight a word using the Type tool (T) and attempt to change its color, the highlight ends up giving you an inversed color effect for the type. So, to keep the text highlighted and see the real color, press Command-H (PC: Control-H) to hide the highlight. Keep in mind that the text is still highlighted, but you just can’t see the highlight (as in our example here, where our black type was inverted to white, but by using this tip, we hid the highlight so we could see the black type). Repeat the shortcut to show the highlight again.

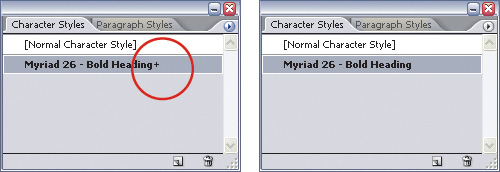
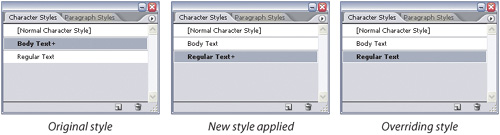
An override is any text attribute in the Character Styles palette (found under the Window menu under Type) that is not part of the style (such as changing the font size). When a style override is made, it is indicated in the Character Styles palette by a small plus sign (+) beside the character style name. To clear the override, select your text with the Selection (V) or Type (T) tool, hold down the Option key (PC: Alt key), and click on the style name in the palette. The selected text will be reformatted to the original character style attributes.
When you apply a new style to some text (by selecting it and choosing a different character style from the Character Styles palette), any overrides will remain from the original style—even though you’re changing the type’s style. To clear overrides when applying a new style to selected type, press the Option key (PC: Alt key) as you click on the new style name in the Character Styles palette.
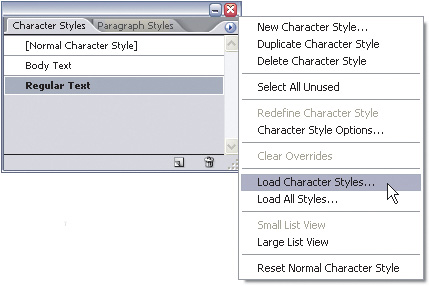
Don’t re-create character or paragraph styles when you can load them from another document. For example, go to the Character Styles palette’s flyout menu (found under the Window menu under Type) and choose Load Character Styles. Then navigate to the document that contains the styles you need. You can choose to load just the character styles (or only the paragraph styles, if you’re in the Paragraph Styles palette) or choose Load All Styles to load the document’s character and paragraph styles while you’re using either palette.
Need to create angled margins for a text box? It’s pretty easy with the Direct Selection tool (A): Make sure only the text frame is selected with the Direct Selection tool and click on the corner anchor point where you would like to create the angle. Then drag the anchor point to the left or right to create an angle on that side of the text box.

The real tip here is to make sure you don’t miss this feature because it’s not in the standard view of the Character palette. It’s called the Character Rotation field, and it lets you rotate characters (duh) relative to the baseline of the text. To access the control, make sure the Character palette is in its full view by choosing it from the Window menu under Type. When the palette appears, choose Show Options from the flyout menu. You can either highlight individual characters with the Type tool (T) or select an entire block of text with the Selection tool (V), and then pick an angle of rotation from the field’s pop-up menu or enter the value you want in the field.

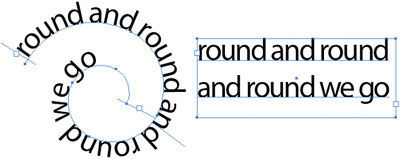
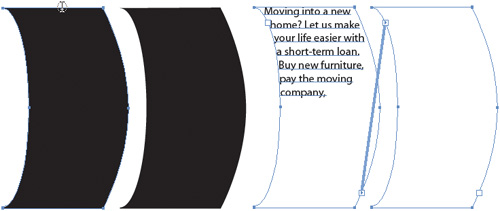
If you have warped some text—meaning you’ve selected it the with Selection tool (V), chosen Object>Envelope Distort>Make With Warp, and chosen a style, such as Arc—and now you want to convert the text to outlines (to send to someone who doesn’t have that font, for example), you can’t use the Type>Create Outlines command. Instead, when you have the warped text selected with the Selection tool, you’ll have to use the Object>Expand command to create outlines of your type.

If you have applied an envelope warp to a text object (Object>Envelope Distort>Make With Warp) and now you want to edit the text, press Command-Shift-V (PC: Control-Shift-V), or go to Object>Envelope Distort>Edit Contents. Once you’ve finished editing the text with the Type tool (T) and want to re-apply the warp, switch to the Selection tool, and press the same shortcut again.

In earlier versions of Illustrator, you could easily create type on both the top and bottom of a circle. You simply had to create the text on the top of the circle, hold down the Option key (PC: Alt key), and drag a copy to the bottom with the Selection tool (V). This shortcut doesn’t work in Illustrator CS2. To work around this missing shortcut, do this: Draw a circle with the Ellipse tool (L) while holding the Shift key. Get the Type on a Path tool (which is nested under the Type tool in the Toolbox), click the Align Center icon in the Paragraph palette (found under the Window menu under Type), click on the bottom center of your circle, and enter your text. Your type will be centered at the top of the circle. With the Selection tool (V), select the circle. Then press Command-C (PC: Control-C) to copy and Command-F (PC: Control-F) for the Paste in Front command. Then, drag the copied text to the bottom of the circle by clicking-and-dragging the little line that is sticking up just above the center of your text (avoiding the bounding box). To flip the text so it’s reading the correct way, just drag that same line across the path towards the center of the circle. Select the bottom text with the Type tool (T) to edit it, and with your text highlighted, use the Set the Baseline Shift field in the Character palette to position the text below the edge of the circle. (Note: Unlike earlier Illustrator versions, you’ll have to manually switch to the Selection tool to drag and flip your text. If you switch to the Selection tool using the Command key [PC: Control key] shortcut, it will stop the text from flipping as you drag it.) It sounds like a lot of steps, but do it once...twice... eight times and you’ll see how simple it can be.

Okay, so this is the world’s saddest excuse for a separate tip because it was just mentioned in the previous tip. But, just in case you didn’t read the previous tip and jumped directly to this one, here we go: To stop text on a path from flipping over as you drag it with either the Selection tool (V) or Direct Selection tool (A), hold down the Command key (PC: Control key).

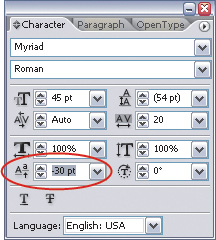
Here’s a pretty good guideline when you’re applying a baseline shift to text on the bottom of a circle. With most fonts, simply enter a value in the Character palette’s Set the Baseline Shift field that’s approximately two-thirds of the font size. Highlight your text with the Type tool (T), highlight the Set the Baseline Shift field in the Character palette, enter minus (–) to move the text down, and enter the value that is two-thirds of the font size. (Remember to deselect the type and reset the Character palette’s Set the Baseline Shift field back to zero when you’re done, or else when you create new type, it will apply your last-used baseline shift setting.)
If you have created text on a path with the Type on a Path tool (nested under the Type tool in the Toolbox), and then later on decide you don’t want it on the path, there is no command called “Remove text from the path.” You’ll have to do this by selecting just the text with the Type tool (T) and pressing Command-X (PC: Control-X) to cut it. Switch to the Selection tool, delete the path, and then click-and-drag with the Type tool to create a text box, and press Command-V (PC: Control-V) to paste.
You can use the Eyedropper tool (I) from the Toolbox to copy the attributes of existing text onto selected text. By default, the Eyedropper tool will copy fill, stroke, and other text attributes. (To see what your Eyedropper tool’s options are, double-click the tool in the Toolbox.) Select the text you want to change with either the Selection (V) or Type (T) tool, and then use the Eyedropper tool to click on the text whose attributes you want to borrow. If you want to copy only the fill color, hold down the Shift key as you click with the Eyedropper tool on the text you’re borrowing from.

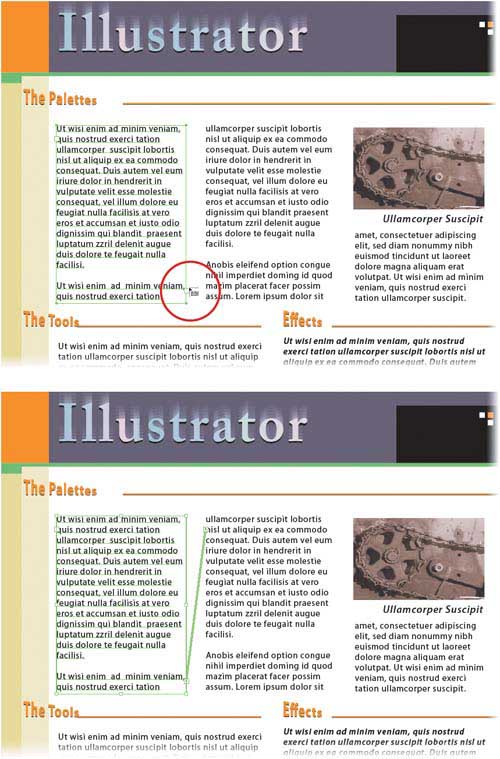
If you want to create threaded text (meaning you want to create linked text boxes that contain overflow text) and you want to ensure that the next text box is the same size as the first one, it’s pretty simple. Select the text frame with the Selection tool (V), and click on the text frame’s Out Port icon (located near the bottom-right corner) to load the overflow text—the cursor will change to the Loaded Text icon, which looks like a tiny newspaper page. Then click where you want the second text box to appear. The text is threaded into a new text box, and that box will be exactly the same size as the first text box in the thread. If you want the new text box to be a different size, click-and-drag to draw a box in the size you want while you have the Loaded Text icon showing as your cursor. When you release the mouse button, your text will flow into the box you created.
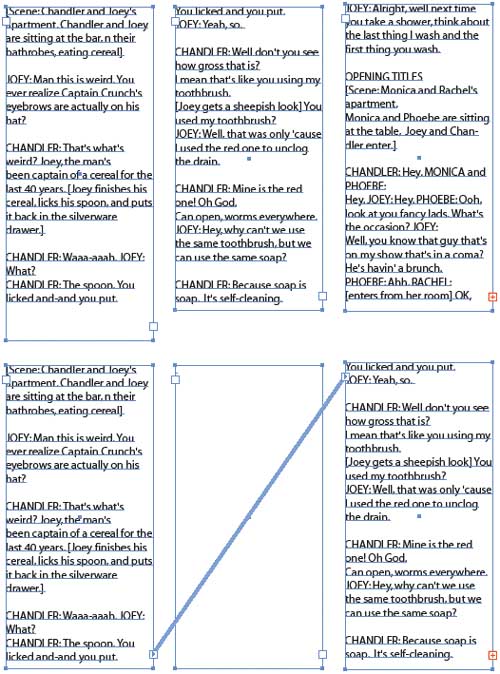
Text threads are Illustrator’s way to show which text boxes are linked, allowing text to flow from one text box to the next. When you create text threads by using the Selection tool (V) and clicking on a text frame’s Out Port icon (the tiny box near the bottom right of the text block), and then clicking on the In Port icon (the tiny box near the top left) of another text frame, Illustrator helps by showing a line that starts at the Out Port icon and ends at the In Port icon of the next text block. While this can be helpful to see where the text is flowing to, it can also be distracting; so to temporarily hide the thread lines for your selected text boxes, press Command-Shift-Y (PC: Control-Shift-Y). To show the thread lines, press the same keys again.

Text can be threaded between objects of any shape, not just rectangles. Draw a shape using any of the Shape tools (or even the Pen tool [P]) from the Toolbox, then click directly on the path of the shape with the Area Type tool (which is nested under the Type tool in the Toolbox) to add some text inside the shape. (Note: If your shape had any stroke or fill, those will disappear when you click with the Area Type tool, which converts shapes automatically into text frames.) Create a second shape, select both shapes with the Selection tool (V), and choose Threaded Text>Create from the Type menu. It’s magic!
If you created threaded text but then changed your mind, you have a couple of options in the Type>Threaded Text submenu. With your text boxes selected, choose Remove Threading to break the flow of the text—meaning no more text will overflow into the selected text boxes—but you otherwise keep the appearance of the text. For example, if you have threaded three text boxes, the Remove Threading option would unlink the three boxes, but all the text would remain as-is. The other menu option is Release Selection. This command removes a selected text object from the thread. For example, if you had three boxes and selected the middle one with the Selection tool (V), then you chose Type>Threaded Text>Release Selection, the text would flow from the first text box to the third text box, skipping the middle box.
Hey, there’s no rule that says you have to use closed shapes as text frames when you’re threading text (mind you, in Illustrator 10 there was). You can also thread text on a path to another path, from a closed object to a path, or from a path to a closed object. Use the regular method of clicking on the first text object’s Out Port icon (the tiny red box on the path with an plus sign [+] indicating text overflow), and then clicking on the next text object to create the thread.

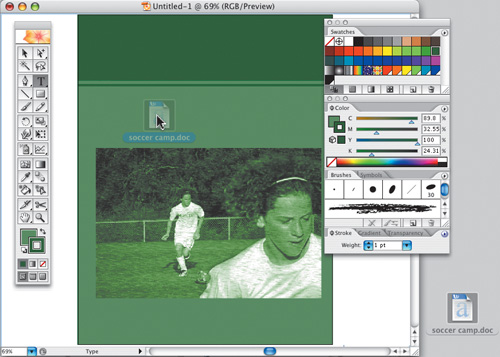
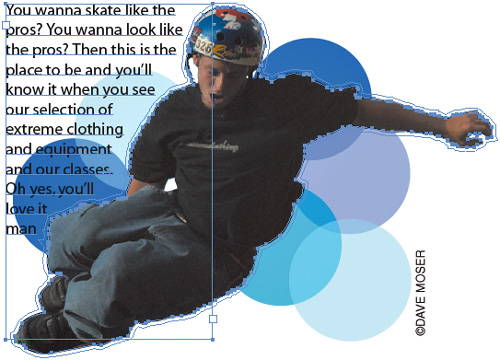
Any object in Illustrator can have text wrapped around it—any object created in Illustrator that is. Just position the object on top of a block of text using the Selection tool (V), and with the object still selected, go to the Object menu and choose Text Wrap>Make. If you want to have text wrap around an odd-shaped, placed raster image (File>Place), you’ll have to create a path around the object. (In our example, we created and exported the path from Photoshop. See Chapter 11 for more details on exporting a path.) Then place your text box on top of the image and path, select just the path, and choose Object>Arrange>Bring to Front so the graphic is below the text and the path is above it. Then choose Object>Text Wrap>Make. In the Text Wrap Options dialog (Object>Text Wrap>Text Wrap Options), enter an Offset amount, and click OK. (Note: This won’t work if your text and image are on different layers.)
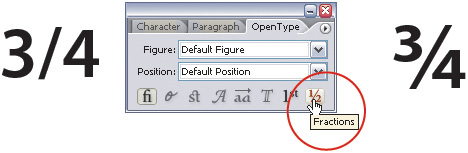
Another nice feature in Illustrator CS2 is support for OpenType fonts and their built-in special characters, including fractions. Choose an OpenType font by highlighting your text with the Type tool (T) and looking for the O symbol to the left of the font name in the Character palette’s Font pop-up menu (in Windows, the symbol shows only in the Type>Font contextual menu). The symbol will only be visible if the Font Preview checkbox is turned on in Illustrator’s Preferences dialog under Type.) Type the fraction you want as “x/x” (for example, 2/3 or 3/4), select the text, choose Type>OpenType from the Window menu and in the palette, click on the Fractions icon.
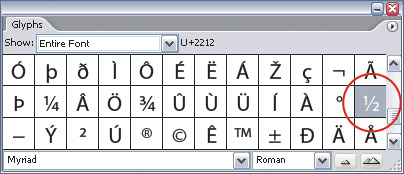
But what if you need to make a fraction in a typeface that’s not an Open-Type font? If you type “1/2” and go to the OpenType palette, the fraction button is grayed-out. Instead, click with the Type tool (T) where you want your fraction to appear but don’t type anything, and then open the Glyphs palette (Window>Type>Glyphs). Scroll through the palette to find the figure you need (in this example, a fraction) and double-click on it to add that character. Many fonts will offer the most-used fractions, such as 1/4, 1/2, and 3/4. (Seems obvious once you read it, doesn’t it?) Needless to say, you can use this tip for any text symbols whose keyboard shortcut you can’t remember, such as trademark, copyrights, accents, etc.
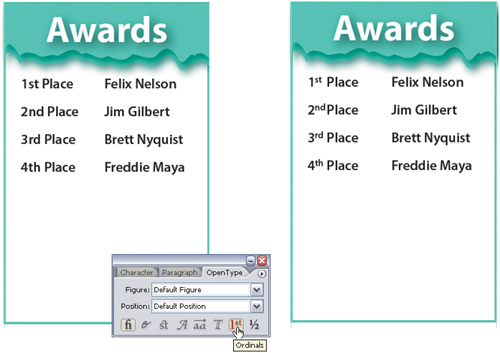
What’s an ordinal, you may ask? That’s the official name for small, superscript text used after a numeral to denote a rank (e.g., 1st, 2nd, etc.). Rather than go to any trouble to create ordinals manually, some OpenType fonts have this function built right in. (OpenType fonts will have an O symbol next to the name in the Character palette’s Font pop-up menu or the Type>Font contextual menu.) Just create some type using an OpenType font from the Character palette (found under Window>Type), select the text object with the Selection tool and in the OpenType palette (found under Window>Type), click on the Ordinals icon. The appropriate text will be converted into ordinals. Interestingly, any additional text you add to the existing type will also be converted into ordinals automatically. In our example, if we were to press the Return key (PC: Enter key) and type “5th” it would automatically change the “th” into an ordinal.
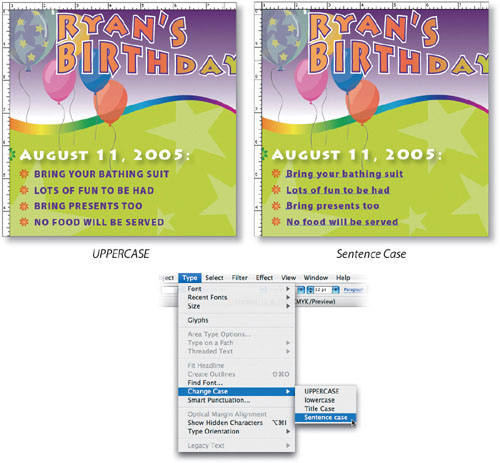
The Change Case command (found under the Type menu) will change the case of highlighted type based on your choice in the Change Case submenu. (First, we chose UPPERCASE and then Sentence Case, in our examples.) You can also perform what you might call a “global” Change Case command by selecting multiple text objects with the Selection tool (V). Then when you use the Type>Change Case option, all text objects will change at once.
You can create some interesting effects by blending two text objects together, keeping the start and end text editable. Create two text objects that are not in text blocks by clicking once on the artboard with the Type tool (T), entering your text, and then clicking again in another location on the artboard, and creating a second text object. Select them both with the Selection tool and from the Object menu, choose Blend>Make, or press Command-Option-B (PC: Control-Alt-B). If you need to adjust the blend (such as change the number of steps), go back to the Object menu, and choose Blend>Blend Options.

Once you’ve created a series of character and paragraph styles, wouldn’t it be nice to make them available in every new document you create? Well, if you read a couple of the other chapters, you can probably see where this is going. Save the document that contains your styles and then open the Adobe Illustrator Startup file (Illustrator CS2>Plug-ins folder). Go to the Window menu and choose Type>Character Styles. When the Character Styles palette opens, choose Load All Styles from the flyout menu. Navigate to the document you saved before, click Open, and all your styles should appear on the palette. Save the Startup file, restart Illustrator, and from then on your styles will be in every new document. (You’ll have to do this in both the RGB and CMYK Startup files.)

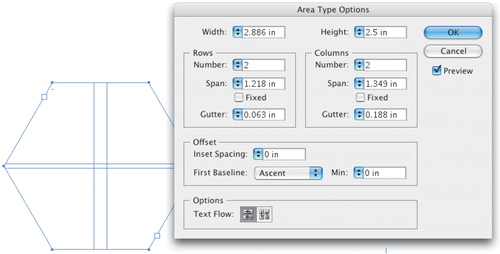
Here’s a simple way to create multiple columns (or rows) of text: Click-and-drag with the Type tool (T) to create a text block. Then, from the Type menu choose Area Type Options. Enter the number of columns (or rows) you want, the gutter width (space between columns), inset spacing you want, and click OK. Click in the text box, start typing, and the text will flow from one column (or row) to another within the text block.

We’ll admit it, once again this probably could have been part of the previous tip, but we thought we’d separate it, just in case you already knew the previous tip. This is the option to add rows and columns to more than just rectangles. Create any shape you want and then click near the shape’s path with the Area Type tool (which is nested under the Type tool in the Toolbox). Then, while still using the Area Type tool, you can go to the Type menu and choose Area Type Options (as in the previous tip) to change the options for columns and rows.
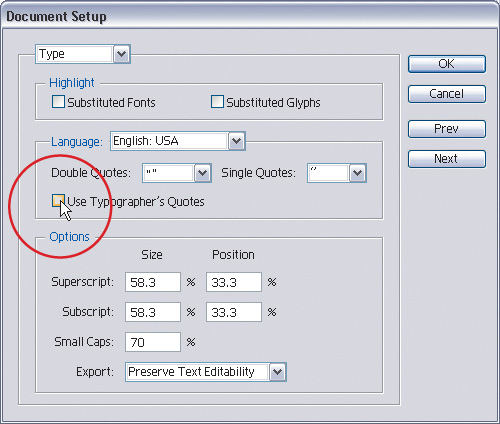
We almost hesitate to mention this one, because hopefully there aren’t too many times where you’d want this option turned off. But, in case you don’t want the quotation key to automatically turn into typographer’s quotes (meaning you want straight quotes), you can turn off this option. From the File menu, choose Document Setup, select Type from the top pop-up menu, and uncheck Use Typographer’s Quotes. Of course, if you change your mind, you can always convert “dumb” quotes back into “smart” quotes by selecting your text and choosing Type>Smart Punctuation. Make sure the Smart Quotes checkbox is turned on, and click OK.
Sometimes when you open a PDF file in Illustrator, the text is editable but it comes in as a series of separate text blocks (or lines), instead of one big text block. Luckily, there’s an easy fix. Use the Selection tool (V), with the Shift key held down, to select all the text blocks, then cut the text using the Command-X (PC: Control-X) keyboard shortcut. Drag out a text block with the Type tool (T) and press Command-V (PC: Control-V) to paste. Now the text will flow within one text block.