
Friends illustrator with other CS2 applications
![]() By now you are probably either anticipating humorous chapter introductions, or skipping past them completely because you have realized they are pretty meaningless. Well, this one is different, and you should definitely read it. Why, you ask, is this intro more important than the others? Because it actually contains some pertinent information (surprise, surprise). Looking at other Illustrator CS2 books, we were surprised how little information there was about moving files between Illustrator and other applications. So, we have included a few tips that may seem like basic information (and frankly, they are). But we wanted to make sure you were not missing out just because everyone assumed that you knew this stuff already. So please bear with the basic tips that are mixed in with the more killer-esque tips. We now return to our regular chapter intro: “Two vector objects walk into a bar…”
By now you are probably either anticipating humorous chapter introductions, or skipping past them completely because you have realized they are pretty meaningless. Well, this one is different, and you should definitely read it. Why, you ask, is this intro more important than the others? Because it actually contains some pertinent information (surprise, surprise). Looking at other Illustrator CS2 books, we were surprised how little information there was about moving files between Illustrator and other applications. So, we have included a few tips that may seem like basic information (and frankly, they are). But we wanted to make sure you were not missing out just because everyone assumed that you knew this stuff already. So please bear with the basic tips that are mixed in with the more killer-esque tips. We now return to our regular chapter intro: “Two vector objects walk into a bar…”
To convert an Illustrator document into a Photoshop document complete with editable type layers, use the Export command from the File menu. Choose Photoshop (PSD file extension) from the Format pop-up menu at the bottom of the dialog and click Export (PC: Save). In the Photoshop Export Options dialog, choose the color model and resolution you need, but also make sure that the Write Layers radio button is selected, with Preserve Text Editability and Maximum Editability checked. (By the way, you may have read in some Illustrator CS2 books that you cannot export area type to Photoshop and preserve editability, but that’s not true—you can.)

To convert an Illustrator (.ai file extension) document into raster format, open it in Photoshop. In the dialog, enter the width, height, resolution, and mode for the raster version. Think carefully, because it is not easy to change your mind later without losing quality. If you’re unsure, guess on the large side; you can always decrease the size or resolution later.
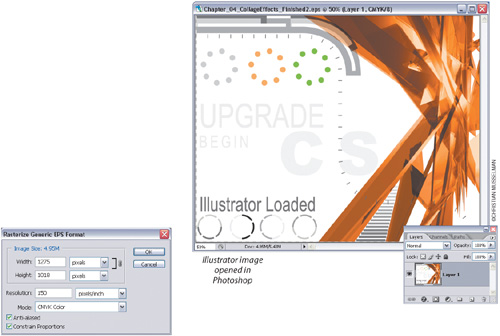
Add an Illustrator file into an open Photoshop document by choosing File>Place while in Photoshop. You won’t get any options for mode or resolution, as those are set by the existing document. The only factor you can control is the physical size of the placed Illustrator file. After placing—and before the image is rasterized—the image has handles that let you resize it. Press-and-hold the Shift key to keep your image proportionate as you make the image larger or smaller. When you’re finished resizing, press Return (PC: Enter) and the object will be rasterized at that size.

Select an object in Illustrator with the Selection tool (V) and drag it into an open Photoshop document. Just as with placing an image, dragging-and-dropping an image results in handles for resizing the image. Is this method better than placing, or vice versa? It’s really a matter of personal preference. Some people like to set up Illustrator and Photoshop side by side, and drag from one to the other, while others will prefer placing previously saved files. They both work well—it’s really your choice.
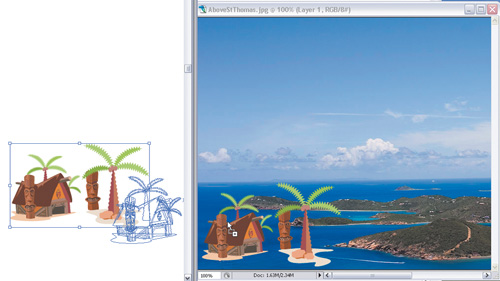
If you can see the photo you want to import into a document, rather than going to the File> Place command, why not just drag it from the Desktop into the document? (Okay, so that was the tip—drag-and-drop from the desktop to place a file into your existing document). The only caveat is you will not get a dialog box with any options—the file will be linked. To embed the file rather than link it, hold down the Shift key as you drag-and-drop the file.

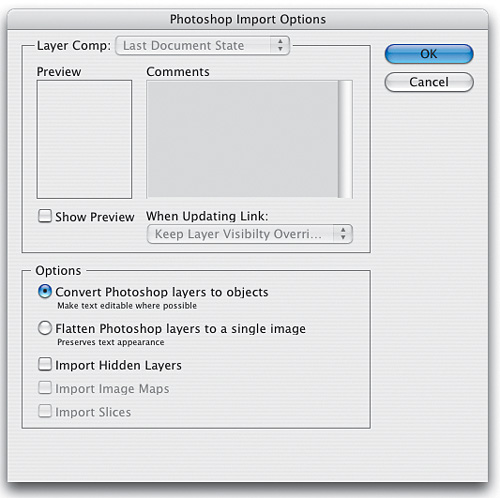
When you open a Photoshop (PSD) document in Illustrator, a dialog will offer two options: “Convert Photoshop layers to objects: Make text editable where possible,” or “Flatten Photoshop layers to a single image: Preserves text appearance.” Your choice depends on the level of editing you’d like to have. So, if you need to alter any layers in the Photoshop file, choose convert; if you don’t need to alter the layered file, choose flatten.

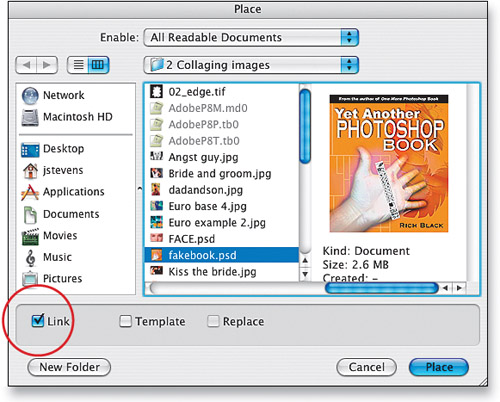
Use the File>Place command to add a Photoshop document into an existing Illustrator document. In the Place dialog, you can choose to link the file or embed the image. To link the file, just choose the document you want to place and click on the Link checkbox at the bottom left of the dialog before you click the Place button. There actually isn’t an option called “Embed,” just don’t select the Link checkbox in the Place dialog. A linked graphic is easier to edit in Photoshop, while an embedded PSD file makes your image more compatible with other applications. To check if a file is linked or embedded, open the Links palette under the Window menu. An embedded graphic will have a small icon (aka: the Embedded Artwork icon) to the right of the image’s name in the Links palette, while linked graphics do not have that icon. Want an even easier way? You can also click on the placed graphic with the Selection tool (V): A linked object has an X through it, while an embedded object does not.

Check this out! You probably knew that you can open files directly from Adobe Bridge by double-clicking on them. If you have a PSD file, then double-clicking will launch the file in Photoshop. If you have an .ai or EPS file, then double-clicking it will launch that file in Illustrator. However, what if you want to open a Photoshop file in Illustrator or vice versa? You can place an image into Illustrator CS2 (or Photoshop, InDesign, or GoLive for that matter) right from within Bridge. Just choose File>Place and choose which application you’d like to place the file into.

It’s easy to change a linked graphic to an embedded image. Open the Links palette under the Window menu, click on the linked graphic in the palette, and then from the palette’s flyout menu, choose Embed Image. If the graphic has layers, you’ll have to choose to either flatten it or convert it. It takes an extra step to change an embedded image into a linked image. After selecting the embedded graphic in the Links palette, choose Relink from the palette’s flyout menu to open the Place dialog. Find your same graphic, turn on the Link checkbox, and click Place.

When you place an image into Illustrator, you have two options: embedding or linking. One of the advantages of linking an image is that you can edit it “on the fly” in the original software. Open the Links palette under the Window menu, and click on the Edit Original icon in the bottom-right corner of the palette. Or, to quickly edit the original without having to track down the Links palette, just hold down Command-Option (PC: Control-Alt) and double-click on the placed artwork. The appropriate software will automatically be launched and the image will be opened. Make your changes, save it, and the image will update in your Illustrator document. (You may get a warning dialog asking if you want to update linked files, depending on your preferences—see the tip on page 262.)

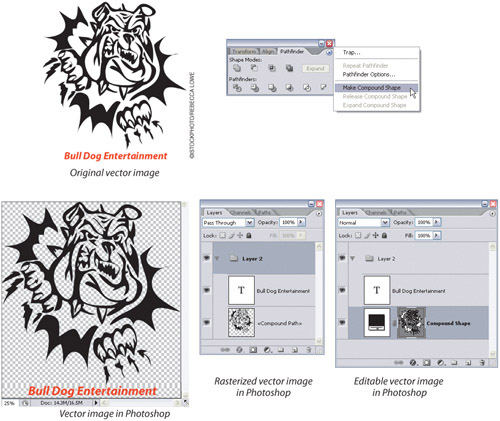
When you export a document in PSD format, any vector shape is rasterized when it’s opened in Photoshop. In order for an Illustrator vector shape to remain an editable vector—meaning you want to create a custom shape layer in Photoshop so you can edit the image—you must do one extra step in Illustrator before exporting. Select the object, choose Window>Pathfinder, and from the Pathfinder palette’s flyout menu, choose Make Compound Shape. (Note: If your image has objects within it, just select its outermost bounding box. You don’t need to flatten the image.) Then choose File>Export, and in the Format pop-up menu choose Photoshop (PSD). When you open the PSD file in Photoshop, the object will appear as a shape layer, preserving its vector editability.
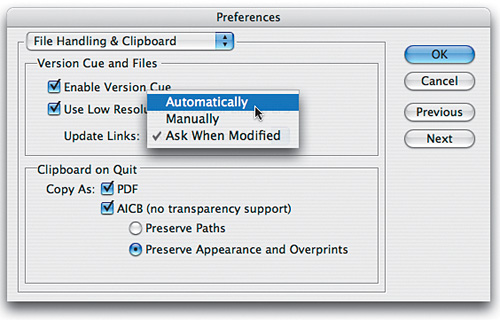
By default, every time you change and save a linked image in another application, you’ll get a warning dialog asking you if you want to update the file in Illustrator. To avoid this warning every time you alter a linked image, press Command-K (PC: Control-K) to open the Preferences dialog and choose File Handling & Clipboard from the top-left pop-up menu. In the Update Links popup menu, choose Automatically. From then on, linked files will automatically update when you edit them in the original software, without any warning.

If you place a graphic (File>Place) and nothing shows up except an empty box, it probably means that the preview was turned off in the original program. You’ll have to fix this problem by opening your image in its original editing software. In Photoshop, for example, there’s an option that’s set in the Preferences (Command-K [PC: Control-K]) under the File Handling category in the top-left pop-up menu in the dialog. In the Image Previews pop-up menu, choose Ask When Saving or Always Save. Then resave the image in Photoshop, and relink your selected image in Illustrator by choosing Relink in the Links palette’s flyout menu.

When you choose Copy from the Edit menu to copy a graphic in Illustrator and paste it into a Photoshop document (Edit>Paste), you get four choices: to paste as a Smart Object, as Pixels, as a Path, or as a Shape Layer. If you don’t get this dialog offering these choices, you’ll have to change a setting in Illustrator. Press Command-K (PC: Control-K) to go to Preferences, choose File Handling & Clipboard from the topleft pop-up menu in the dialog, and make sure that AICB (no transparency support) is checked. Copy the object again (Command-C [PC: Control-C]), and then switch to Photoshop and Paste (Command-V [PC: Control-V]). Now the Paste dialog will appear.

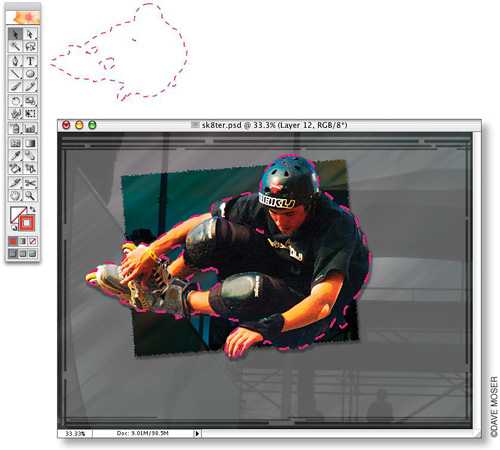
If you know that you need a path in Photoshop, you can avoid the Paste dialog (see previous tip) by dragging-and-dropping an object from Illustrator into a Photoshop document. Just select your object with the Selection tool (V), hold down the Command key (PC: Control key) to override the Paste dialog, and drag-and-drop the object into your Photoshop document to automatically create a path. To ensure that your object was converted to a path in Photoshop, choose Paths from the Window menu. You should see a Work Path created in the palette for you. (In our example, the copied path was stroked with a brush in Photoshop after we selected Stroke Path from the Paths palette’s flyout menu.)

If you would like your one-color logo to be a built-in part of Photoshop, accessible to every document, it’s pretty simple to do. Keep in mind that this works best with basic compound shapes; so if you want to add effects, alter opacity, etc., you can simply do that in Photoshop. In Illustrator, select the logo with the Selection tool (V) (if the logo contains text, convert it to outlines by selecting the text with the Selection tool and choosing Type>Create Outlines) and then go to Edit>Copy (Command-C [PC: Control-C]). Switch to Photoshop, and from the Edit menu choose Paste (Command-V [PC: Control-V]). When the Paste dialog appears, choose Shape Layer (to access the Paste dialog, see the tip on page 263). When your logo appears in Photoshop, it will change to whatever fill or stroke color is active in Photoshop’s Toolbox, but you can always change this later. So, with the logo still selected, go to the Edit menu and choose Define Custom Shape. Name it, click OK, and from then on your logo will appear in the Shape Picker when you have the Custom Shape tool (U) selected. Just choose a color in Photoshop’s Toolbox, get the Custom Shape tool, choose your logo from the Shape Picker in the Options Bar, and click-and-drag with the Shift key held down to add your logo proportionately in any size you want!

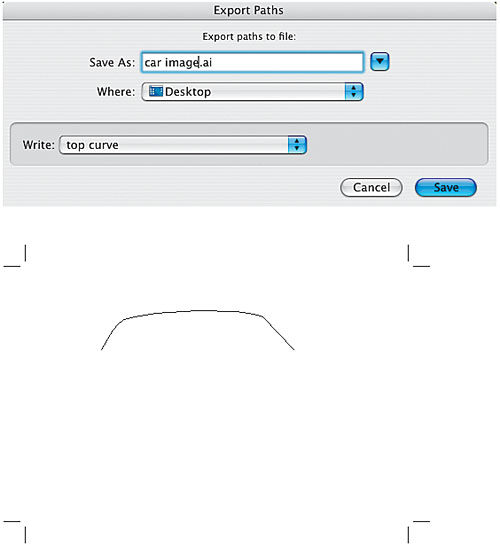
One very effective way to use Photoshop and Illustrator is to create a path in Photoshop (from a selection, for example), and use that path in Illustrator. To do this, go into Photoshop, open your document with your created path, and choose File>Export>Paths to Illustrator. In the resulting dialog, choose the appropriate path (which you saved when you created the path in Photoshop), in the Write pop-up menu, click OK, and open the resulting file in Illustrator. At first, you won’t see anything except crop marks, which represent the boundaries of the Photoshop document. Switch to Outline mode from the View menu (Command-Y [PC: Control-Y]) to see, select, and start working with the path. (If you’re unable to select or work with the path, you may need to use the Object>Expand command.)
Using this theory of exporting paths to Illustrator (see previous tip), why not take advantage of the many custom shapes that are built-in or can be loaded into Photoshop? Get the Custom Shape tool (U) and click the Paths icon in the Options Bar (it’s the middle icon in the group of three icons on the left). Select an object from the Shape Picker in the Options Bar, then click-and-drag to create your object with the Custom Shape tool. This will create a Photoshop path. With the object still selected, choose File>Export>Paths to Illustrator to save the path. Now switch to Illustrator and go to File>Open to “transfer” the custom shape.

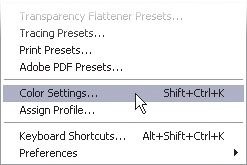
When placing images created in Illustrator into Photoshop (or vice versa), the colors may appear different. To fix this, ensure that the color management settings for both applications are the same. From Illustrator’s Edit>Color Settings dialog, save your color management settings to a color settings file (CSF). From Photoshop’s Edit>Color Settings dialog box, click the Load button, and load the CSF you just saved.

Got a swatch set that you’re using in Illustrator and want to use it in Photoshop or InDesign? Don’t recreate all of the swatches all over again. Try using the new Save Swatches for Exchange function in the Swatches palette flyout menu (Window>Swatches). This will generate an ASE file that can be loaded into Photoshop CS2 and/or InDesign CS2, so you can take your swatches anywhere.


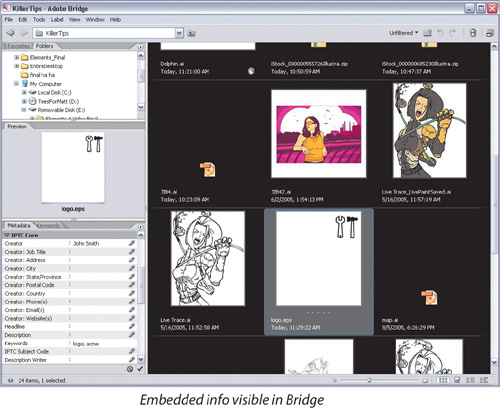
The File Info command under the File menu is a very useful way to embed details about your document, including the author, keywords, and copyright information. As useful as it can be in Illustrator, the same information can be just as practical in Photoshop because that information becomes searchable metadata in Bridge. For instance, click on the Go to Bridge icon in the far right of Photoshop’s Options Bar, navigate to find your Illustrator file, and click on the Metadata palette tab. Here you’ll find all the file info that you embedded in your Illustrator document.

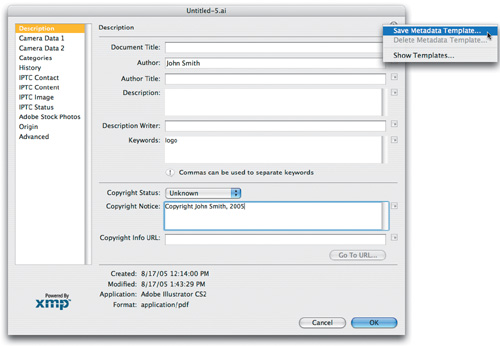
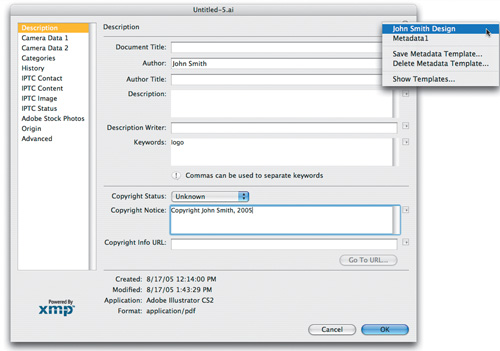
If there is information that you need to include in multiple documents, you can make your life simpler by creating a metadata template. Use the File Info command under the File menu and enter the information you’d like to embed in your documents. Once you’re done, use the flyout menu to choose Save Metadata Template. Anytime you need to embed the same information, go to File>File Info and use the flyout menu to choose from your saved templates. As an interesting aside, the same templates are available in Photoshop (and metadata templates created in Photoshop can be applied in Illustrator).
By default, placed images are not visible in Outline mode (Command-Y [PC: Control-Y]). If you’d like to be able to see placed images while you’re in Outline mode, go to Document Setup in the File menu. In the dialog that appears, check Show Images In Outline Mode. Any placed image will be visible, albeit in a poor-quality, black-and-white bitmapped version. Still, it can be helpful to see even this mediocre view if you’re trying to edit objects in Outline mode.

The only way to create a dotted (or dashed) line in Photoshop is by playing with the Spacing slider in the Brushes palette found under the Window menu. It’s a little clumsy, so why not take advantage of Illustrator’s ability to create dashed lines? Draw a path with the Line tool (). With the line selected, open the Stroke palette from the Window menu, choose Show Options from the palette’s flyout menu, and turn on the Dashed Line checkbox to create a dashed line. Copy (Command-C [PC: Control-C]) the object in Illustrator, switch to your Photoshop document, and choose Paste (Command-V [PC: Control-V]). Voilà—a quick, dashed stroke! (In this example, we created a path in Photoshop, exported it to Illustrator choosing File>Export>Paths to Illustrator, added a dashed stroke, and pasted it back into Photoshop by choosing Paste in the Edit menu.)
Sometimes when you save a document as an EPS file in Illustrator and place it into a page layout program, the EPS file appears to be “clipped”—missing some information at the edges. To make sure that doesn’t happen, create a rectangle slightly larger than the artwork, with no fill or stroke. Then choose File>Save As, and in the dialog choose Illustrator EPS (EPS) in the Format (PC: Save as Type) pop-up menu. Clipping should no longer occur.

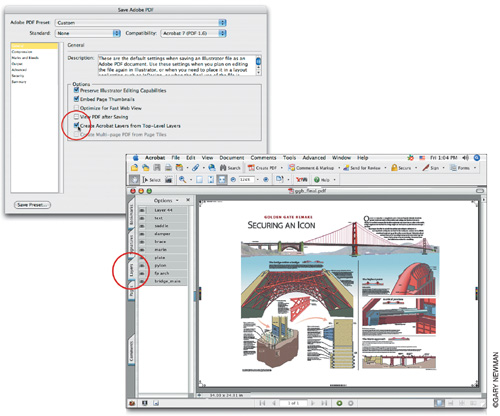
One of the cool features in CS2 is the ability to take an Illustrator (.ai) file with multiple layers and save it as a PDF file, with those layers appearing in Acrobat. Yes, Acrobat 7.0 Professional (as well as Adobe Reader 7.0) has a Layers tab that works like a palette with the option to show and hide your Illustrator layers. Just choose File>Save As and in the dialog that appears, choose Adobe PDF (PDF) in the Format (PC: Save as Type) pop-up menu, then click Save. An Adobe PDF Options dialog will then appear, in which you change the Adobe PDF Preset popup menu to Custom, change the Compatibility pop-up menu to Acrobat 7 (PDF 1.6), and click the Create Acrobat Layers From Top-Level Layers checkbox. After you click Save PDF, open your document in Acrobat 7.0, and click the Layers tab on the left side of your document. Imagine having the ability to use Acrobat to show several versions of your document…
Besides Acrobat, Illustrator is one of the few software programs that can open and edit PDF files. Go to File>Open and target the PDF file. If it is a multipage document, a dialog will appear that allows you to navigate to the single page you’d like to open. (Unfortunately, you’ll have to base that decision on a pretty small preview window.) If you open a page, edit it, and choose Save in the File menu, it will be saved back as part of the multipage document. To separate the image from the multipage document—converting it into a one-page PDF file—choose Save As from the File menu, rename the file, and click Save.

If you create a spot-color document in Photoshop (that is, with one or more spot color channels) and place it into Illustrator (File>Place), you probably want the spot color to preview. Unfortunately, if you save the file as an EPS file in Photoshop (File>Save As and choose Photoshop EPS in the Format [PC: Save as Type] pop-up menu), and place it into Illustrator, the spot color will import with the EPS file, but it will not show in the placed file. Instead, in Photoshop choose Save As from the File menu and select Photoshop PDF in the Format (PC: Save as Type) pop-up menu (making sure you have the Spot Colors checkbox selected). Switch to your Illustrator document and choose File>Place. When your image appears, go to the View menu and choose Overprint Preview (Command-Option-Shift-Y [PC: Control-Alt-Shift-Y]).

Before you create a document that will be printed at an outside service provider (such as a large format printer), see if you can get a copy of the bureau’s printer driver. Load it on your system and choose it in the Print dialog (File>Print). That way, you can make sure all the settings are correct and that your document is set up correctly before sending it off to print.
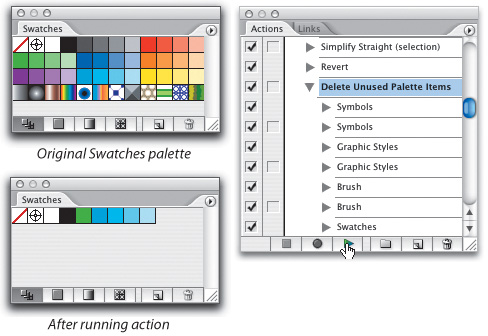
Before saving a file, you can cut down the file size by removing all unnecessary stuff in the file (in this instance, stuff meaning swatches, symbols, patterns, etc.). Thanks to Adobe, it’s pretty easy. In the Actions palette (Window>Actions), look in the Default Actions folder for Delete Unused Palette Items. Click on the action name, and press the Play Current Selection button at the bottom of the palette to run the action. All the unused stuff will be removed, so that when you save the document, it will be a little smaller (not all that much in some cases, but every little bit helps, right?).
Before printing a file, you can do yourself a favor by “cleaning it up.” First, from the Object menu choose Path>Clean Up. In the dialog, make sure you select the Stray Points and Empty Text Paths checkboxes. Click OK to delete all these unneeded points. If you’re sending the document to an outside printing service, you may also want to go to the Swatches palette and use the pop-up menu to choose Select All Unused. Then click on the Trash icon at the bottom of the palette to delete the swatches. Save the document (File>Save), and you’re ready to go.

Illustrator is not backwards compatible, which means that you cannot save an Illustrator CS2 file into an older version such as 10, 9, or earlier. The best way to create a document that can be read by an older version of Illustrator is to choose the Save As command in the File menu (Command-Shift-S [PC: Control-Shift-S]). Click Save and from the Illustrator Options dialog, you can choose from older versions of the program in the Version pop-up menu. Be aware that several functions—notably type—will not transfer well from CS2 into earlier versions. (Note: If you attempt to open an Illustrator CS2 file in Illustrator 10, you’ll get a dialog saying that the file was created in a newer version of Illustrator, but it does give you the option to import the file. Opening a file in this manner does not maintain the CS2 formatting as well as using the Export option.)

Before sending your file off to the service bureau for color separations, you can (and probably should) print a test separation on your own printer. Use the Print command from the File menu (Command-P [PC: Control-P]) and click on the Output category on the left-hand side of the dialog. Under the Output option, change the Mode pop-up menu from Composite to Separations (Host-Based). That way you can make sure that only the appropriate number of colors print.

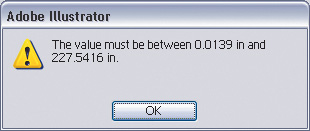
If you haven’t figured this out yet, the largest document Illustrator will let you create is 227.54 inches in width or height. How do I know this? Try creating a new document that is 250 inches in size and Illustrator will give you a little reminder of the maximum settings. Well, what if you need to print something out that is larger than this? There’s a way to cheat a little and it’s in the Print dialog box (Command-P [PC: Control-P]). Under Options, near the bottom of the dialog, just click Custom Scale and enter in a percentage scale value that will get you to the print size you need. For example, if you need to print something that is 260 inches in width and height, then create a document that is 200 inches instead. Then enter 130% in the Width and Height settings under Custom Scale. This will print out at 260 inches (200 * 1.30 = 260).
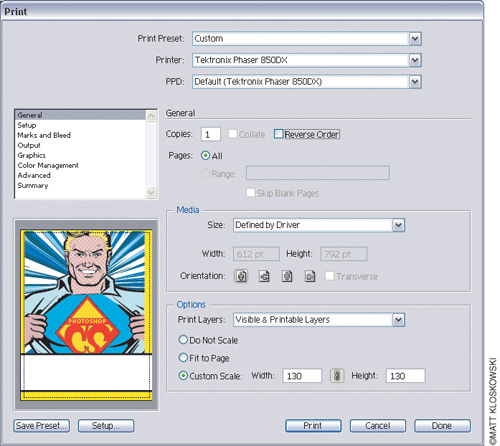
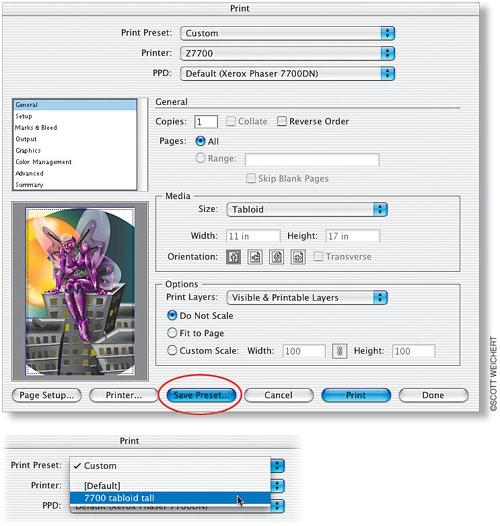
If you have more than one printer in your location, or you send out files to various print shops, you can easily create printer presets for these different locations. Just set up the options in the Print dialog (File>Print) as if you were going to print to one of your printers (or as if you were setting up the file to send to the print shop). Rather than printing, though, click the Save Preset button, name the preset, and then click Done (instead of the Print button). Now, anytime you use the Print command from the File menu, you can choose from a list of presets in the Print Preset pop-up menu in the Print dialog. This can be a great timesaver, avoiding the need to change settings every time you change printers.
In addition to saving presets (as mentioned in the previous tip), if you need to change the page setup and other settings for a document—without printing—you can do this in the Print dialog. Go to File>Print and just change the settings, such as page setup options, printer marks, etc., and then click the Done button rather than Print. Your settings will reappear when you reopen the Print dialog.

Many people don’t realize that in the File menu, Illustrator has a similar Save for Web interface as Photoshop. This is especially useful if you’re saving Web graphic icons, as the PNG format is popular for this type of work. Illustrator’s Save for Web dialog even includes a 2-and 4-up view, which really helps get a preview of how your vector artwork will look when compressed using various Web image compression formats.

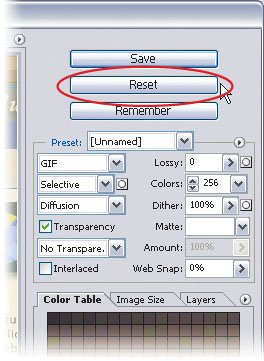
Often, when you’re using the Save for Web command in the File menu, you’ll find yourself experimenting with various settings. Should you ever want to start again from square one, you can reset all settings in the dialog by holding down the Option key (PC: Alt key). When you do this, the Cancel button changes to Reset. Click Reset to put all settings back to their defaults.
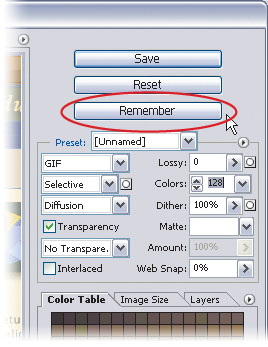
Here’s a cool way to remember a setting and then experiment further, knowing you can revert to these settings. To do this, go to the File menu, choose Save for Web, and then choose your settings. When you’re finished, hold down the Option key (PC: Alt key) to change the Done button to Remember. Now you can feel free to experiment, knowing that you can go back to this remembered setting by clicking the Reset button. (As mentioned in the previous tip, hold down the Option key [PC: Alt key] to change the Cancel button to Reset.)
It’s not unusual to get a request for a Web graphic to be no larger than “x” kilobytes. Advertising banners, for example, are often restricted to a maximum file size. Luckily, the Save for Web command in the File menu can help with that; in the flyout menu to the right of the preset options in the Save for Web dialog, choose Optimize to File Size. Enter the size for your graphic, click OK, and Save for Web will do the rest.

Before sending files off to print, you may need to use the Flatten Transparency command in the Object menu. Unfortunately, the preview function in this dialog can take a while, so here’s an alternative: From the Window menu, choose the Flattener Preview palette, then in the palette’s flyout menu choose Show Options. There you can get a much quicker preview of the areas that would be affected by flattening, when you select Quick Preview from the palette’s flyout menu. To see the preview, be sure to click the Refresh button at the top of the palette. (Note: Resolution values cannot be previewed in the palette.)

If you’re having trouble getting gradients and gradient meshes to print properly, there is one setting you can change. But be warned, only change this if you’re unable to get gradients to print properly, because if you leave this option on, printing can become extremely slow. Open the Print dialog from the File menu, click on the Graphics category in the left-hand side of the dialog, then turn on the checkbox beside Compatible Gradient and Gradient Mesh Printing. (Note: You’ll likely get a warning dialog informing you that this option should be selected only if you’re having problems printing.) The current raster resolution will be shown just below the checkbox, and if it’s set too low, you’ll have to click the Cancel button and use the Document Raster Effects Settings under the Effect menu to change the resolution. If you read the previous chapters, you know that changing raster effects settings after you’ve applied filters and effects can alter these effects, so remember—only use this if you’re unable to print gradients on your printer (this is common in older printers).

Okay, so this really has nothing to do with this chapter, but I thought I’d sneak it in here… just because. For all of its life, Illustrator has always used Botticelli’s Venus as its symbol. Then in the CS and CS2 versions, she went away, replaced by flowers. If you miss the old look, you can get a glimpse of the past by holding down the Option key (PC: Alt key) and choosing About Illustrator. In OS X on the Mac, it’s under the Illustrator menu; in Windows XP, it’s under the Help menu.

