
Basic Training!: basic tips you can’t live without
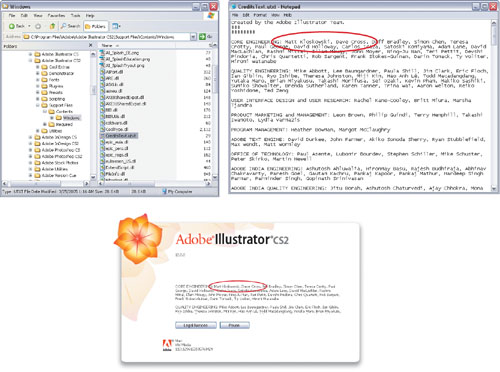
OK, so it’s a stretch to include this tip anywhere, but I thought it was cool. Make yourself famous by appearing in the Credits that display on a PC when you choose Help>About Illustrator and click on the Credits button. Just modify the file located in Adobe Illustrator CS2Support FilesContentsWindows. The file name is CreditsText.utxt and it opens in any basic text editor. Add your name into it, save it, and show the credits. You can impress all of your friends by saying you were on the product team. (Okay, maybe that’s exaggerating a bit. They probably won’t believe you, but it’s still fun.)
If you haven’t realized this yet, Illustrator CS2 comes with a ton of extra content. This includes fonts, symbols, swatches, gradients, styles, and custom brushes. I can’t stress this one enough. If you need some creative inspiration, then check out this content. It’s located right inside the Presets folder (in the Adobe Illustrator Applications or Program File on your hard drive) and is categorized based on what type of preset it works with (i.e., brushes, patterns, gradients, symbols, etc.).

If you liked the previous tip, but thought to yourself, “How am I supposed to ever see all of this content so I can choose what I like?” then I’ve got some good news and some bad news for you. Which do you want first? I always take the good news first, so that’s where we’ll start. Illustrator CS included a PDF file called Additional Content.pdf that showed a high resolution preview of all the presets. The bad news is that Illustrator CS2 doesn’t, so it’s basically a guessing game. Don’t let that stop you, though. If you have Illustrator CS, then the PDF file is located in Illustrator CSAdditional Content.pdf. If you don’t have CS and only have CS2, we’ve made the file available for download at http://www.peachpit.com/title/032133065X.

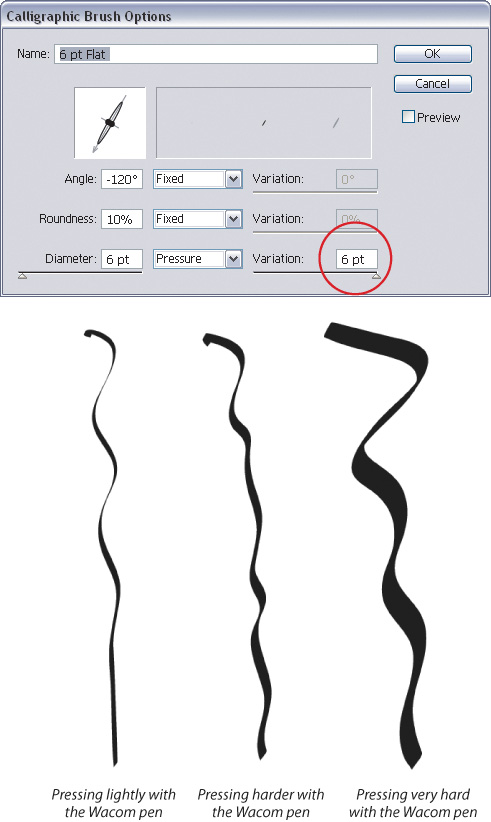
Many people don’t know that Wacom pen tablets work great in Illustrator. It mimics traditional drawing techniques because you actually hold a Wacom pen just like you would a drawing pen or pencil. Also, the pressure-sensitive nature of the Wacom pen allows you to control the width of brush strokes in Illustrator. Try it out. Grab the pen and tablet and double-click on any Calligraphic Brush in the Brushes palette (under the Window menu) to bring up the Calligraphic Brush Options dialog. Under one of the settings, such as Diameter, select Pressure, make the variation setting higher, and click OK. Then try drawing on the artboard. Press down softer and harder with the pen and you’ll see that the strokes do indeed reflect how hard you are pressing.
If you’re ever unsure that you’re holding down the correct modifier key, check out the Status Bar in the lower left hand corner: It constantly changes based on what you’re doing. For example, if you have the Rectangle tool (M) active it will display “Rectangle.” Press-and-hold the Command key (PC: Control key) and start to drag the object and it will display “Move.” Throw in Option-Shift (PC: Alt-Shift) while dragging, and the display will change to “Constrain and Copy.” It’s a simple but effective way to reassure yourself that you’re using the correct keys. Note: If you do not see the tool name, click on the Status Bar and under Show, choose Current Tool.

One of the more important principles of using keyboard modifiers is that the same key will have different effects, depending on when you use it. For example, with the Direct Selection tool (A) active, holding down the Option key (PC: Alt key) will select the entire path. If you don’t let go of the Option key when you drag, you’ll get a copy. So in this case, to move a path without copying it, press-and-hold the Option key and click on the path, then let go of the Option key before dragging the path.

Many Illustrator palettes have more than one display size—in some cases, multiple sizes. You can use a palette’s flyout menu to choose Show Options or Hide Options, but it can be faster to double-click on the tab at the top of the palette. To see if a palette has multiple sizes, just keep double-clicking on the tab to switch among the collapsed, basic, and expanded views. (Why collapse palettes? To save space without closing palettes or to move them out of the way.)

To delete anything from a palette, without getting a dialog like this example asking you to confirm your choice, hold down the Option key (PC: Alt key) as you click on the palette’s Trash icon. This applies to brushes, swatches, layers, etc.

By default, all guides that you add to a document are locked. To unlock all the guides in one quick step, press Command-Option-; (PC: Control-Alt-;). This also works the other way around: Once you’ve unlocked all the guides, use the same shortcut to lock all guides.

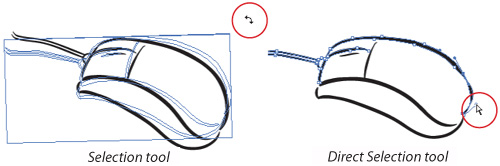
Trying to determine when to use the Selection tool (V) versus the Direct Selection tool (A)? Here’s a simple suggestion: Think of the Selection tool as the “move” tool and the Direct Selection tool as the “reshaping” tool. Actually, I suppose that the Selection tool should be thought of as the move/resize tool, since those are the two functions it performs. So, anytime you need to decide between tools, ask yourself, “Do I need to move/resize the object or reshape it?” That will help you pick the correct selection tool.
If you’re having trouble getting the Direct Selection tool (A) to select only one individual point, here are two “secrets” to success. (1) Make sure nothing is selected by either clicking away from any object or by pressing Command-Shift-A (PC: Control-Shift-A). (2) If you click on the fill of an object, the Direct Selection tool will act just like the Selection tool. So, make sure no anchor points are selected, and then position your mouse over one anchor point and click.

If you need to use the Selection tool (V) and then return to the tool you were using, here’s how to do it. With any tool selected, press-and-hold the Command key (PC: Control key) to temporarily activate the Selection tool. (Actually, it will activate the last selection tool you used, so you may get the Direct Selection tool.) Once you’ve used the Selection tool, let go of the key to return to whatever tool you had been using.

Here’s a shortcut that you’ll want to memorize—the ability to show and hide the bounding box. The bounding box is a great way to resize objects without switching to the Scale tool (S). On the other hand, sometimes the bounding box is very distracting, so the option to show or hide it is very useful. Just press Command-Shift-B (PC: Control-Shift-B) each time you want to toggle the bounding box on and off.
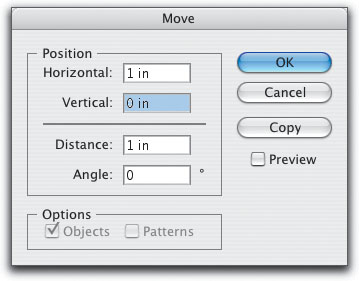
A quick way to access the Move dialog is to double-click on the Selection tool. That saves you from having to dig down in the Object menu to get to the command.
If you know there’s an object hidden under another object and you need to select it, use the contextual menu. With the Selection tool (V), click on the top object, then Control-click (PC: Right-click) and from the contextual menu choose Select>Next Object Below (as we did here to select the airplane). You’ll notice there are similar commands for objects above.

You can create an object at a specific size by choosing the appropriate shape tool (Rectangle, Star, etc.) and then clicking on the artboard. In the subsequent dialog, enter the exact measurements you’d like to use and click OK. To create a shape that’s centered on the position of your click, hold down the Option key (PC: Alt key) when you click on the artboard. Bonus: Want to know the size of the shape you just created by dragging? Click once using that shape’s tool and check out the numbers in the dialog (then click Cancel).

With any of the shape tools, you can change the position of the shape while you create it on the artboard. Simply hold down the Spacebar to “interrupt” the tool you’re using, allowing you to move the shape. Let go of the Spacebar to continue drawing the shape.
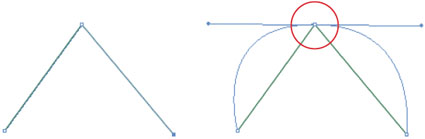
If you’re new to drawing curves with the Pen tool (P), here’s a quick method to create a simple curve. Use the Pen tool to draw two straight lines that create a triangle that points in the direction you want your curve. Then hold down the Option key (PC: Alt key) to activate the Convert Anchor Point tool. Click on the anchor point where the two lines meet and drag outwards to create a curve.
One of the basic rules of Illustrator should be to use the minimum number of anchor points that you can get away with on a path. This will keep your objects as simple as possible, which will help streamline the printing process. An easy way to reduce the number of anchor points on a path is to select the path and use the Simplify command (Object>Path>Simplify).

Hopefully, you know that the command to select everything (Select All) is Command-A (PC: Control-A). That’s pretty standard in most programs. In Illustrator, it’s just as easy to ensure that nothing is selected. To do this, press Command-Shift-A (PC: Control-Shift-A). Or, if you want to do it the “old-fashioned way,” go to the Select menu and choose Deselect (as shown here).

To select everything except one object, select the object, then from the Select menu choose Inverse.

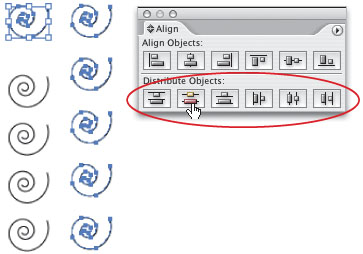
You’ve created a bunch of objects, with nice even spaces between them, then you decide that the top object needs to be up higher. You move the top object and, of course, the other objects are no longer evenly spaced. The solution? Select all the objects and in the Align palette (Window>Align), click the Horizontal or Vertical Distribute icons.
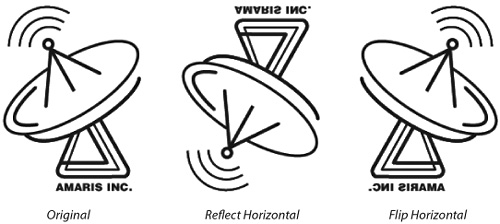
In almost every application, there are commands called Flip Vertical and Flip Horizontal— in Illustrator they’re not so obvious. There’s the Reflect tool (O), but that’s more like a mirror reflection than a flip. In other words, Reflect Horizontal is the equivalent of Flip Vertical. That’s because “horizontal” indicates the angle of your mirror, which—in effect—flips your object vertically. In case you find that too confusing, commands for Flip Horizontal and Flip Vertical are found in the flyout menu in the Transform palette (Window>Transform).
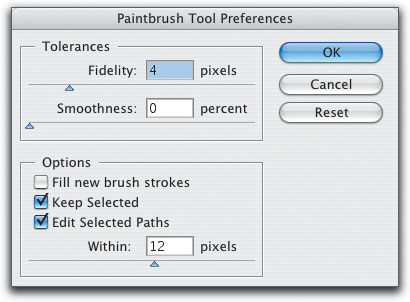
A number of tools have individual preferences or options that you can change to affect the way the tool performs. To open a tool’s preferences or options, double-click any of these tools in the Toolbox: Line, Arc, Rectangular Grid, Polar Grid, Flare, Paintbrush, Pencil, Smooth, Eyedropper, Blend, Paint Bucket, Paint Selection, Measure, and any Liquify, Symbolism, or Graph tools.
After creating a new swatch, you can always name it after the fact by double-clicking on it. Or you can name a new swatch as you create it by pressing the Option key (PC: Alt key) as you click on the New Swatch icon at the bottom of the Swatches palette (Window>Swatches).

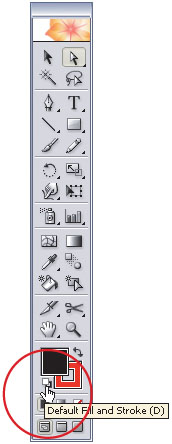
To get back to the default colors of a white fill and black stroke, press D (for default). Needless to say, this shortcut doesn’t work if you’re using the Type tool.
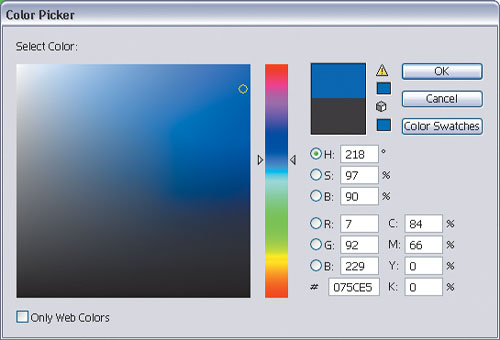
To access a Photoshop-style Color Picker, double-click on either the Fill or Stroke icon near the bottom of the Toolbox or in the top-left of the Color palette. Choose a color visually or numerically, click OK, and you’re done.
If you have a long list of layers or sublayers and need to hide a bunch of them—but not all of them—click-and-drag through the Eye icons in the Layers palette to hide or show the layers. Of course, this only works with contiguous layers, but it sure works well, and fast.

What’s the main difference between the two? Effects are more flexible, allowing you to edit the effect through the Appearance palette (Window>Appearance), but they require more memory and processor power. Filters are “permanent” (although you can choose Undo from the Edit menu), but typically they don’t take as long to process. In our example, we first applied the Roughen filter (Filter>Distort>Roughen), and then we applied the Roughen effect (Effect>Distort & Transform>Roughen), which is editable in the Appearance palette.

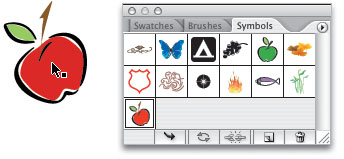
If you see a pattern in the Swatches palette (Window>Swatches) or symbol in the Symbols palette (Window>Symbols) that you’d like to adapt by changing colors or by adding or deleting objects, drag the swatch or symbol onto the artboard. Patterns are editable, but with symbols you’ll have to choose Object>Expand to be able to edit the original artwork. Once you’ve made your changes (using the Direct Selection tool, most likely), select the objects and drag them back into their appropriate palettes, which creates a new pattern or symbol.
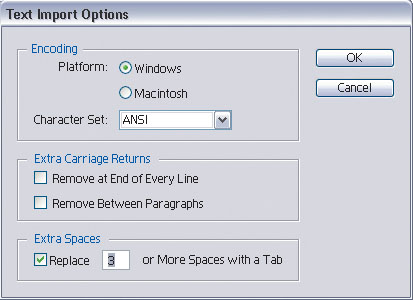
You can make your life a little easier when you place text by setting the options in the importing options dialog that appears before the text is placed. Depending on the type of text file, you’ll get a different dialog upon placing (File>Place). Word documents, for example, offer a few choices, such as including a table of contents or removing text formatting. Text files (TXT) will cause the Text Import Options dialog to open, with more options such as removing extra carriage returns or replacing extra spaces with a tab.
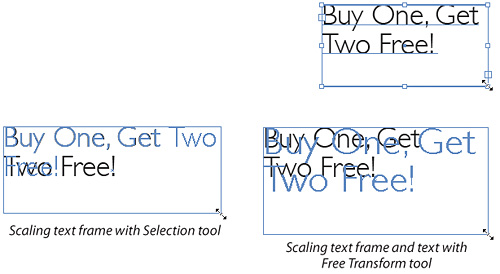
To make a text frame bigger, so the text reflows, click with the Selection tool (V) to make the bounding box visible. Then click-and-drag on a handle to resize the text frame without affecting the size of the type. In contrast, if you select a text frame with the Selection tool, and then use the Scale tool (S) or Free Transform tool (E), any adjustments to the text frame will scale the size of the text inside the frame.
Take a look in the Glyphs palette (Window>Type>Glyphs), and if an OpenType font is selected in the pop-up menu at the bottom of the palette, you will see a small black triangle at the bottom right of some of the characters. The triangle indicates that there is more than one choice for that character. Click-and-hold on one of these characters to see the choices, move your cursor over the character that you want, and release the mouse button to add that character to the artboard. This palette also serves as a great preview of a font—just choose a different typeface from the pop-up menu for an instant preview of the characters in that font.

One of the advantages of the Appearance palette (Windows>Appearance) is the option to affect only the stroke or only the fill of a selected object. A great example of that is to apply an effect (not a filter) to only the stroke, or only to the fill. In the Appearance palette, click on the word Stroke and then apply an effect from the Effect menu. (In our example, we used the Roughen effect under Distort & Transform in the Effect menu—first applied just to the stroke, and then applied only to the fill.)

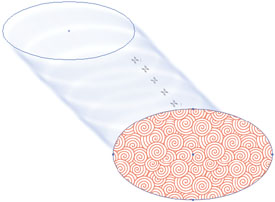
Don’t be fooled by the shortcut for this command: Command-D (PC: Control-D). In many applications that’s the shortcut for Duplicate, but not in Illustrator. In this program the command is called Transform Again, and it’s quite different from duplicating (in a very good way). Transform Again is a shorter way of saying, “Whatever you just did, do it again.” So if you just rotated an object 30°, pressing Command-D (PC: Control-D) will rotate the object another 30°. The object will not be duplicated unless that’s part of the original transformation. For example, if you drag an object with the Option key (PC: Alt key) held down to move a copy, Transform Again will move another copy the exact same distance and angle. This is an extremely powerful command that has many uses! (Just remember not to do any additional operation, or you will alter your Transform Again command.)

You can easily create crop marks around a graphic (to indicate where a graphic should be trimmed, for example). Just draw a rectangle that represents the crop area (don’t worry about fill or stroke, they’ll automatically change). With the rectangle selected, go to Object>Crop Area>Make. If you ever need to change the crop marks, use Object>Crop Area>Release and then edit the rectangle. (Note: The cropping object must be a non-rotated rectangle that is not being used as a clipping mask.)

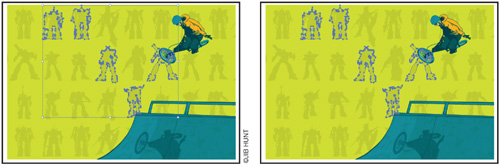
Adobe was kind enough to provide many useful templates and a simple way to make use of them, so why not take advantage of it? If you need to design artwork for a CD, for example, choose File>New From Template. You should be directed to the templates folder (Illustrator CS2Cool ExtrasTemplates), where you select from the various folders. In this example, we opened the template in the Extreme Sports folder called DVD Label.ait. A new, untitled document is created that contains all the artwork, ready to edit, and the original template artwork is untouched, ready for next time.

You can easily make your own template and save it in a format that will automatically be opened as an untitled copy of your artwork. Create your artwork complete with sample text, guides, and the colors you want, and then use File>Save As Template. Name the file and save it in the Templates folder for easy retrieval (it should default to AIT format, but check just to be sure). From then on, use the File>New From Template command to open your template— ready to edit—then save it as a regular Illustrator document.

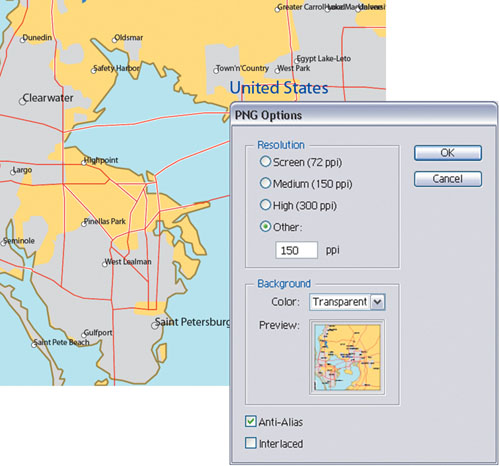
Imagine that this command under the File menu is really called “Save As a PNG File, But Without Seeing Any Options.” Sure, PNG is a great format for use in MS Office, but personally, I’d like a little more control over how it’s saved, such as the resolution and whether the background is transparent. To be able to see—and change—the save options, use the File>Export command instead of Save for Microsoft Office. Choose PNG in the Format (PC: Save As Type) pop-up menu, name the file, and click Export (PC: Save) to see the PNG Options dialog, where you can make changes. (Or you could select the Save for Web command in the File menu, choosing PNG in the pop-up menu under Preset.)
In the Actions palette (found under the Window menu), you can record, edit, and play automated functions to speed up your work. In the Actions palette’s standard view, every step of an action is visible and can be turned on and off. The other possible view is Button Mode (chosen from the palette’s flyout menu). In Button Mode, you only see the name of the action and its keyboard shortcut, if one has been assigned. So you can use this display mode to either click on an action to play it, or to remind yourself of the F-key shortcut. To return to standard view, go back to the palette’s flyout menu and deselect Button Mode. (Note: If you’ve assigned a modifier key to your shortcut, such as the Shift key, this will not be reflected in the Button Mode—for some reason. You’ll only see the Function key listed.)

In Chapter 2, we show you how to customize your own keyboard shortcuts. Here’s one little extra tip that you may discover on your own, but we thought we’d make sure that you did by adding it in here. There are a few unusual commands that are kinda “hidden” in the Keyboard Shortcuts dialog (Edit>Keyboard Shortcuts). With Menu Commands selected in the top-left pop-up menu, scroll down to the very bottom of the dialog and click on the triangle beside any of the Other options (e.g., Other Select, Other Text, etc.). Look in those lists and you’ll find useful keyboard commands, such as Switch Selection Tools or New Swatch.
