
Different Strokes colors, swatches, fills, and strokes
You can customize the Swatches palette (Window>Swatches) to have your choice of colors, patterns, and gradients appear in every document. To do this, you need to open a document called Adobe Illustrator Startup, found in the Illustrator CS2 Applications (PC: Program Files) folder under Plug-ins. There are actually two documents, one for RGB and one for CMYK. Open the document that corresponds with whatever color schematic you use most often. Once the document is open, add or delete swatches for colors, gradients, and patterns. Save the document, restart Illustrator, and from then on, the Swatches palette will contain your swatches.

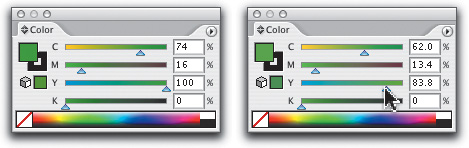
If you have created a color using CMYK or RGB sliders in the Color palette (Window>Color) and now you want a slightly lighter or darker version of that color, you can adjust all the sliders at the same time. Hold down the Shift key as you drag one slider and the other three sliders will move together, creating a lighter or darker shade of the color.
By default, the Eyedropper picks up everything—fill and stroke color, stroke attributes, transparency, etc. (These options are set by double-clicking on the Eyedropper tool in the Toolbox.) To pick up only the color (without changing the default settings) press-and-hold the Shift key and click with the Eyedropper on an object that has the color you need.

Anything you drag into the Swatches palette (Window>Swatches) will become a pattern, but it takes a bit of planning to create a seamless repeating pattern. Start by creating a square with no stroke—pick a fill color if you want your pattern to have a background. Draw the shape you want in your pattern, center it, and then copy it four times, lining up each one’s center on each corner of the square. Select the square, Copy it (Command-C [PC: Control-C]) and Paste in Back (Command-B [PC: Control-B]), and then change the fill to none. Select all the pieces (Command-A [PC: Control-A]) and drag them into the Swatches palette. Now you can use the pattern swatch to fill any object.

It’s possible to transform only the pattern within an object, without moving the object itself. You can do this with any of the transformation tools (Rotate, Scale, Shear, etc.) while holding down the tilde (~) key. Keep the key held down as you transform—don’t let go or the object will be transformed instead.

If you need to change the fill of an object and the stroke is active (or vice versa), the Color palette offers a simple solution. With the object selected, press-and-hold the Option key (PC: Alt key) as you click on the color ramp at the bottom of the Color palette, and the color will be applied to the opposite of what is active. That is, if the stroke is active, Option-click (PC: Alt-click) to apply the color to the fill. This only works when you click on the color ramp or the black or white squares to the right of the color ramp—it does not work in the Swatches palette.

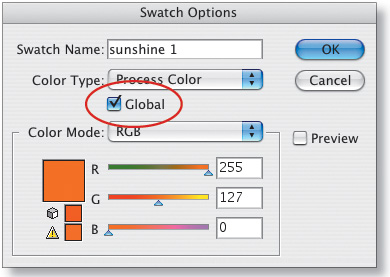
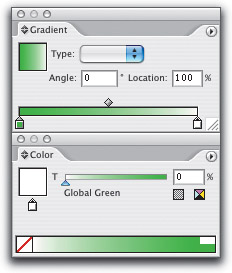
Global color lets you create a document in which you can easily change colors at once, throughout all objects. Start by creating a new swatch in the Swatches palette (Window>Swatches) by using the palette’s flyout menu and choosing (strangely enough) New Swatch. Click on the Global checkbox. Use this color to fill and/or stroke images, using different percentages of the color (just make sure you have the color selected and then adjust the Tint percentage slider in the Color palette). You can also create a gradient using different percentages of the global color by dragging the swatch to the gradient ramp in the Gradient palette. Later, if you need to change all objects to a different color, you can either edit the global color by double-clicking it in the Swatches palette, or create a new global color swatch and press-and-hold the Option key (PC: Alt key) as you drag it over the original global color swatch. (Before replacing the global color, make a duplicate of the swatch by dragging it onto the New Swatch icon in the Swatches palette.)

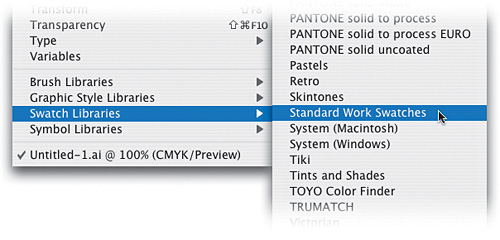
You can grab colors (and more) from an existing Illustrator document without opening the file. From the Swatches palette (Window>Swatches), use the flyout menu and choose Open Swatch Library, then select Other Library. Then browse and find the document you want and click Open. A second Swatches palette will open with all the swatches from the other document. (One way to use this is to create for each client or project a document that contains only the swatches you use for that purpose, then load them as you need them.)

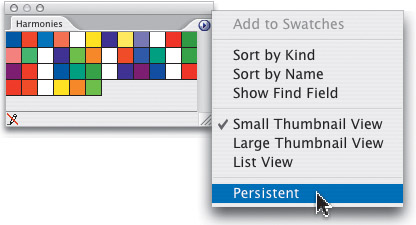
After you’ve loaded swatches from a preset library, you can make sure that library loads each time you launch Illustrator. To do that, first load the library from the Swatches palette’s flyout menu. Once it’s open, position the palette where you want it to appear, then use the flyout menu from that library’s palette, and choose Persistent. (This also works for Symbols and Brushes libraries, but doesn’t work on libraries that you’ve opened from another Illustrator document.)
You can sample color from any-where on your computer—or anything you can see, that is. Just take the Eyedropper tool (I) and click-and-hold anywhere on the artboard. Then, while still holding, drag the Eyedropper tool over any color you can see, including in other applications, other files, or on your desktop. In this example, we’re sampling a color from a photo that’s open in Photoshop.

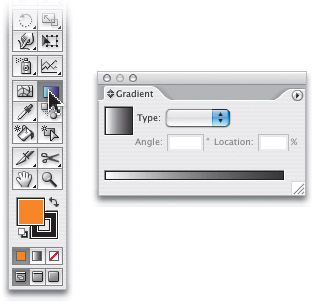
Here’s a quick way to open the Gradient palette: Just double-click on the Gradient tool in the Toolbox and the palette will open (or move to the front if it’s hidden behind other palettes).
To create a gradient using only one spot color, you’ll get better printing results if you create a gradient that goes from 100% to 0% of the same color (rather than using white as the second color). Just drag your spot color twice to the Gradient Slider in the Gradient palette (found under the Window menu), then select the second color stop, go to the Color palette, and change its percentage to zero in the Tint Percentage field.
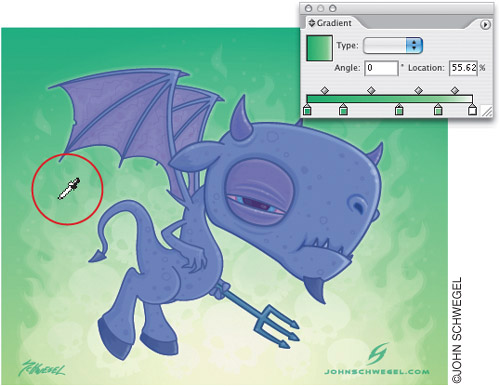
You can pick a color from an object in a document and use it to color a gradient stop. In the Gradient Slider, click on the stop you want to change and then pick the Eyedropper tool. Hold down the Shift key and click on an object to use its fill color for the gradient stop.
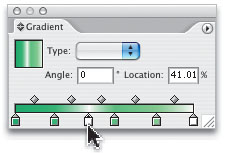
If you need to use the same color elsewhere in a gradient, you can easily copy a stop. In the Gradient Slider on the Gradient palette (Window>Gradient), press-and-hold the Option key (PC: Alt key), and then click on a stop and drag a copy to create a new color stop on the gradient.
In the Gradient Slider on the Gradient palette (Window>Gradient), you can swap colors by holding down the Option key (PC: Alt key), and dragging an existing stop (the color you want) on top of another stop (the color you want to replace).

If you have selected an object filled with a gradient and you try to edit the gradient, you may run into a challenge. If you go to the Gradient palette (Window>Gradient), click on a color stop in the Gradient Slider, and then click on a swatch, the object’s color will change to the swatch rather than editing the gradient. To apply a swatch to a color stop, click on the stop, hold down the Option key (PC: Alt key), and click on a swatch in the Swatches palette (Window>Swatches). You can also click-and-drag a swatch from the Swatches palette and drop it onto the Gradient Slider to create a new stop in that color (just don’t let go of the swatch—click-and-drag in one step). If your stop changes color, but your gradient doesn’t reflect the change, simply click on the stop and slide it a little. The gradient will then change.

Here’s a great, quick way to change the stroke of a path, even if it’s not selected. Just drag a swatch from the Swatches palette or Color palette (both found under the Window menu) onto an unselected path. If the stroke is not active in the Toolbox, press-and-hold the Shift key once you start to drag the swatch onto the path.
If you need to change the color mode being used by the Color palette (from RGB to CMYK, for example), just press-and-hold the Shift key, and click on the color ramp at the bottom of the palette. With each click, you’ll cycle through the various color modes.

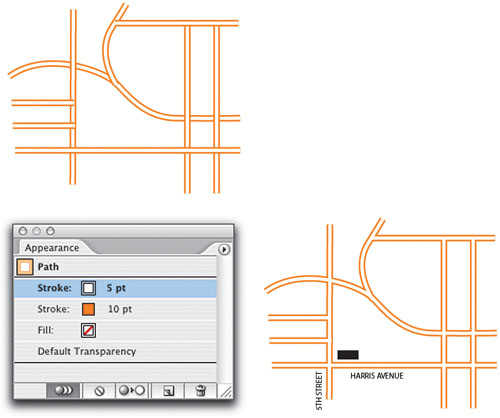
Here’s a great way to use multiple strokes without creating multiple objects. Draw your path and in the Appearance palette (Window>Appearance), use the flyout menu to Add New Stroke. Double-click on each stroke in the Appearance palette and adjust the stroke width, color, and stacking order (using the Stroke palette, Color palette, etc.) to get the effect you want. (In our example, we chose a white, 5-point stroke and placed it above our wider 10-point stroke.) If you are working with multiple objects and need to get the “intersecting streets” look, select all the paths and press Command-8 (PC: Control-8) to create a compound path.
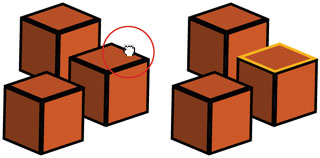
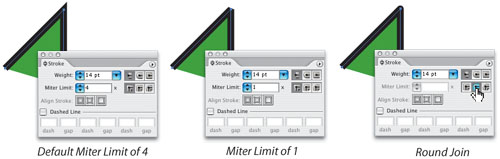
When you create a path that has a sharp corner, you have a couple of options for making it “less pointy” (how’s that for technical terminology?). In the Stroke palette (found under the Window menu), you can either adjust the Miter Limit field by entering a lower number or, in many cases, it is simpler to change the join from Miter Join to Round Join or Bevel Join by clicking on one of the Join icons. (The same concept applies to the corners of a rectangle.) Remember to expand the Stroke palette (using the palette’s flyout menu) if you can’t see the Miter Limit or Join icons.
After you’ve sampled a color from an object with the Eyedropper tool (I), you can apply the color to an unselected object by pressing-and-holding the Option key (PC: Alt key). This turns the Eyedropper tool into the Black-tipped Apply-it Eyedropper tool (okay, we made up that name)—click and the color is applied.

By default, the Live Paint Bucket (K) will paint only the fill of the area you’ve hovered over. (It paints with the Fill and Stroke colors showing in your Toolbox. To use the colors of another object, such as the small star in our image, click on that object and then Command-click [PC: Control-click] on the object you want to paint.) If you want to change the stroke color of an object using the Live Paint Bucket, press-and-hold the Shift key while hovering over the stroke and the cursor will change to a paintbrush, indicating you’re now painting the stroke. (The other option is to double-click on the Live Paint Bucket and change the tool options to Paint Fills and Paint Strokes. Then the tool will affect either fill or stroke, depending on where it is positioned. You will see a paint bucket when you are hovering over the fill and a paintbrush when you are hovering over the stroke.)

The Toolbox displays the last solid color and gradient fills you’ve used. After you have selected an object, check to see if your last-used color or gradient appears in the icons (shown here) just below the Fill and Stroke colors near the bottom of the Toolbox. If so, you can apply the last solid fill color you used by pressing the comma (,) key. To fill an object with the last gradient you used, press the period (.) key. Of course, this won’t work if you’re using the Type tool (T). (Note: Although Illustrator implies you should use the Shift key by showing < and > in the Toolbox, you don’t need to do this. Instead, consider the keys as the comma and period keys.)
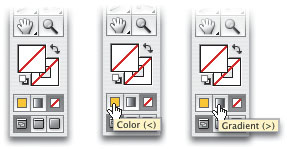
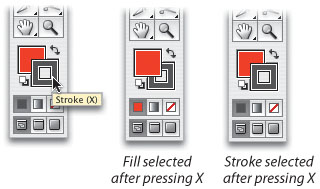
Before you choose a color, you need to indicate whether you are working on the fill or stroke for the selected object. At the bottom of the Toolbox, look at the two icons that represent the Fill (left) and Stroke (right). The icon in front indicates which is active, fill or stroke. If the stroke is active and you want to work on the fill (or vice versa), press X. Each time you press X, you will toggle between an active fill or stroke (unless you are using the Type tool).
Need to change the fill or stroke of an object to None? After indicating whether you want to affect the fill or the stroke (see previous tip), press the forward slash key (/). (If you need a reminder as to which slash key to use, look at the “None” symbol, as shown here. And if you’re using the Type tool [T], stop it. It won’t work for this tip.)

Okay, so you have an object that has a red fill and a black stroke and now you want to see it the other way around. Press Shift-X and the fill and stroke will be swapped (in this case resulting in a black fill and red stroke).
When you click on the New Swatch icon in the Swatches palette (Window>Swatches), you’ll get, yes, a new swatch. However, the swatch will be a process color. If you want a spot color swatch, hold down the Command key (PC: Control key) as you click on the New Swatch icon. To edit your spot color, head to the Color palette (Window>Color).

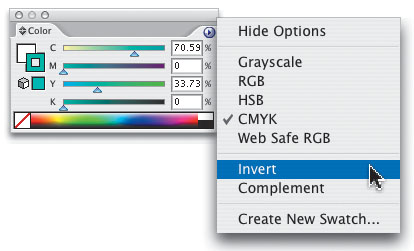
To choose the complementary color of the current fill or stroke (depending on which one is active in the Toolbox) of a selected object, hold down the Command and Control keys (PC: Control only), and click in the color ramp at the bottom of the Color palette. (Or, use the flyout menu in the Color palette and choose Complement.)

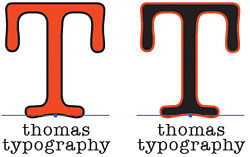
To pick the inverse of the current fill or stroke (depending on which one is active in the Toolbox) of a selected object, press-and-hold Command-Shift (PC: Control-Shift), and click on the color ramp on the bottom of the Color palette. (Or, use the flyout menu in the Color palette and choose Invert.)
If you’ve used a color or gradient for various objects and you want to replace that color with another one, press-and-hold the Option key (PC: Alt key), and drag the new replacement swatch over the original swatch. If you’re using global color, meaning you’ve checked Global in the New Swatch dialog when you created the color, all objects using the original global color will change to the new color. (Note: Doing this will remove the original swatch from the palette. So, if you want to keep the original color, drag the swatch onto the New Swatch icon to duplicate it before using this replacement method.)
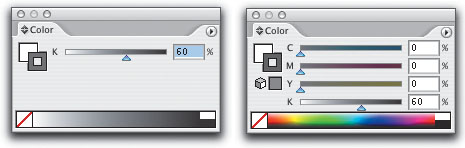
Huh? Okay, so you want to fill an object with 60% gray. You could change the Color palette (Window>Color) to Grayscale from the flyout menu and enter 60 in the Tint Percentage field. However, that means that your object will always be gray, so you won’t be able to change it to color in the Color palette, unless you first change the mode of that object to CMYK. Instead, stick with CMYK and just enter 60 in the K field—that way you can always change to a color from the Color palette whenever you want.
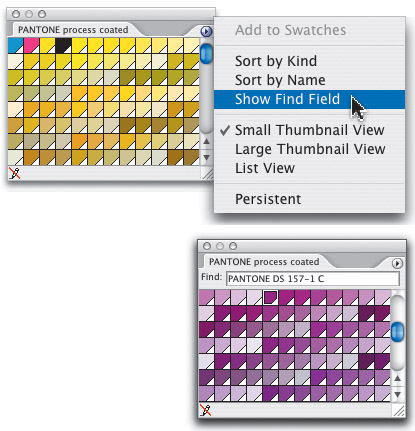
If you need to pick a specific Pantone color, go to the Window menu and choose the appropriate Pantone library from the Swatch Libraries. Use the flyout menu in the Pantone palette and choose Show Find Field. Then enter the Pantone number you need in the Find field (type in only the number, there’s no need for “Pantone”).
Although it is possible to print a grayscale version of a document using the Print command, on some color inkjet printers the results may be less than satisfactory. Instead, make a quick grayscale version of your document by selecting all the artwork and from the Filter menu, choosing Colors>Convert to Grayscale (gradients and patterns will not be converted). If you like, save as a different name, or just print and then undo the filter.

You can edit Illustrator’s startup documents to customize your palettes, but this doesn’t really help if you are constantly changing sets of swatches. Instead, consider saving and using libraries. Add and delete swatches until the Swatches palette contains your choice of swatches and then use the palette’s flyout menu to choose Save Swatch Library. Name it and save it in the Swatches folder in the Illustrator CS2 Applications (PC: Program Files) folder under Presets. Restart Illustrator, and from then on you can access your library from the Window>Swatch Libraries>(yourlibrary).

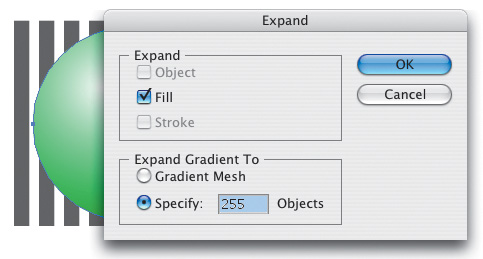
There are times when you may have to expand a gradient to convert it to a series of objects (for example, if you are having trouble getting a gradient to print and/or look the way you want). With the object selected, go to the Object menu and choose Expand. In the dialog, choose between Gradient Mesh and Specify Objects. To expand a gradient-filled object with the last-used settings, press-and-hold the Option key (PC: Alt key) as you choose Object>Expand.
Considering how different shades of colors, grays, and stroke widths can look on different printers, you may want to create a printer test page that contains boxes filled with a variety of shades of gray, standard colors, paths with different stroke widths, and type in various small font sizes. Anytime you want to decide on the best color, shade, or stroke width to use, print your test page, and use that as your guide. (If your final output is always the same printer, create a test page that contains every swatch and gradient and use it to choose swatches based on the printed version rather than the screen.)

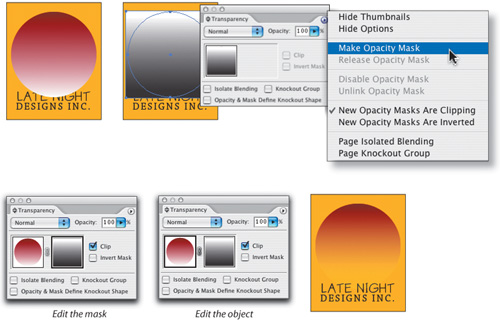
Unfortunately, in Illustrator you cannot create a gradient that goes from a color to transparent as you can in Photoshop. To work around this, create a gradient using the color you need plus white. Fill the object with the gradient and then create an opacity mask to gradually change the object to transparent. To do this, create a rectangle slightly bigger than your object and position the rectangle over the object. Fill the rectangle with a black-to-white gradient, positioning the black over the area of the original object where you want the gradient to be see-through. Select both objects and from the Transparency palette (Window>Transparency), use the flyout menu to choose Make Opacity Mask. If you need to adjust the effect, click on the mask thumbnail (that’s to the right of your object) in the Transparency palette and then adjust the position of the rectangle and/or the gradient. To return to regular editing, make sure you click on the object’s thumbnail (that’s to the left of the mask) in the Transparency palette.
By default, Illustrator uses the path of an object for measurements, alignments, etc., ignoring the stroke width. No matter how thick the stroke, the size of the object will be measured based on the position of the path. If you want to use the stroke width (and position) as the reference rather than the path, press Command-K (PC: Control-K) to go to the Preferences dialog and check Use Preview Bounds. From then on, all operations will be measured based on the thickness and position of the stroke, as shown here in the Transform palette (Window>Transform).

The only downside to the previous tip is that you change the setting for all operations to use the stroke width. If you’re using the Align palette (Window>Align), there is a quicker way for one-time uses. Use the flyout menu in the Align palette and click on Use Preview Bounds to turn it on when you want to use it and turn it off when you’re done. In other words, the Align palette temporarily overrides the Preferences setting.
