Nip/Tuck: selecting, editing, and transforming

If you’ve made a challenging selection of a number of objects, you don’t want to have to do that again, so save yourself the effort. With the objects selected, go to the Select menu and choose Save Selection. Give your selection an appropriate name and click OK. From then on, if you need to make that difficult selection, just choose it from the bottom of the Select menu. (If you have deleted one or more objects from the page, whatever objects remain in that saved selection will be selected.)

Use the Pencil tool (N) to reshape any existing path by drawing. Make sure the path is selected, then click-and-drag with the Pencil tool to redraw the path. You must start fairly close to the path for Illustrator to recognize that you are redrawing versus creating a new path. How close? That depends on the preference for the Pencil tool. Double-click on the Pencil tool in the Toolbox to set the distance from the path in the Options section of the dialog—just click Edit Selected Paths and choose your pixel amount.

So, does this concept also work with the Paintbrush tool (B)? Well, kinda. The Paintbrush tool can only be used to reshape paths that were created with the Paintbrush tool (whereas the Pencil tool will reshape any path, including those created with the Paintbrush tool). Double-click the tool in the Toolbox to change its preferences, just like the Pencil tool (see previous tip).

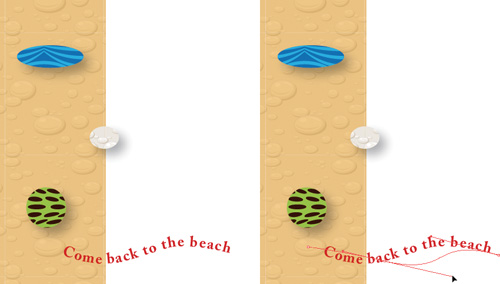
It’s easy enough to create type on a path in Illustrator. Just create a path, grab the Type tool (T), and click on the path to start aligning your type to it. However, once you do this, it appears as if your path is gone. Don’t worry, it’s not. Just switch to the Direct Selection tool (A), and click on the actual path. Don’t click on the type, because that will just select the entire object. You want to make sure you click on the path to display any anchor points or directional handles. Then, you’re free to manipulate the path just as you would any other path in Illustrator.
When you are using the Scissors tool (C) to cut a path, you may want to add an anchor point or two to help edit the path. Rather than switching to the Pen tool (P) or the Add Anchor Point tool (+), just press-and-hold the Option key (PC: Alt key) and the Scissors tool will switch (temporarily) to the Add Anchor Point tool. Click on the path to add a point, then let go of the Option key to return to the Scissors tool.

It’s important to recognize the difference between Join and Average & Join. If you select the end-points of two paths with the Direct Selection tool (A) and choose Object>Path>Join (Com- mand-J [PC: Control-J]), a straight path will be created to join the two paths. If you want the paths to be joined together using a common point, first choose Average (Command-Option-J [PC: Control-Alt-J]), then use Join.

As shown in the previous tip, to join two open paths using a common point, you select the end-points of both paths with the Direct Selection tool (A). Choose Average from the Object menu (Object>Path>Average), click Both for Axis in the resulting dialog, and then click OK to make the two anchor points share one location. Then it’s back to the Object menu to choose Path>Join. To trim the process down to one step, just select the two end-points, press Command-Option-Shift-J (PC: Control-Alt-Shift-J) to Average and Join in one step.
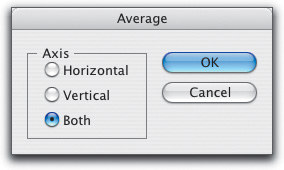
When you use the Attributes palette (Window>Attributes) to show the center of a star, you’ll note that the center point isn’t exactly centered. Rather than try to explain why this happens (which isn’t really important since we can’t change it), let’s see how to find the true center of a star. Select the object, then choose Edit>Copy (Command-C [PC: Control-C]), and then Edit>Paste in Front (Command-F [PC: Control-F]). From the Object menu choose Path>Average (Command-Option-J [PC: Control-Alt-J]). In the dialog, click Both for Axis. The point that appears is the true center of the object.

Perhaps you are trying to scale one object to fit within a second object, or you need to make an object smaller, but you’re not sure by how much. Try this method: With the object selected, double-click on the Scale tool and enter 98% if you’re scaling down, or 102% if you’re making it larger. That will scale the object 2% smaller or larger. (You can choose Copy from the dialog to make a smaller or larger copy of your object, like we did in our example here.) Then press Command-D (PC: Control-D) to repeat the transformation. Each time you press this shortcut, the object will scale by 2% (smaller or larger, depending on the value you entered), allowing you to scale a bit at a time.

Here’s a neat trick when using the Scale tool (S). While you’re scaling an object, try pressing- and-holding the Option key (PC: Alt key), and that will make a duplicate copy of the object for scaling instead of modifying the original. This just saves you the step of creating the duplicate first and lets you do it all in one step.

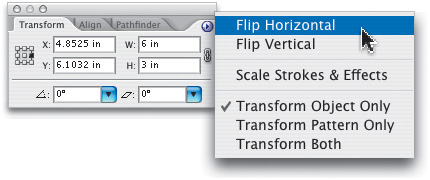
When you use the Transform palette (Window>Transform) to change the size of an object, you can enter the width and the height for a selected object and press Return (PC: Enter). Another option is to enter either width or height and keep the other measurement proportionate by pressing Command-Return (PC: Control-Enter). For example, if your object is 1.5 inches high by 3 inches wide, change the width from 3 to 6 inches and press Command-Return (PC: Control- Enter), and the height will automatically change to 3 inches.

When you need to flip an object horizontally or vertically, ignore the Reflect tool and jump right to the Transform palette (Window>Transform). Select the object and from the palette’s flyout menu, choose either Flip Horizontal or Flip Vertical.
When you are using any of the liquify tools (Warp, Twirl, etc.) and your brush is the wrong size, press- and-hold the Option key (PC: Alt key), and drag to change the size. Drag outwards to make the size larger, drag inwards to make it smaller. (Note: Using Option/Alt alone will alter the brush size non- proportionally. If you want to keep the brush as a perfect circle but change its size, use Option-Shift [PC: Alt-Shift].)

Use the Select>Same options to select objects that have the same Fill Color, Fill & Stroke, Blending Mode, etc. Then, the next time you need to make a selection using the same “select same” criteria, press Command-6 (PC: Control-6). (Note: If your selection requires a fill and/or stroke color(s), make sure you have those colors selected in the Toolbox.)

If you want to see if you’ve used a specific color in your document—and if so, where—with nothing selected, click on the swatch in the Swatches palette and then use Select>Same> Fill Color and every object filled with that color will be selected (regardless of which layer they’re on).

Use the Direct Selection tool (A) to select individual paths and anchor points, even when they’re part of a group. To select the entire path, press-and-hold the Option key (PC: Alt key) as you click on the path. To take this a step further, each time you click on the same path—with the Option key (PC: Alt key) held down—you will select the group that contains the path, and then the group that contains the group, and so on. You’ll really have to try this one to see how useful it is!

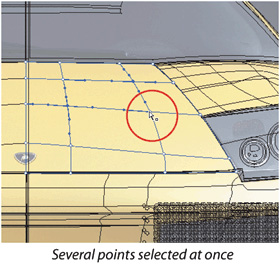
Here’s a great tip when working with the Mesh tool (U). Many times, you’ll need to select an existing mesh point to change its color or placement. Well, if you use the Mesh Tool to select points, you’ll find that you wind up inadvertently adding a mesh point here or there because you didn’t click on the exact point. Instead of using the Mesh tool for this, try pressing-and- holding the Command key (PC: Control key) and that’ll switch to the Direct Selection tool (A). Now you won’t have to worry about adding mesh points that you didn’t want all over the place.

Take the previous tip a step further by adding the Shift key into the mix. While holding down the Command key (PC: Control key) to select certain points, hold down the Shift key to select multiple points. This comes in handy when you want to change the color of several mesh points at once.
You can perform simple math in the Transform palette or the Control palette, both found under the Window menu. For example, if you need to make an object one-third of its width, just click after the current size in the Width field and type /3. Use / for divided by, * for multiplied by and + or - for, well, you know. Then press Return (PC: Enter) and Illustrator will do the calculation and transform accordingly.

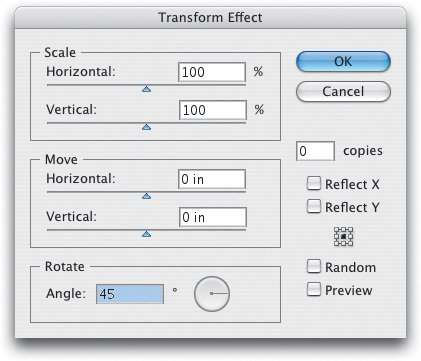
When you use any of the transformation tools such as Scale (S) or Rotate (R), the effect is permanent once you save and close the document. For example, rotate an object, save the document, and close it. Next time you reopen the document, there is no easy way to undo this change. Instead, consider using the Transform command under the Effect menu. You’ll find it here: Effect>Distort & Transform>Transform. In the dialog, check the Preview option and then apply whatever transformation you like. Once you’ve clicked OK, you’ll always be able to access and edit these transformations (even after closing the document) by selecting the object, looking in the Appearance palette, and double-clicking on Transform.
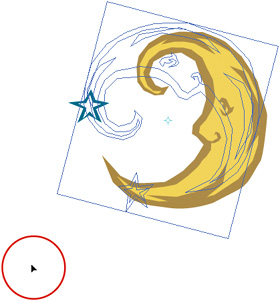
When you’re using the Rotate tool (R), keep this in mind. If you leave the cursor too close to the original rotate bounding box, the results can be somewhat erratic. For more precise control, move the cursor farther away from the object you’re rotating. That will give you more control over positioning it.
To rotate and copy an object a specific number of times so you end up with even angles between objects, let Illustrator figure it out for you. Select your object, then with the Rotate tool (R), press-and-hold the Option key (PC: Alt key), and click on the bottom of the object. In the Rotate dialog, enter 360/x, with x being the number of objects you want. Then click Copy. The object will be copied and rotated the correct number of degrees. Then press Command-D (PC: Control-D) x-2 times (with x being the number you used before) to complete the effect. For example, for eight objects you’d enter 360/8 in the Rotate dialog, click Copy, and then press Command-D six times (since you already have the original and the first copy).

Need to repeat the last Pathfinder effect you just used? Use the flyout menu in the Pathfinder palette (found under the Window menu) and choose Repeat (name of Path-finder), or press Command-4 (PC: Control-4).

With all transformation tools, such as Scale, Rotate, and Shear, you can transform manually by dragging the mouse or numerically. Double-click on any transformation tool to get a dialog for a numeric transformation. By default, the reference point for the transformation is the center of the object. But to open the dialog and set a different reference point, press-and-hold the Option key (PC: Alt key) and click in the spot you’d like to use as a reference point.

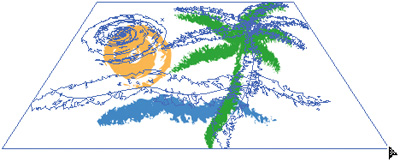
Add all kinds of extra functions to the Free Transform tool (E) by using a number of different keys, after you click on a corner handle. For example, press-and-hold the Command key (PC: Control key) as you click-and-drag to distort; press Command-Option-Shift (PC: Control-Alt-Shift) to distort perspective; press Command-Option (PC: Control-Alt) to shear an object; press-and-hold Shift to scale; etc.
When you want to transform multiple objects, you have a couple of choices. One option is to select the objects and use transformation commands (Object>Transform), such as Scale or Rotate. This will transform the objects as if they were one object. The other choice is the Transform Each command (Object>Transform>Transform Each). Use this dialog to transform the separate objects, and take advantage of a preview.

To select an object hidden behind another object, select the top object, and then press Command-Option-left bracket ([) (PC: Control-Alt-left bracket). That will select the next object, below the selected object. Keep pressing the same shortcut to select the next object down. To select back the other way (Select>Next Object Above), press Command-Option-right bracket (]) (PC: Control-Alt-right bracket). In our example, we selected the top object (part of the face), and used the shortcut to select the next object below.

This one is new and it may slip under your radar if you aren’t looking closely at CS2’s new feature list. In the Stroke palette, you’ll see options for aligning a stroke. The default used to be center, which means that half of the stroke width would flow along the inside of the path and half would flow along the outside of the path. However, there was no way to change it. But now you can change this to outside or inside as well.

When you scale an object to make it larger or smaller, you’ll have to decide whether you want the stroke and effects to scale also (in general, this is usually the best choice). Although this option is controlled by the General Preferences (under the Illustrator menu in OS X or the Edit menu in Windows), there is a quicker way to change this setting. Double-click on the Scale tool to open its dialog. Either check or uncheck the Scale Strokes & Effects box, and that will not only change the setting for the selected object, but will also change the preference from then on.

You may find that you enter a value in the Transform palette and, after pressing Return (PC: Enter), you get an odd value. For example, you type in 3 for the width, but after pressing Return (PC: Enter), it says 3.01. One factor that can cause this is a function called Snap to Point. Turn this off from the View menu or press Command-Option-” (PC: Control-Alt-”), and you should now get the exact value you enter.

To move an object to a specific area and copy it, use the Transform palette. Enter the amount you’d like to move the object in the X or Y field and press-and-hold the Option key (PC: Alt key) as you press Return (PC: Enter). Keep in mind the reference point in the proxy.

Here’s a weird one: The Knife tool (Shift-K) doesn’t use the Shift key to cut in a straight line. Although every other tool uses Shift as a constraint for straight lines, with the Knife tool you hold down the Option key (PC: Alt key) to cut in a straight line. Use Option-Shift (PC: Alt-Shift) to cut in a straight horizontal or vertical line.

The Move command (Object>Transform>Move) and the Measure tool (nested under the Eye- dropper tool in the Toolbox) work very nicely together. Start by selecting your object, then click-and-drag with the Measure tool to “measure” the distance and angle you want to move the object. The numbers will appear in the Info palette (Window>Info), but more importantly, the Move command will use these measurements. Use the Move command (Command-Shift-M [PC: Control-Shift-M]) and click OK to move the object the specific distance and angle you just measured.

When you’re using the Pencil tool (N) and need to smooth out your path, just hold down the Option key (PC: Alt key) before clicking-and-dragging to temporarily activate and use the Smooth tool. Then let go of the key to return to the Pencil tool.

When you use the Simplify command (Object>Path>Simplify) to adjust a path, take advantage of the Show Original option to compare the effects of the Simplify command with the original path. The original path will be shown in red, while the simplified path will display in blue.

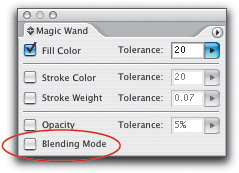
If the Magic Wand tool (Y) isn’t doing its job the way you think it should (i.e., it’s not selecting objects that it should be selecting), make sure the blending modes are not causing a problem. Double-click on the Magic Wand tool in the Toolbox to open its palette and uncheck Blending Mode. Why? When it is checked, the wand will only select objects with the same fill and the same blending mode. (Note: If this option isn’t showing, go to the palette’s flyout menu and select Show Transparency Options).
Selecting an object’s bounding box while using the Selection tool (V) is a great way to make quick transformations, such as scaling and rotating without switching to the transformation tools. However, one thing it cannot do is to make a copy when rotating or scaling. To do this, you must use a transformation tool and hold down the Option key (PC: Alt key) as you rotate or scale.

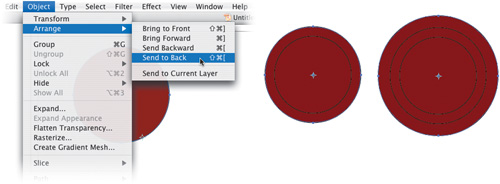
An earlier tip told you not to do any additional operation after transforming an object or the Transform Again command wouldn’t work. Well, here’s one important exception to that rule. You can use the Arrange commands (such as Object>Arrange>Send to Back and Bring to Front) and still retain Transform Again. For example, you scale a circle by Option-clicking (PC: Alt-clicking) on the object with the Scale tool (S) and pressing Copy to make a larger circle. By default, the larger circle will be in front, so use Object>Arrange>Send to Back to reposition the new circle. Then press Command-D (PC: Control-D) to Transform Again (copy and scale the larger circle), and then once again use the Object>Arrange>Send to Back command.
You know that pressing Command-D (PC: Control-D) after transforming an object will apply the transformation again. However, did you know that you can do the same thing to an anchor point? Just select the Direct Selection tool (A) and move a single anchor point on the object. Here’s the tip, though: You won’t be able to press Command-D (PC: Control-D) to redo that transformation/move. You’ll need to manually go through the Object menu under Transform>Transform Again to do this because pressing the Command key (PC: Control key) reverts the tool back to the Selection tool (V).

A very common task in Illustrator is aligning objects horizontally and/or vertically. However, there’s no keyboard shortcut for this task, and if you find yourself doing it a lot, then it can indeed become a nuisance. Well, don’t let that stop you. Just record an action that does it for you. First, draw two objects on the artboard and select both of them. Then choose Window>Actions to display the Actions palette. Click the Create New Action button at the bottom of the palette, and be sure to assign a function key shortcut to it on the resulting dialog. Press Begin Recording, then align the Horizontal and Vertical centers of the two selected objects. Press the Stop Playing/Recording button at the bottom of the palette and you’re done. Now just press the F-key shortcut you assigned to the action whenever you want to align selected objects.

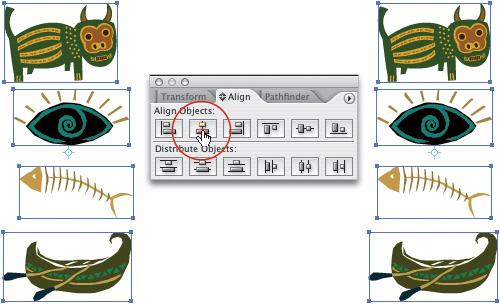
The Align palette (Window>Align) is a simple way to take a number of selected objects and line them up vertically or horizontally by their edges or centers. You can control this alignment by lining up all objects with one specific object. To do this, select all the objects and then click on one object (all the objects will stay selected). Then click on the appropriate icon in the Align palette (or Control Palette) and all the objects will align relative to the object you clicked on. For example, we aligned all of the objects by selecting them and then clicking on the eye graphic. Then we clicked on the Horizontal Align Center icon in the Align palette.
At first glance, it doesn’t appear that it’s possible to convert a dashed line to an outline. If you use either the Object>Expand or Object>Path>Outline Stroke command, you get a solid line. The solution? Select the path and from the Object menu choose Flatten Transparency. In the dialog, move the Raster/Vector Balance slider to 100, make sure Convert All Strokes to Outlines is checked, and click OK. You’ll end up with an outlined dashed line (where each dash is a separate object).

Here’s a cool tip that comes courtesy of David Creamer in Mac Design Magazine. As an interesting way of transforming text without creating outlines, select the type with the Selection tool (V), and use the Object>Envelope Distort>Make with Mesh command (Command-Option-M [PC: Control-Alt-M]). The trick is to make the mesh have only one row and one column. Then use the Mesh tool (U) to distort the corner handles. To edit the text, select it again with the Selection tool, and go back to Object>Envelope Distort and choose Edit Contents (Command- Shift-V [PC: Control-Shift-V]).

Instead of copying-and-pasting from one document to another, just drag-and-drop. Select an object and use either selection tool to drag the object to a second open document. There’s only one catch: If you drag from a document with objects on multiple layers, in the other document all objects will end up on one layer. To avoid this, use the Layers palette flyout menu, and choose Paste Remembers Layers—then the layers will be preserved when you select your object and drag-and-drop.

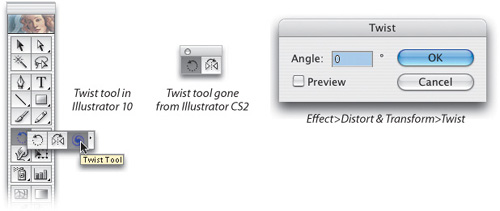
In Illustrator 10, there was a Twist tool (which was also named the Twirl tool in previous versions) nested under the Rotate tool, but it is not in CS2. Why? You’ll have to ask Adobe that one, although we understand that it has to do with the inability of the Twist tool to twist things back to the way they were. Now if you want to twist an object, you’ll have to use Effect>Distort & Transform>Twist. Although you have to distort numerically, the advantage of using the effect is that you can easily change the settings (by double-clicking on Twist in the object’s Appearance palette [found under the Window menu]).