The View viewing, doing, undoing, and more

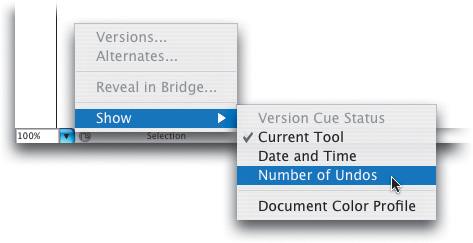
Illustrator has (virtually) unlimited undos. Of course, you could keep pressing Command-Z (PC: Control-Z) over and over again until you run out of undos, but there is an easier way to know how many undos you actually have available. Click on the Status Bar at the bottom-left of the document window (next to your document size). From the popup menu that appears, under Show, choose Number of Undos. Now, you can see how many you’ve got and undo away.
In Illustrator, there is often more than one way to do things, and zooming in and out is no different. You can use keyboard shortcuts to change the view to Actual Size (Command-1 [PC: Control-1]) and Fit in Window (Command-Zero [PC: Control-Zero]), and you can also change to these views using the Toolbox. Double-click on the Zoom tool to change to Actual Size view, double-click on the Hand tool to change to Fit in Window.

Press Command-Zero (PC: Control-Zero) to change the view to Fit in Window. If that’s not zoomed out far enough, try this: Hold down the Command key (PC: Control key) and doubleclick on the Zoom tool in the Toolbox. The view will change to 3.13%, the smallest zoom view possible, which is ideal for those poster-size images.
Before Illustrator CS2, the only way you could switch between open windows was to go through the Window menu and choose the file you’d like to work on. Or, if you were adventurous, you could always do (our personal favorite) the window/palette shuffle and just try to maneuver your open windows around the screen. You’ll be happy to know that Illustrator CS2 for the PC now has a keyboard shortcut to switch between open windows. Just press Control-Shift-F6 to cycle through each open window.
With Illustrator CS2, we now have the ability to use workspaces. Basically, a workspace is the way that, well, the workspace is set up (i.e., palette and Toolbox locations). This is huge if you’re like us and your palettes become a jumbled mess halfway through working on your images, or if you’re an instructor in a classroom and find it tedious to manually reset palette locations of 20 or 30 computers after a class. To help out, just choose Window>Work space>[Default]. This will reset the Toolbox and the palettes to their default locations.

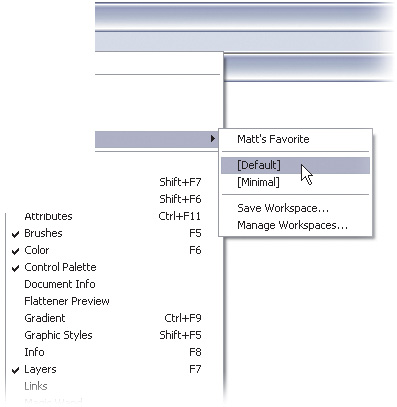
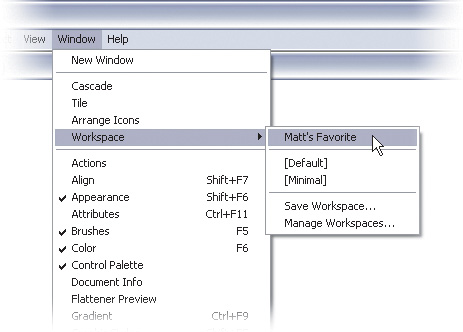
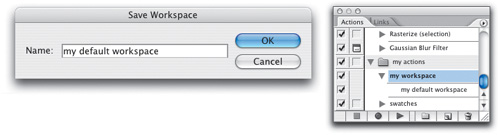
One of the most useful areas of the new Workspace feature in CS2 is the ability to create your own personal workspaces. To do this, set up the palettes you want where you want them. Then choose Window>Workspace>Save Workspace. Give it a meaningful name and you’re in business. Now, if your palettes ever get to the point where everything is a mess (come on, you know it happens to you), then just go under Window>Workspace and pick your own personal workspace. It’ll be right near the top of the menu.
Although you can save your own workspace (Window>Workspace>Save Workspace) in CS2, you cannot assign it a keyboard shortcut. Instead, record an Action: Click the Create New Action button at the bottom of the Actions palette (Window>Actions), give it a functionkey shortcut and press Begin Recording. Then use the flyout menu in the Actions palette to choose Insert Menu Item and go to Window>Workspace to select your custom workspace. Press the Stop Playing/Recording button at the bottom of the Actions palette, and from now on you can press that F-key to change to your workspace.
The new context-sensitive Control palette in Illustrator CS2 is a great way to discover new features and find existing features faster. The ability to access selection-based tools from a single location eliminates the need for multiple palettes. However, sometimes it can be cluttered, especially if you find you don’t use many of its features. If this is the case, then turn some of them off. Just click the small right-facing arrow all the way at the far right of the palette to get the flyout menu. Then click on any items you don’t want it to display anymore.

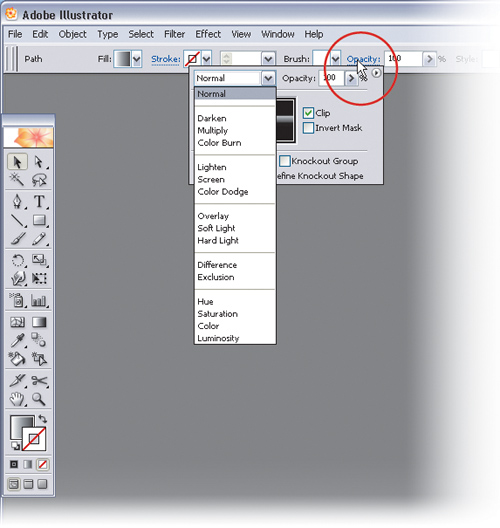
If you use the new Control Palette often, but still have the need to use some of the extended settings that normally appear in a specific palette, then just click on any of the setting names that are underlined and highlighted in blue. For example, the Control Palette displays Opacity, but no Blend Mode settings that you’d normally find in the Transparency palette. Instead of moving to the Transparency palette, just click on the word Opacity and a small palette will pop up below it allowing you to change more than just Opacity.
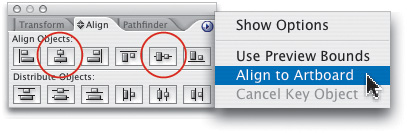
If you drag a guide from the ruler onto the page and you want to make sure it is centered horizontally or vertically, try this: Press Command-Option-; (PC: Control-Alt-;) to unlock the guides. If necessary, make sure that only the one guide is selected by deselecting every guide and then clicking on the guide you want centered. Then in the Align palette (Window>Align), use the flyout menu to select Align to Artboard. Click on the Vertical Align Center icon (or Horizontal Align Center icon, depending on the direction of the guide).

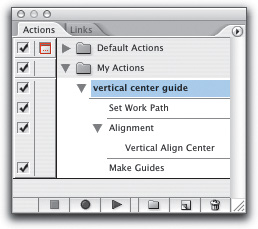
You may be thinking, why not record an action to add centered guides automatically? (I know I was.) You can, but with a bit of a trick. Problem is, you cannot record adding a guide to the page, so you have to use another method. Use the Pen tool (P) (with the Shift key held down) to draw a horizontal line that is wider than the current page, and keep the line selected. In the Actions palette under the Window menu, click the Create New Action icon, give your action a name, and press Begin Recording. Then use the Action palette’s flyout menu and choose Insert Select Path. Next, click on the Vertical Align Center icon in the Align palette (be sure the Align to Artboard option is selected in the palette’s flyout menu), followed by View>Guides>Make Guides. Click the Stop Playing/Recording icon in the Actions palette. Of course, you could also record an action for a vertically centered guide and/or both horizontally and vertically centered guides.
As in many applications, you can add non-printing guides to a document by clicking on one of the rulers and dragging onto the document. As you click on a ruler and drag a guide onto the document, the guide will be based on the ruler you’ve used (top ruler creates horizontal guides, side ruler creates vertical guides). To override this, press the Option key (PC: Alt key) as you drag from the ruler and you’ll get the opposite guide. (Press and release Option/Alt to switch back and forth.)

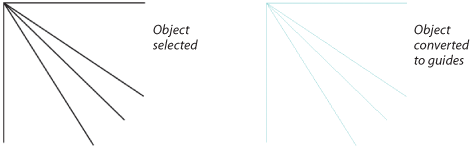
Not satisfied with only horizontal or vertical guides (and why should you be)? Then make your own. Create any object you want to use as a guide, make sure it is selected, and then from the View menu choose Guides>Make Guides (or press Command-5 [PC: Control-5]). To turn your guide back to a regular object, first unlock the guide using Command-Option-; (PC: Control-Alt-;), then use View>Guides>Release Guides (Command-Option-5 [PC: Control-Option-5]).
If you want to have a guide that is locked to an object so that the guide moves with that object, here’s the secret. Create and position a path that you’ll use as the guide with either the Pen tool (P) or Line tool (). Select the path and the other object(s) and press Command-G (PC: Control-G) to group all the objects together. Deselect everything (Command-Shift-A [PC: Control-Shift-A]), and then use the Direct Selection tool (A) to select only the path that you want as a guide. Press Command-5 (PC: Control-5) to convert the path to a guide. From then on, the guide will move with the group.

To quickly change a locked guide into an editable path, hold down Command-Shift (PC: Control-Shift) and double-click on the guide. One very practical way to make use of this shortcut is when you want to adjust a guide. Use this shortcut, move the guide, then press Command-5 (PC: Control-5) to turn it back into a guide.

If you have one or more objects selected and you want to lock everything else, you can do that in one easy step. After selecting the object(s) you want to keep unlocked, press Command-Option-Shift-2 (PC: Control-Alt-Shift-2). To unlock everything, press Command-Option-2 (PC: Control-Alt-2).
In a previous tip, you saw how you can turn any object into a guide. Take this a step further and start using guides as a perspective grid. Just draw straight lines that match the perspective of the objects you’ll be drawing. Once you’re happy with your perspective grid, turn the lines into guides by choosing View>Guides>Make Guides. Then you can ensure that you’ll be drawing to proper perspective throughout your illustration. You can even turn on Smart Guides (Command-U [PC: Control-U]) to help you align your paths to this new perspective grid.

If you use rulers often in Illustrator and get frustrated by having to add them into each new document, then this tip is for you. You can automatically add rulers to each new document by modifying the Illustrator startup file located in your Applications or Program Files, in Adobe Illustrator CS2, in the Plug-ins folder. There are two files, so be sure to change both the CMYK and RGB files.
Quit Illustrator.
This step is optional. In the Adobe Illustrator CS2 Plug-ins folder, duplicate the current default startup file—Adobe Illustrator Startup_CMYK or Adobe Illustrator Startup_RGB—and give it a different name. (This creates a copy of the original startup file in case you need it again. You only need to do this once to back up the original if you want.)
Open one of the default startup files—Adobe Illustrator Startup_CMYK or Adobe Illustrator Startup_RGB—depending on which type of document you intend to use.
Choose View>Show Rulers.
Now, here’s the trick. You can’t just save this file because you haven’t really made any changes that Illustrator will register yet. So, create a rectangle on the artboard using the Rectangle tool (M). Then just delete it.
Save the new file as Adobe Illustrator Startup _CMYK or Adobe Illustrator Startup_RGB (depending on which you opened) in the Plug-ins folder.
Restart Illustrator.

By default, the rulers display with the top left of the page set to zero for the horizontal ruler, while the vertical ruler displays zero at the bottom left of the page. To change the ruler origin, click on the top left corner of the rulers and drag to wherever you want to set zero.

If you have changed the ruler origins and want to put them back to the default setting, double-click on the top left corner between the two rulers.

The unit of measurement in Illustrator is determined in the Preferences (Illustrator>Preferences>Units & Display Performance [PC: Edit>Preferences>Units & Display Performance]). This will affect all aspects of the program that use measurements, including the rulers. However, if you need to quickly override the current measurements, just Control-click (PC: Right-click) anywhere on the ruler and choose your new unit of measurement.
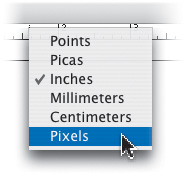
You set the default general unit of measurement in your Preferences (under the Units & Display Performance category) and that becomes the unit used by every dialog and palette (except Stroke and Type). It is possible, however, to override that default simply by typing in the unit you want to use. For example, if your default is set to inches, you can create a rectangle that’s 40 points wide by clicking once with the Rectangle tool (M) on the artboard and then typing “40 pt” in the dialog. Use these shortcuts: in for inches, cm for centimeters, pt for points, px for pixels, or mm for millimeters.

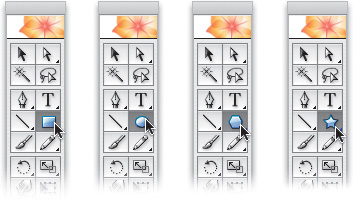
Any tool in the Toolbox that displays a small triangle in the bottom right-hand corner has a set of “hidden” tools that can be popped up by clicking-and-holding on the current tool. Instead of popping up hidden tool menus all the time, make your life easier by tearing off commonly used tool menus. Just click-and-hold on the tool to pop up the other tool choices, and then drag over to the bar at the end of the tool menu. When you release the mouse, the tool menu becomes a floating palette that you can position anywhere you want. If you’re really efficient (lazy?) you can add multiple tool menus all over the place. Tear off tool menus and position them all over the screen. This way, if you have a large monitor, you can always have a Type tool nearby without moving too far.
Here’s a simple way to have your logo (or any other art you need) readily available in every new document you create. Open either the CMYK or RGB Adobe Illustrator Startup file (found in Illustrator CS2>Plug-ins) and paste your logo into that document. Select your logo (if it has text, you’ll have to create an outline by going to Type>Create Outlines) and from the Brushes palette (under the Window menu) click on the New Brush icon. Choose New Art Brush as the type of brush and in the Art Brush Options dialog, click on the second Direction symbol so the arrow displays from left to right. Name your brush and click OK. Delete the artwork and save the document. From then on, you’ll be able to click-and-drag the logo from the Brushes palette onto any new document.

To help simulate what your artwork would look like printed on colored paper, you can change the color of the artboard. From the File menu, choose Document Setup and navigate to the Transparency category. In the View section, click on the top swatch to choose your paper color, then check Simulate Colored Paper. Click OK and the entire artboard will display in your chosen color. This eliminates the need to draw a separate box filled with the paper color. Note: The simulated paper will not display properly if you choose Show Transparency Grid from the View menu.

Some objects, such as rectangles and ellipses, always show the center point, while others, such as polygons, do not. You can choose whether or not to show the center point using the Attributes palette in the Window menu. With the object selected, look in the Attributes palette and click on the small Show Center or Don’t Show Center icon. This does not change the default setting for that tool. Instead, you’ll have to do this for each object.

You can show a non-printing grid by using View>Show Grid, or by pressing Command-” (PC: Control-”). Once the grid is showing, there’s no rule that says it must be perfectly horizontal—why not angle the grid to help you create angled objects? Just go to the Preferences dialog by pressing Command-K (PC: Control-K) and change the Constrain Angle field from zero degrees to whatever angle you want your grid to follow. Hold down the Shift key to force tools to precisely follow the angled grid. Once you’re done, put it back to zero.
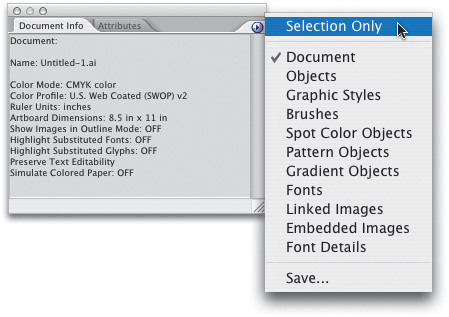
Your document. Want to know what fonts you used, how many objects there are, or if images are linked or embedded? Try the Document Info palette, found under the Window menu. Then use the flyout menu to access all kinds of information about your document. You can even save the information as a text file by choosing Save, in the flyout menu.
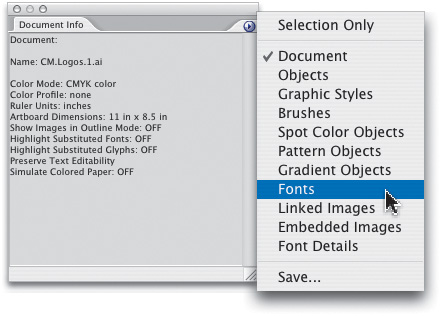
To see a quick summary of everything you need to know about a selected object, use the Document Info palette (Window>Document Info), and choose Selection Only from the flyout menu. Go back to the flyout menu to view other options such as Spot Color Objects, Fonts, Linked Objects, or to save a text file containing all the information.
If you’ve recorded some actions for key operations, you can make use of these actions in another action. Confused? Here’s an example: You have previously recorded an action that scales, rotates, and copies a selected object. Now you want to build on those steps and add to them. Rather than re-creating these steps, the first thing you record in the new action is to play the existing action. (Click the Create New Action icon, play the actions you want, then stop recording.) Simply put, you create an action that plays one or more actions. (It’s easier than it sounds—try it, you’ll like it!)

If you find yourself zooming in and out and scrolling a lot in a document, try saving specific views. To do this, simply change to the view you wish to save by zooming in or out and positioning your view. Then from the View menu choose New View, name the view, and from then on that view will be available at the bottom of the View menu. You can even create views that are in Outline mode rather than the Preview mode. The views you create are saved with the document itself (they are specific to that document as opposed to being global views).

It’s often tempting to zoom way in to look at fine details in your document—remember, Illustrator lets you zoom in to 6,400%. At the same time, it’s easy to get carried away and zoom in more than you need, or at least more than the naked eye can see. Here’s one way to have the best of both worlds. Create a second view of your document and keep it at Actual Size while you zoom in on the other window. From the Window menu, choose New Window, then manually adjust the window sizes so you can see both windows and pick a zoom level for each window.

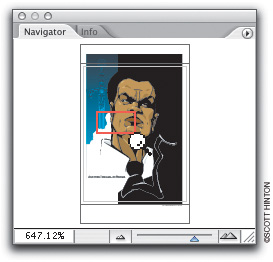
One of the advantages of using the Navigator palette (found under the Window menu) is that no matter how big your document is, you’ll always see a thumbnail view in the Navigator. The red box indicates the portion of the document you are currently viewing in your window. To take full advantage of this thumbnail view and zoom in to a specific location in the document, hold down the Command key (PC: Control key) and click-and-drag in the Navigator thumbnail view. To return to a smaller view, Command-click (PC: Control-click) on the thumbnail again.
To make more room to work, temporarily hide the floating palettes by pressing the Tab key (with any tool active other than a Type tool). The Tab key acts like a toggle switch, so to show the palettes again, press Tab again. The only problem is that the Toolbox disappears too, so if you want to keep the Toolbox and hide the rest of the palettes, press Shift-Tab. As before, press the same shortcut to show the palettes again. (This is a better method than the alternative, which is spending all your time dragging palettes around to get them out of the way.)

If you start to click-and-drag with the Zoom tool (Z) to zoom in on a specific area and then realize you’ve positioned your mouse in the wrong place, don’t let go of the mouse button. Press-and-hold the Spacebar, reposition your cursor, then let go of the Spacebar to continue selecting the zoom area. Once you try this one, you’ll find yourself using it more often than you think.

To present your artwork without the distraction of floating palettes and menus, follow these steps: From the View menu, choose Hide Artboard, then go back to the View menu and choose Hide Page Tiling. Now press the Tab key followed by F and F again. Tab hides all the palettes and pressing F cycles through full-screen views, one of which is Full Screen mode with no menus. If the rulers are showing, press Command-R (PC: Control-R) to hide them. (You can still use the Hand tool [H] to position your graphics, or use your zoom shortcuts to change your magnification.) To return to Standard Screen mode, press Tab and F, and then from the View menu show whatever else you want (rulers, artboard, page tiling, etc.).
If you are having a hard time remembering keyboard shortcuts to show and hide all the floating palettes, focus on one shortcut. Pick a palette shortcut that you do remember (such as F8 for Info), and then dock other palettes into that one. To do this, click on the palette tab and drag onto the bottom of the chosen palette until a solid line appears. This will dock the palettes together, and now the one shortcut will hide and show multiple palettes at once.
Rather than moving all the way over to the Toolbox to click on the Zoom tool, press Command-Spacebar (PC: Control-Spacebar). This will interrupt whatever tool you are using and activate the Zoom tool. Click to zoom in, and then release the keys to return to whatever tool you were using. To zoom out, add the Option key (PC: Alt key), making the shortcut Command-Option-Spacebar (PC: Control-Alt-Spacebar).
Don’t bother clicking on the Hand tool in the Toolbox to scroll your view, either. Just hold down the Spacebar. This will activate the Hand tool so you can scroll, then let go of the Spacebar to continue with your current tool. This works with all tools except the Type tools. (There is a trick, but you’ll have to peek at the text chapter.)
As a quick way to hide all the objects you’re not currently working on, try this: Select the object or objects you want to work on, then press Command-Option-Shift-3 (PC: Control-Alt-Shift-3). All the unselected objects will be hidden. To show all objects again, press Command-Option-3 (PC: Control-Alt-3).

If you want a more precise cursor, press the Caps Lock key. For many (but not all) tools, the tool cursor will change to a crosshair. To switch back to the regular tool cursors, release the Caps Lock key. Here’s another way to look at this: If you use a tool and suddenly it isn’t looking like the normal tool icon anymore, chances are the Caps Lock key is on. Turn off Caps Lock and there’s your tool icon again.

To ensure that an object is exactly centered on your page, use the Align palette (Window> Align or Shift-F7) with one minor change. From the palette’s flyout menu, choose Align to Artboard. Then click on the Horizontal and Vertical Align Center icons to align your selected object to the page.
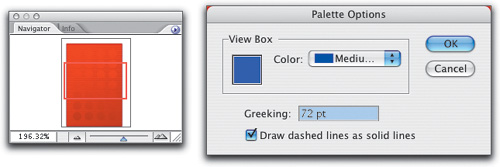
If you’re working on artwork that contains lots of red, the red View Box in the Navigator palette (Window>Navigator) might be a little difficult to see. In this situation (or if you just don’t like the color red), you can change the color of the View Box by using the flyout menu in the Navigator palette and choosing Palette Options. In the resulting dialog, choose the color you’d like to use for the View Box.
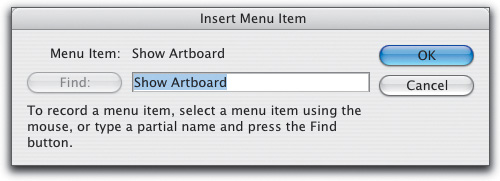
There are some functions that cannot be recorded in an action—such as painting tools, tool options, effects, view commands, and preferences. (In action-speak these are called unactionable.) To add these functions into an action, click the Create New Action icon in the Actions palette (Window>Actions), and choose Insert Menu Item from the palette’s flyout menu to record non-recordable operations. With the Insert Menu Item dialog open, go to the menu command you’d like to use and it will be added automatically in the dialog.
Although it is possible to hide/show guides with the shortcut Command-; (PC: Control-;), you can give yourself even more control by putting guides on their own layer. Click the Create New Layer icon in the Layers palette (under the Window menu), name the layer “guides,” and then add guides to that layer. Then you can hide the guides by clicking on the Eye icon beside the layer name. To take this a step further, you could create several guide layers to give yourself even more options over which guides you’d like to be visible.

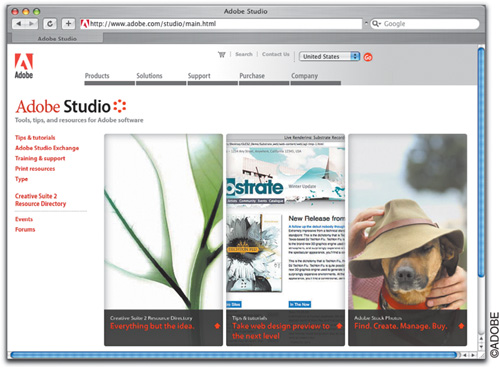
If you need some tips or tutorials, or you would like to download brushes, symbols, styles, actions, etc., check out the downloads through the Adobe Studio Exchange website: www.adobe.com/studio/main.html. Click on Adobe Studio Exchange on the left side of the screen and choose the downloads you’re interested in from the pop-up menu.
You may encounter situations when Illustrator starts behaving strangely. For example, tools aren’t working the way they should or colors or patterns aren’t displaying properly. In cases like this, you probably need to reset the Illustrator Preferences. Although it is possible to find the file and delete it, there is an easier way, especially since you need to launch Illustrator to create new preferences anyway. To reset the preference settings as you launch Illustrator CS2, hold down Command-Option-Shift (PC: Control-Alt-Shift). Note: Unlike previous versions, no dialog will appear, but the settings will be reset.
Having trouble focusing in on those tiny little fields in a palette? Instead, just click on the name of the field and it will highlight. Then type away and you’re all set!

To create a new document with the same settings (width, height, orientation, color mode) as the last document you created, press Command-Option-N (PC: Control Alt-N).

![]() You can use the Page tool (nested under the Hand tool in the Toolbox) to set the page tiling in a document—wherever you position the mouse will be the bottom left corner of the page tiling (this also represents the printable area on your printer). If you’ve experimented with the Page tool and you want to get the page tiling back to “normal” (i.e., centered relative to the page), double-click on the Page tool in the Toolbox.
You can use the Page tool (nested under the Hand tool in the Toolbox) to set the page tiling in a document—wherever you position the mouse will be the bottom left corner of the page tiling (this also represents the printable area on your printer). If you’ve experimented with the Page tool and you want to get the page tiling back to “normal” (i.e., centered relative to the page), double-click on the Page tool in the Toolbox.

There are many sets of tools that you access in the Toolbox by pressing-and-holding on the visible tool, which pops up a menu of additional tools. Another method to switch quickly between tools in a set is to hold down the Option key (PC: Alt key) and click on the visible tool. Each time you click, you’ll switch to the next tool in the set.
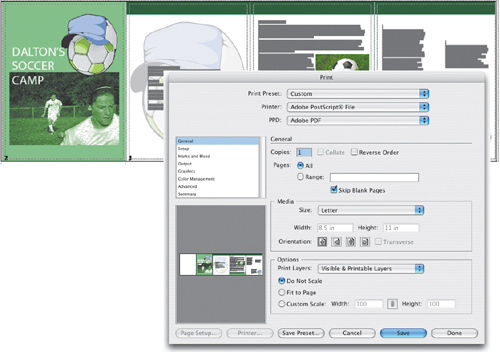
Some people wish that they could create multipage documents in Illustrator. Well, with quite a bit of effort, you can (if you have Acrobat Distiller). First, go to File>New to create a document that is the size of all your pages side by side. For example, a four-page letter-size document would be set up as a landscape page with a width of 34 inches (8.5 x 4) and a height of 11 inches. Either choose View>Show Page Tiling or create guides to help you show the separation of the pages. Once you’ve finished designing your “superpage” and are ready to turn it into a multipage document, go to File>Print and in the Media section choose your orientation (we use Letter for Size, and in the Orientation section check the Portrait Up icon). Go to the Setup category (in the list on the left side of the dialog) and set the Tiling to Tile Full Pages. Then create a Postscript file by changing the Printer pop-up menu to Adobe PostScript File. (Note: You may need to change your PPD pop-up menu to select the correct print driver, depending on your system’s setup.) Click the Save button and give the file a name followed by “.ps” as the file extension. Now launch Acrobat Distiller, open your saved PS document, and the Distiller will save the PDF file as a multipage document.