
Trading Spaces: text, text, text
For the most part, selecting text in Illustrator CS2 is similar to most applications: Double-click on a word with the Type tool (T) to select it; triple-click to select the entire paragraph (as we did in our example). To select a portion of a paragraph (without clicking-and-dragging), there are a couple of options. Hold down the Shift key and press the Right Arrow key, or click once at the beginning of the text, hold down Shift and click at the end of the text you want to select.

To move the insertion point to the start of the previous word, press Command (PC: Control) and the Left Arrow key. We know you’d never guess this, but believe it or not, press Command (PC: Control) and the Right Arrow key to move the text insertion point to the start of the next word (as we did in our example here).

To select a paragraph, try this. Press Shift-Command-Down Arrow key (PC: Shift-Control-Down Arrow key) to select from the current text insertion to the end of the current paragraph. Press Shift-Command-Up Arrow key (PC: Shift-Control-Up Arrow key) to select from the current text insertion to the beginning of the current paragraph. To select the paragraph above or below your current selection, use the shortcut and continue to press the Up or Down Arrow keys, with the Down Arrow key selecting the next paragraph and the Up Arrow key selecting the previous paragraph.
In case you haven’t realized yet, the default font in Illustrator is Myriad. This font is selected in the Font menu, Character palette, and as the Normal Character Style in the Character Styles palette. It is selected even if the document you open doesn’t contain that font or if you last used another font before quitting Illustrator. Are you seeing a pattern here? For some reason, Adobe wants us to use Myriad. Heck, it’s a nice font, so they may be right. But if this bugs you, then you can always change the default font by editing the startup files. It’s a little tricky, but hey... if it really bugs you, then it may be worth it. To change the default font:
Quit Illustrator.
In the Adobe Illustrator CS2Plug-ins folder, duplicate the current default startup file—Adobe Illustrator Startup_CMYK or Adobe Illustrator Startup_RGB—and give it a different name. (This creates a copy of the original startup file in case you need it again.)
Open one of the default startup files (Adobe Illustrator Startup_CMYK or Adobe Illustrator Startup_RGB, depending on which type of document you intend to use).
Choose Window>Type>Character Styles.
Select the Normal Character Style and choose Character Style Options from the palette’s flyout menu.
Select Basic Character Formats on the left side of the dialog, and choose the desired font from the Font Family menu.
Click OK, and save the new file as Adobe Illustrator Startup_CMYK or Adobe Illustrator Startup_RGB in the Plug-ins folder.
Restart Illustrator.

If you have a big long list of fonts, it can take a while to scroll through the list to find the one you want. Instead, get the Character palette from the Window menu and click just to the left of the font name that appears in the palette. Type the first letter or two of the font name you want (as we did here with Trajan Pro). You’ll jump to the first font that matches the letters you type.

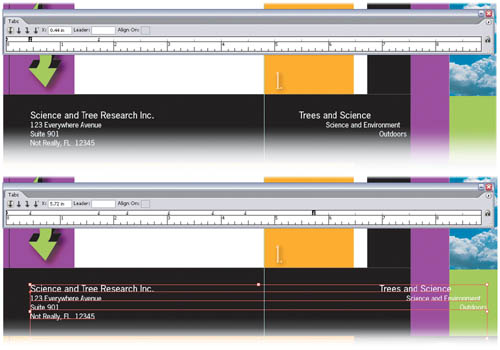
When you’re creating a table using the Tabs palette, you may need to move a tab stop, but you still want to keep the rest of your tabs evenly spaced. To do this, first make sure you have the palette open by choosing Type>Tabs from the Window menu (Command-Shift-T [PC: Control-Shift-T]), then select your table with the Selection tool (V), and while pressing the Command key (PC: Control key), drag the tab stop you need to move. In the Tabs palette, all the tab stops to the right of the one you’re dragging will also move, preserving the space between them.
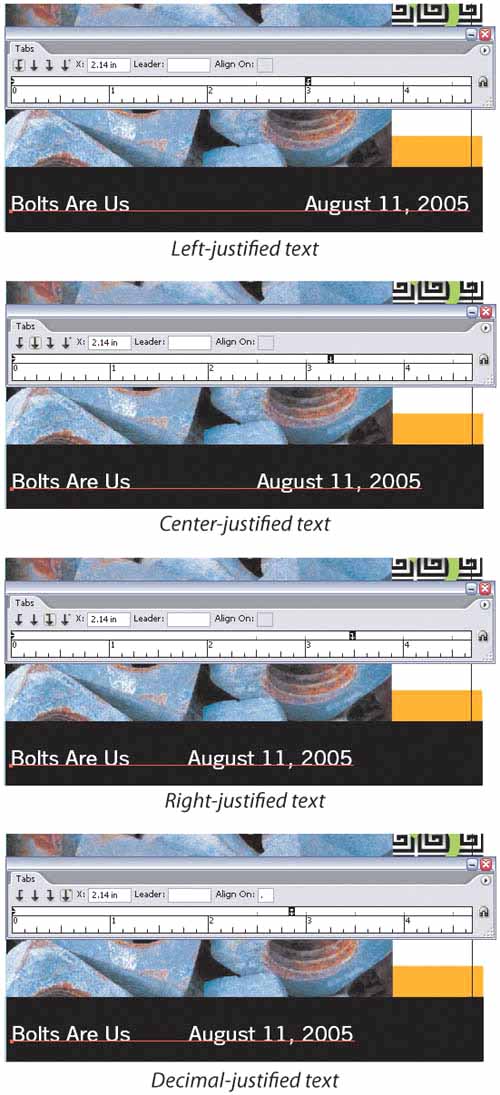
Illustrator lets you add tab stops for left-, center-, right-, and decimal-justified text. Once you have added a tab stop above the Tab Ruler in the Tabs palette (Window>Type>Tabs), you can quickly change between the different tab styles by Option-clicking (PC: Alt-clicking) on the existing tab stop. Each time you click, the tab stop will change to the next style (left-justified, center-justified, etc.).
To delete a tab stop in the Tabs palette (Command-Shift-T [PC: Control-Shift-T]), you click-and-drag it off the Tab Ruler. Rather than manually dragging every tab stop to delete them all, hold down the Command key (PC: Control key) and click-and-drag the left-most tab stop off the Tab Ruler. All tab stops will be deleted. Use the same theory anytime you need to delete all the tab stops to the right of a tab stop: Press-and-hold the Command key (PC: Control key) and click-and-drag the first tab stop you want to delete off the palette and all the tab stops to the right of that tab stop will be deleted.

If you need a bunch of tab stops evenly spaced apart, there’s an easier way than “doing the math” and figuring out where to position each new tab stop. Select a Tab Alignment icon from the row of four icons near the top left of the Tabs palette, click above the ruler to add the first and then the second tab stop, using the space you want between the two. Then, with your last tab stop still selected, choose Repeat Tab from the Tabs palette’s flyout menu to create a whole series of evenly spaced tab stops. (The new, nicely spaced tab stops will appear as wide as you make the Tab Ruler in the Tabs palette. To extend the Tabs Ruler, just click on the bottom-right corner of the palette and drag to the right.)

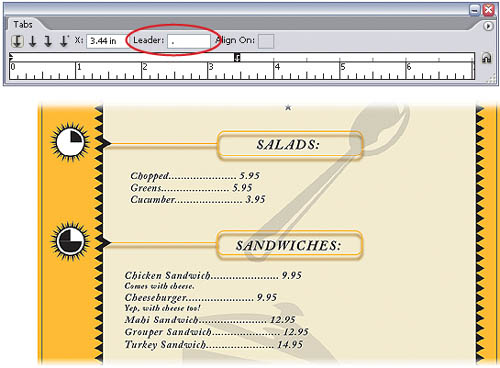
A nice feature in Illustrator CS2 is tab leaders, which provide the ability to fill the space between the type and the tab with a text character. Click on a tab stop in the Tabs palette, enter a character in the Leader field (such as a period), and then press Return (PC: Enter) or Tab to see the results. You can actually enter up to eight characters in the Leader field, so the possibilities are pretty interesting.
When you have a series of text blocks throughout your document and many or all of them use tabs, you’ll need to move the Tabs palette (Command-Shift-T [PC: Control-Shift-T]) from one text block to the next to see the Tab Ruler, and edit the tab stops. Rather than dragging the Tabs palette above each text block, just select the text block with either the Type tool (T) or Selection tool (V), and in the Tabs palette, click on the magnet icon along the palette’s right side (aka: the Position Palette Above Text icon, but who wants to say that?). The Tabs palette will automatically line up perfectly above the selected text block.

This tip is, we’ll admit, a little out there, but there are some interesting uses for this concept. When you add a decimal-aligned tab stop to the Tab Ruler in the Tabs palette (Window>Type>Tabs), by default Illustrator assumes that you want the text to align using the decimal point (a fair assumption). You don’t have to be satisfied with aligning to the decimal point, but instead you can align your text to a character by entering any character in the Align On field at the top of the palette. In our first example, all the tabbed text is aligning to the semi-colons, so the workout times all line up. The second example is a little more unusual, with all the words aligning on the letter “a” in each word.

With a bit of effort, you can create what amounts to graphical tabs. Create a text frame with the Type tool (T) and fill it with text information, separating the text with tab stops by using the Tabs palette (or by simply pressing the Tab key as you type information). Then get the Pen (P) or Line () tool from the Toolbox and draw paths that will replace the tab stops. You can give your paths a stroke color, such as black, but you should avoid a fill color so you can see the effect you’re about to create. Select the paths and the text frame with the Selection tool (V), and from the Object menu choose Text Wrap>Make. Click OK if you get a warning dialog; this is just letting you know that text will be altered. The tabbed text will line up with the paths. To change the text offset or invert the wrap, go to Object>Text Wrap and choose Text Wrap Options. You also may need to use the Direct Selection tool (A) and perform some tweaking to get the ideal result, as we did in our example here.

With most tools, pressing the Spacebar temporarily gives you the Hand tool so you can navigate in the document. Try that while you’re typing and, of course, you get spaces. So how do you do that temporary Hand tool thing when you’re typing? Press Command-Spacebar (PC: Alt-Spacebar), the shortcut for the Zoom tool. Once the cursor has changed to the Zoom tool, let go of the Command key (PC: Control key), and you’ll have the Hand tool, ready to navigate. Let go and you’re right back to typing again.

Here’s a quick way to switch between the Selection tool and the Type tool, allowing you to start editing some text. Using the Selection tool (V) or the Direct Selection tool (A), double-click on some type. The Type tool will be activated and the text insertion point will appear in the location where you clicked.

To create hanging indents easily, select your text with the Type tool (T), go to the Window menu, select Paragraph, and use this formula in the Paragraph palette: Enter a positive value in the Left Indent field, and in the First-Line Left Indent field (right below the Left Indent field), enter the same value with a minus sign in front to make it a negative value. Once you get it to work just right, create a paragraph style by choosing Type>Paragraph Style from the Window menu. In the palette that appears, choose New Paragraph Style from the flyout menu. Now you can select your style in the Paragraph Styles palette, and you don’t have to go through all that formatting again.

Illustrator has a long memory when it comes to text settings, so if you have changed indents, baseline shift, etc., you have in effect, changed the default settings. To make sure you don’t get unexpected results, you probably want to deselect the text and then either manually change the settings back to “normal,” or use the type palette’s flyout menu and choose Reset Palette. You’ll need to do this for both the Character and Paragraph palettes.

When you create area type, there are two different objects that can be colored: the type itself and the box that contains the type. To change the fill color of the type, go to the Toolbox, click on the Fill color swatch, and get the Selection tool (V). Then click on the text object and choose a fill color from either the Color or Swatches palette. Use the Direct Selection tool (A) to change a text object’s color without affecting the text. First, click away from the object to deselect it, then click directly on the path of the object (typically the text frame). Now when you choose a fill color from the Color or Swatches palette, you will fill the text object, not the text.

Before using the Type tool (T), you can change from the regular horizontal Type tool to the Vertical Type tool by holding down the Shift key before clicking on the artboard (notice your cursor changes direction). As you may have guessed, the Shift key also works the opposite way if you’ve selected the Vertical Type tool from the Toolbox. The Vertical Type tool will change into the regular Type tool when you Shift-click.

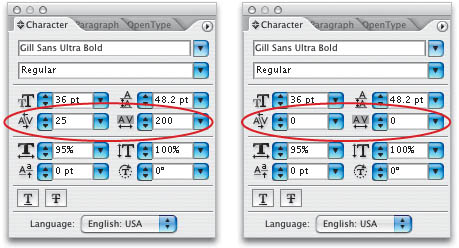
Adjusting the space between a pair of letters is known as kerning (yes, you probably knew that, but we needed to be sure). To adjust the kerning between two letters, click between the two letters with the Type tool (T), press-and-hold the Option key (PC: Alt key), and use the Right Arrow key to increase the kerning or the Left Arrow key to decrease the kerning. To change the kerning using larger increments, add in the Command key (PC: Control key), making the shortcut Command-Option-Right (or Left) Arrow key (PC: Control-Alt-Right [or Left] Arrow key), depending on whether you’re increasing or decreasing the kerning.

Tracking loosens or tightens the amount of space between selected text or a full block of text (again, sorry if that’s old news to you). The shortcuts to adjust the tracking with the keyboard are the same as with kerning, except to select a range of text. Highlight all the text you want to adjust using the Type tool (T), press-and-hold the Option key (PC: Alt key), and use the Right Arrow key to increase tracking or the Left Arrow key to decrease tracking. To change the tracking using larger increments, press Command-Option-Right (or Left) Arrow key (PC: Control-Alt-Right [or Left] Arrow key) while you have your text block selected.

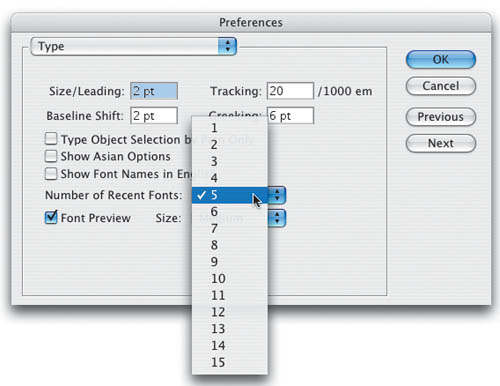
One of the newer options in Illustrator CS2 is to view the most recent fonts you’ve used in Illustrator. That is, you’re not just seeing the fonts you used in the current document, but the fonts you’ve used since you last launched Illustrator. If you open a new document, your most recent fonts show up in the list under Type>Recent Fonts. You can control how many fonts display in the list through Illustrator’s Preferences. Press Command-K (PC: Control-K) to open the Preferences dialog, and from the pop-up menu in the top-left corner, choose Type. Pick a number from 1–15 in the Number of Recent Fonts pop-up menu.
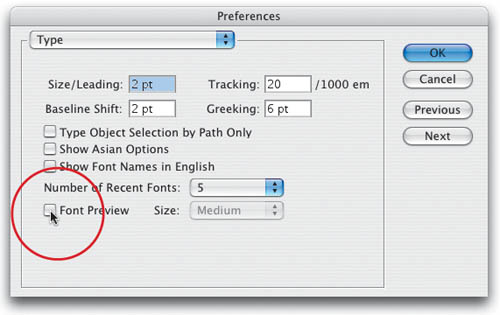
The ability to see the typefaces in the font list is a personal choice: Some people like the option to see what all their fonts look like in the Character palette (Window>Type>Character), others don’t like the slight slow down in the font list. To turn off this preview in the font list, go to Illustrator’s Preferences (Command-K [PC: Control-K]) and choose Type from the pop-up menu in the top-left corner of the dialog. The checkbox to the left of the Font Preview Size pop-up menu turns the preview on and off.
We showed you in an earlier tip how to reset all the settings in the Character and Paragraph palettes (choosing Reset Palette from the respective palette’s flyout menu). If you want to keep everything else as-is but reset just the kerning and tracking to zero, here’s how: To reset the tracking, highlight your text with the Type tool (T) and press Command-Option-Q (PC: Control-Alt-Q). To reset the kerning, click the Type tool where you’ve adjusted the kerning and use the same shortcut. Needless to say, make sure you’ve got the Option (PC: Alt) key held down, or you’ll get a very different result!
Here’s a cool way to jump right into formatting your text if the Character palette isn’t visible—or even open. Press Command-Option-Shift-M (PC: Control-Alt-Shift-M) to highlight the font field in the Character palette, which will also open the palette if necessary (whether you’re using the Type tool or not).

Chances are the text that someone typed for you may not be ideal—perhaps they used two spaces after a period, or typed in inches symbols rather than quotation marks. After placing the text file (File>Place), get Illustrator to automatically strip out all errors using Smart Punctuation. Select the text with either the Selection (V) or Type (T) tool, choose Smart Punctuation from the Type menu, then check the items you want to replace in the resulting dialog.

To reset just the Horizontal Scale field to its default setting of 100%, without affecting all the other text settings in the Character palette (Window>Type>Character), press Command-Shift-X (PC: Control-Shift-X). You can use this tip to reset the horizontal scaling of an entire selected text block or to simply change the setting in the Character palette before you create another text object.

Here’s a quick way to set the leading (the space between lines of type) to the same size as the current font size: Highlight your text with the Type tool (T), double-click on the Leading icon in the Character palette (just to the left of the Leading field). Just in case you’re interested, equal font and leading sizes is known as solid leading, and it works best when your text is in all caps, so there are no descenders to bump into the type below.
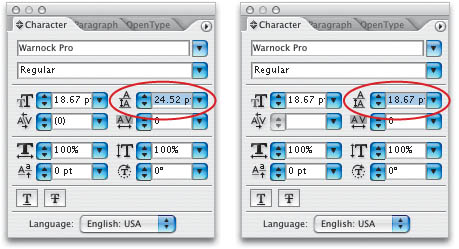
To quickly increase or decrease the leading, select text with either the Selection (V) or Type (T) tool and press Option-Up or Down Arrow (PC: Alt-Up or Down Arrow). At first it might seem a little counter-intuitive because the Down Arrow key increases leading (in most palette fields, the Down Arrow makes values smaller). But when you think about it, it makes perfect sense—increased leading makes the second line of type move down, therefore we use the Down Arrow key to increase leading. Here’s where it gets a little weird: If you click in the Leading field in the Character palette, the Up and Down Arrow keys work like all the other fields, so you would press the Up Arrow key to increase leading! It’s all very logical—really it is!

Unfortunately, there is no command to convert paragraph text (that is, text you’ve created using a text box) into regular point type (meaning type that is not confined to a text box). You’ll have to do this conversion yourself by highlighting all the text in the text frame with the Type tool (T) and cutting it using the Command-X (PC: Control-X) keyboard shortcut. Then, deselecting the text box (Command-Shift-A [PC: Control-Shift-A]) and clicking with the Type tool on the artboard. This creates a new, single text insertion point and you can press Command-V (PC: Control-V) to paste the text. (You can tell the difference by clicking on the text with the Direct Selection tool (A), which will show a text bounding-box or a path, as seen here.)

Each time you click with the Type tool (T) and then decide not to add type after all, you may be adding small text insertion points that could end up causing you grief. You won’t see these points in Preview mode, but if you switch to Outline mode from the View menu, you’ll see a little X for each insertion point. To automatically remove all of the extra points, go to the Object menu and choose Path>Clean Up. In the dialog, make sure that Empty Text Paths is checked and then click OK. All those unnecessary—potentially troublesome—empty text points will go away.

Okay, it’s not exactly making a typeface, but it’s a pretty cool way to change the look of type in a way that’s very flexible. Enter some text with the Type tool (T), select it with the Selection tool (V), and from the Effect menu choose Stylize>Round Corners. Check the Preview checkbox and then experiment with the Radius field using the Up and Down Arrow keys to get the result you want. Of course, the effect can always be edited by double-clicking the words Rounded Corners in the Appearance palette.
