
Chapter 12. Raspberry Pi Media Center
I am a huge set-top box fan. Not the rubbish one your cable company gave you, but the ones that let you connect to virtually every streaming service under the sun. In fact, if it weren’t for my wife and daughter, I would have gotten rid of digital cable service years ago and devoted myself entirely to streaming media services such as Netflix and Hulu. The only way that somebody will take my Apple TVs away from me is from my cold, dead hands!
One of the biggest attractions of the Raspberry Pi is its utility as a media center platform. Recall that the combination of the Broadcom VideoCore IV GPU and the HDMI output means that you have the capability of sending 1080p High Definition to your monitor or HD television.
As it always happens in open source development, several software options exist for building a Raspberry PI media center. Some of the most popular choices include
![]() Raspbmc: http://is.gd/OX7dMY
Raspbmc: http://is.gd/OX7dMY
![]() RasPlex: http://is.gd/HfEIIi
RasPlex: http://is.gd/HfEIIi
![]() OpenELEC: http://is.gd/drMs1E
OpenELEC: http://is.gd/drMs1E
![]() Xbian: http://is.gd/7LUXtc
Xbian: http://is.gd/7LUXtc
Three of these software/OS packages are derivatives of XBMC Media Center (http://is.gd/xwVddv), the gold standard in open source media player software. You can see a screen shot of the XBMC interface in Figure 12.1.

Note that because I wanted the highest-quality screen shots for this book, the XBMC interface images I give you in this chapter are from the Windows version rather than from Raspbmc. The good news is that XBMC 12.2 “Frodo” looks and behaves exactly the same regardless of its host hardware—hence the great beauty of platform-independent, open source software.
A Bit o’ History
The name XBMC originally stood for Xbox Media Center because the software was intended to run only on modified (“modded”) Xbox consoles. These days, of course, XBMC runs on almost every desktop or mobile platform, and to that end, uses the backronym “XBMC Media Center.”
Note: XBMC and Raspbian
For those who are more experimentally minded, you can actually install XBMC directly on top of Raspbian. Check out the Raspbian XBMC project page (http://is.gd/vxKwGJ) for more details.
I like to describe XBMC as a Swiss Army knife media application that can play just about any media file you can throw at it. Here is a run-down of some of the best features of XBMC:
![]() Plugins: You can easily extend XBMC functionality by installing add-ons that (for instance) display local weather, pull Internet Movie Database (IMDB) metadata for your currently loaded media, and so forth.
Plugins: You can easily extend XBMC functionality by installing add-ons that (for instance) display local weather, pull Internet Movie Database (IMDB) metadata for your currently loaded media, and so forth.
![]() Media Scrapers: XBMC can scan any media you load and automatically detect everything there is to know about the item. For instance, the scraper can detect an MP3 audio file’s album track listing, song lyrics, and so on.
Media Scrapers: XBMC can scan any media you load and automatically detect everything there is to know about the item. For instance, the scraper can detect an MP3 audio file’s album track listing, song lyrics, and so on.
![]() Apps: You can launch applications that enable XBMC to tie into streaming media services such as Netflix.
Apps: You can launch applications that enable XBMC to tie into streaming media services such as Netflix.
![]() Codec Richness: Compressor–Decompressors (Codecs) allow media player software to recognize, decode, and play various media. Not only does XBMC ship with a ton of media codecs, you can manually install additional codecs to ensure that your custom media is playable from within XBMC.
Codec Richness: Compressor–Decompressors (Codecs) allow media player software to recognize, decode, and play various media. Not only does XBMC ship with a ton of media codecs, you can manually install additional codecs to ensure that your custom media is playable from within XBMC.
For a more comprehensive listing of XBMC features, read the associated Wikipedia article at http://is.gd/yZmSK8.
But Will It Blend?
If you haven’t yet seen the Blendtec’s “Will It Blend?” viral marketing videos, then do yourself a favor and check them out on YouTube at http://is.gd/8gWfN9.
“Will It Blend?” reminds me of a question that is more cogent to us as Raspberry Pi enthusiasts—namely, “But does the Raspberry Pi have enough processing power to run XBMC appropriately?”
Ah yes, the eternal question. First things first: The Model A board simply will not do as a media player. Number one, there is the limited memory issue. Number two, you’ll need a hardwire Ethernet connection to get appreciable network speeds, and the Model A has no RJ-45 port.
Yes, yes—I know what you are thinking: “Couldn’t I add an RJ-45 wired Ethernet port to my Model A Pi by using USB?” This is true enough, but I nonetheless submit that the latency you’ll experience in not employing wired Ethernet that is built into the Pi’s circuitry (like we have with the Model B) makes the process barely worthwhile.
As in all things, though, your mileage may vary.
The primary differentiator among the various Raspberry Pi XBMC ports is how completely they take over the host operating system. Remember that with a device as hardware-constrained as the Pi, the fewer software layers you have between XBMC and the underlying hardware, the better.
There is vociferous debate online as to who makes the best XBMC player for the Pi. However, in this book we install Raspbmc because it is (generally) considered to be the most stable and mature XBMC port.
Introducing Raspbmc
As you probably guessed, Raspbmc (http://is.gd/OX7dMY) is a portmanteau of Raspbian and XBMC. Thus, Raspbmc replaces the operating system on your Raspberry Pi instead of serving as a third-party app that you install on an existing Raspbian installation.
Raspbmc is the brainchild of Sam Nazarko of London and achieved final 1.0 release status in February 2013. For in-depth coverage of all things Raspbmc-related, see Sam’s book Raspberry Pi Media Center, by Packt Publishing (http://is.gd/GDTsVR).
Basically, Sam stripped Raspbian down to almost bare metal and wove XBMC on top of it. To that point, don’t expect to get anything more than Terminal access to your Raspbmc system. Because X11 is not present, you’ll never get VNC remote connections to work.
You need the following components to get Raspbmc up and running on your Raspberry Pi Model B:
![]() HDMI connection: You need a monitor or television (remember, no VNC support in Raspbmc).
HDMI connection: You need a monitor or television (remember, no VNC support in Raspbmc).
![]() A decent-sized SD card: Go for a 16–32GB, Class 10 card unless you are absolutely committed to storing your media on a USB thumb drive.
A decent-sized SD card: Go for a 16–32GB, Class 10 card unless you are absolutely committed to storing your media on a USB thumb drive.
![]() Keyboard and mouse: These peripherals are necessary due to the “no VNC” rule mentioned previously.
Keyboard and mouse: These peripherals are necessary due to the “no VNC” rule mentioned previously.
![]() Wired Ethernet connection with DHCP: Although you can get Wi-Fi going easily enough after Raspbmc is installed on your Pi, your best bet—at least during the installation phase—is to plug in a physical Ethernet cable and let the Pi pick up an IP address from your local DHCP server.
Wired Ethernet connection with DHCP: Although you can get Wi-Fi going easily enough after Raspbmc is installed on your Pi, your best bet—at least during the installation phase—is to plug in a physical Ethernet cable and let the Pi pick up an IP address from your local DHCP server.
Task: Installing Raspbmc Under Windows
1. Download the Windows Raspbmc Installer from the Raspbmc website (http://is.gd/jdMxS2) and extract the .ZIP file contents to a local directory on your Windows system.
2. Open Setup.exe, which starts the Raspbmc Installer. The interface is shown in Figure 12.2.
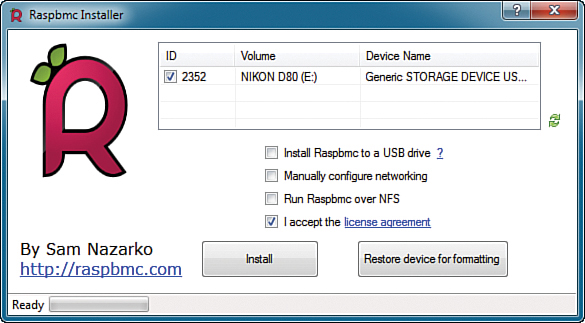
3. Take pains to verify that you select the correct volume in the device list. You want to flash an SD card, remember, and you don’t want to pick the wrong drive. (You also need to select the I accept the license agreement option before clicking Install to flash your card.)
4. When the installation process completes, you see a Congratulations! message informing you to boot your Raspberry Pi from the newly flashed SD card. Note also that you need to plug in the Ethernet cable into your Model B board, have your home network configured for automatic (DHCP-based) IP address assignment (if it’s not already), and have your keyboard, mouse, and HDMI monitor all plugged in and ready to rock.
Task: Installing Raspbmc Under OS X
1. Open up a Terminal prompt and download the Python 2-based installer:
sudo curl -O http://svn.stmlabs.com/svn/raspbmc/testing/installers/python/
install.py
Note: Curl
The curl program is used in Linux to fetch web-based content from a command line. Note also that the parameter after curl is an O (the letter), as opposed to a zero.
2. Now run the install.py Python script:
sudo python install.py
Hey, you are applying some of our newly found Python skills already—awesome! You can view the screen output of these commands in Figure 12.3.

Configuring Raspbmc
Flashing your SD card by using the Raspbmc installer does not actually fully set up your environment; instead, the installer formats your SD card, creates one big partition, and installs the barest layer of Raspbian on the card.
Upon first bootup the Raspbmc installer takes over the system, downloading and applying Raspbian to your Pi. You can see this in action in Figure 12.4.

FIGURE 12.4 Raspbmc automatically installs the latest version of the software during the Pi’s first startup.
After installation completes, you see the XBMC interface and are asked to choose a default language. You need to navigate to System, Settings, Appearance, International to verify and set your localization settings for
![]() Region
Region
![]() Character Set
Character Set
![]() Timezone country
Timezone country
![]() Timezone
Timezone
You’ll find that XBMC navigation is pretty intuitive by using the keyboard and mouse. As shown in Figure 12.5, each configuration window can be closed individually by clicking the “X” in the upper-right corner of each window. Also the navigation buttons in the lower-right of each screen take you back one screen or jet you to the Home screen, respectively.

FIGURE 12.5 The XBMC user interface can be navigated easily with a keyboard, mouse, or infrared (IR) remote.
Getting Your Remote Control Working
What is a set-top box worth if you can’t control it with your favorite remote control? Nothing, in my estimation. Your first order of business is to study the list of Raspbmc-compliant remotes at the Raspbmc website (http://is.gd/5Sw23o).
Second, you need to decide whether you want to control your Raspbmc box via Internet Protocol (IP) or Infrared (IR). An example of an IP-powered remote control is an iOS or Android app that enables you to control your Raspbmc media center.
IR is a line-of-site remote control protocol that has been around seemingly forever; I’m sure that you use IR remotes to control your television sets right now.
If you decide to go the IP remote control route, then you should investigate mobile apps designed to control XBMC over your local IP network:
![]() Official XBMC Remote (Android): http://is.gd/k4UeWY
Official XBMC Remote (Android): http://is.gd/k4UeWY
![]() Official XBMC Remote (iOS): http://is.gd/qZkt3l
Official XBMC Remote (iOS): http://is.gd/qZkt3l
Just for grins, let me show you how to set up your iOS-based XBMC Remote app to connect to your Raspbmc system.
Task: Controlling Your Raspbmc Box from iOS
1. In XBMC, navigate to System, Settings, Services, Remote Control and enable Allow programs on other systems to control XBMC.
2. On the same configuration page, navigate to Zeroconf and enable Announce these services to other systems via Zeroconf. For more information on Zeroconf, see the note “What is Zeroconf?”
3. One more setting group: On the Webserver page, ensure that Allow Control of XBMC via HTTP is enabled and optionally change the listener port (8080 is a good choice) and add a username and password (xbmc/xbmc is a common combination).
4. Verify your IP address by going back to the home page, navigating to System, System Info, and checking out the IP address field.
5. Download and install the Official XBMC Remote from the App Store.
6. Start the app and tap Add Host.
7. In the New XBMC Server dialog box, add as many details as you can regarding your Raspbmc (see Figure 12.6).

FIGURE 12.6 The more information you can provide to the remote control app, the better the chance is that the app will discover your Raspbmc box on your network.
Zeroconf is a shorthand notation for Zero-Configuration Networking, which is a collection of technologies that operates over TCP/IP and allows network devices such as computers and mobile hardware to communicate without the need for special setup procedures. For instance, Apple has a Zeroconf protocol called Bonjour that enables, for instance, your iPhone to discover your iMac’s iTunes music library and stream the songs from the computer to the mobile device. Pretty neat, eh?
8. Tap Save to save your configuration, and tap Find XBMC to locate your device on the network.
With a successful connection, you can fully control your Raspbmc box remotely as shown in Figures 12.7 and 12.8.
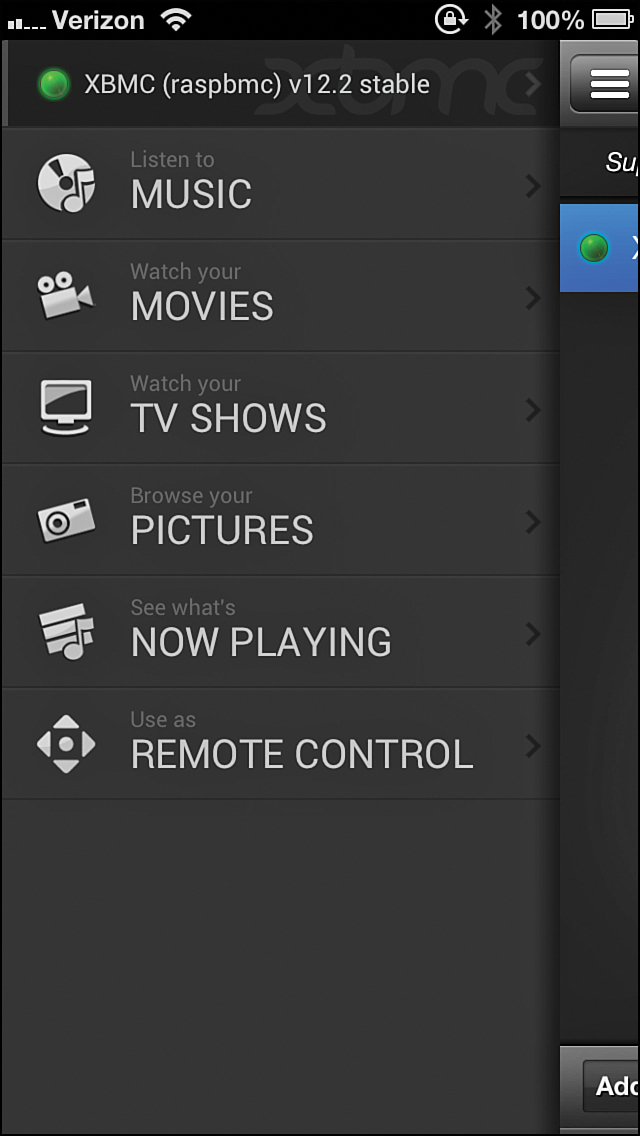

FIGURE 12.8 The Official XBMC Remote app serves as a, well, remote control for your Pi (among many other things).
Task: Controlling Your Raspbmc Box from a Web Browser
1. Ensure that Raspbmc is configured to allow HTTP access as outlined in the previous procedure.
2. Fire up a web browser from a computer on the same LAN as your Raspbmc system and navigate to the proper URL. You can obtain your system’s IP address by navigating from the home page to System, System Info and examining the IP address field.
3. Next, navigate to System, Settings, Services, Webserver and enable the option Allow control of XBMC via HTTP. For instance, imagine my system has the IP address 10.1.10.1. Now I can open a web browser, type http://10.1.10.1 as the address, and remotely connect to my Raspbmc server.
4. Upon a successful connection, you are presented with a simple, yet intuitive method for managing the content on your Raspbmc device. The default web interface is shown in Figure 12.9.

Note: Extensibility, Ho!
In the XBMC Webserver Property page, note that you can download additional web interface skins that change the website’s look and feel. Click Default and then click Get More... to do some shopping. Of course, your Raspbmc device must be connected to the Internet for this procedure to work.
Task: Configuring a GPIO-based IR Receiver
![]() Purchase an IR receiver and wire it directly to the GPIO pins on the Pi board.
Purchase an IR receiver and wire it directly to the GPIO pins on the Pi board.
![]() Purchase a USB IR receiver, plug it into your powered USB hub, and load the appropriate drivers.
Purchase a USB IR receiver, plug it into your powered USB hub, and load the appropriate drivers.
![]() TSOP38238 IR receiver (http://is.gd/y9XzOC)
TSOP38238 IR receiver (http://is.gd/y9XzOC)
![]() Female-to-female jumper wires (http://is.gd/anFo27)
Female-to-female jumper wires (http://is.gd/anFo27)
![]() Mini remote control (http://is.gd/dp0mPW)
Mini remote control (http://is.gd/dp0mPW)
1. As shown in Figure 12.10, connect three female-to-female jumper wires to (a) the three leads of the IR receiver and (b) three GPIO pins. The receiver-to-GPIO lead mapping is as follows:
![]() IR receiver pin #1 to GPIO pin #18 (data)
IR receiver pin #1 to GPIO pin #18 (data)
![]() IR receiver pin #2 to GPIO pin GND (ground)
IR receiver pin #2 to GPIO pin GND (ground)
![]() IR receiver pin #3 to GPIO pin 3V3 (3.3V power)
IR receiver pin #3 to GPIO pin 3V3 (3.3V power)

FIGURE 12.10 Schematic showing you how the GPIO pins connect to the IR sensor by means of female-to-female jumper wires.
2. The Linux Infrared Remote Control (LIRC) software component is what orchestrates communication between your hardware IR remote and XBMC. Log into XBMC on your Raspberry Pi and navigate to Programs, Raspbmc Settings, IR Remote.
While you are testing the hardware remote on its own, ensure that the setting Enable GPIO TSOP IR Receiver is disabled. When you’re ready to test your hardware remote, come back to this setting and enable it. Remember while you’re in the Settings area to make a note of your Raspbmc’s IP address.
Note: TSOP, What’s That?
In electronics, TSOP stands for Thin, Small Outline Package and refers to the physical form factor of the IC chip itself. Thus, TSOP is a general descriptive term that applies to many types of IC components, not simply IR receivers.
3. The remainder of the configuration is done from the Linux command line. You can use SSH to connect to your Raspbmc box in the same manner you can with traditional Raspbian. (Remember that you learned how to use SSH in Chapter 7, “Networking Raspberry Pi”). The default username is (surprise, surprise) pi, and the default password is raspberry.
Rather than give you a couple pages of Linux terminal commands, I will simply refer you to the “Using an IR Remote with a Raspberry Pi Media Center” tutorial at Adafruit (http://is.gd/97RvGt).
For instructions and/or advice on getting your own personal IR remote working with Raspbmc, I suggest you turn to the trusty eLinux.org website at http://is.gd/yaJOSw. This site contains a constantly updated list of peripheral devices that have been verified to work with the Raspberry Pi.
Transferring Content to Your Pi
You can upload media files (movies, TV shows, home videos, music, pictures...the list goes on) to your Raspberry Pi using File Transfer Protocol (FTP). I recommend the freeware Filezilla to Windows and Mac users because it is a stable, straightforward FTP client that looks and behaves the same on either OS platform.
You already know the IP address of our Raspbmc box, so you can get right to work.
Task: Uploading Media Content to Raspberry Pi
1. Start Filezilla and fill in the details in the Quickconnect bar:
![]() Host: <IP address of your Pi>
Host: <IP address of your Pi>
![]() Username: pi
Username: pi
![]() Password: raspberry
Password: raspberry
![]() Port: Leave this field empty because FTP assumes the use of Transmission Control Protocol (TCP) port 21 by default.
Port: Leave this field empty because FTP assumes the use of Transmission Control Protocol (TCP) port 21 by default.
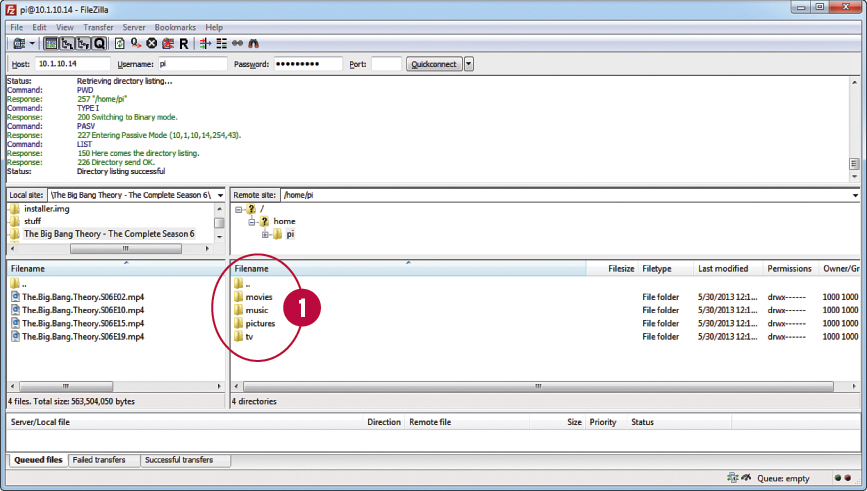
2. Connecting as the pi user puts you in the /home/pi home directory by default. Right-click in the Remote site window and click Create Directory to create the following folders for your media:
![]() Movies
Movies
![]() TV
TV
![]() Pictures
Pictures
You can name your content folders anything you want, of course, but I suggest you avoid spaces (see Figure 12.11).
3. To actually transfer a file, simply drag and drop the file(s) from the OS X Finder, Windows Explorer, or from the Local Site pane in Filezilla over to the appropriate destination in the FileZilla Remote site: pane.
Note: USB Is Allowed
If your Raspbmc SD card isn’t as large as necessary to store all your stuff, note that you can use a USB thumb drive as a media source. Simply populate the USB stick with your media, plug it into the powered USB hub that is connected to your Pi, and specify the USB location when you configure media detection.
Scraping Your Media
As I mentioned earlier in this chapter, a media scraper is a program that can detect, analyze, and report upon a media file that is present to XBMC. For instance, you can upload a season of The Big Bang Theory and let the built-in media scrapers fill in metadata such as plot summary, cast, original air date, and so forth.
The types of media that scrapers can detect are as follows:
![]() Video games
Video games
![]() Music
Music
![]() Movies
Movies
![]() TV shows
TV shows
![]() Internet-based videos
Internet-based videos
Although the media scrapers available in XBMC are excellent, I advise you to name your media files as descriptively as possible (and without spaces) to help them to more efficiently and accurately do their work.
Take a look at Figure 12.12 to see an example of media file naming best practices.

FIGURE 12.12 In order to ensure that media scraping works correctly, individual show files inside my s06 (season 6) folder should be named Big.Bang.Theory.s06e01, Big.Bang.Theory.s06e02, and so on.
The XBMC Wiki has an outstanding article on video library management and file naming best practices that needs to be on your required study list. You can find it at http://is.gd/RTkODz.
Now that you have your media uploaded and named appropriately, let’s configure media detection.
Task: Configuring XBMC Media Detection
1. In XBMC, navigate to Video, Files.
2. In the Videos screen, click Files, and then click Add Videos...
3. In the Add Video Source dialog, click Browse and select your target directory. On my system, I want XBMC to detect my legally backed-up TV shows, so I supply the path /home/pi/tv.
4. Optionally add a name for the new media source and then click OK.
5. In the Set Content dialog box, set the This Directory Contains option to your desired media type. In this example, I chose TV shows.
6. In the Choose a Scraper list, select a default choice or click Get More to browse for an alternate choice. You can see the interface in Figure 12.13.

FIGURE 12.13 After pointing Raspbmc to a content location, we instruct the application as to what kind of data the location contains, and which scraper service we want to use.
Note: A Desktop Scraper for Anyone
Windows users can download the free Media Companion (http://is.gd/qemjHg) to prepare media file metadata from your personal computer. Then when you transfer the media to your XBMC, the files are prescraped!
When you click OK the selected scraper performs a full scan on your content source. If all goes well, you can go back to the Home screen, click TV shows, and access your library to see all sorts of new artwork and bling to accompany your detected media.
For instance, try right-clicking a television show media file and selecting Episode information from the shortcut menu. The results of selecting information for one of my recorded shows is shown in Figure 12.14.

FIGURE 12.14 The ability to provide rich metadata is one of the biggest strengths of XBMC (beyond its ability to play the media, of course!)
Playing Your Content
Let’s finish this chapter with a brief tour of the player controls in XBMC. Using Figure 12.15 as your guide, let me explain some of the controls on the XBMC player’s onscreen display (OSD):

1: These playback controls should be self-explanatory to anybody who has operated a DVD player remote.
2: This control enables you to manage subtitles. For more information on how to use subtitle files with XBMC, see http://is.gd/PmFob0.
3: Here you can tweak video settings, including aspect ratio, black bar cropping, and brightness/contrast.
4: Here you can customize audio settings, including delay, subtitles, and so on.
5: Here you can set, go to, and delete bookmarks. This is one of my favorite features!
Installing Add-Ons
XBMC/Raspbmc add-ons are small apps that extend the functionality of your media player software. You’ll find an impressive variety of tools here, giving you the ability to interact with all sorts of cool media, including, but not limited to, the following:
![]() Apple iTunes podcasts
Apple iTunes podcasts
![]() Break.com and CollegeHumor prank videos
Break.com and CollegeHumor prank videos
![]() Weather and webcams from all around the world
Weather and webcams from all around the world
![]() News headlines from all around the world
News headlines from all around the world
![]() Streaming video from a variety of online sources
Streaming video from a variety of online sources
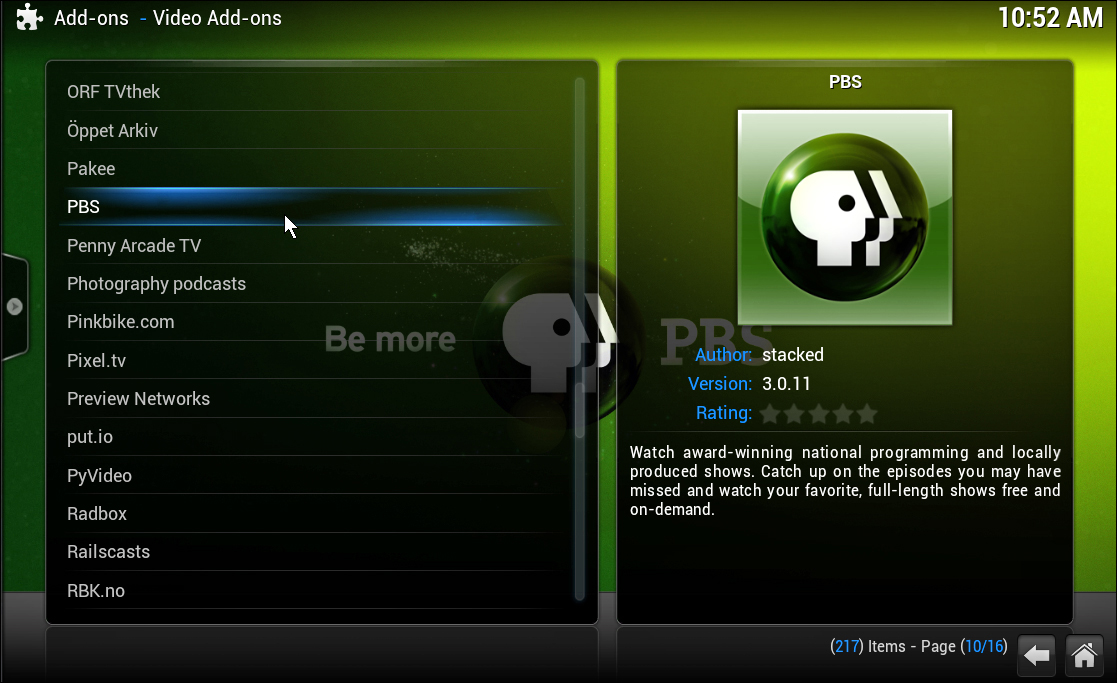
To install an add-on, navigate to the home page in Raspbmc and hover your mouse over Pictures, Videos, TV Shows, or Music. One of the submenu options is Add-ons; click that.
In the resulting Add-ons window that appears, click Get More.... As shown in Figure 12.16, you’ll be presented with an alphabetical assortment of add-on apps that are related to your selected media type.
Once you’ve found an add-on that you like, double-click it in the list and then click Install.
To use your new add-on, return to the Add-ons window we saw earlier. Instead of being empty, you should see your new app in the list; double-click it to get started!